Bamboo Tips - Tips Area - |
|
< Home < Tips Area < Machines < Ovens
Any sources on heater elements for heat treating ovens?? (Tom Ausfeld) Go to WalMart and buy a 5-dollar hot plate and bend and uncoil the element. The elements are pretty easy to bend. It’ll unwind to about 6 feet. It already has the wiring and temperature control build in. Works great. Using 2 to power my oven. (Paul York) Call Grand Technology at 616-940-3345, they have the strip heaters in a 4 ft length, ideal for a rod oven. The heater is 120 volt and it's a Watlow #S1J54AS1 strip heater. I bought mine 6 years ago for around $65.00 I salvaged a thermostat from an old kitchen oven for nothing, but it did take some footwork to come up with it. (Jim Bureau)
Heat Gun Oven
I first connected the reducer to the 5 inch duct with sheet metal screws (bottom). I then put the 3 inch duct inside the 5 inch duct and left about 5 inches sticking out the top and screwed the 3 inch pipe to the inside of the 5 inch duct. I drilled a hole for the thermometer screwed it in place. I took the 3 inch aluminum pipe and scrunched (probably a better word out there) down between the 3 inch and 5 inch pipes. I then scrunched the aluminum pipe around the nozzle of my heat gun. I stuffed aluminum foil and insulation around the pipes to prevent leaking. I then used aluminum tape to dress it up some (I'm sure that the sticky side of the tape will burn off, but it made it look better). I took the remainder of the insulation and covered it will aluminum foil and stuck it up inside the reducer to close off the bottom of the oven. I stood the oven up beside my latter and rested my heat gun on the latter while connecting it to the top of my oven via the scrunched up 3 inch aluminum pipe. It seems to work great. (Darrin Curtis)
Does anyone know where I can pick up ducts for a rod oven in the Chicago area, or anywhere else. I want 6x10 and 4x8. They can be custom built, but that would be cost prohibitive. (Mark Bolan) I would check some construction sites trash dumpsters or go to any Heating and AC shop and see if they have some that are premade and just taking up space. I use to work in a shop as an installer and I always seen some ducts laying around and I also threw some away. (Dave Henney)
Has anybody had any experience with using a piece of steel or stone in their ovens to even out the heat? (Dave Kenney) I have a Cattanach style oven that I put a 1/4" X 4" piece of steel on top of the screen. It takes the oven about 45 minutes to reach temp, but it gives a much better more even heat treatment. I also use MD's fixtures. (Scott Grady) Yes, indeed. I built a shelf about two inches above my heating element and lined it with one-inch brick -- leaving about 1/2" space between the brick and the sides all the way down. I'm only assuming that this functions as a heat-sink to stabilize the heat, but as I also installed a fan-driven convection loop at the same time, I can't really say which improvement has done the trick for me. In any case, the brick shelf can't hurt, and it doesn't cost enough even to give it a second thought. (Bill Harms) Yes. I use firebrick. (John Zimny) Nah, I just use a fan in my oven... ;^} (Mark Wendt) Just a thought. If anyone is having trouble convincing SWMBO that a new and larger oven is needed, perhaps a bit of rationale to help the argument would be to mention that a bigger oven with bricks, similar to a French Pastisserie uses, could be used to bake some of that nice crusty French bread, or some baguettes, or...(Claude Freaner) I worked with a maker one time that made a very large oven - to spread the heat more evenly the heating element was buried in sand - I don't know if this is workable in your case or not - remember as well that the time to bring the oven to temperature will be long the more mass you add to the inter of the chamber. (Wayne Cattanach) I was trying to minimize 2 hotspots that plagued the oven from the start. 1. I tried a piece of 3/4" thick 4" wide & 6' long mild steel set on top of the hardware cloth shelf. Some good points 1. The steel holds heat for a long time (hours).
What sort of wire should I use in constructing a Mica Strip oven? I am concerned about high temperatures on normal plastic coated braided wire. (Taylor Hogan) Go down to your local appliance repair store, and pick up a length of three wire oven wiring. It has a case on the outside of the wires that will withstand the heat of your oven. (Mark Wendt) Normal PVC coated wire will quickly melt at oven temperatures. I believe the melting point for that insulation is around 275°. The good news is that you can still use it as long as it is placed on the outside of your insulation, and provided you are using good insulation. Where the wire will need to enter the oven, strip back all of the insulation for ever how long you need, leaving a bare wire. Find an auto repair shop, preferably someone who works on hot rods, and get a 9mm, silicone insulated, solid core, spark plug wire. Strip out the core, and run the oven wire through the 9mm insulation. You may have to take a 1/8" drill to help open things up a bit. It's a pain, and the drill bit won't actually cut a 1/8" hole in the wire. You can further lubricate the wire to facilitate installation. The silicone will still be there even if you have an oven meltdown. (Martin-Darrell)
In the last discussion about heating elements, someone mentioned that they used the element from an old dishwasher. Is it possible to straighten those things out after they have been used? If so, how many does one need for an oven? And, for those of you who had your boxes made by local heating contractors, or whatever, did they also install the clips for the heater elements, the rack, etc.? How do y'all install that stuff once an insulated box is put together? (Jason Swan) The heating element from the dishwasher bends. Just straighten it out and you are good to go. Look for the power rating of the element, the on I pulled was 750W at 120V, and is more than adequate to do the job. These elements are typically round/oval, with threaded ends that have 90 degree bends, which are perfect for mounting on your oven. (Kyle Druey) Be real careful when you bend those elements back to straight, if they've had power applied to them and have been heat set. Those elements are designed to be bent before they've been heated, but you can bend them straight. If you crack the insulation on the outside of the element while bending them straight, you run the risk of 110v or 220 v right on the surface of the element, and that would transmit directly to your oven. Shocking experience...(Mark Wendt)
Just as an FYI to anyone making ovens. I was able to find a sheet metal co. that built my box with two end caps for 80$. The outer box is 6x10 the inner is 4x8. Bremer Sheet Metal Works, West Chicago IL. 630.469.2330 (Mark Bolan) A fellow here in Tulsa just delivered my oven today: 6' length at 6x10" exterior with a stainless 4x8" interior, piano-hinged at one end, all Pittsburgh seams for $50. Said he'd do the same for anyone needing/wanting them. Turn around was about a week. Certainly have no personal financial interest myself. He just did a terrific job for me and I bet he'd do the same for anyone else. Shipping would probably be a doozie... Now I need to get the hi-temp wiring, heating element and insulation before I can make my very own charcoal. (Gerald Buckley)
I'm in the process of building an oven. It's the typical box inside a box that several others have made. I haven't been able to find the insulation to put between the two boxes. I've searched several retailers and wholesalers, but I haven't had any luck. Everything I've found is not rated for temps in the 300-400 degree range. I would really appreciate ideas on where I can find some. Also, any ideas for a temperature gauge? I would like one with a gauge that I can mount on the outside but where the sensor is on the inside. I'm looking forward to getting back to working with bamboo. I've spent far too much time building this oven. It sure is going to be a nice one though. (Mike Ealy) I found some insulation at E.J. Bartells, NFI. 425-228-4111, 800-468-9528 It is ceramic insulation about 1" thick and rated at 2200° Comes in a roll about 2' wide. Quality stuff that really works well. I use Weber barbecue thermometers, the ones with a probe about 4" long in my oven. You can get them anywhere they sell Webber parts. (Don Schneider) I found a place to buy the correctly rated insulation here in Tulsa and it's really affordable, readily available and came in 4 x 8 sheets. Just looked in the yellow pages under "insulation" made some phone calls, explained what the insulation was going into (an oven operating for short periods of time around 500 degrees - obvious overkill) and they fixed me right up. Bet you'd have similar luck in or around Clearwater. (Gerald Buckley) I have a simple set up. I got the insulation from Builders Square. I use an oven thermometer from Walmart. Both have cooked 30 rods without problem . I have overheated the oven but generally operate it at 375. (Rich McGaughey) What you need to find is an industrial insulation supplier. Check with a local HVAC guy, and ask him if he knows of any distributors for boiler insulation. That's how I found my local distributor (well, sorta local. I had to drive about 45 miles to get to my "local" distributor... ;^}) (Mark Wendt)
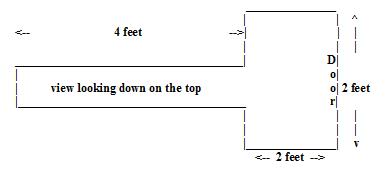
How have those of you with “Wayne-style” ovens attached your sensors inside? Can they “float” or do would you recommend they be affixed to the inner chamber wall? Is there any kind of heat-tolerant tape I can use that won’t skew my readings? Do I rely on the rigidity of the sensor line to basically hold the sensors in position by bending the heavy gauge wire? I am supposing I want to measure the relative temperature at the level of the bamboo (as opposed to at the top of the oven where it may be hotter). So, positioning of the sensors... Top center? Side middle? Again (and typical of me) thinking to much and experimenting too little :) Thanks in advance for the input that’s bound to flow. (Gerald Buckley) The sensor to your thermostat consists of a capillary bulb attached to the thermostat via a small copper tube (the "wire" you referred to). I cut an opening on the top of my oven at midsection. I attached the bulb inside the oven with small metal clamps. The oven seems to work OK, but I do have some hot spots. If I ever build another oven, I will build the "million" dollar type that M-D and Mark have. (Dave Alexander) When you design it, make it the same height as theirs, but a stepped design, width-wise; something like this.
The 2 foot x 2 foot end can be easily used as a home pizza oven when not cooking cane - sure to make your expenditures easily justified to SWMBO, as well as making you a great inventor in the eyes of your kids! (Claude Freaner) The idea is to get the bulb (the sensing part) into the oven as close to half way as possible - a way of doing that is to attach it to the Hardware cloth that the shelf is made of - and it is insulated from the side walls where the lose ( heat escape is) - I have used short pieces of bare copper wire to do this - then once the "shelf" is in place an idea is to take a 2 x 4 and lightly tap downward on the flat surface - this will help assure that the shelf is flat and will help prevent the entrance of unwanted bends due to bumps in the shelf surface - this is especially important with tip sections. I know that there are several other ideas now for ovens - but even with mild fluctuations in the inside of the cabinet - I feel it is still a valid design - one of the leading causes of fluctuations is that the heating element is not supported as recommended - using short pieces of conduit at 3 places along the length of the element - and have the element suspended. (Wayne Cattanach)
Back in the early 60's when asbestos tape was available in corner hardware stores, I made a crude pipe oven with an aluminum tube lined with asbestos, plugged at the ends and with a thermometer, all suspended in coat-hanger hooks. The heat was applied from a propane torch, and I controlled the heat exposure by holding the blue cone flame to 1.5 inches for 15 minutes of heat application. Not an original idea, I read it somewhere in one of the few early maker's books. It worked, but the rod products were not darkened evenly by any means, and one time I made ashes. Wish I'd been smart enough to use the cycle method of torching rather than end-to-end. Would have helped. But I did make some nice rods that I still use. (Bill Fink)
I worked up an oven last night using vent pipe and a heat gun. As I was watching the oven steadily crank up to 200+ F the images of negative reactions that occur with rapid temp changes struck me. I shut down the operation and proceeded to drill a series of small vents. Now heating sucks and I'm back to the original design. I guess the best way is to just fire it up and see what happens. Just wondering if anybody has thoughts on the explosion thang. (Lee Orr) I too use a heat gun oven. Nothing fancy at all. Just a straight horizontal tube with a heat gun stuck on the end. There are a couple of holes drilled right at where the gun attaches to the tube to draw in air. This oven works best by using convection currents. The heat gun is variable output but, I can regulate the heat in the tube by raising or lowering the far end of the tube. The more air that spills out (to a point) of the end, the hotter it gets inside my oven. So if I raise the far, ungunned end it will get hotter, if I lower the end, it begins to cool off. In any event, there are no holes drilled the length of the tube to vent hot air. There are three holes drilled that the thermocouples are inserted into though, but they are covered with insulation and are inconsequential to the actual operation of the oven. In fact the entire tube is covered with insulation. (Mike Shay)
I am having problems with a heat treating oven I just built. It is made from a 52" piece of 4 1/2" ID aluminum. I wrapped the pipe with 2 layers of pipe insulation and installed a 40" burner from a hot plate purchased from Walmart and straightened . 2x6 wood blocks were installed as ends of the pipe and a wire rack was added through the center. I tried heat treating a 48 "strip for 8 minutes and the center 15" of the strip is to dark and the ends of the strip are to light. The burner is level with the bottom of the pipe, approximately 1/2" off the pipe. When you touch the insulation on the pipe it feels hotter in the middle than on the edges. What did I do wrong and how can I correct it? (Joe Esther) You did nothing wrong. The design is the trouble. Short of modifying: 1] the element Or turfing the whole shebang and putting a recirculation oven system in it's place. Now I know this is going to piss on someone’s parade, but maybe we should all confess that most of us have found the oven design regaled in song/story/internet BB and books is just plain poor. Even Garrison flipped the cane from end to end recognizing that the design was poor. Keane talks about a Garrison rod darker in the middle than the ends. Now I built one and turfed it about 15 years ago. But the books and stories keep coming about folks having the same trouble. Oh sure, some folks get along with them, flipping and modifying the things every which way but fundamentally the design is just plain lousy. The real question is: Are we helping beginning rod builders by passing on information that touts poorly designed equipment? If we expect beginners to progress and set new bench marks for us to aspire to, we got to provide them with quality information. Or maybe the real question should be: Should I tell the truth as I see it or maybe just go fishing and shed the shack nasties. (Don Anderson) OK guys, how about laying out the basic design elements for an oven that will work as desired/needed? (Larry Puckett) I simply cannot convert anyone to retrogress in their thinking on heat treating., I see some of the ovens available and i, too, begin to salivate. But the fact remains that if you want repeatable results rod after rod. Results with virtually all of the ambient moisture expelled, uniform color of the cane; no matter what the temperature of the shop may be, no matter what the humidity may be you have to go back to basics. Forget the stainless steel sheet metal, forget the intricate and often costly heating elements, forget the forced air heating, forget programmable thermostats, heat sinks, shielding and flipping end to end, and complex timing formulas. It takes an engineer to do all of those things and I would rather build rods. I explained my technique in Power Fibers, but basically it requires two clothes hangers, five feet of iron pipe, two wooden plugs and a propane torch. Pop the strips in the pipe, pop in the plugs, used the coat hangers to suspend the rod at a decent height, and pass the propane torch back and forth rotating the pipe 1/4 turn after each pass of the torch. The rod is done when the steam exiting from a small hole in the pipe stops and the odor of volatile oils commences. Go no further. You are done. Just remember the smell and you can duplicate the results time after time. (Ralph Moon) I guess you should avoid heat treating when you have a cold <VBG>. Thanks for the sage advice. (Larry Puckett) That is my heat treating regimen almost to the T. After getting scared by all the fancy expensive contraptions in the various books. I looked at George Barnes and Claude Krieder’s book and thank goodness there was a sensible solution. (Bill Taylor) I used exactly the same technique for about 40 rods. Was an aluminum pipe suspended in clothes line wire loops with pipe caps on each end. A vapor exit hole was drilled about 2" from the end caps. In each cap, I installed a 0>500F thermometer. I used a Bernz-o-matic Propane torch and played the fire along the pipe. A couple of things I found out by accident: 1] I couldn't play the torch forth and back as the center of the pipe got hotter than the ends. I finally used a "loop" system where I played it down the pipe from left to right and lifted it off the pipe for the return journey. 2] The thermometers told me what the temp was getting to. If I recall about 325F was the magic number. They also told me it mattered which hand I used to play the torch. If left handed, the left end of the pipe got hotter first, if I used my right hand, the right end got hotter first. 3] I used to have by little girl read the thermometers - when she went off to university about 15 years ago, the technique had to change. Then I rigged trailer mirrors up so I could read the thermometer. Worked - but not as well as my daughter. 4] Like Ralph says, you can tell when the water is gone and the volatile oils are starting to come off. The reason I quit using the pipe oven was every now and then I'd screw up and get one hotter @ the middle than the ends or hotter @ one end than the other. I built the convection oven to resolve my shortcomings. Now the tempering this is idiot proof and I frankly need all the help I can get. (Don Anderson) One difference between heating in an iron pipe versus an electric oven is that the blank is suspended in the oven and does not touch the heating element. Although the blank does touch some sort of support, normally wire mesh. In the iron pipe method, in essence, the iron pipe is the heating element in that the torch heats the pipe, but it is the pipe that heats the oven. As you turn the pipe the blank rolls inside the pipe but it is always in contact with the pipe. Granted that contact is not limited to a single point or area, but that contact is what would concern me. Is that a needless concern or can you comment further? Another question, Don, would be if your use of aluminum pipe rather than iron caused you to have a hot spot in the center? (Tim Wilhelm) I have observed no problems, but one reason I used the iron pipe instead of aluminum or copper, was that the thickness of the pipe seemed to me to be more uniform. I could envision hot spots with aluminum or copper. (Ralph Moon) Also, since iron is not as good a conductor, (that's why copper is first choice for electrical wiring, with aluminum second and iron is seldom or never used) it tends to hold the heat better once it gets hot. I'd expect more even distribution of heat for that reason too. (Neil Savage) I started with a similar set up. I took 1/2 inch copper pipe inserted inside a 3/4 inch copper pipe (both five feet long), and shimmed (with bamboo chopsticks) between the two to get an even air gap between them. I used copper for the excellent heat conductivity. Cap one end with a wooden plug, insert thermometer thru the plug, and heat the whole shebang with a heat gun. The heat gun heats the outside tube, which heats the air, which heats the inside tube nice and evenly throughout. I pass down along the whole length and back, then turn, pass, turn, etc, To evenly heat the unit for the proper time and temperature. As stated before, look for the steam and odor for doneness. Works great. (Chris Obuchowski) The reason I chose aluminum is that I wanted to use pipe caps on each end and needed the ends threaded to accept the pipe caps. The pipe caps in turned were bored and thread to accept 3/4" ANSI pipe thread bimetallic 0<500F thermometers. Further, aluminum accepts and sheds heat rapidly and I thought that it might reduce the danger of a hot spot as the heat would not only travel well along the aluminum but out to the atmosphere. The aluminum used was 1" electrical conduit which is about schedule 80 or so. I rejected copper as I would have had to "sweat" on caps that might not last in the high temps. required for HT. The screwed caps worked OK although the difference in metal expansion between the aluminum pipe and steel caps caused the use of a pipe wrench occasionally. (Don Anderson) One trick to keep the cane away from the pipe is to cut a few finish nails to a length slightly less than the ID of the pipe. Then bind the nails crossways to the sections in a few spots. They act like a rack to keep the sections centered. I did my first couple rods that way. It worked fine. (Tom Smithwick) I must admit that there can be some danger. I recall a student of mine who didn't have a nose for the technique. I kept asking him, " is it done yet," and he kept replying, " nope." Finally I got up from my dead behind and opened the plug to see for myself and the tip therein burst into flame. Another lesson learned. Actually, I could never get the electric oven to work; that's why the pipe technique. (Ralph Moon) Check out my article in Power Fibers, or Don Anderson's plans for a convection oven. I firmly believe that a convection oven is the way to go, because there are no hot spots in the heat treating chamber. My convection oven has two chambers, one to house the elements and fan system, and the other with the rack that holds the cane to be heat treated. The temperature at any point in the heat treating chamber is identical to any other point in the heat treating chamber. And, taking it one step further, controlling the oven with a PID computer controller which keeps the temperature in the heat treating chamber ± 1 degree. (Mark Wendt) Try a strip of bamboo with the door cracked open, as Don is pointing out there can be quite a few things that MAY cure the problem. But air circulation is the one key to even temps inside an oven. If I crack the door open on mine (air duct style w/fan) I can raise the temps at the door and lower the temps in the rest of the oven. (John Freedy)
I think I am ready to build a fancy oven that I can feel safe walking away from for a few minutes at a time. I'm considering the different kinds of heater elements, and being the cheapskate that I am, I looked first at eBay. My questions are these: Has anyone tried, and succeeded, to build an oven using an electric burner/hot plate type element, straightened out? If that has the juice to raise the temp in my oven to 300+ degrees, that might work slick since it has a built in temp control that I can use. Also, I know folks have used the mica strip element successfully. However, I found some strip elements that look like they might work well. They are made by Chromalux and have a chrome steel sheath and rated to 1000+ degrees. I downloaded the specs for using the things in an oven and it seems pretty straight forward. Anyone know anything about this type of element? Finally, what about infrared elements? Anyone have some experience there? I found a good deal and might be able to set that up. It looks pretty tough and can be bent and mounted in a variety of ways. I'm probably over thinking this. Logic tells me to just go with the mica strip and build it like everyone else. But, I'm also interested in convenience and economy when I can find it. (Jason Swan) I made my oven with a broiler element from an old stove. Straightened out it is 58 inches long. 4000 watts at 230 volts. I run it on 120 volts for about 2000 watts. You only need somewhere around 500 to 600 watts to run a bamboo heat treat oven hot enough to make crispy critters our of your sticks. Those mineral insulated elements didn't start life all bent up. They were straight. Besides, if I messed it up, it was junk before I started with it. I use a Chromalux controller with a type J thermocouple to control the temperature. (Jerry Drake) 4000 at 230ish is 1000 at 110ish. Still plenty to cook the strips, though. (Larry Blan) I built my oven using two electric hot plate burners I purchased from Walmart for about $6 each. I bought new ones because I heard the used ones don't bend very well (not sure if this is true or not-never tried). I used the temperature controllers that came with the hot plates, so I'm able to adjust the temperature with some degree of accuracy. I also have a thermometer mounted in the center of the unit to give me a more precise reading. I picked up the aluminum from a local scrap yard - very cheap. I used ceramic oven insulation that I purchased locally. When the temp on the inside is 300-400 degrees, the outside stays nice and cool. I ended up buying a whole roll of the insulation because I couldn't find the size I needed. It wasn't that expensive though, maybe $10-$15. (Mike Ealy)
The center of my oven measured 25 degrees higher than either end, (350 - 375 - 350) I monitored three locations and the result was unchanged after approximately five hours. all three thermometers were calibrated to boiling water and repositioned hourly. what is the recommended solution to this problem? (Wil Gatliff) There is no solution of high temps in the center and lessor towards the ends. The problem is the design itself. The only way to get a even temperature is to circulate the air within the oven. Been through the high temp on each end thing about 15 years ago. Built a circulation oven to stop the problem. (Don Anderson) Don is most likely correct about this, but since the hot spot is in the center, maybe you could mitigate the problem by installing a baffle over the center portion of the element. I would not suggest a solid piece of metal, as that would cause more problems than it solves. I'm thinking something like a metal screen, or a piece of perforated metal. That's just a thought, it does not come with my usual double your money back guarantee:-) I have always been a fan of Don's design, if you can't solve the problem, I would certainly suggest you try to adapt his design ideas to your setup. (Tom Smithwick) I agree with Don. You need air circulation, convection ovens, to get even heat. I've tried elements from electric ovens, circular cooking elements and flat bar strips making radiant ovens. All had the same problem - uneven heat. Incidentally, a guy at an appliance parts store told me you can buy straight oven elements of various lengths/wattage and bend them to what ever shape you want but you have to shape them before you use them the first time. Otherwise you run the risk of breaking the outside covering. I know some have bent/straighten used elements with success though. The key is air circulation. Some on the list make some very efficient/even heat ovens with very precise temp controls. If you are looking for insulation, check out www.ejbartells.com They have a ceramic wool that is very efficient. (Don Schneider) Use a heat gun oven, or build a convection oven like Don did. Of the two solutions, the heat gun oven is definitely simpler. The down side (maybe the upside too) is that you have to constantly monitor the temperature while you're heat treating, because there is no thermostat. You have to adjust the temperature while you are heat treating if you want to maintain a fixed temp. I use a vertical heat gun oven made from 5-foot lengths of duct. There's an 8" duct on the outside, 1" of insulation, a 6" duct on the inside of that, and a 4" duct in the center. The hot air goes into the 6" duct near the top, down around the 4" duct, and back up inside the 4" duct. I just hang the rod sections from a wire across the top of the 4" duct. The counter current air flow helps to maintain a uniform temperature. (Robert Kope) Depends on where your heat source is and whether you are using a blower/heatgun type oven. You might try to put more insulation on the ends to keep down the heat transfer energy loss out the ends of the oven. Just a quick thought and suggestion. (Frank Paul)
My old oven dial temperature control is starting to act up and I am thinking about replacing it with a PID control and SSR. I just did a quick search for PID’s and figured it would be quicker to ask for help from the list as to what brand and sources are available for a controller. (Gary Jones) I put a Love 1600 on my oven last winter. Paid about $75 on eBay. A friend of my configured and wired it for me. The wiring was more complicated than I was willing to deal with. I also had to have a compatible thermocouple sensor. You'll find a lot of controllers on eBay. Search for "temperature controller". There are several Fahrenheit 999s listed that include a free type k thermocouple. As I recall, I just had to make sure the unit was rated for the temperature range I needed. I also found a PDF version of the users manual on the web before I bought the thing. There was no way we could have configured and wired it without the manual. (David Bolin) Just visited with the friend that installed my controller. He reminded me that the thermocouple may have a limited temperature range. If you buy one that has a thermocouple included, be sure to ask what temperature range it covers before you buy it. (David Bolin) I bought a Omron controller and type J thermocouple on eBay. I use a small relay to limit the current running through the controller and it works great. The Omron web page can provide details as to wiring and specs. Hope this helps. (Bob McElvain) "Solid State Relays" typically have a resistance of around 70 ohms, that wastes a fair amount of power. Either look for a resistance around 10 ohms or less or buy a mechanical relay (typically an ohm or so). (George Bourke)
I am constructing a new heat treat oven. I have two pieces of galvanized ducting. One is 6" x 10", the other is 4" x 8". The larger is 60", the inner (smaller) is 59". Have end caps for inner and outer and a slip over metal door that I can also insulate. I have the strip heater and oven control and these are no problem. I am having difficulty in finding 1" thick Duct board (compressed fiberglass, foil faced). Has anyone experienced using non craft faced fiberglass insulation, perhaps R13, compressed into the one inch cavity? My outer 6" x 10" duct is in two pieces (U shaped) so would be no problem in assembly for me. I plan on pop riveting the two sections together, over the insulation and inner section. I am sure others have experience in the insulation of an oven. Any help will be appreciated. (Denny Conrad) You may want to test a small piece of the insulation you are planning to use by putting it in a tuna can and heat it to 400° in your oven WHEN YOUR WIFE IS NOT AT HOME. (Don Schneider) I may have just what you need. I had to buy a bale of the stuff when I made my oven on the same duct-within-a-duct principle. It is 1" thick insulation rated for (if memory serves) 1200 degrees F. If you're going to the Roscoe gathering I may be able too get some to you. I've got 13 2'x4' slabs. Trade you 4 of those for a Cree juvie hen neck. How's that sound? Anybody else have a need? I'm in Maine. I want to keep 3 of them for covering a drying box, but otherwise I don't need the rest. (Henry Mitchell) I ended up going with Precipitator Spin-Glas. I picked up three sheets, 2' x 4' x 1" this AM. my cost was $16.14. It is a product of Johns Manville, Eastern Region is in Defiance OH. 1-800-334-2399. Western Region is in Denver, CO. Application: Specifically designed for insulating precipitators, baghouses, scrubbers, ducts and breechings in power generation plants. Also suited for boilers, heaters, ovens and other industrial equipment operating at temperatures up to 850ºF (454ºC). I am sure it is available all over the US, just need to contact a rep for dealers in your area. My cost was .62¢ per sq. ft. Not shipped but picked up at a local industrial supplier here in Spokane. I was assured by a factory rep. that this product would better suit my needs than duct board which was priced out of sight. It has no foil face and is quite board like. It weighs 2.4 Lbs. per cubic foot, semi-rigid, lightweight, felted board composed of fine rotary process fibers bonded with a special organic resin. Note: It is available in 1, 2, 3, & 4 inch thickness. (Denny Conrad)
I am ready to do some baking. I have a Sears industrial heat gun. What is the best/easiest/cheapest way to go about an oven. I've read about the old iron pipe method in some books and it seems pretty straight forward but are there other ovens I should consider. Not looking to spend a whole lot of $ -- at least not yet. (Matt Baun) There are any number of sources for heat gun oven plans. Here are a quick 2 1/2 of them. I can't comment on any of the designs other than the Cattanach style oven, which is the most elaborate. I'll leave that for others. Frank Neunemann's page - The site is done in java or some such, so I don't have a direct link. You'll have to navigate to the bamboo section, and then the article section. The one that started it all... the Rodmakers page. Go to Rodmakers, then the tool section. Much worthwhile reading on all 3, if you aren't familiar with them. (Larry Blan)
My new oven is completed except for hooking up the wiring inside the oven. I have used the standard box inside a box from galvanized sheet metal with the Spin Glas insulation between. Strip heater and oven control with 4" x 4" box outside to hold the oven control. The probe is threaded inside as per instructions. My Problem is: I cannot find even the name/nomenclature of the insulated high temp wire I need to hook up the strip? I have searched the internet, made numerous phone calls and come up with nothing. I only need a hot and a neutral as the unit is grounded. Can anyone give me any direction? Anxious to fire it up. (Denny Conrad) Head down to your local appliance repair store and get yourself a package of oven wire. Usually it comes in three-wire sections about 8 - 10 feet long. (Mark Wendt) What you are looking for is high temperature fiberglass coated wire used in kitchen ovens. It is usually sold in 12 gauge and 14 gauge. I used 14 in mine, my element is about 1500 watts. If you buy it from an electrical supply house you will have to buy 75 ft. rolls, usually about 25 bucks for the 14 gauge and 35 for the 12 gauge. I went to a local appliance repair shop and they sold it to me by the foot. If you can't find it locally contact me off list and I can give you the info to get it from my outlet. (Tom Vagell) McMaster Carr - West Coast (LA) Phone (562) 692-5911 Wire - 8209K19 - 12ga high temp wire - $2.79/ft Terminal - 69405K41 - 10/12ga wire, #8 stud (verify first) - $11.57/pack of 100 (Larry Blan) If you just can't find it locally as a couple of list members indicated in earlier replies, I just purchased some from Grand Technologies in Grand Rapids, Michigan. Great folks! Give them a call and you receive it in a few days. Grand Technologies, Inc. (Now Closed) 12 gauge wire High temp - $1.30 per foot. (Scott Bahn)
I've given up on my heat gun oven (too long to heat up and too many toasted tips) and bought the parts to make a mica strip oven. Lets just say I'm electrically challenged and have a question about how to wire everything together. From looking at the parts, my impression is that I should wire one wire of the power cord to the thermostat, then a heat protected wire from the thermostat to the mica strip, the other heat protected wire from the mica strip is then connected to the other wire in the power cord. Is this right? I don't see silver Vs brass screws on the thermostat, so I assume it doesn't matter whether I attach the black or white wire to either screw. Correct? (Mark Lenarz) Not quite, Black goes to the brass screw. The black (hot wire) goes to the thermostat then to the heat strip. The white wire is the neutral it goes from the silver screw to the other terminal on the heat strip. (Tony Spezio) It is also advisable to put a fuse or circuit breaker between the black wire and the first of your oven connections, the reason being if your oven draws too much current (i.e., enough current to turn something not intended to be a heating element into a heating element) it keeps stuff from melting or catching fire. You should choose the fuse or breaker (measured in current flow, Amperes, "amps", or "A") such that normal oven operation isn't affected (i.e., it doesn't trip with the normal current drawn by your heating element). (George Bourke) I'm confused by your advice. First of all, both of the screws on the thermostat are silver. So I can see how the black wire from the power cord goes to one connection on thermostat and then a wire goes from the other connection on the thermostat to the mica strip. I don't understand why or how the white wire would connect to the thermostat. Both terminals are already used. I would think that the white wire from the power cord would hook up to the other terminal on the mica strip. (Mark Lenarz) I should have said there are exceptions, this is one of them. I have my black wire going in and then out if the thermostat, only the "hot" black is used on the thermostat, that is the way I do it. I guess the neutral " white can be used to break the circuit but I prefer to use the black. The thermostat breaks the circuit when the temp reaches what you have it set for. It might still need adjustment. The last one I had was 100 degrees off. Read the adjustment instructions to set it. Lamp sockets and plugs and outlets have a brass and a silver screw. If there is both brass and silver, the black goes to the brass and the white to the silver, then there is a green screw. The ground goes to the green. Another exception is in a three way switch, well let's not get into that. Hope this will "un confuse" what I confused you with. LOL Just be safe around electricity. (Tony Spezio) The neutral wire should never be switched. It wants to be a continuous run back to the service panel. (Larry Blan) I agree, I did say the white can be used. "Can" was not the right word to use I guess. Breaking the circuit with the hot wire (black) is the only safe way to go. (Tony Spezio) My oven is off by 75 degrees, but I don't have any instructions. Actually I didn't even know you could adjust the oven thermostat. If its not to difficult to explain, or if you could scan the instructions I would like to try to adjust mine also. Second question is where would you place an LED light, that is how would you wire it, so you can tell when the oven is up to temp. (Floyd Burkett) My scanner is not working, can't scan the instructions, here is what I did. I had thought my new oven was not coming up to temp because I was not getting the color on the bamboo for the same amount of time that I used with my old oven. On my thermostat, the adjusting screw is in the shaft that the control knob goes on, you have to lift the control knob off the shaft to reach it. It takes a long skinny screwdriver to reach the screw through the knob shaft. My small screw drivers were not long enough to reach the screw so I made one from a length of 3/16 rod. I put an oven thermometer in the oven and set the thermostat to 400 degrees. After the the thermostat kicked off, I checked the thermometer in the oven and it read 300 degrees I have to assume the oven thermometer was right. Screwed in the screw a bit and repeated this till the oven thermometer read the same as the dial setting. I installed a ( Radio Shack) LED light on the electric box cover that the thermostat is mounted on. It is wired from the "out" end of the thermostat with a pigtail wire. This will be the hot side of the LED. When the thermostat shuts off the light will go out and back on when the thermostat kicks back on. (Tony Spezio)
I have a Watlow temperature controller (series 945) I'm trying to hook up to my oven. If anybody knows how to get these things going I'd sure appreciate some/any assistance. (Wil Gatliff) User manual with instructions for wiring at this site. It is as a PDF file and is twenty pages or so and a 170k file so the download should be easy. (Charley McNeil) That is the Series 945 limit control manual. The link for the temperature control manual is here. (Larry Blan)
I am a very beginner in rod making and still in the process of accumulating the necessary equipment. I saw the message relating to the "stove pipe, heat gun" oven. Since I will be starting on a low budget, is this a better oven for heating the cane rather than an iron pipe and propane torch? If so, what is the best way of attaching the heat gun to the pipe? I've seen the heat gun attached with automotive hose clamps. I, however, made a cone out of sheet metal, big end in the stove pipe, little end for the heat gun. So the hottest air did not blow directly on the cane, I used a 90 degree elbow between the 2. I set the stove pipe at the desired angle and set the heat gun on the concrete floor of the garage. Then the cone fits over the gun - works for me and meets my secondary criteria - simple and cheap. (John Dotson) My Black and Decker nozzle fits perfectly inside a cast iron 2-inch pipe, which was screwed into a 90-degree reducing elbow leading from the pipe forming the body of the oven. Oven hung horizontally, 2-inch pointed down. Heat gun points up, into 2-incher, held in place by a coat hanger that encircled the back of the heat gun and the oven body. Worked fine, never fell off. (Steve Yasgur) I recently built a Vertical stove pipe heat gun oven based on Frank Neunemann's design. I found that this works very well and is cheap and easy to build. The only major drawback is that being vertical, head room in your shop may be an issue. To attach the heat gun, I went to the local hardware store and searched out a conduit hub in the electrical section. This is a device that is used to connect metal electrical conduit to a metal panel box. It has a slip fit sleeve on one end with a couple of set screws and a threaded end with a lock nut at the other. Find one that slips over the metal nozzle on the gun and you are in business. (Rick Hodges) My heat gun just fits in a hole in the top of the oven. Being infinitely variable, temperature control is fairly easy. Pictures on Todd's Tips Site under contraptions here. (Neil Savage)
I have been building an oven using a copper pipe and a some heating tape. I have written up the details and put them up on my personal wet site for whoever may be interested. The Bamboo Toaster. I will be happy to answer any further questions. (Mike McGuire) A couple questions if I may: First I love this concept of your oven. Simple, small, great looking results. My current oven is an eyesore and it has been grating on my wife for some time. It is so big it is stored outside, on a picnic table, covered with a tarp. when I use it, I get temps that vary as much as 100 degrees over its length. I flip the strips during my heat treating regimens and this seem to work OK for me. It is powered with a heat gun. I need to discard it and was going to go to the Joe Arguello black pipe and torch until i saw your oven. 1. Is it necessary for me to create the thermocuople set up that you had? Temperature variation is not that big a deal to me and this would be better than what I have now. I would simply install 2, 3 or more thermometers along its length. Would this suffice? 2. Can you tell me where to get the PID "stuff"? if I am going to do this I would like to use a controller. 3. Does the heat tape come wired with a cord? 4. I am not an engineer and am not good with electricity. Are there pictures anywhere as to how to wire this? I do not understand wiring diagrams although I have a neighbor who might be able to help with this issue. 5. Is copper a necessity or could other metals be used? I was thinking black pipe, or the stuff used to make chain linked fences? Aluminum? Sorry for all the questions but I really like this setup. Heck, it even looks like it could be portable, storable, etc etc (Bill Bixler) To answer your questions 1. If you want to put a PID controller on it, you do need an electronic way to measure the temperature, and thermocouple is by far and away the simplest. For a PID controller you won't need the second thermocouple in the ice bath--it would have that in effect built in. 2. I am getting the PID stuff from <http://auberins.com/index.php?main_page=index&cPath=1> I am getting the one at the top of the page. In addition to make it work, it needs a relay to turn the heat on and off. The item I am getting for that is <http://auberins.com/index.php?main_page=index&cPath=2> a solid state relay, the one at the top of the page. That and a couple of feet of thermocouple wire is all the techie stuff you need to make it work. Of course you also need a power cord and other wiring to set it up. When I get it up and working, I will add some more to my web page about it, and try to make it detailed enough to be clear. 3. The heating tape I used did not come with a cord, just a 6" or so length of wire coming out each end. I got a three conductor (grounded) power cord and connected one wire to the black wire of the cord, one wire to the white wire of the cord, and grounded the green wire of the cord to the tube using a hose clamp. I used wire nuts to make the connections and held stuff down with insulated staples. Right now I am running it with a dimmer wired into the power cord to control the amount of heat, but that will be set aside when I get the PID controller going. 4. When I update my web page for the controller, I will add some detail about the basic wiring. 5. Any of those other metals could be used. Black pipe might be a good bet, stainless steel would be good too, but pretty spendy. If you go much larger in diameter than nominal 1" pipe (it's actually a little bigger) you might need a longer heating tape. (Mike McGuire) Nice job on the oven idea, especially finding the heating element. I have a few thoughts that you might want to consider while getting your bamboo ready for roasting. Inserting the bamboo bundle, especially if you use one of Harry's fixtures will pull the temperature down substantially. You may have to increase the input power to get a reasonable ramp up to temperature and then manually reduce it to steady state power. This is where a PID shines. A PID also makes it easier to change the set temperature for drying and heat curing glues. Bamboo will out gas while it is cooking. You need to vent that. The TC probe holes that you are using for calibration may work for that so don't plug them during operation. Cooling may become a problem. If you overshoot the temperature target, you'll need to be able to get rid of the excess. I started my career setting up diffusion furnaces and it was always much easier at 1200C than 400C. The furnaces were too well insulated to get the temperature to regulate right at the lower temperatures. We often had to increase gas injection to move the hot gases out of the tube. You might consider bleeding in a liter per minute of 15 psi air. That would tend to move heat down the tube as well as expel some of the heat and gases evolved from the bamboo. The design is in the direction I wanted to take for my oven, but I couldn't find a heat source until now. I'm thinking of 1 1/2 black iron pipe, partly for the thermal mass. For heating, either 3 PID controlled zones, or two PID controlled zones with a gap in the center. A port at the closed end for a low volume air bleed to clear the tube and another port for injection of steam or maybe NH4 for toning. Keep us informed on the performance during actual use and what you end up doing for improvements. (Larry Lohkamp) You guys may trump MD for the honor of "Mother of all Ovens" at the rate you're going. Where were you when I was building my oven? I had a few random thoughts as I was reading your posts: Larry, The temperature drop when loading the oven can be avoided by preheating your bamboo. I lay the bamboo on top of the oven while it's heating up. That preheats the bamboo to about 150 degrees. The temp still drops about 15 degrees, but the PID catches up soon enough. Mike, how are you going to suspend the bamboo in the pipe? I don't suppose it would be a good thing for the bamboo to touch the surface of the pipe. That would be like cooking a pizza on the heating element instead of the oven rack. Larry's right about "out gassing". I'll have to remember that terminology for other highly technical applications around the house. Said another way, your oven will be like a tea kettle. You're going to want to let that steam escape. As I recall, Tony Spezio holds a mirror up to the steam hole on his oven to tell when his soaked strips are dried out. Tony can tell you more about that. Heat tape and a pipe might have another useful application. Several folks have experimented with circulating ovens that have a pipe outside the oven to move the heated air back to the other end of the oven. You might be able to use your pipe as both the heat source and the circulating duct for a separate cooking chamber. You would just have to figure out how to move the air. I built a circulating oven, but it's all self contained. There is no external duct. There's more about that here. You guys are going the extra mile on these ovens from a technical perspective. You're apparently pretty good at that stuff. I can understand the urge to go all out. But like my taper analytics, you can way over build it. Keep in mind that you could just flame your bamboo inside and out and forget the oven completely (but don't over heat the nodes with the torch...like I did). I really like the toaster idea. A friend of mine actually took a toaster oven apart and used the element with a piece of stove pipe to make an oven (Larry, I know where some toaster ovens are at the flea market). He's been using that oven for about 15 years. Simple is good! Save some of your energy to figure out how to finish a rod like Al Medved. For me, that's been a much bigger challenge than making a high tech oven...and I'm not even in the ballpark yet. (David Bolin) I just cock the cover cap a bit by slipping a 1/8" spacer under one end of the cover. This leaves a gap in the closing cover. The steam escapes through that gap. I use a small inspection mirror to check the opening for moisture. When there is no moisture showing on the mirror, the strips are dry. (Tony Spezio) Our ideas aren't all that complicated. Even my 3-zone idea is more straight forward than it sounds. My experience with vertical heat gun ovens has been less than stellar. Either thermo dynamics work differently in Arkansas, or some builders are more optimistic in their measuring than I am. I considered the endless loop, forced air concept after seeing your setup. The heat transfer characteristics of a single length of heating wire is not all that great. A finned strip heater would be good, and I almost got an element for an apartment sized cloths drier. While looking for a circulating fan that wouldn't croak on continuous 400F air, it disappeared off of Ebay. The fan part is the problem with convection designs like yours. I would like anything I build to be made of easily obtainable parts so that if somebody else is fool enough to try the concept, then they can actually get the parts. My wants for an oven is an easily constructed, economical unit that will hold a temperature of 125F to 375F with a ± 2 degree differential over a length of 5 feet. The temperature range probably rules out variable pitch element winding or nonlinear insulation distribution... sheesh, look at that. I haven't used so much gobble-de-goop language since I got outsourced. Anyway, my practice calm is cooked and rough tapered. I should be able to final taper and glue next week. Then we'll see if I can plane cane like I think I can. And while I'm letting the strips air dry, and being its the weekend and I can't go fishing, I might as well appease my obsession with oven designing. (Larry Lohkamp) Check out my convection oven, both on Todd's tips site and the Power Fibers article. The hard work has already been done... (Mark Wendt) As far as suspending the bamboo in the pipe, could you lay a strip of "chicken wire" down the center and lay the bamboo on the chicken wire? (Grant Adkins) I might make one suggestion on your copper pipe heat treating design. I have built a similar design but used an iron pipe (I wanted to use a 4" copper pipe but its cost did not fit my $500 design budget requirement). My suggestion to get uniform heating along the pipe length is to make extra wraps on each end of your tube with your heating tape. The heat losses are the largest on the tube ends as your measurements show (we did a heat transfer analysis based on my mechanical engineering background). Your approach to use more insulation to fix the problem improves the problem but will not reduce the pipe end heat losses enough to get a good uniform temperature distribution. To improve your design, I would suggest doubling the number of wraps at the tube ends for maybe 10% or 15% for each end of the pipe length. What is needed on the tube is higher heat input on the tube ends to overcome the higher heat losses. I think this will improve the uniformity of heating in your tube. Just my experience and opinion that I know works. Your design looks very nice; congratulations and I think you will like how your copper pipe design "cooks" your bamboo. (Frank Paul) Depending on the affectivity and small diameter of your heating tape I would not do that. There is no heat loss, my experience if you have good insulation, you will get uneven coloration dependent on temperature. I use a 10 cm about 3.94 inches diameter aluminum tube. Wolfram Schott used a similar design. (Christian Meinke) You are welcome to have your own opinion, but the technique works and is one used in many engineering heat transfer situations that I have worked on over 40 years of solving engineering problems. Keep well. (Frank Paul) Thanks to all for helpful comments on my oven. I think I will try moving the wraps around get more heating towards the end. As it is I have a pretty uniform temperature over 48" in the middle, so a bit more ought to take care of most rods I am likely to build. I could just use a longer tube and the 120" cord instead of the 96". I am figuring on making sure vapor can escape. To keep the bamboo off the surface I am thinking I will spiral wrap the bundle of it with fairly large diameter cotton cord, this in addition to the binding thread. I can see the advantage of using a PID controller to change temperatures as rapidly as possible, especially the smart kind that can tune itself. (Mike McGuire) I will spiral wrap the bundle of it with fairly large diameter cotton cord One trick you might consider is to cut some common nails to a length just shorter than the ID of your tube. These can be then tied crosswise to the bound strips, and will hold them in the center of the tube. (Tom Smithwick) You may have found the answer to my problem. I have been trying to find a source for a heat cable to wrap around my varnish tube. I would like to have my varnish at about 85 degrees when dipping. My dip tube is 1" PVC 48" long. Do you thank a 60" tape would do the trick? McMaster's has one that is 250 watts 50 watt/ft 2.5 amp. Can this be controlled with a light switch dimmer? (John Cole) That should work. You can figure that with a 60" tape (hypotenuse) and a 48" pipe (one side) of a right triangle, the other side of the triangle is about 36" so that the number of wraps you will get is 36" divided by the circumference of the pipe. I would guess 9 or 10 wraps so that should cover it OK. The dimmer should control the tape no problem. The ones you get at the hardware store will handle up to 600 watts. The rotary kind will be best for control. Since it's plastic pipe, I would start real cautiously, the tape can reach temperatures which would melt the plastic. (Mike McGuire)
Are we over-engineering the whole oven deal? Am I missing something here? What exactly is the purpose of ovens for Boo building? With all the talk, I am seeing on this list and other forums, about these fancy PID controlled ovens I am getting confused. Will my cheap home made heat gun oven, without any temperature control other than a thermometer, work or not? Background: I build Blonde rods, haven't flamed one...yet. Use a heat gun oven without any temperature controls other than a thermometer. I only "temper" my rough planed strips and never go over 325 degres F for more than 20 minutes. Once I get "the smell" Harry talks about in his wonderful rod building series I stop and let the pieces cool in Harry's fixtures, in the oven. I use Titebond Extend, so I don't need to "set" the glue. Maybe that is where my confusion lies. If I flame a culm do I even need to use an oven except to straighten the rough planed strips in Harry's fixtures? (Pete Emmel) I don't see the oven I have described here as being particularly over-engineered.. I have got less than $100 in it, may go a bit over if I put in a $35 PID controller I've got my eye on. Is that terribly fancy? I don't think so. Time was when you would need to be a pretty hard-core techie to get one of those tuned up and working right, and they were decidedly uncheap. Now they have built in smarts to tune themselves up. In our lives we have all kinds of other gadgets we mostly don't have to give much thought to, and mostly don't, like GPS's, cell phones, what have you. I'm adding a PID to that list. But thinking about it, there is a certain delicious irony in reading an anti-tech diatribe on an online forum. As for the effect on bamboo, it's this necessary vs. sufficient question. Holding it at X.000000 degrees +/_ a microdegree for Y.000000 seconds ± a microsecond may be sufficient to get the desired result but such precision is surely not necessary. We make choices as to what is a reasonable amount of cost and effort to hold down uncertainties so that variables say like heat treatment can be ruled out if results are unexpected. As they say YMMV. (Mike McGuire) I always figured there were enough variables in making a fishin' pole from natural substances, that if I could determine there was a way to remove some of those variables, I could achieve more consistency in the finished product. That's why I've described it in the past as a heat treating "regimen." I use a convection oven, which I know doesn't vary temp from one end of the bamboo cooking section to the other, I use M-D's fixtures to enable as much heated air flow around the strips as possible, and a PID controller to guarantee that once the oven is up to the set temperature, I know it's not going to vary more than 1 degree either way. I heat treat strips which are not tapered, but are rough beveled all to an identical size, using a powered rough beveler, so I know that each strip is getting the same heat throughout the entire strip as all the other strips in the oven at the same time. My heat treating regimen runs the same every time. One less variable I have to worry about in the overall construction of the rod. (Mark Wendt) The advantage of an controlled temperature oven are many. I got the concept from a Danish fellow and built my oven according to his ideas. Of course, my oven was constructed before the advent of PID equipment. MD's oven was patterned after my own and utilized the same circulating fan setup I originally used. The fan I used was destroyed by sticking my thumb into it. A seven stitch mistake. Looking for a different fan setup, I got an exhaust fan from a gas fired furnace. There is a lot of heat sources out there. Many, if used incorrectly, will kill you. Electrical resistance wires like used for electrical driven toasters, heat guns, clothes dyers etc. can kill you if the insulating boards or supports are compromised and touch any part of the oven body. I know that many of us get a kick out of building things - ovens among them but be careful will ya'. Want to read the stuff your wrote not stuff wrote about you. (Don Anderson) An alternative to making your own oven. Find a friendly baker. They have very specific temperture controlled ovens.......... Bake/temper to specific amounts of heat and time. A friend does 6' length culms, several at a time with very consistant results. (Peter Jones) That's a good question. One that's been kicked around the water cooler a couple thousand times. If you're looking for a laboratory quality answer, be sure to read Wolfram Schott's Bamboo in the Laboratory. You can download it from the Power Fibers site. Here's the link. The PID thing is overkill. But it's a cool tool to have around the shop. It's a great conversation piece. Actually, I will say that I could not continue to heat treat at 390 degrees without the controller. A 25 degree fluctuation in the wrong direction and the bamboo really would be toast. (David Bolin) PID overkill? ;-) Nah, not it you want ±1º consistency in your heat treating regimen. We talk about getting ±.001" accuracy on our final strip dimensions, so why not take some variance out of the process of making a rod? If I know that my oven will hold a temperature within 1º of my set temperature over the entire length of the strip for the entire heat treat, wouldn't that be something that might be worthy of having? I heat treat at 360º for 30 minutes. (Mark Wendt) Being over engineered in in the eye of the engineer. If you find hand binding after a hectic gluing session to be the personification of elegance, then a Smithwick 4 string binder is way, way, over engineered. If you make a living producing bamboo rods, then a hand mill or saw beveler may be a minimum level of mechanization. If you find that the rods you make please you esthetically and perform adequately, then you probably have found the level at which you are comfortable. Further fancification of your machinery would make no sense at all. I am new enough at this that I do not have a preferred process, and my current crop of machinery does not perform at a level that will allow me to try some of the things I am planning. A more precise oven than you use is one of the things I need. For me the exercise makes sense... and when I come up with something that performs adequately, I will publish the method so anyone that wants to do something similar will find the road a little easier. As to whether your oven produces a good enough rod is something only you can answer. There is evidence that heat treating in the 300 to 375 area produces permanent changes in the cane for the better. There is also some evidence that any change in cane color from heat treating indicates deterioration of the cane to some extent. Serviceable rods have been made with processes that never achieve 300F. and serviceable rods have also been made with cane cooked to a dark color. the exact time and temperature to make the best cane rod is the subject of an on going debate. I doubt that our obsession will ever garner enough interest in the industrial research arena to produce a data backed process that would pass ISO-9000 muster. (Larry Lohkamp) At 325º, you're not "tempering" your strips, you're basically just fast drying them. You have to get the temperature to 350º or higher to actually chemically change the cane. (Mark Wendt) A few others hold Mark's position as well. But, can we be sure that anything less than 350 degrees will fail to provide the molecular cross-linking we're after? Are we really certain of this threshold? (Bill Harms) With all due respect to Wolfram Schott’s heroic work analyzing the characteristics of bamboo, I disagree with the statement that heat treating bamboo increases its stiffness (MOE). I have done extensive tests on bamboo strips heat treated at temperatures between 250 – 375 F. I have found there is no statistical difference in samples treated in this range. Even when treated at 375F for 40 minutes. Indeed, there is a color change indicating a “chemical” change, but no physical change other than shrinkage due to moisture loss. This shrinkage results in a dimensional change as well as an increase in density. When moisture is allowed to re-enter the bamboo, the bamboo expands and reverts to its former state. If MOE measurements are taken without regard to shrinkage there can be an “apparent” change in MOE. One question that remains to be answered: Does heat treating improve bamboo’s resistance to taking a set? I have not yet be able to prove or disprove the idea. I can say that it does NOT improve one of those “mushy” sections you occasionally find in a culm. The one significant finding from my testing has been that there is a rather large variation in stiffness in adjacent samples from the same culm as well as in samples from different culms. (Al Baldauski) Not being a scientist in any sense of the word, nevertheless Al's analyses do not surprise me in the least. Indeed, I am even wondering if the desired miracle of "cross-linking" actually occurs at all -- at any temperature. And even if it does, would this effect cause the permanent strengthening that we suppose? A little skeptical of our loose assumptions in my dotage. (Bill Harms) Ah, the never ending debate. I guess it all boils down to what one chooses to believe. If it wasn't for those who chose to doubt or disregard the currently accepted beliefs, we would still be setting in caves fire hardening shafts for weapons and tools. To each their own. If a particular method of treating strips or blanks produces a personally acceptable fly rod blank, and the recipient of the finished product is satisfied, what more really needs to happen. However, virtually all the research done by forest products researchers state that fibrous materials with the same basic chemical composition that bamboo shares with wood, do undergo a chemical change when subjected to heat treatment resulting in a denser, harder, stiffer state than before treatment. A few thousand years aboriginal history world wide would seem to bear this out as well. Incidentally, this research has demonstrated conclusively that these fibrous materials will not re-hydrogenate to their original state once cellular collapse has occurred as the result of heat treatment. I guess the question then, really comes down to how much difference. That becomes another debate as well. If your of the personality type that is compelled to take a process as far as is scientifically possible, as I have to admit I am, (G) then you'll want to know as much as possible about the research done on the subject and proceed accordingly. If you do not suffer from this compulsion, which I gather you don't Bill, then you may disregard the research, save yourself a good deal of aggravation, and remain content in the methods you have come to have faith in. As for those of us not similarly blessed, read both of Wolfred Schott's bamboo research papers and Google up all you can find on the chemical composition of bamboo and wood and the effects of heat treatment on these materials. (Wayne Kifer) I don't think your conclusions are all that different from Dr. Schott's. See his comments regarding MOE beginning at the bottom of page 15 of Bamboo in the Laboratory. Also, I may be taking the comment a little out of context, but Dr. Schott indicates that selecting the best possible culms is more important than trying to improve mediocre material by a few percent (third paragraph on page 16). In my own words, the heat treating regimen isn't very high on the priority list when it comes to making the best possible bamboo rod. Selecting a quality culm, good angles, a functional taper and quality glue are all more important than using the "correct" heat treating routine. That's why I think PID controllers, circulating ovens and similarly complex toasters are overkill. But they're a lot of fun to have around. Dr. Schott also addressed the MOE of adjacent strips taken from the same culm beginning on page 22. His conclusions are consistent with yours. The MOE variance is significant. (David Bolin) Interestingly enough, circulating ovens do not need to be complex or expensive. My cheap heat-gun oven, which is double walled with 1" of fiberglass insulation between the walls, easily achieves temperatures within a couple of degrees of each other along its length. Circulation is, of course, provided by the heat gun. My controller is me watching two thermometers and adjusting the heat gun's input temperature. Just to muddy the waters, I would suggest that a uniform oven temperature does not necessarily mean uniform heat treatment. If you flame your cane enough to influence the color of the rod, then the surface fibers have been considerably heated before any oven treatment. If chemical changes accompany heat treatment, they may be dependent on time, temperature, and rate of temperature change. When the cane is placed in the oven, its internal temperature is much lower than the temperature of the air in the oven. As it heats up, there is a gradient from hot to cooler towards the interior of the cane. If you use Harry Boyd's fixtures, that gradient looks different than if you bind the strips into a hexagon without the fixtures. There are also the effects of the dimensions of your strips and whether or not they are tapered. All other things being equal, the interior of thicker strips would heat up more slowly than that of thinner strips. The thin part of tapered strips would heat up faster than the thicker part. Then there is the question of the time of heat treating. Do you start timing from the moment the cane goes into the oven or from the time that it has a uniform internal temperature? It is even possible that there might be retrograde effects. In other words, the cane might change determined by its rate of cooling or even change if you put it in an oven to set epoxy. For me, those are far too many variables to worry about. If you have a heat treatment process you feel works, then it is probably just fine to use it. David and Al have made a very good point that the variations in the completed rod due to heat treatment are far less significant than variations due to other factors. (Tim Anderson) This is kind of a nit, but those are actually M-D's fixtures, which Harry is selling. BTW, using M-D's fixtures, in my convection oven, the strips go in when the oven is cold, and heat up with the oven. The clock starts when the oven temp hits 360º, and the set temp is held for 30 minutes. Then there is a slow cool down, with a step stop at 225º, to open the door and vent any residual moisture. M-D and I were playing around with this regimen back when he first came up with the idea for the fixtures, and I've been using it ever since. There really shouldn't be any retrograde effects in heat curing epoxies. The temps required to heat cure are simply not that high. (Mark Wendt) Every time I read Schott’s work, I come away with more information. As I last read it I came away with the impression that he was saying there is a definite improvement in stiffness due to heat treating which I cannot reproduce. I find a few percent variation up and down, as likely to be ascribed to variables in measurement. As I said, I can’t find a “statistical” support for improved stiffness. I’ll read his work again to see if I misinterpreted something. The bottom line is, use whatever method consistently works for you. The greatest advantage seems to be the straightness of strips especially after being bound in Harry’s extrusions which will significantly improve uniformity of treatment however you control it. As far as how you control your oven: I agree with Mark. There so many variables in rodmaking that the relatively low cost of a PID controlled convection oven eliminates yet another uncertainty. (Al Baldauski) There will only be an increase in stiffness per unit area if bamboo contains thermosetting compounds. I don't know whether it does, but if it does they cannot be in any great quantity. Inevitably if you drive water out of something it will become lighter, by which I mean less dense, unless its volume compacts proportionally. Thereafter we are down to the business of drying wood and at what levels of moisture content it "Stabilizes." It seems to be quite a good idea to dry bamboo out as much as is convenient, and I am coming to the view that hanging the bevelled splints in my inglenook alongside a multifuel stove which is always burning for 8 months a year is probably entirely sufficient. If you live somewhere warmer than shoving them under a tin roof all summer would probably work just as well. (Robin Haywood) When I made my first rod in the 60's , even with my crude heat treatment, it was fine. But my second rod, made from the very same well aged pre-embargo cane from Sewell Dunton I did not bother to heat treat and which ever way you bent it it stayed that way. I was convinced. (Bill Harms) I thought Milward said 325 was the magic number for this change. He spoke at the Grand Gathering 2 years ago about this. (Gordon Koppin) What is the basis for your assertion that cane is not tempered at less than 350 degrees. I have been using Joe's method of black pipe tempering except I do without the thermometer. I usually stop just when the steam changes to smoke (read smell of smoke)it produces a slight change of color and I think it does temper. (Ralph Moon) See some of the other posts. Schott's paper, Rick Crenshaw's wife's exposition, and numerous other sources. (Mark Wendt) Thanks, but I don't agree and I have read all of the sources you have cited. I have personally experienced a significant stiffening with my heat treatment and I do not believe it ever got to 350 degrees.. C'est la vie (Ralph Moon) I have to agree with you on this point. Using the MD fixtures I heat treat between 325 and 360 degF temps for 20 minutes - tips at 325 and butts at 350. I think there is a lot of change in physical structure of the bamboo - it may not be MOE as Al suggests ???? , but it is something as far as I can tell. (Frank Paul) What temp do you actually heat treat at? "Between 325º and 360º for 29 minutes" is a pretty big spread. Why 29 minutes instead of 30 minutes? (Mark Wendt) Oh, I hit the wrong keys when I was typing - notice the 9 and 0 are kind of close as are the 5 and 6 - age. ;-) My oven holds temp either at 325 or at 350, so when it is up to the lower temp I first put in my uniform tip strips on the MD fixtures cold and heat treat for 20 minutes at 325 - the triangle tips are about 0.180 in dimension. I then do the same with the butts at 350 with them at about 0.220 in dimension. The aluminum MD fixtures heat up fairly quickly because of their fin like design and high thermal conductivity. I have not put a thermocouple on them, but I would guess they are at the heat treating temp within about 1 to 2 minutes of being placed in the oven - a fast thermal time constant even though the oven works on the basis of free convection. I support the MD fixtures holding the bamboo on two end racks that slip on the MD fixture and keep the assembly about 2 inches above the bottom of the iron pipe. The warm up time for my system is about 45 minutes because of the massive iron pipe - (I wish I would have use a copper or aluminum one but it did not fit my overall design cost). Of course this is a disadvantage in warm up, but also an advantage at holding temperature because of the thermal mass of the pipe. I should have been more careful before I hit "Send" on the previous email. ;-) Hope this answers your question and helps others on the list. (Frank Paul) Yes, we all have our favorite regimens, and most of us try to take care in how we run our strips. But the question remains: Does any of us really know what we're doing with regard to the holy grail of cross-linking (polymerization)? Despite all the dogma on one side and the other, I think this part remains a crap-shoot. I insist, too, that the most important single factor in producing a good rod is to start with ONLY excellent cane. So, finally, I wonder how many of us really knows how (or dares) to put each culm to the test. (Bill Harms) I was not suggesting that my approach to heat treating is a good approach, only addressing my earlier email screw-up and Mark's questions. Now, I think the only thing we know for sure is that research done by the wood products industries document that changes do occur structurally in those materials when cooked - now bamboo is a grass that grows like a composite wood material and is harvested, dried, and available to rodmakers. It is a natural organic material composed mostly of cellulose that can be modified by chemical action such as the addition of heat or other chemicals. For example, cellulose was modified into cellulose acetate and made into photo films of the past ;-), and into a variety of textile fibers. Cellulose has also been modified to make explosives, rayon, and varnishes. So cellulose, a major component of a composite bamboo, and is an interesting material with wide chemical properties and modifiable characteristics. I believe the works of Milward and Schott speak to the issue of heat treating bamboo; whether it is a crap-shoot Bill, I am not sure I would go that far. I think we know some of the particulars of the heat treating process, so each of us needs to adapt it as we choose to the rods we make. As far as selecting excellent bamboo cane; well I think we figure this out after we have made the rod ;-) and live with its results >:-} - the devil is in the details. (Frank Paul) How do you put each culm to the test. For myself, I look for straightness of fiber, heft of culm, then I take a close look at the fibers crosswise at what will become the ends of the blanks and look for uniformity. Am I close or completely out of the ballpark? (Ren Monllor) Yes, do all these things. But most importantly, take an initial strip from the culm (no less than a uniform, 3/8" width), plane its pith side to a uniform thickness as well, and submit each area between each node to a severe bending between your hands. Feel for that section's willingness to yield, watch for the uniformity of the bend, and when released, watch especially, how it wants to return to its original position. A good strip will feel "steely" when bending, and will show a smooth curve. When suddenly released, it will want to snap back to something close to its original shape. Any "mushiness," lack of uniform bending, or weakness in springing back will indicate a culm that cannot be used. When this condition is found, it will usually be in only one of the internode areas, and not through the whole strip. You will see and feel the difference. A weak, internode area will implicate the entire circumference of the culm at that location, and the culm is trash. Even in a GOOD culm, you may ruin the test-strip in the bending process (if you're really looking for the truth). But this seems like a fair trade-off for the security of knowing you have a good culm. You'd be surprised how many culms are really unsuitable or marginal, which may account for why most makers prefer not to know. The common assumptions are that any good-looking culm that's been hand-selected, well-seasoned, visually inspected and heat-treated will be fine. Sorry, not so. Bamboo is a strange material, and you don't always get what you're assuming. (Bill Harms) I absolutely agree with you, Bill I do it a little differently than what you suggested. I test each strip throughout the planing process, as I have found that at times, once the strips get thinner, I’ll come across a weak spot when compared to others. You are right, as if I find the weak spot in one strip, I usually find it in others. At that point, the whole thing goes in the garbage, and I kick the dog. Doing it as you suggest might save me a little time though. (Ren Monllor) Just curious. Anyone ever build a bamboo rod and not heat treat? If so, what where the results? Don’t recall hearing of anyone ever heat treating red heart, hickory or any other woods/grasses. Why bamboo? Or is it just one of those things “MY Grand Daddy did it so should I”. I know there is a lot of theory out there but does that make it right? What’s your thoughts????? Anyone have any FACTS? (Don Schneider) When I built my rod for the Grand Experiment I did not heat treat. It was a spiral and has not taken any sets and I think you would have a hard time knowing it wasn't heat treated by the way it casts. It was made from well aged cane (20 years old). (Scott Grady) I assume you used no heat for node displacement and built the spiral at glue up using no heat. I am curious. I have known it to be done both ways. (Timothy Troester) Responses: -anecdotal evidence (See, The Lovely Reed) suggests some culms are just born that way, i.e., so well-seasoned that tempering is superfluous. -some makers, e.g., Jan Jancourt, limit tempering to flaming the culm. So . . . Two possibilities. It’s a variation of “In God we trust; all others pay cash.” So unless you’re Jan or have 50-yr old cane, it’s probably advisable to heat treat. (apparently). (Steve Yasgur) We have here a gentleman who wrote a book, who is now an authority. Has anyone on the list ever seen, or cast, a Jack Howell rod? (Jerry Foster) Maybe you missed this thread. The pictures here are the only ones I've seen of Howells rods. I've never had the opportunity to cast any but they do appear to be very well made. (Will Price) I suppose the thing to do at this point is to start building rods with no heat. No heat for node displacement. no heat for flaming. Use both new bamboo and some of the old stuff also and see what happens. (Timothy Troester) Just curious. Anyone ever build a bamboo rod and not heat treat? If so, what where the results? Don’t recall hearing of anyone ever heat treating red heart, hickory or any other woods/grasses. Why bamboo? Or is it just one of those things “MY Grand Daddy did it so should I”. I know there is a lot of theory out there but does that make it right? What’s your thoughts????? Anyone have any FACTS? (Don Schneider) I built a Thramer 44DX with bamboo ferrules and was only doing this to see if I would be able to make the bamboo ferrules. I didn’t heat treat and the rod casts great. My ferrules turned out great. I can’t wait to fish the rod. However, I was doing some stress testing to see how the ferrule reacts when the rod is bent to an extreme and the tip section now has a nasty set. Well, it did until I bent it the other way. It is straight now and remains straight when casting and I assume under normal fishing conditions. But, if I ever want to “tweak” it, I can bend the tip and make it stay in just about any position I want. Is that because I used a mushy culm or because I didn’t heat treat? I don’t know. But what I did learn from this whole thread, is that I will definitely be testing my culms for mushy strips and will continue to heat treat my rods. All thanks to this list. (Greg Reeves) A number of years ago, John Long organized what was called the “Grand Experiment”. He had people build the same taper but each one had a specific deviation, one such deviation was “no heat treat”. There were 20 some rods in the test and they were made available to cast at the Fergus gathering. As I remember, the heat treated and the non heat treated version cast about the same; however with the non heat treated rod, you could bend the tip and it would easily take a set. (Dennis Bertram) If it's any consolation, I've done the same over bend thing to various makes of classic rods, including a Payne, a Leonard, 2 Heddons, a top of the line Gene Edwards, and 4 or 5 of my own rods, all stayed bent, NONE returned to their original condition until I shook the sets out like Marinaro says to do after landing a heavy fish. Interestingly, the 2 Heddons came closer to straight than any of the others. Time doesn't seem to make much difference either, I have several reject sections in the shop that I put a bend in just to see if they would creep back to where they were over time, it's been several years and they're still closer to bent than straight. I think what really counts is how they hold up to actual fishing conditions, fwiw. (John Channer) Tempering bamboo makes a superior fly rod. You just need to plane a strip of untreated bamboo at the same time as planing a strip of tempered bamboo and you immediately know there is a difference. That said, there is a technique for proper heat treating. This was explained to me by Walton Powell. You can't just turn on the torch and flame away. According to Walton, that ruins the bamboo. Not using tempered bamboo is a faster, easier way to make an inferior rod. Your choice. (Chris Raine) I think that it has been established that aboriginal man not only heated wood to bend it since some artifacts are most assuredly arrow straighteners (like tamegi) and also hardened the ends of spears and arrows in fire to make them harder. And this was not even grass. I still remain very convinced that bamboo undergoes a transformation when heated properly. (Ralph Moon) We have all experienced heating bamboo to a point it becomes pliable and we have all experienced once pliable bending/twisting it to a new orientation and stay once cooled. Did the bamboo undergo some sort of transformation? Maybe it did and maybe it didn’t, I don’t know. I don’t believe bamboo undergoes a transformation that is beneficial to rod building somewhere between green and charcoal. What, where and if this happens I don’t have a clue. My conclusion: The real purpose of ovens is to dry out the cane more rapidly than air drying and the magical transformation never happens.. Anyone care to join me and Ralph making spear points? (Don Schneider) If you don't soak, why bother..it'll be ambient in a few days to a year with varnish anyway. In fact if you don't soak and your bamboo is old enough, driving out the water will just shrink it and when it swells back up, your numbers will be off, does it matter, no, just a fact. (Jerry Foster) No, I don't soak. Tried it but didn't like planning mushy bamboo. All I wish to do is plane dry bamboo after it has been heat treated/dried out some with a sharp plane. Numbers come out fine. (Don Schneider) During one of my former lives I taught Plastics Technology to high school kids. I had had very little training or education that prepared me to teach plastics, but what little I did know made me the expert so the class fell to me. My goal was to stay a few days ahead of the kids and to get them in the shop fabricating as quickly as possible - machines and tools I did know. However, I do remember teaching them that some plastics fall into the thermoset plastic category and some into thermoplastics. The neat thing about the thermoplastics is that they can be heated and held in a new shape that will be retained once the temp cools - sort of like what we do with our bamboo when we add heat to straighten nodes, sweeps and kinks. If I remember correctly this happens because the molecules "slip" when heated which allows them to move to a new position. (If there are any plastics experts out there feel free to tell me I'm full of (insert your own word). I also used to make my own wooden water skis for the same reason I build my own rods - I'm cheap. To achieve the tip bend multiple layers of wood were coated with Resorcinol or Weldwood plastic resin glue (this was 40 years ago) and clamped in a mold. You guessed it, once the glue dried the plies were held in place and would return to that bent shape if flexed. This makes me think that one of the reason our rods do not take a set (at least most of the time) is not that they have been tempered, but rather the glue (whatever you use) has bonded the strips into whatever shape you've bound them (hopefully straight), and the reason they return to that shape when flexed is that the glue (usually plastic) wants to return to is unstressed position and takes the cane along with it. (No that was one heck of a run on sentence.) Therefore, if you were to bind your rod with a built in bend, and never attempted to remove the bend, it would always return to that bent position. The reason we can straighten a glued rod is that we are heating a plastic glue that allows it's molecules to slip without breaking it's grip on the cane, and once the heat drops the plastic glue molecules stay in their new position. The first three tips I made all took sets (heat treated) when fishing and for the life of me I couldn't figure out why. In desperation I posted my problem on this list and one of our brethren advised that I might be suffering "glue creep." He asked what type of glue I was using (TB3) and how long I was allowing the glued sections to dry before I started flexing them (maybe an hour or two - come on, I was excited and couldn't wait). The member informed me of his own TB3 experiment of squeezing a blob of TB3 on a piece of glass and kept track of how long it took for the glue against the glass to dry (almost a week). As soon as I let the sections dry for a week or more I stopped getting sets. Does any of this makes sense? (Tom Key) OK, to sum up this can of worms I opened with my initial post: 1) We can use an oven or not. 2) Heat to between 300 and 400 degf or not. 3) use a pipe oven, heat gun oven, strip oven, or not. 4) Use PID controls, thermometer or the steam/ smell test or not. 5) The Bamboo does go through a permanent molecular change or not. Last but, not least: 6) Heat treat or not. Whatever floats your boat. Does that just about sum it up? Think I'll stick with my heat gun oven using Harry's fixtures and the steam/ smell method plus a few extra minutes @ appoximately 350 degrees. That will equal 20 to 25 minutes at 350 degrees F total. No heat on glued sections except to slightly straighten. Now if somebody wants to build me a nice oven with PID controls , I won't turn it down. (Pete Emmel) Yep, that's about the gist of it, the same rules apply to the rest of the procedures involved in building a rod. (John Channer) I have to admit that this time these guys just about have me convinced, too. My oven, that I've used for 25 years, is just an insulated box with a straightened out calrod element that I salvaged from a household oven. I set up the oven controls too, but they never worked right, so for years, I've used a putz control system. That's right, I do it myself. I heat the unit to 350°, then put in the cane. The temperature drops to about 300°, and I wait until it gets to 350° to start timing, when it gets to 358°, I unplug it. The temperature rises to 360°, then starts dropping. When it hits 350°, I plug it in, the temperature will drop to 340°, then start climbing again. Two cycles like that give me ten minutes at temperature, which in this oven produces a slight color change. It's hard to argue with Mark's logic on eliminating variables. If the best a putz can do is 350° +/-10°, and a PID can give you 350° +/-1°, why would you want a putz running your oven? I was further gratified to see that Mike chose one of the controllers at the top of the page. The one's further down offer fuzzy logic enhancement. It seems to me that's the last thing we need around here. Tongue firmly in cheek. (Tom Smithwick) Well, I have been reading this thread and I decided I would throw in my .02 worth. I suppose that some may think that the black pipe is what I use since I did the black pipe tutorial. But, this is what I have come up with. I built a heat gun oven which works very well, I have three thermometers to monitor the temp through the entire length of the oven. One on each end and one in the middle. The oven is set up horizontally and for the longest time I fought the temp which would tend to get hotter in the middle. Then I had a revelation and I turned the oven 90 degrees so that the heat was introduced on the side of the heating chamber instead of on the bottom. This along with a piece of rod tube flattened on the end distributes the heat perfectly and the temp doesn't vary on any of the thermometers. I preheat the oven to about 375 degrees then put in the beveled and bound sections, the temp drops to around 350 degrees and I have to lower the setting on my heat gun I can them maintain that temp fairly easily. I then heat for 15 minutes. The black pipe tutorial was simply for those trying to get into rod building. It doesn't have to be so complicated and you shouldn't let an oven stop you. (Joe Arguello) Which plane did you turn the oven 90 degrees? Did you stand it vertical or rotate 90 degrees? (Greg Reeves) I rotated it 90 degs so that the heat inlet is on the side instead of on the bottom, it's amazing that just this mod made such a difference. I does make sense though since heat rises and when the inlet was on the bottom it would heat the bamboo chamber in the center! Hope this makes sense. (Joe Arguello) Consider raising the inlet/outlet end a tiny amount so that the oven is not horizontal. (Wayne Thompson) My last oven attempt was a vertical, tube in tube, counter flow design with 4 inches of insulation that was purported to be very uniform. After 3 hours of running I had a 50F differential from the bottom to the top. After futzing with inlet baffling I gave up and laid it over on its side. the differential quickly subsided to 25F. By raising the bottom 2 inches higher than the inlet I got it down to 15F. At that point I gave up. If I'm going to build a horizontal unit, I'm going about it a lot differently... But it does show that sometimes a heat gun doesn't have the omph to overcome vertical stratification and that injection and configuration have a large effect. So if you are fighting uniformity, changing how you attach the heat gun, or even adding a cheap auxiliary gun at another location may salvage the investment. (Larry Lohkamp) Why is it that some of the simplest solutions elude us for so long. Kudos Joe. I assume you mean the heat gun is still introducing heat from one end of the oven, but the oven is used horizontally instead of vertically? Care to elaborate on the piece of rod tube that distributes the heat? You may have found the answer to the vertical heat gun dilemma. I've started accumulating the components for one of Mark's "Mother of all Ovens" but went through much the same problem of even heat distribution with my vertical heat gun oven. Perhaps you can save some newbies, that like the heat gun approach, a lot of aggravation. (Wayne Kifer) The rod tube is simply a cut off of a 1 5/8" rod tube, I buy my rod tubes with just the screw end attached and the bottom caps are left off, I them cut the tubes to fit the rods and attach the bottom caps. This was just a piece left over. The oven sits horizontally and the heat is introduced along the bamboo chamber. Here’s a pic:
OK, I'm using the same design heat gun oven Joe uses but I use a Weldy Pro heat gun. On the heat gun I can dial in the temperature I want (350 F) and as long as the inlet air temperature to the gun does not change the oven will maintain 350 F as long as the gun is on. Drops to 325 F when cane is inserted and recovers back to 350 F in about 10 minutes. Cost of oven about $50 from Home Depot. List of stuff for oven:
I haven't insulated it yet as it works the way it is. One day I will wrap it in insulation and then cover it with a section of 8" single wall pipe just like Joe A. (Frank Drummond) I guess what strikes me as strange is that, this question should be easy to answer by a well-designed engineering experiment with a decent sample size. But apparently no one has ever done it. If we can't figure this out, what chance do we have of figuring out something really complex like the physics of rod design? The US Forest Products Lab has some old research on fire hardening of wood, the molecular changes going on: modification of wood fiber using steam. Maybe we could get them to work on bamboo; anyone have any connections there? (Frank Stetzer, Hexrod, Taper Archive, Rodmakers Archive) There is some extensive literature on heat treating bamboo and it's affects, if that is what you are looking for. Have fun reading this.... (Louis DeVos) I've done it with 24 sample strips treated at different times and temps. Multiple strips at each time/temp. The bottom line is that there was no difference in MOE among the samples that couldn't be explained by measurement error (2%) Some have suggested that MOE might not be the metric to prove an advantage. If stiffness is the criterion then MOE is right. If resistance to set is the criterion then I haven't measured it yet. (Al Baldauski)
I have an old (unused for thirty plus years) ceramic kiln without an automatic temperature control. I used to put a ceramic cone in a trip lever and when the box reached the required temperature the ceramic cone would melt and the electric would shut off. It has a very clean 17"x20" interior so it would make a great oven for heat treating short nodeless sections and I was wondering if there was some kind of electronic temperature control device that I could use to make it maintain 350 degrees for 25 minutes. I haven't experimented with it yet to see if I could maintain it manually but I have checked with kiln manufacturers and they only have things which cost several hundred dollars. If someone could point me to an inexpensive control device I would be very grateful. (Dick Steinbach) No need to buy a brand new one. Look on FleaBay, for a used PID controller that has a logic or DC output. You can also pick up Solid State Relays pretty cheap there too. The all you need is some thermocouple wire, which you can get from McMaster-Carr, relatively inexpensively. It shouldn't cost you much over $100 for all that. (Mark Wendt)
I have done some further work on my heating tape oven. I took Frank Paul's suggestion to redistribute the wraps of the heater to get a greater length with uniform temperature. This worked well. I have also put in a PID controller which helped a lot in adjusting the insulation to make the temperature more uniform. Since there was interest in it, on my web page. I have provided more detail on the wiring of the oven, and also a tutorial on implementing the particular controller that I used. (Mike McGuire) Nice job and that heat tape modification was just right for giving you an almost uniform temperature. =D> =D> Your design is similar to mine except for the pipe size. I suspect your heat up is much quicker and that should give you a lot more flexibility in setting various temperature regimes. (Frank Paul) Thanks for taking the time to put together the detailed explanation with sources and pictures. There have been many references to PID controllers for ovens over the last few years but they have always left out the specifics. This helps immensely. Great job! (Ralph Tuttle) So now I suppose you will be building a new oven? Stainless steel interior, PID controlled, hepa filtered convection.... (Scott Grady) I think you have grossly misunderestimated me. Stainless steel would be overkill, I was thinking more on the line of nickel plated copper to match my ferrules and reel seat hardware. Along with a silver backed glass tube to reflect the heat back into the chamber much like a thermos so as to reduce my carbon footprint. Of course it would have to have multiple PIDs so that I could control each section to the nth degree. (Ralph Tuttle) Thanks for efforts in putting this together. After you redistributed the heat cable I assume you put the insulation back as shown? What kind and where do you get the insulation? The relay and PID controller make the thermocouple setup unnecessary? (Bill Bixler) The insulation is fiberglass pipe insulation from the hardware store. It has no paper or foil backing like some I have seen. It's 3" wide and claims to be 1/2" thick although it compressed a fair amount when I wrapped it on. The first layer of insulation went back on as shown in the original work. For the second layer it just took a little doubling up in the 4" or so near the ends to get the temperature close to uniform. You don't need the setup with the second thermocouple, the ice water and the little voltmeter, but you absolutely do need one thermocouple. The PID controller uses it to measure the temperature that it is controlling. It's really no big deal. It's just a piece each of the right kinds of two different wires twisted together at the end on the oven, and connected to the controller at the other end. If you get the heating cord from McMaster, you can also get the wire to make the thermocouple. The stuff that I suggest is at this link. It's actually the two types of wire packaged together. You strip the insulation off the ends. One end you twist together and weld, either with a torch, or by cold welding by hitting it with hammer on an anvil. The other end you connect to the terminals on the controller. It costs 70 cents a foot. You only need enough to reach between the oven and the controller. (Mike McGuire)
What type (candy, digital, etc.) and brand of thermometer for a heat gun oven? I am looking for something more reliable. (Ron Delesky) I have been very happy with "Digital Min/Max Stem Thermometers" purchased from Edmund Scientific. (Tim Anderson) I use a digital candy thermometer that I picked up at Ace Hardware. (Tyler Beard) I stole my wife's Polder brand digital thermometer from the kitchen. These are cool because they have a probe w/ stainless cable a few feet long and a magnetic base, so you can locate it conveniently. Also it has a timer/alarm, which is handy. I think they are about $30.00 @ Target or cooking specialty stores. Candy thermometers are probably less money if you don't want to spend that much, and they certainly do the job well. (Tom Vagell) I use a dial type candy/deep frying thermometer. It's nothing special, and I didn't buy it for accuracy. What it has, that was hard to find, is a 1/8" x 5.5" spike-probe that I can insert into a small hole in the side of the oven to get my readings. It isn't that difficult to calibrate any thermometer, as water boils at 212f at sea level, etc. When I set up my oven, I place a second thermometer, an oven thermometer, at the exhaust port. In normal operation, the two thermometers should read within a few degrees of each other. Do I know that I'm cooking my cane at precisely 300f? No, but the results have been consistent and acceptable. Let's face it, if I was looking for precision heat control, I wouldn't be using a heat gun oven to begin with. (Paul Gruver) A lot of small digital multi meters come with a type K thermocouple probe including one from those patrons of economy (sometimes false) at Harbor Freight. That would do the job. You can readily check it or any other thermometer, at least if you are at or near sea level, by measuring the temperature of boiling water. (Mike McGuire) Check at any altitude by reducing the boiling point of water by 2 degrees F for each 1000 foot rise in altitude. (Jerry Drake) I borrow the thermometer off of my gas grill. The price is right and accurate enough. My digital B-B-Q ones seem to have a longer response time. Once I figure out how to plane, I'll invest in a PID controlled oven. (Larry Lohkamp)
I am about to take the plunge and scrap my heat gun oven. I have questions about using your oven design. What do you support the bound strips on in the oven... or do you just set them in contact with the bottom of the tube? How uniform is the oven at other temperatures? I currently use my oven at 225F to dry strips after wet pressing nodes, at 390F to heat treat, and 150F to set the URAC glue. One of the problems we had with diffusion furnaces was getting enough cooling at low temps for the controllers to be able to regulate. (Larry Lohkamp) I may not be particularly demanding but I am more than happy with my heat gun oven. The temperature from top to bottom is within a couple of degrees. The pipe that I use is designated as a stove pipe which can be used to go through walls and attics but not in direct contact with wood. It is double walled but not the kind that costs an arm and a leg and can be used in direct contact with wood. The internal pipe where the strips are is just single walled galvanized duct .pipe. I can't remember the diameter but it is around 4". The key is a good heat gun. Tim Abbott has one that he demonstrated at Roscoe which is really nice and can be used in a straight pipe. This type of oven was pictured in Maurer's Book. It needs to have enough power and a good temperature regulation. There are lots out there. I was a little cheap and mine doesn't have thermostatic regulation so I wouldn't advise you to get one like mine. I have to mind mine. Watching over it for 20-30 min. isn't much trouble. Chris Bogart reviewed a really nice one in Power Fibers. It is pretty expensive but it could be used in a Maurer/Abbott straight pipe oven. Now to answer your original question: I have a wire across the top of the inner pipe that I hang the bundled strips from. I just use a piece of wire (paper clip), hook it into the wraps and hook it over the wire. I could provide pictures, but there are plenty on Todd's tips site. (Doug Easton)
Using a plan I saw someplace, I have a straight pipe oven made out of heavy 3" iron pipe wrapped in sheet insulation that comes covered in some silver reflective material. I use light wire galvanized grating as a shelf for the bamboo. I strongly recommend getting a variable temp heat gun. The first time I hooked up my Bosch heat gun, I turned it on, set a timer for five minutes, and ended up torching the ends of my sections. We are talking charcoal at the very ends. So, my plans for an 8ft rod turned into plans for a 6'6" rod. Now, I have a relatively cheap heat gun with lots of control. I've drilled small holes up and down the pipe and bought a thermometer to test the temperature at various spots, and have eliminated any problems. (Reed Guice) There is some discussion of straight pipe ovens in Maurer and Elser's Book. The key is a good heat gun. Tim Abbott uses one. He demonstrated how it is set up at Roscoe which is really nice. The key, he said, was a good heat gun. I don't remember if he insulated his tube or not. (Doug Easton) I use a pipe oven too. It's a piece of aluminum pipe about 7ft long that has in inside diameter that's the same as the outside diameter of my heat gun. I have an electronic heat control that goes in the open end of the pipe to control the temperature. My oven is usually up to heat (325F) in about 2 minutes and cycles off and on to maintain that temperature about every 8 seconds. The temperature is higher at the heat gun end but I find if put the butt ends of the strips towards the heat gun it helps and putting the ends in a old cigar tube helps even more to maintain an even coloring and tempering. I don't use a rack to support the cane they just sit on the bottom of the pipe which is not insulated either. (Ken Paterson) I have never had the charred end problem because i have configured my oven differently. Simply, I have a 4" stove pipe inside an 8" stove pipe. The 4"er is attached into the top half of the 8"er. My heat gun is directed into the other half of the 8" pipe and exhausts out the 4" pipe where the bamboo is. It's coming back at you. I have the whole thing wrapped in high temp insulation. I do flip the sticks half way through and have them on a screen in the middle of the 4" tube. I partially cover the exhaust but have a good consistency of temp throughout the oven. (Timothy Troester) I use a similar oven. Would you mind sharing how long and at what temp you cook using this type of oven. (George Wood) I made an oven last year using a double walled pipe and a heat gun, I covered it with foam insulation board with a foil backing and silver A/C tape. I use a heat gun and placed two digital thermometers about 24" apart. I am not pleased with it. While it will reach temp it is off by as much as 40 degrees from front to back. I would love to find plans for a more efficient oven. Does anyone have plans for a more efficient system? (Phil Crangi) I started this oven go 'round when I mistakenly sent an email to the list instead of Mike. I have built 2 vertical heat gun ovens and even with a digital heat gun and playing with insulation, I have to flip strips to get close to uniform results. The most uniform heat distribution was with the oven turned 60 degrees from vertical, or almost horizontal. Now I am about to put together what I had in mind originally and should have done a more thorough job of searching for the element. Mike McGuire found high temp heat tape at McMaster-Carr. His oven is here. (Larry Lohkamp) This basic design for my oven was on Frank Neuemann's web site. I poured about 2-3" of Sacrete into the bottom as a means to prevent it tipping it over. I think that the cement heats up and may provide a heat sink that can "buffer" any rapid temperature change. I use a cycle for heat treatment that probably varies from others, in that I start the oven with the bamboo in it and let it come to my treatment temperature over about 15 minutes. Then I try to hold it at 315 degrees for 10- 20 minutes. depending on the result I want. As far as the oven is concerned, I pop riveted the inner tube directly to the outer tube. The bottom of the inner tube is about 6 in. above the bottom of the outer tube. I use a removable elbow fitting on the top end of the inner tube to shoot the hot air away from the heat gun. The outer tube is double walled pipe. I, like Rolf, did not provide any insulation. I drilled holes at 3 points through the two pipes along the joint between them. I check the temperature at each point along the pipes and never find a difference exceeding ± 2 degrees F. I sometimes wonder if trying to insulate this kind of oven risks creating hot and cold spots. I think that the original design was meant to tolerate some heat loss. This allows all the metal parts to equilibrate. The principle upon which the oven is designed is called called the counter current distribution. It is what makes your kidneys capable of reabsorbing water and keeps carabou’s feet warm in the wintertime. (Doug Easton) PS: It was interesting, however, that in one of the pictures I linked to, a fire extinguisher is prominent ;-) I built a heat gun oven much like has been described here. 4" aluminum tube placed into a 6" double wall stove pipe, the 4" tube sits on the floor of the 6" stove pipe and is riveted in place. Now the 6" double wall pipe is covered with insulation and placed inside of an 8" single wall stovepipe. The whole mess is capped with stove pipe caps and a small hole is drilled into this so a section of rod tube slips into the air space between the 4" and the 6" tubes. The end of the rod tube is flattened some to create a kinda flare. I think this is about 12" or 18" long so it extends into the tube some. The 4" is shorter than the others so it has some air gap at the back. Now the heat gun fits into the rod tube just right and blows the heated air into this chamber. I have 3 bar-b-que thermometers one at each end and one in the middle. Here is the neatest part of this arrangement...........took years of R&D and I just couldn't get the oven not to get hotter in the middle! One day a light bulb came on and I realized that heat rises so I turned the oven 90 degs. so the heat is entering on the side of the tube.................Eureka this oven keep the heat right on throughout! I have posted this before, perhaps to deaf ears! Hope this helps someone, email me if you have any questions..........or call, may phone number is posted somewhere you will have to find it! Hint the answer to the riddle is on this page! Here is a pic of my set up.
Wish my shop was that neat. (Tony Spezio) Yeah me too!!!!!!!!!!!!!!!!!!!!!!! That was when we first moved into this house! I was able to keep it that way for a while, but since my wife's Aunt Dottie passed away the day after Easter Sunday it has been full of boxes of stuff that my wife has been wanting to go through, and since she got sick we really haven't been able to do much but squeeze around in there. (Joe Arguello)
|