Bamboo Tips - Tips Area |
|
< Home < Tips Area < Planing < Final < Tearout
I started planing a strip and had a tear out at a node. Not that unusual if it's time to sharpen the blade. So I started working on the tear out. I usually am able to fix problems like this by sharpening the blade or going to my next plane which is for fine work. This one refused to be fixed. No matter what I did it hung in there. It's like the node was splintered all the way to the center and each time a plane would pass over it, it would grab the edge and pull away. It eventually gave up and so did I. I'm now working up a new strip. (Terry Kirkpatrick) Did you try planing it in the opposite direction? (Pete Van Schaack) I seldom get any tear outs but if I see one starting, I file the area so it is lower than the surface of the strip. The plane blade passed over the low area and will not pick up the bamboo there.. I also found is I "cock" the blade at an angle to the strip over that area, It will help. We each have our own way of correcting this problem, this is how I do mine. (Tony Spezio) I'm convinced an occasional "part" just does not want to be part of a rod and you just have to move on to one that does. The first thing I do after heat straightening a strip is grab my Simonds 10" Flat 2nd file and smooth the node. File to the enamel or in extreme cases I will have to heat and compress nodes using a vise and then file. Once this is done I will lightly file perpendicular to the entire enamel side of a strip and help flatten that curve just a bit ... but not so much to get into those power fibers. This allows the enamel side of the strip to lie flat in the form, becomes more stable and planing is just easier for me. When planing the enamel side I make doubly sure my plane blade is scary sharp and since I usually work with 4 planes at a time I save my finishing plane just for this work. Having those nodes flush to the enamel helps a lot and I can't remember my last node tear since doing it this way. (Doug Alexander) Wait till you go through all the strips and find out you're still short of what you need. I threw the culm out. (Ren Monllor)
I started planing some tip strips this evening and something is wrong. I cannot plane more than .001 without my plane tearing at out the nodes and I'm getting some tear out even planing .001. I have sharpened and sharpened and sharpened again the way I always have. My iron is "scary" sharp and I am at a loss. Any thoughts would be appreciated! (John Smith) Still, I would say your plane is not sharp or your bevel is too low. If you are using water stones, you need to flatten them. They are cupped. If you are using Scary Sharp method I would check for a burr. I would check that your front nut is tight and you do not have a wad or collection of dust and scrap under the toe plate. If those things don't work then you should change your music. (Timothy Troester) Maybe it's the cane:
Maybe a subtle change in your technique?
One piece of recent advice that I found valuable is to make sure that you flatten and hone the back of the blade when you sharpen. It has made a big difference for me. (Jack Holton) Increase the angle when your sharpening your blade. I set my honing guide at around 40 to 42 degrees for regular block planes and 45 for low angle planes. This has really lowered the amount of tear-outs I get. The rule of thumb is the harder the wood the higher the angle. Give it a try and see if that helps (Ken Paterson) What is your angle of attack like, John? If too low, that could contribute to the problem. (Peter McKean) If no one has mentioned it, the throat should be as small as possible. Just enough to allow your thickest shaving to pass. Some planes have an adjustable throat some don’t. My plane did not so I remachined it to install a “throat reducer” and that made a BIG difference. (Al Baldauski) I sorta had the same problem. I made about 15 rods, with ok planing results. Then, I couldn't plane without tearouts. I tried planing down the form, instread of up the form. Ithought I had sharpened to a high degree. I tried double bevels {?} on the hock, 30 and 40 degrees and a whole bunch of other blind stumbling attempts. I eventually got a worksharp 3000 and an adjustable throat plane. I keep the plane throat just narrow enough to pass a 15thousands shaving and most important, the worksharp 3000 showed me how sharp I wasn't. (Charlie Dybus) Thanks for all the replies. I will answer them to the list so that maybe some further conclusions can be drawn. My throat plane is closed fairly tight, my nodes are flat and my nodes are straight. I have already rough planed the strips and didn't have this issue before drying them in my stove. I decided to resharpen again. I cut a new 35 degree angle on my iron with my worksharp 3000 and was able to make 2 good passes until the tear out started again. (John Smith)
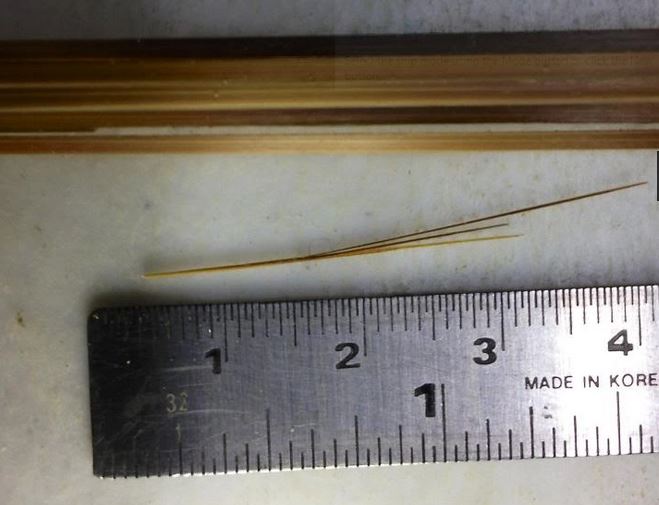
I'm on the road in NJ, 1,200 miles from home. I threw my forms and tools and rough planed bamboo in the back of the car and hit the road. In the process of the final planing I took a sliver out of a spot on the rod tip about 10 inches from the top. I measured and it's just above where the guide will be. Here's a photo of what I'm dealing with.
This rod is a gift for my son. I'm on a deadline, I have no other bamboo with me. Could you advise? Can it be repaired? Suggestions? I have the sliver. (Jim Sabella) Although it will probably be called heresy, I would glue it back in place with super glue. For me, that would require strong magnifiers, a needle (or bodkin) for applying tiny drops of the glue, and gluing progressively and waiting until each part of the splinter is held in place before gluing the next little section. I would not worry about having a small excess of super glue on the finished surfaces. It can be scraped off with a razor blade.Other than the fact that you can glue the sliver in place, in real time, the super glue will also wick into the areas to be glued.Okay everybody, flame away. (Tim Anderson) Tim has company as a heretic, me. Take your time and super glue it in place. super glue is one of rod makings best kept secrets. (Jerry Drake) No flame, Tim. If the tip had been glued up, I would recommend cramming as much epoxy into the void as possible, placing the splinter, and heating carefully until the epoxy flows and wicks. Bind with thread and allow to cure. This is not like the old “white silk transparent reinforcement.” The thread is removed after cure. Rod is sanded and varnished per normal. A good repair is well nigh invisible if the splinter can be fitted back in well. Jim, that’s the alternative if you’d rather glue up first, but I’d recommend against that if you can glue everything at the same time. (Steve Yasgur) Wow! Thank you all for you help with this. I donned a magnifying visor and went to work with super glue. Got the sliver in place. It's solid and looks like it's going to work. Doing the glue-up this afternoon and we'll see how it goes. (Jim Sabella) BTW: I haven't glued up the tip yet. (Jim Sabella) Is the sliver on the side that will be on the exposed surface or inside? I once snapped a rod tip without completely separating it. I filled the crack with Gorilla Glue then tightly wrapped it using waxed dental floss. Once it set up I lightly sanded the joint and it was an invisible repair. I fished that rod a lot afterwards without any change in the action. If your damage is mostly on the inside then I'd just glue it back together, wrap it tight, and see what the pair looks like after it dries. Sand it down flush and go ahead with the rod. The fact that it will be under a guide wrap should help strengthen it too. (Larry Puckett) Super glue the sliver back. Leave it just a little proud on the enamel side so you can sand/scrape it flush. After glue up and clean up you'll never find it! This is a cosmetic issue not a structural one. (Dennis Higham)
|