Bamboo Tips - Tips Area |
|
< Home < Tips Area < Sharpening < Fixtures
Well, since I was never that great at sharpening my whittlin' knife when I was a boy scout, (got it sharp enough to slice fingers, though) I figured I'd add a bit of precision to my plane sharpening techniques. I was on the Lee Valley page this morning, and was looking at the Veritas Sharpening System. Anybody out there have one of these? Pros? Cons? Should I look at other honing jigs? What other ones are available? Looks like I'd have to order it online, since none of the local hardware emporiums even knew what I was talking about, and had special order policies that'd make your head spin at the price gouging they commit.....(Mark Wendt) The plane blade holder is very nice. The little jig to help you set the angles is next to useless. (I've got one you can buy cheap) What else was in the "system"? (Harry Boyd) I agree with Harry. The blade holder is great but the angle setting jig is like a pair of crutches with training wheels. I will sell mine cheaper than Harry! (John Channer) What are you guys whining about? I never had any problems with the angle setting jig -- other than it took three hands to use. I used the secondary bevel on blades. 35° plus another 2°. Takes more effort to plane, though. (Martin-Darrell) According to the web site, it included the jig, angle guide and instructions. The angle guide did look a little cheesy, but the holder did look very nice. Is it all metal, or combination of metal and plastic? (Mark Wendt) Everything in the package is made of metal. The honing jig is very well made and works well. The angle guide is also made of metal. How accurate is it? I have no idea, but it does give you a place to start. I use the 15, 5 & 0.5 micron SiC PSA micro-abrasives mounted on a glass block to hone the edge. I've found a shot of WD40 on the abrasive helps keep it clean. Having the secondary bevel speeds up the touchup sharpening, cutting less metal on the blade. I'm pleased with the whole system. (Don Schneider) The Veritas jig is made from good metal; two types - brass and steel, I suppose. Some folks do have a hard time getting repeatable angles. I made a crude jig similar to the one in Wayne's book; or the elegant one on Chris Bogart's web site. Using that jig seems to help keep things repeatable. In the last week or so someone mentioned another blade holder that squeezes from the sides, making it simpler to keep things parallel. I've seen them in the catalogs but not used them. In theory, that setup looks good to me. Now, you might want to take all that I say with a grain of salt. I only use sharpening stones for roughing in the angles on my blades. 99% of my sharpening is done on a leather wheel with diamond paste. Since I use the carbide tipped blades that I had specially made, I find that I only sharpen about every 36-48 strips. Just recently finished planing three 2/2 rods. I sharpened before starting, and probably should sharpen again now that I am through. I work down to .005" oversized with one plane, then switch to a second plane and blade for that last little bit. No stopping to sharpen in between. Ever. Yes, I am bragging. But it's the truth. (Harry Boyd) I use the side clamping jig that costs about $11. I have used the Veritas, but it has a screw that clamps the blade from the top and even with a jig to position the blade, it's very hard to keep it square to the stone. The Veritas jig is very well made, and the eccentric wheel for secondary angles is nice. You do have to remember to return it to the primary position every time you use it though. If you want to hone a secondary angle with the side clamp jig, I just put a shim under the wheel, on the stone, to raise it a few degrees. I keep an old worn out plane blade handy for this purpose. It only takes a few strokes on the gold stone to get a nice sharp secondary angle. (Bill Hoy) Do you remember where the side clamping jig came from? (Harry Boyd) The one I have came from Woodcraft; and I'll swear that you won't make mine flex. Mine was made in Poland, and is a beautifully finished tool. (Peter McKean)
In the past there has been some discussion about honing jigs. There were a few who didn't like some types, though. Was it the Veritas? If I remember right it was due to an odd shape, but I don't remember which one it was. Anyway, I have a nice slab of flat marble and some really fine sand paper (scary sharp set up), but I need to hold the blade angle. Any recommendations? (Jason Swan) I bought and used the Veritas Jig while I was planing the first rod, and it was an unqualified success in helping me keep my blade sharp. I used the cheesy Stanley blade, so I tested both the regular bevel and micro bevel setup with the jig. Over the course of planing the strips, I settled on the micro beveled surface because, 1) took me less time to resharpen, and 2) the blade was sharper with the micro bevel than without. I'm a firm believer in the "Scary Sharp" system, it works like a champ. Check Todd's site for my write up on Cedar and Mr. Stanley. I covered all the steps I did sharpening my blade using "Scary Sharp", and as usual, there's a bit of random wanderings and musings... The angle jig was very handy in getting the blade jig set up to the correct major angle eery time, and made sharpening the micro bevel very repeatable. (Mark Wendt)
I hate sharpening plane blades. I always wanted one those wood wheels with a leather strap to sharpen blades. I never got around to making one. What I did do is buy a Jantz sharpening kit off of eBay. It works very well and puts a hair shaving edge on a blade in seconds. The $18 was worth it. Just thought some of you guys would like to now. (Adam Vigil) You like it, huh? I've looked at those in the catalogs several times and always wondered how the 3/4" wheel would work. From your experience it sounds like it does just fine. (Harry Boyd) I use the slotted wheel with the compound they give you. I match the angle of the blade to a spot on the lower half of the wheel and pass right to left and left to right a couple of times. Presto! I am shaving my legs and I am not even ashamed of it. (Adam Vigil) I have always had sharpening "issues." Until last week when I took delivery of a Veritas (Lee Valley) power sharpening system. I bought a few extra disks and mounted 1200x, 1400x, 2000x wet dry paper. Darn thing redefines "scary sharp." At a steep price, though. I highly recommend it for those willing to burn the dollars. (David Smith)
I am curious to hear the various opinions on sharpening jigs; how valuable they are and, if so, which you would recommend. (Greg Holland) The best one I've seen so far (and the one I'm using) is one that Chris Bogart showed me. It's merely two pieces of Plexiglas (generically) and they're glued together to form one piece that is a sort of shelf. If they're parallel, you don't really need a third to make sure the blade is perpendicular to the stone. You hold the jig's body against the end of the guide, stick the blade through your guide and out 'til it bottoms on the upper piece, lock up, and then set the guide so it's at the angle you want it at, AND NEVER ADJUST THE GUIDE AGAIN (sorry, I don't have italics on this Eudora). There's a picture of it at Chris' web site (listed at Rodmakers' page -- I can't find the URL to save my neck right now). I use a rotation of 5 planes and I sharpen them all at once, all 5 on one grit of sandpaper, then all 5 on the next, etc., and I have NEVER had such consistent results from a system! The blades get sharper and they take less time to do since you're not reestablishing a new angle every time you throw them in the guide. The only trick is in dedicating the guide to your cane work or getting another guide if you use different angles for different planes. Once you readjust the guide, your jig is DOO-DOO! (Art Port) I have both the Veritas and the side clamping sharpening jig. I like the side sharpening jig best. It is more repeatable for me when I use it. I purchased it from Harbor Freight some time ago. The way I use it is to set the angle and then mark an edge on the blade to reset it for resharpening. Of course as the blade wears from sharpening, one has to correct the mark on the blade for keeping the correct angle. (Frank Paul)
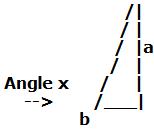
I have bought one of the generic sharpening jigs from Lee Valley. Not the Veritas, but the Japanese one. The instructions came with directions on how to hone a plane blade at a 30 degree angle, and a 25 degree angle. I would like to add a secondary edge at 40 degrees, but lack the trig skills to calculate this. Can anyone enlighten me as to how far from the front of the jig the blade should protrude to achieve a 40 degree angle. (2" = 25 degrees, 1.5" = 30 degrees) Also, I feel like I am not being very precise in measuring how far the blade is sticking out just using a ruler, it seems as if being just a smidgen off will not give me a correct angle. Are there any tricks to get the exactly correct angle in the jig that you can share? (Shane Pinkston) To consistently get the same angle on your plane blade, glue or screw a small block of wood onto your bench (a "bench dog"), or a separate board. make sure the edge of the block is parallel to the edge of the bench/board. when you go to clamp the blade in the jig, put the edge of the jig against the bench/board, and the edge of the blade against the block. this way you'll always have the same amount of blade out of the jig, and therefore always get the same angle, and you won't need to measure anything after the initial set up. You can have as many "dogs" as you like, for as many angles as you like (make sure you label them if you make more than one). (Chris Obuchowski) I figured it out by grinding the edge and measuring with a protractor. and adjusting a doing a gain. When I got my angle I drew a line on the bench. Now you can do the trig and come up with a number with a lot of decimal places but you will still need to check the angle and make an adjustment. The afore said triangle is a small one and a tiny error, like which way you hold your tongue can make a big difference. So I am suggesting that the most accurate and expedient method is eyeballing, measuring and adjusting. (Timothy Troester) Shane: one of your measurements is off. If the 25 degree angle is correct and the distance is exactly 2 inches, here's the rest of the angles and distances: Angle Distance 25 2.0000 Notice that the 30 degree angle is actually 1.6153 inches, not 1.5 inches. If the 30 degree angle and distance of 1.5 inches are correct, then the angles and distances are Angle Distance 25 1.8572 I am not contesting Claude’s math. It is good, but depending on the diameter of your pivot point as well as the particular jig you are using these figure will vary linearly from the start. (Timothy Troester) If you learn to do this free hand it makes everything a lot simpler. It's also better on your sharpening stone. I grind the edge giving it a concave hollow then sharpen by hand to a wire edge then a single pass on the back to take off the wire edge and do this until the curve reverses after many sharpenings which is pretty much unavoidable then grind again etc. Doing it this way is pretty fast because you're only sharpening the leading edge and heel of the face of the iron or chisel or what ever so it's only a few strokes on the stone and you're away again. I've been doing it this way ever since I started using sharp tools and wont change, in fact I can't change. I was given a U Beaut sharpening jig once for a birthday present and much as I tried to use it I always found myself going back to basics and gave the training wheels away to some bloke who thought he needed one. This is as much habit as the fact I had to keep truing the sharpening stone because it made tire tracks on the stone where the edge runs up and down so if I went from a chisel to plane iron I had all these ridges to deal with. That's not such a bit deal now I'm mainly using a plane iron more than chisels I confess but when I used a lot of different width edges it was a real nuisance. When you sharpen by hand you use the whole stone and it stays true a lot longer, besides, it's not a hard thing to learn, sort of like riding a bike really. None of these things I mention are all that big of a deal but I can't be bothered with it. (Tony Young) Just to give you a bit more information. Tim is correct - that's the assumptions I mention in my last paragraph below. If your angle looks like this
The tangent of angle x is../p> 1. You can measure the angle x, calculate the tangent of x, then multiply by b, and find out what a is. 2. If you know the distance a, you can divide a by tangent of x, to get b. 3. If you know a and b, you can divide a by b, then look up the arctangent of (a/b) to find out the angle in degrees. If you notice from the two tables I sent earlier, there really isn't all that much difference between the two, so it really doesn't matter much which table you use, as long as you are consistent and always use the same one. If you are measuring the angles with a plastic protractor, you probably can't get more accurate that plus or minus a degree anyway, so either of the tables should get you close enough. These calculations do assume a couple of things about your jig. If you have a photo or the side of the jig, or a URL, send it to me and I'll modify the tables I sent, if they need it. (Claude Freaner) Don't want quibble but seems the simplest formula is A = O/tan25 Where O is the distance between the lower point of contact of the guide, and the top of the blade (not to the bottom, otherwise you have to take the thickness of the blade into account) A caliper will get you this very easily... A is the distance between the center of the guide and the tip of the blade, measured along the top, or the longest surface as the blade is mounted in the honing guide.... If my guide height is 1 in Substitute your honing guide dimension for A in this formula to get the result... I would caution against spurious accuracy here... though the math is simple, you can probably get just as good by eyeballing with a protractor, then making your jig based on your actual blade set in the actual guide - use it as a jig for the jig.... The point is consistency more than accuracy, otherwise you almost end up grinding a new bevel angel on your blade every time you sharpen it.... Not that I know anything about anything... Just have a few aching thumb and wrist joints..... from sharpening.... (Chris Spurrell) Geez Louise, It took me a few years to figure out which decimal place was a thousandth on my micrometer. How in the heck am I ever gonna figure this one out??? My personal favorite formula is IF IT LOOKS GOOD = IT IS GOOD! (Jeff Fultz) Okay, I just have to ask. I've pondered, muttered, and fumed. What is the difference between the Veritas and the Eclipse, as far as calculating the amount of projection? (Larry Blan) Ohhhh, goody - a theory question! <G> Based on the photos of the two items, they're theoretically the same. The problem is (with both) that to accurately calculate the angle - or the distance to measure - requires more than a simple tangent calculation. If you assume a triangle whose hypotenuse is along the whetstone, then one side is the plane blade and the other side is the theoretical direction at a right angle to the plane blade at a point where this third side passes through the axis of the rolling wheel. Right angle is at the top, in other words. Problem is, as the angle at the plane blade edge increases, this side also increases in length, because it pivots around the wheel axis at a fixed point part way up the side, instead of pivoting around the 65 degree. angle. As the plane blade angle increases, this side also lengthens, and the plane blade side shortens, and the hypotenuse shortens. It all can be calculated easily enough (albeit a bit time-consuming), if one knows the distance from the wheel axis to the whetstone, because this will be a constant. It's all an interesting little math exercise. If anyone is still reading at this point: Frankly, the easiest way of all to do it is to use a plastic protractor - adjust the plane blade until the correct angle is formed on the bottom (back) side of the plane blade, sharpen the blade, then after checking to make sure the angle is still correct, measuring the distance the plane blade projects from the jig, so it can be replicated in the future. Calculating it all is much more elegant as a solution, and a fun exercise, but let's face it: as long as it can be reproduced fairly accurately, it's "good enough"...We all have to remember here that we aren't building rocket engines <G> I think plastic protractors can be purchased at your local Dollar Store or Office Supply Store...(usual disclaimers) (Claude Freaner) I really mean no disrespect, but please go fishing before your head explodes. The thought that these sort of calculations are your idea of a "fun exercise" is quite mind boggling to me. It is very interesting to me that we have such a wide range of enthusiasts from simple minded blue collars like myself, to great southern preachers, and to genius rocket scientists. It really goes to show how alluring those slimy little finned creatures can be. THE ALMIGHTY TROUT - ALL MEN (OR WOMEN)ARE EQUAL IN HIS (OR HERS) EYES Seriously though, this ever growing wide range of talent we have on this list is dumbfounding. Everyone brings the best of their talents to contemplate some of the most interesting discussions of all time! (Grits..Red-Eye Gravy..Vegimite..) I think the old great masters would be proud! (or maybe they'd just run the other way)! So this holiday season, I for one am going to try and not take myself and my craft so seriously, after all in the words of the infamous Claude, "we ain't buildin rocket pushers" (blue collar interpretation provided for clarity)!!! (Jeff Fultz) <G> For me, it truly is a fun thing to play with. I have a math degree, and it's fun to actually put it to use every now and then before it fades even farther into memory-of-what-I-used-to-know-but-no-longer-remember. What I have to keep reminding myself is that many others prefer the bottom line, and not the step-by-step process of getting there. ...and you're right about the fishing. I do need to get out more. I also need to get the house painted inside so SWMBO won't get upset when I start actually working on a bamboo rod. I've got most of what I need, and Mark has even offered to let me come over and use his oven while we brew a batch of beer - so the only thing holding me back is work schedule and painting... (and I really HATE painting, almost as much as I HATE wallpapering! <G>) Oh, and little math exercises keep me occupied also. <G> (Claude Freaner) Something that may be good to spend a bit of time on is the theory I have about defining the taper of a rod using rocket science. You may or may not have read something I wrote a while back about a documentary I saw that was about a stockbroker firm that developed software that used a combination of buy and sell options to guarantee the performance of the shares they traded with. They used a nifty combination of high performance and hedge shares, the idea being no matter which way the market went there was margin. I know everybody does that but these guys used the maths developed by a Japanese guy who worked for NASA and developed the maths required to accurately define where a rocket would be at any precise moment in time. As I'm sure you know a rocket isn't like a bullet. The bullet doesn't loose mass during it's trajectory so that's easy to work out but a rocket does as it burns fuel. The guy who worked this out recalculated the trajectory on a continuous scale of less mass and increased velocity and therefore change of impact as a result. Now, this has to be able to be related to anything where alterations are made while the activity is in progress such as the stock market where the brokers used this program to predict the movement of the market and also predict how much hedging to do and when. It worked for a few years and for some reason it all fell over. I can't remember what the reason was, it may have been new laws that altered the way the market behaved and the program didn't respond properly or something like that but it did work very well within the parameters it was designed for. Rod taper design needs IMHO this kind of math to really work. Any time you alter a number in the taper you'll affect the whole rod as a result, not just that local area. To make an obvious picture or what I mean imagine you have a butt section that runs in a pretty much straight taper (I know that's contradictory but you know what I mean) and right in the middle you reduce the taper by half. That will not only affect the local area but will also affect the action right to the tip in one direction and into the handle at the other. IMHO the only real way to develop tapers directly on a PC is to use maths that takes into account all stresses to use a term already understood over the entire rod. That way you could decide on how much stress the tip should have, the butt , middle etc and any changes would recalculate any alterations over the whole rod. From there I would imagine you could develop a program that allows something like a mouse to pick the stress line on display and move it up and down recalculating all numbers as you adjust the taper. Reminds me of the story behind Public Encryption Keys we use any time we do an online purchase. I know this is not 100% correct but I read of it years ago so some details are a bit vague. The US secrete service and military spent years researching this concept for use by them and them alone and when they ALMOST had it an English math graduate was given a job in a company in the UK and was being shown around the office. They stopped by one office and he was introduced to the bloke working on the same problem for the last few years. The graduate was told of it and was asked if he liked he could spend some time on it once he was settled in. He sort of fiddled with the problem, got the gist of what they were looking for and worked the whole thing out over the weekend. At the same time there was a group of friends in the US working on the problem for use in commerce as we are now using it but unaware of the work being done in the US and UK and came up with it at the same time. Ultimately they were allowed to use it in commerce which is why we have it now. Who was the Frenchman who developed (preceded???) Newton with Differential Calc? Strange how a problem like these can be solved simultaneously by unrelated teams. (Tony Young) Tony, actually, your rocket science theory is not far off concerning using that field as a type of model for our bamboo fly rod problem. It is, as you suggest, that we are trying to propel (cast) a projectile with an ever changing mass: As I'm sure you know a rocket isn't like a bullet. The bullet doesn't loose mass during it's trajectory so that's easy to work out but a rocket does as it burns fuel. The guy who worked this out recalculated the trajectory on a continuous scale of less mass and increased velocity and therefore change of impact as a result. We are casting a mass that is ever decreasing as the line unfurls and straightens out. This might be hard to believe, but to achieve the same end velocity you must slow the cast down for longer casts relative to shorter casts, i.e., to achieve the same leader straightening effect of a 30 foot cast in a 60 foot cast you must have a lower initial line/rod tip velocity. As far as I can tell, this is similar to the rocket and velocity situation you described. The fly rod casting model is indeed quite complex. Within it contains a complex system of movement and forces. Think about the motion of the fly rod during a cast: the ideal cast will have a tip that moves in a purely linear fashion (translation), while the butt rotates, with the remainder of the rod in between moving with differing degrees of rotation and translation as you move from butt to tip. The forces are relatively simple; forces from the line and bamboo sections, but the complex motion explained above makes evaluating them difficult. I think we've got some list members who have PhD's in mechanical engineering who can explain this better than I, but nobody that I know of has yet been able to accurately model the fly rod casting problem. Any of you guys experienced in FEA who can give me some suggestions on how to get started with the modeling? [:)] (Kyle Druey)
Picked up a copy of "American Woodworker" January 2003 because it advertised an article on a homemade power sharpening system on its cover. The system requires the use of a drill press but can be made from scrap materials with a few pieces of hardware (hinge and some bolts and a piece of track). It uses the 5" round pieces of sandpaper attached to a disk driven by the drill press. The track is used to hold the item to be sharpened and is set on an angle jig built of the scraps of wood. The sandpaper holder has interchangeable disks for different grits of sandpaper. I think I might try to make one of these. Could also coat one of the disks with leather for a strop. (Dick Fuhrman)
What type of pipe would be suitable to act as a bushing for a wood honing wheel? Copper? It needs to have an ID of 1/2". This will be used on a coarse threaded rod and held in place by a flange and a nut. I will cut it to the needed length. Also, what can be used as a flange other than a large washer? I have become very interested in flange's for safety sake since yesterday afternoon when an old grinding wheel shattered on me. Thankfully the grinder was off but this was the second wheel that has broken on me. The first one really whacked my hand real good and I don't care for a repeat performance. (Randy Tuttle) McMaster-Carr sells flanged bushings that just might serve both tasks. Worth a peek, anyway. (Larry Blan) I have a couple of saw blade stabilizers from Sears as flanges on one of my grinding wheels. They are about 4" diameter, and not very expensive. Lumber Yards have bronze bushings in various sizes if you don't want to use pipe. Look in the pull out drawers of fasteners etc. Electric conduit might work too, not sure of the I.D. (Neil Savage) Just a thought, if you are going to be cutting out a circle of thick wood for your wood wheel, it would be much stronger to use laminated wood. Instead of using 2 inch thick stock, for example, buy 1/2 inch or even 1/4 inch stock, and glue together, alternating the grain direction in each layer by 90 degrees - basically making plywood out of the wood stock. (Claude Freaner) It was also suggested that I use Baltic Birch Plywood or even try MDF. The reason I am using simple construction lumber is that it is cheap to experiment and learn with.(We just built a garage and have lots of scrap plus a bunch that has been salvaged over the years). Does anyone have a negative personal experience with using construction lumber to make wood wheels that will be turning at 1750 RPM maximum? The maximum size I will make is 10 inch diameter by 3 inch thickness. Do you think Baby Moon hubcaps could be used as flanges? (Randy Tuttle) Maybe I don't get it. Why would you want a bushing on something that will not spin? The felt polishing bobs you gave to me do not have bushings. Don't you want the wheel to be solidly attached to your mandrel or shaft? If so then the problem is to batten the wheel down on your wheel so it doesn't turn. (Dave Norling) I understand your reasoning and it applies IF you never take the wheel off of the shaft upon which it is turned to round and assuming that the nut and flange never come loose. Thus far I am experimenting and have moved my wheels to various different shafts to see which will work best. So far it has become clear that using a shaft extension is a mistake since it will never be centered as well as a single longer shaft. I am also going to try using pillow blocks on each side of the wheel when using a belt/pulley driven 1/2" coarse threaded rod mandrel. This should reduce the degree of play in the shaft and result in a smoother running wheel. I am envisioning a setup where the motor is separate and connects to a pulley. The pulley has several different steps(diameters) so it will result in different speeds. This will be good for experimentation on the different speed/grit combinations. I already know that the coarser the grit then the slower the speed should be to avoid overheating the blade and also to avoid micro fractures and deep gouges in the blade. What kind of pipe can I use for making a bushing? Copper? Electrical conduit? Since it will not be turning(hopefully) it would seem not to matter. I don't want to pay $1.75 to Seven Corners Hardware for a single brass bushing anymore or $.75 to Axman when I can make my own and to my own desired length. One gentleman said that the best glue to use to attach leather is hide glue which is available at Tandy. I will try this. Another web site said that the final step in sharpening is a piece of leather with nothing on it. Just like a plain strop in a barber shop. If any compound is used then it becomes a honing device and is used prior to the strop. DO NOT CROSS CONTAMINATE! Just two days ago while I was working on a wood wheel I tried using various scrapers and razor/scraper blades as a final touch. This helped produce a very smooth surface. Then I also tried resharpening the razor blade on just the wood and it did resharpen it fairly well (it was difficult to obtain & maintain the proper angle freehand) (Randy Tuttle) Thought it might be worth pointing out my system again (available here). It's the simple, redneck version. But it'll get a plane iron awful sharp, awful quick. (Harry Boyd) I think you were asking about the feasibility of using large dimension stock for the wooden wheels? A couple of things to keep in mind: 1) Wood expands and contracts a lot more across the grain than with the grain. Therefore, a wheel that's round in the winter won't be round in the summer humidity. Plywood does this very little because of its construction. 2) Plywood will be a lot less likely to fracture than a large solid wood wheel turning at 1000 rpm or so. Ask a bowl turner about what happens when a large solid block shatters! I'd use plywood and fill the voids with wood filler to make a solid surface under the leather. (That might not even be necessary.) I'm too cheap to use Baltic Birch plywood for something like this! MDF is another option. Either way, cut your circles and glue enough layers together to make the desired thickness, then mount them and true them up while spinning and glue on the leather. Just my $0.02. (Neil Savage)
For those of you interested in getting your plane irons sharp and sharp fast, there is nothing I have come across that approaches the new Veritas MK II Jig. I had been happy for years with the standard Veritas sharpening jig. A student brought the new MK II to a class here in November. He is a woodworker and had just bought the MK II prior to coming up here for a class. I took one look at it and said, "Hmm. This thing won't twist the iron as its clamped down." The setup/guide attachment allows for any angle to be consistently repeated. This means fewer trips to the grinder to reestablish your perpendicular cutting edge. For those of you still using stones to sharpen your irons, the Veritas MK II jig is the cat's meow. Best new widget. The price is reasonable, and you will get very sharp edges in a small amount of time. (Chris Raine) I concur with Chris' comments. I have been using one for some months now. The angle setting attachment is repeatable, and sets the iron perpendicular at the same time. For those who like a microbevel, that feature has been carried over from the old jig. I haven't had time to check one out yet, but Wolverine just came out with a grinding attachment for their sharpening fixture that will go straight to a stone off the grinder. That isn't all bad, and the Wolverine toys are pretty nice. It won't fit every grinder/wheel combination, but Wolverine has also recently brought out a grinding wheel balancer. I have had the opportunity to play with one of these. Pretty amazing. My bench grinder weighs in at about 80 pounds, and is smooth to begin with. With the wheel balanced, it just purrs. I had no complaints about the quality of finish before, but the difference is readily apparent. (Larry Blan)
Question to anyone using the Veritas MK ll honing guide. What angle are you using to hone your blades? Also the angle for the back bevel. (Bill Tagye) Hollow grind, then a 30 degree bevel, no back bevel. (Larry Blan) Well, I had the original one, and used 30 degrees. I made a stop block for it for consistency. I did not use a back bevel, and simply flattened the back of the blade on a piece of 2000 grit sandpaper that I glued to my workbench. I would occasionally put some green honing compound on it, or not. I had better results once I switched to a micro bevel (saves time as well). I now power-sharpen, but it is a nice tool and I used mine for a couple years. (Jeff Schaeffer)
Any feedback on the Veritas Mk II honing guide? (Louis DeVos) I like it and many at SRG liked it too. Lee Valley was kind enough to donate one to our auction and we got a chance to play with it. For us guys that use stones or Scary Sharp, IE: hand honing, the nice thing is the repeatability of the angle (the attachment allows one to set this) and the fact that it is self centering. Much improvement over the original. I would recommend it, in fact, I think Santa is bringing me one - and also a self centering drill press jig for reel seat inserts. Usual disclaimer - no $$ interest, dang it. (Darrol Groth) Works for me. Use the scary sharp method on a marble floor tile. I am pleased and the price is right. (Scott Bearden) You can pick up a marble tile sample piece about 12 by 12 at Home depot for a couple of bucks to put you sand paper on for the scary sharp method. (Gordon Koppin)
I read on the list last week that someone was using one of the Sharpening Sleds by Alisam but I misplaced that email. Can anyone else recommend one of these? (Scott Wolfe) I have one, it works quite well. The Veritas is maybe a little more repeatable, the sled is certainly quicker to adjust. Having the Sled I'm not sure that the Veritas is enough better, if any, to justify buying it. (Henry Mitchell) I use a battery of "ECLIPSE" sharpening jigs, made in the UK, and in my opinion they are as good as you can get for plane irons. They have severe limitations when you apply them to chisels, in which case the Veritas is a tad more convenient, thogh you do have to make up a jig in order to get (a) the sharpening angle and (b) the square front reliable and repeatable. Note that there are quite cheap copies of the Eclipse available at around $15-20, but I think they are made out of watermelon rind and whale spew, as they wear out in no time at all. The Eclipse, on the other hand, with a modicum of sensible care, such as washing out the slugge and oiling occasionally, will last for years and years. The Eclipse can be bought here in Australia from any number of companies, and will cost about US$40 give or take a few dollars depending on exchange rates. I get mine from a local engineering supply company, but the most accessible source online is a company called CARBA-TECH. I suppose that would probably be www.carbatech.com.au in a perfect world, but when I need to contact them I just Google carba-tech. (Peter McKean)
I hand sharpen plane blades using water stones and over the past 25 years have tried a number of honing guide devices. Either the blade slipped in them or it was a bitch to get the plane blade to sit square with the stone. Problem is now solved. Got a Veritas® Mk II Honing Guide several weeks ago. Looked a little complicated when I took it out of the box but a quick read of the directions and I sharpened a bunch of plane blades. Works like a charm. The guide provided with the hone makes setup both square and fast. Even got carried away today and sharpened a bunch of chisels. Another success. So if you/you wife or kids want to get something for Xmas that will work, try this one. It's a goodun. See here for pictures and description. (Don Anderson)
For those of you who like to make their own tooling, there are plans for a low cost sharpening machine in the new issue of Shop Notes Magazine. There is a picture of it on their web site. (Steve Krumpos) Just got my latest ShopNotes yesterday. Just finished reading the article. A cross between Scary Sharp and WorkSharp. Uses you Drill Press on lowest speed for power. I might make this. (Dick Fuhrman) I would be interested in making a sharpener. I don't subscribe to the magazine. Could you give me a few details. I could not find the plans online. What is the platter made of and what drives it off the drill press a belt system are there bearings. Do you know where I might find the plans if I think I could build it? (Rick Barbato) The magazine, I believe, is available at most of the big box home improvement stores. The platter is made out of MDF, and is interchangeable . Most of the other parts are ¾” plywood. The device uses a “v” drive belt and pulley system. The bearings, bushings, pulleys, drive shaft, etc. are listed as being available from McMaster-Carr. They show the 8” PSA Abrasive Disks available at Red Hill Corporation. (Steve Krumpos) It’s Vol 18, Issue 107 – Sept./ Oct. 2009. (Steve Krumpos)
Before starting to plane bamboo, I am going to tune up all my 9-1/2 block planes. I currently us a Veritas honing guide, but have had trouble with the blade slipping or turning in the holder guide causing me to readjust it and start over again. I am thinking of buying the Veritas Mk II which is around $69.99 at Woodcraft and I just pick it up, have lunch and come home compared to buying on line and paying shipping. Have any ou guys used the Veritas MK ll and how do you like it. Also just for some discussion, what do you guys do in tuning up your block planes:
Any thoughts? (Lew Boyko) It works well. The last time I used it I made the mistake of standing blade upright, sharpened edge down and the blade went down thru the bench top, 3 drawers and a 4-inch cement slab before It finally came to rest. Seriously I do like the guide and if you are careful in setting the blade you can sometimes get by only resharpening the micro bevel with a water stone which just takes a minute. (Ron Kubica) I've got both styles of Vertas Honing guides. I really like the MKII as it is easy to get the blade square to the stone and repeat the angles. The original guide was kind of a pain to get things square. I spent some time getting a blade square and scribed a line on the blade. I then could repeat the setting time after time. Never had the blade slip in the original. New one to me.
|