Bamboo Tips - Tips Area - Flaming |
|
Don't flame your first rod. Flaming does a great job of covering up mistakes but you want to see them when you're done otherwise you don't know what needs improvement. It is also messy when you're sanding and you have no idea when you'tyoddve removed the enamel and started to remove fibers. (Tim Wilhelm)
Blonde Flamed Cane If you flame the inside only of a split in half culm, the outside will remain straw yellow (blonde - whatever you want to call it). When you flame the inside of a culm, at first you will have a swirl of orange flame around your torch flame. Flame until the swirl goes away and your torch produces only a glowing red spot on the carbonized pith. I start in the middle and work my way towards one end, then the other. Make sure the inside is evenly blackened from edge to edge. Give a little extra time to the nodes. They are thicker and will need more heat. Notice the end grain when you get close to it with the flame. You will see bamboo sap foaming out of the end and liquid dripping out. When cool, wire brush away the soot, split, and plane away. No other heat treatment is needed. I do not use an oven. (Darryl Hayashida)
I was never thrilled with flaming with my propane torch because it is rather slow and I've wondered if I'm getting too much heat penetration. At home Depot, for $28, I picked up a torch handle with a three foot hose and I also bought a bottle of MAPP gas and gave the system a try. It works very well and I can adjust the flame up to a major roar. Much quicker to flame a culm now. I really like it. Has anyone else out there tried MAPP gas? I have also used a plumbers torch with acetylene and that works well also, but those torches are $200-$300. (John Long) I use a plumber’s torch with a six ft hose and a 20# (BBQ size) propane tank. Adjusting the air mixture to give a soft flame, and adjust the propane to give a 3 to 4" long flame. The nice thing about the plumbers torch is the pilot light setting can be adjusted to just stay lit, and with a touch of the trigger the main flame is there. I've had mine for years and never used it until I started building rods. Must have picked it up at a sale. MSC and other industrial supply places have them, but as John pointed out they are not cheap unless you can get one at a sale. (Kurt Clement) I use to do Heating and Air, also a plumber for the same company. I would suggest get a torch called a Turbo Torch. all you need is a acetylene bottle and they work excellent. (Dave Henney) I also use the same three foot hose and MAPP gas and have been extremely happy with results. When I took my rodbuilding class from George Maurer 5 years ago, he advised my to not use a standard propane torch and cylinder. It seems much safer than trying to use a propane torch hooked up to my gas grill's propane tank. (Bob Williams) Be careful if you got the big weed burner type torch. I was flaming some culms and had the hose come off the torch and cause a near disaster. I am glad I was doing this outside, instead of in the garage. I replaced the hose with a better one and used real hose clamps instead of the ones that came with it. (Jeremy Gray) This was from Home Depot and not a weed burner. It is just a small hand held torch with a 3' hose and has a belt clip which slips on to the valve at the gas bottle. If I end up in orbit, I want Bob Nunley to catch me on the way down - I know I'll be in good hands but a long way from home. (John Long) That kind of a setup is an accident looking for a place to happen. I can't believe they're still selling setups like this. My Dad's been in the propane business for over 40 years, and as a young pup, I worked for him. Do yourself, your family and all of us a favor, go to your local propane dealer, and have him/her make you up the proper hose, with crimped fittings at the end. Propane is so dangerous in faulty equipment. Equipment like you bought should be banned from the marketplace. The hoses should have crimped fittings, and either a threaded connector or certified quick connect. Even though you were outside and lucky enough not to have burned the house down, you were also lucky to have not given yourself serious burns from the gas igniting at the end of the hose where it disconnected from the torch. I never really wanted to work in the propane business, but I sure learned a lot from my Dad about the business. I homebrew also, and some of the setups folks have built that use propane burners really make me cringe. Propane, like natural gas, is something that in inexperienced hands can be harmful, even fatal. I used to go out to constructions sites to deliver gas, and saw cobbled together heater setups, tar kettles and such, that if any OSHA inspector had seen, they'd be written up for hazardous setups. There've been instances where folks have been either killed or burned very badly by gerry-rigged setups. (Mark Wendt)
How can I get a rod to look almost black? I think Bob Nunley has a picture of a rod on his web site that looks charred (the one with the green wraps). Funny, but I like the way it looks. How does one get that dark, charred looking effect without damaging the integrity of the power fibers? (Kyle Druey) I use a really hot flame. Harbor Freight has a torch that runs off a gas barbecue tank. I think it's a 20 lb tank. The torch sells for $19 something regularly but is on sale regularly for around $15. Just crank it up and you can char the enamel without overheating the inside. The quicker you char the enamel, the lower the inside of the bamboo will get. Slow flaming heats the inside hotter. (Onis Cogburn) I heat my strips (I build nodeless) up to 200°C (now YOU imperial measure guys do the conversion!!!) in my kitchen oven until they are almost black. After this too aggressive heat treatment, I discard the ones damaged by the heat (bend them and if the power fibers don't stay together it is bad) and keep the ones that look still OK. Makes a nice dark brown-almost black rod. When gluing the splices together, I don't care that the colors do not match exactly, on the contrary, I like it! I look for different pieces of bamboo to glue together so the joints clearly show. (Geert Poorteman)
I had seen someplace that you can flame bamboo to darken it. If this is true how is this done and at what stage of restoration is this done? Again thanks for all the help. (Richard Federation) Generally, flaming is done to the entire culm of bamboo before it's split to make the rod, however, there are ways of darkening it without flaming. You can do ammonia toning. I use a method where I put a clear tube on top of a jug of strong aqueous ammonia (you can get it from Blueprint shops and I think it's around 26% ammonia, which is VERY strong) in the sunshine and OUTSIDE!!! The evaporating ammonia will darken the cane evenly. Check it daily and take it out when you get the color you want. There are other methods of darkening blanks. Maybe some of the others will chime in and tell you how they do it. (Bob Nunley)
I have not been very happy with my torch and I went by Harbor Freight today to see what they have. I remember that Onis (I think) uses one from there. I found a long one that connects to a large tank like you use on a grill. It is #36346 and has an end that looks like a can. It is made in Italy and has the name Dealgas Co. & C. on the packaging. Does anyone use this one? Does it put out enough heat? Do you have any other suggestions? (Hal Manas) I use that one, and it seems to be just about right. When you hit the air lever on it it blasts way hotter than you would ever need. I use it only outdoors on rainy days. A Pyromaniac's dream. Be careful! (Tom Hardy) Be careful of this one. There was something on the list awhile back about a product recall on this unit. This is supposed to be for burning weeds, (kind of the same thing I guess!) There is another from H-F that also works fine and is for soldering pipe and whatnot. (Mike Shay)
This idea came to me out of the blue. When flaming a complete culm, mount two paint rollers (minus the plush roll part) on adjustable microphone stands (or whatever else would accept the hollow handles). Insert the rollers into each end of the culm. Adjust the mic stand's height so they are even. You could roll and flame the culm very painlessly. If you have not made a check split, you would get absolutely no burned edges (not that I think that matters anyway because you'd cut it off). I think most rollers would fit inside the culm with possibly the need for small adjustments to the end. The plastic endcaps on mine were just ever so slightly too big. I filed them down. Oval shaped culms are a problem. The metal sections on the roller expand out and hold the culm tightly. Need to try it in action. I will check this out and report back. (Bob Maulucci) I made 2 cones with a shaft in the middle of them and chuck one in the lathe and put the other on a stand, then mount the culm on the cones and turn the lathe on just barely turning the culm, makes flaming much easier. Thanks to Hal Bacon for that tip. (John Channer)
I've been flaming my cane. This prompted some thoughts (which is almost always dangerous) My question is: Does there seem to be a difference in action, durability, and so on between lighter flamed cane versus really darkening it? Next, How far is too far in flaming cane? (I do realize you don't burn it up) Is there some method to ascertain when you have reached the proper point? (Dewey Hildebrand) First, let me say that I always flame, and I always heat treat as well. I don't necessarily advocate either as being necessary, but I think I have gotten pretty good results. With both processes, one needs to take care. Flaming is always somewhat controversial -- the primary reason for this being that it is rather a randomly controlled process, and as a result, it is all too easy to damage fibers below the surface. Additionally, as flaming is usually thought of as a "cosmetic" step, many guys then subject the strips to a regular regimen of heat treating, thus, risking further damage to the fibers. In general, the more you subject cane to high heat, the stiffer the action of the rod becomes. The downside is that this effect is brought about entirely at the expense of fiber elasticity, and in time, that translates into a broken rod. (As a coarse analogy, bend a piece of bread. Then toast it to a dark brown and bend it again after it has cooled and dried. See?) Bob Milward's recent book seems to describe these considerations pretty well. Many makers have believed that flaming (and heat treating) is entirely detrimental to the cane, since the "toasting" effect is clearly visible, and since that effect is concentrated on the most critical fibers. It may be so at some point, but I tend to doubt that it's inescapably so. I think that there is some latitude between what is theoretically true and what is practically applicable. Consider the longevity of Paul Young's rods, most of which have been rather heavily flamed. (I mean, as a sort of silly example, it could be argued that all life is in the process of dying from the moment of birth. Yet, most of us are able to squeeze out a few productive years anyway.) In my opinion there is nothing wrong with either flaming or heat treating PROVIDED IT IS DONE GENTLY, and provided the maker realizes that there is a cumulative effect when doing both. When flaming, you want to move the source of heat constantly, and do not allow any charring or bubbling of the enamel. Rather than achieving all the darkening in a single, searing application, go over the cane two or three times, building the color more slowly. If heat treating is also going to be done, I would suggest significantly lower temps for a somewhat longer time. Say, 275 degrees for 20 minutes. In general, if maximum "crispness" of action is the objective, I would rather tinker with the dimensions of a taper than risk ruining a good rod with excessive heat. (Bill Harms)
Flamed a couple of rods. Wonder if anyone has a guess how much time/temp would now be needed for tempering. The color change is about 0.010" thick suggesting that the cane itself was little effected by the flaming. (Don Anderson) I flame to get an intentional mottled "tortoise shell" look in the finished rod. The strips are planed to within .010" oversize (tips), and .020" oversize butts. The enamel surfaces are also scraped. I then heat-treat at approximately 350 degrees F. Because of the temperature variation within the oven I flip the strips end-for-end every 5 minutes. I use two digital thermometer probes to monitor temps. Tips are usually flipped 3 times and butts 4 times. Depending on observed color and "smell" of the cooking bamboo I may leave them in longer. I acknowledge that this isn't very scientific, but when the color looks "right" they are done. (Ted Knott) I guess this just shows the uncertainties of rodmaking. I heat treat using a hot air gun powered oven , a vertical design. It struggles to get to 330 (According to my candy thermometer) degrees and I treat the rough, level planned, strips for 4 minutes and then turn for 3 and a half minutes. Experience has taught me that if I leave them in the oven for a total of 10 minutes they certainly smell different, they are quietly moldering and sending off smoke signals!. I continue to be amazed to read that some people heat treat for 15-20 minutes and do not have charcoal. I guess it is different dynamics producing quite different results and illustrates why there is no one recipe of building rods whether it be in glues, planes binding or heat treating etc. (Ian Kearney) When I flame culms, I use exactly the same heat treating regimen I would if the rod were blonde. Though one study (in The Planing Form???) said that flaming alone is the best of all heat treating regimens, I still remain skeptical. The fact that the color change is only .010" or so deep implies that the rest of the cane still needs whatever benefits are derived from heat treatment. Currently my heat treating regimen is 3 hours at 200 degrees F, followed by 30 minutes at 335 degrees F. For some reason my mica strip forced air oven won't get any hotter than 335 degrees, or I would be using a higher temperature for a shorter time period. (Harry Boyd) Well, it IS a guess, since there's no way to know how much one's flame treatment has already contributed to the "tempering." Your cane may show signs of color change only to .010" depth, but the heat does its work well before a color change becomes visible. So, the positively affected area is probably a good deal deeper than can be seen. I always flame my culms, then cut down later on the heat treating by warming my oven to 280 and leaving the strips in for 20 minutes. I haven't a clue as to the adequacy of this regimen, but I do know that it isn't too much. "Adequacy" probably depends as much upon the nature of the culm itself as upon how I happened to have flamed it -- both of which are bound to vary from culm to culm. So, who knows? Some heat treating is always better than none, while too much can destroy. (Bill Harms) I made my second and third rods from the same culm, which I flamed before splitting. One was heat treated at 350º for 7 minutes. The other was not heat treated beyond flaming, as I hadn't built my oven yet. I used the same taper for both, and as far as the family experts can tell, there is no difference in casting between them (I'm not that good, but my son-in-law is an expert, as is my son). How the untempered rod will hold up in use is a question, but the heat treating didn't seem to make any difference in stiffness etc. (Neil Savage) Since flaming is such a skill and the technique varies due to distance, heat and time I will tell you what I have observed. Taking into account that the culm is fairly dry and the split is about 1/4 wide or so this is the technique Jim Reams showed me and others at the Bishop Gathering. Using a garden torch with the culm placed on the ground supported to keep it a few inches above the ground. The garden torch, which sounds like a jet, is held about 7" above the cane and is passed from end to end with moderate speed. The culm is rotated and the passes from end to end are repeated. This is done over and over until the whole culm has been subjected to the flame and the drying split is now about opened 1". The time elapsed for a 6' culm is 7-8 minutes. There is no burning of the enamel and the color is a light caramel. If highlights are wanted a small torch is used to add them in. This flaming method requires no added heat treatment. If you use a alternate technique try this: Now if the flaming technique is burning the enamel it is like searing a steak "dark on the outside, juicy on the inside". I would then take a strip of the cane and do some breaking test. Place 4-5" pieces of the strip into an oven and cook at 325-350 and remove the strips at different times such as 7 minutes, 10 minutes etc. up to 25 minutes. Make sure to mark them. Then break them, when cool, by placing them in a vise. If it bends and stays that way go to the next trip. The ideal strip will bend and return back to normal. If it snaps and no long cane fibers are present that is to much heat. This is the only way to determine how much heat treatment after flaming is needed. Once you find the best recipe apply it to the rest of the culm. One other thing use digital thermometers $8 BBQ section and calibrate them to boiling water 212 degrees. (Adam Vigil)
I have acquired a flame torch used for weed killing etc. It has a broad nozzle about 2 or 3 inches in diameter and a boost handle which probably gives it a flame thrower effect. Does anyone used one for flaming ? If so could you give some do's and don'ts and about the results. Also do you run it straight from the tank or thru a regulator first. (Jim Tefft) Sounds like the one I got a couple of years ago from Harbor Freight. Works great. You can flame the outside so fast, the inside isn't overheated. I've got some nice dark, almost chocolate dark but only on the surface. Just don't go to slow if you have it on high. (Onis Cogburn)
I'm working on my 3rd rod and have decided to flame the culm. My question is can I soak the strips for pressing an straightening or will this cause a problem? (Mike Maero) Works great. (Jerry Young) Go ahead and flame and do want you like to the nodes before soaking, it won't hurt them at all. (Mike Shay)
I have made only blond rods to this point, and I think I'm ready to flame one or two. I have checked my local welding shops and hardware stores but can't find a torch that will produce a wide enough flame. Where could I order a torch that would give me what I'm looking for? Thanks! (Robert Hicks) I make mostly blond rods too. I had a couple of requests for flamed rods. What I did was take the strips from a culm that I had split out and flamed each strip with a regular propane torch. Worked out just fine. (Tony Spezio) In Ron Barch's classes, we flamed the whole culm section (6' piece) or at least flamed after only splitting it in half. We used a regular propane torch, worked fine, just keep moving it, and don't go TOO dark. Flaming the culm before splitting cuts down a lot on scorched edges. The only down side is that the cylinder gets pretty cold by the end. (Neil Savage) Most hardware stores sell a garden torch. This is what I use to flame culms. I have mine attached to a 50 gallon propane tank. This type of torch is used to burn weeds and to heat metal plates prior to working. The flame is about 4 inches wide I would guess, maybe more. The thing sounds like a burner on a hot air balloon. Hey, I just got an idea! [:)] Cost is around $50. (Jeff Fultz)
I would like to hear some details on mega-flaming the inside of the culm for blonde rods. I tried it on a couple of one piece rods, but it did not seem to impart the same crisp feeling I get when I flame the outside. Having the pith glowing red hot probably stopped me too soon- the outside of the cane felt surprisingly cool even as the pith was exploding in flames. I think this is a great technique and want to try it again, but could use some advice on exactly how you do it. (Jeff Schaeffer) I tried it also and thought it a big mess. I am thinking of doing it again but with a heat gun. (Timothy Troester) I realize this flaming technique sounds scary, the most frequent question is "What if the culm goes up in flames?" Well, it doesn't. When the pith is getting burnt it reaches a point where it seems to actually work as a heat insulator - a glowing red spot under the torch flame and the bamboo doesn't ignite - sort of like trying to light a log by holding a match to it in the middle. The next question I get is "What ever possessed you to even try to do this?". It was a progression of circumstances, I started with regular flaming, then I tried using a heat gun on the inside only to make a blonde rod. When the pith charred from the heat gun and I realized it was acting like a charcoal insulator, I tried a torch since it would be a lot faster, and the charred pith would help to evenly distribute the heat. Start by splitting a culm in half lengthwise and do a half at a time. Essentially you are burning away the volatile parts of the pith and leaving the unburnable parts. Hold the torch flame at about 45 degrees to the length of the culm and start flaming away. If you hold the torch pointing at the culm directly at 90 degrees the torch will go out. It doesn't get enough air. At first you will have a swirl of orange flame around your torch flame. Moving the torch back and forth constantly, flame until the swirl goes away and your torch flame produces only a glowing red spot on the carbonized pith. I think that orange flame swirl is volatile oils being burned off. The key to this flaming process is getting to the point where you get only the glowing red spot at the flame point on the carbonized pith. Move the torch flame around - you are trying to evenly heat the culm. If as you said the outside of the culm remained cool you are not flaming it enough, when I do it the outside of the culm gets very hot - hot enough so that I can only briefly touch a fingertip to the enamel. Sort of like touching a hot clothes iron - maybe not quite that hot, but pretty close. I start in the middle and work my way towards one end, then the other. Make sure the inside is evenly blackened from edge to edge. When you get close to an edge the edge may ignite. I have a little water spray bottle I use to put the flame out. Put a little extra heat on the nodes. They are thicker and will need more. I forgot to mention I use a pair of pliers to break away as much of the internal dam and the lump of pith at the node. Look at the end grain when you get close to it with the torch. You will see bamboo sap foaming and dripping out. When cool, wire brush away the soot. After you split you might notice that there is no more pith left. Not surprising since you just burnt away all of it, but realize that now you are not guessing as to where the pith stops and the good fibers start - all you have left is fibers. Another list member mentioned he tried this and it was too untidy for him. Yes it is a bit sooty. The wire brush gets rid of most of it, and I take a few passes with a bench plane to get rid of the burnt surface before I bring the strips inside to plane. (Darryl Hayashida)
My question is, and I apologize if it sounds stupid, but has anyone ever used a propane or MAP gas torch inside their shop? Other than the pungent smell of burning cane, is it a real danger carbon monoxide wise if I only do one culm? Better safe than sorry, but I got some serious work to do here and there's no way I am going outside! (No, I am not the one behind in the recent thread). (Bob Maulucci) Unless you're single, or SWMBO is out of town for a couple of weeks, I don't think the odor of cooking bamboo in the house would go over too well! I HAVE used a torch inside, but for soldering, not flaming. Do you have a garage you could do it in? The first rodbuilding class I took, we had snow on the ground, and it was pretty cold, but with coats and gloves we flamed everyone's culms outdoors. (Neil Savage) I would consider this to be an extreme fire hazard. Yes, and I find the fumes pretty caustic. Why not look for a friend’s garage, out of the wind, or go by a local warehouse or machine shop and ask a favor. I did this one year and even drew an audience and sold a rod as result. (Timothy Troester) I have done about 50 culms in the garage in my time, just never tried it in the basement before. Guess the consensus is go out there! (Bob Maulucci) Correct me if I'm wrong, but I would have thought that burning propane produced carbon DIOXIDE and water, like most open burned hydrocarbons, and that that was extremely unlikely to do you any harm. (Peter McKean) You are correct. It is only incomplete combustion that causes carbon MONOXIDE. That is why it is necessary to keep all heaters, vented and unvented, clean and adjusted properly. Cars and other equipment with internal combustion engines have incomplete combustion in the combustion chamber, that is why they produce carbon monoxide. I worked for over thirty years in the R&D department of a major heat & air manufacturer and tested designs for many type of heating equipment. To this day I can walk into a building and sense if a piece of heating equipment in burning correctly or not. I have cleaned many unvented heaters for people that I was just visiting. Their senses were dulled by having been exposed to the fumes for so long. I guess that I am sensitized to carbon monoxide as I can feel it. (Dick Fuhrman) Rob Hoffhines flamed a rod in a snow storm and got an absolutely fantastic pattern on it. Who knows what you'll get if you don't try? (Brian Creek) I've flamed cane in the shop several times. Not because of cold, but because of windy conditions. I don't like trying to keep the flaming consistent when there's a stiff breeze blowing. As long as you have an exhaust fan of some sort running, you'll be fine. You will wind up smelling like smoke, but hey, that's the price we pay. (Harry Boyd) I do it in the basement all the time. My wife and kids say the cane makes the house smell good. (Jeff Schaeffer) I always work in the basement and even if I don't flame my cane, I still use the propane torch to heat my high tech heat treating oven. It will be burning for over 1/2 hour. And besides what is wrong with the smell of cooking cane. I love it and I too think it perfumes the house with a delightful smell. (Ralph Moon) My shed is 20'x20' and is heated by an unvented propane heater and I've had no problems as yet. I don't think a propane torch would asphyxiate you no longer than it would take to flame a culm. Might 'smoke you out though.' (Don Greife) I've flamed somewhere in the neighborhood of fifty rods worth of bamboo (call it forty culms) with a propane torch inside my 12'x16' shop, winter and summer. Most of them have been turned in my lathe while flaming them, no fires and no health problems that I know of, your mileage may vary, proceed at your own risk. (John Channer) To each his own but I have no open flames in my shop. Maybe I am subject to more lapses and spasms than most but I have been on fire before when I sit on a candle. Oops! I never realized before how often I sit down without looking first. (Timothy Troester) In a pinch I have flamed in my basement shop. Took a lot of grief from those smelling it upstairs but did not set off the smoke alarms (maybe I had better check those). I do have a small exhaust fan running in the basement shop so I could still breath. (Gordon Koppin) When propane is burned, carbon monoxide is not one of the byproducts. I can't say the same for MAPP gas, since I don't know what other fuel is included in it. The biggest worry you have with a propane flame is it's consuming of oxygen. That's why the area you use propane heaters in should always have adequate ventilation. Propane is not a noxious gas like natural gas, and it burns very clean. Crack a window or shop door a little bit, and you should be all right. (Mark Wendt) The primary concern that I would have about flaming cane indoors is the safety of having the propane tank indoors. When I lived in Alaska I knew a guy who was severely burned because he brought his propane take inside to keep it from freezing (propane freezes at around -40F). During the night the regulator let loose some propane, it ignited and his whole cabin went up in flames. I've been told since that regulators are made to be used outdoors and it isn't unusual for them to release propane. (Mark Lenarz) I don't think a hand held torch is such a problem, just unscrew the torch from the tank (the 16 oz. or so size you get in the hardware) and listen/sniff after a minute. I wouldn't try it with a 20# tank and hose setup. The little cylinders let off a bit of gas when you unscrew the torch, but it should seal almost instantly. You could also dip the end in water and look for bubbles if you've got a stuffy nose. (Neil Savage) On portable tanks, like the ones you use for a grill or a torch, the easiest way to avoid this, not that I'm sure it happens, is to close the valve on the tank, which should be done anyway when the tank is not in use. (Mark Wendt) What in the heck are you guys doing that generates so much smoke, vapor, or noxious emissions? I now am convinced that I am not heating my cane enough... Alternatively, I have the largest workshop on the list (doubtful) or the draftiest basement (distinct possibility). (Jeff Schaeffer) I do it all the time, but I do it in my bathroom as there is an exhaust fan and no burnable surfaces. Not a problem in the least and the smell of burning cane is, to my nose, a pleasant one. (Joe West) Well, being in the mechanical contracting business I can tell you that flaming cane with MAPP gas, propane, or acetylene in a semi closed environment is probably no worse than soldering copper pipe, especially since solder flux gives off nasty zinc chloride fumes. After 27 years of soldering pipe I can still breathe a little! The gas itself burns pretty clean, and as yet OSHA has not required us to wear respirators even in close quarters. The smell/toxicity of the burning cane though, that's another story. Cough, cough... (Tom Vagell)
I was wonder what the output is on some of the torches folks use for flaming. ~100,000 BTU? Do folks use a displacement nozzle? (Jim Lowe) I use the ordinary propane torch found in all hardware stores, usually used for soldering copper pipe. (Darryl Hayashida)
When flaming a rod and NOT intending to heat treat in an oven later, is it necessary to see steam come out the ends in order to be thoroughly heat treated? I live in dry Colorado and the cane I am using has been in this climate for at least 2 years - will this affect the amount (lack thereof) of steam/juicing out of the ends? I've sanded a part of the cane and it's a light caramel color under the enamel which I desired for these 2 rods. Good enough? Used a Bernz-o-matic TS4000 torch. (Aaron Dimig) This is just my opinion, but I think that if you do not see anything boil out you have not heated it adequately. This is based on observation- when I saw liquid the finished rod stayed straight, when I didn't the rod took a soft set. Of course, I live in humid SE Michigan, but I do most of my flaming in a basement with rather low humidity during the winter and a dehumidifier in summer. I could imagine a situation where the cane would be dry enough not to steam, but the stuff picks up moisture like a sponge. I would expect something to boil out. Although I am getting infamous for applying too much heat to a variety of things (and situations). By the way, I also agree that if you flame it hard enough to make the moisture boil, you do not need any further heat treatment. (Jeff Schaeffer)
Thanks to the motivating influence of Harry Boyd, Dave Norling and a new rodmaker, Juan Castro, I have picked up the bamboo again. The problem is that I took a section of Bamboo and tried to flame it. My mistake was to use a propane tank with to little gas and for a nozzle I used a garden flame weed killer (I know, I should have read the Tips page). The flame out of the nozzle was weak and gave off lots of black smoke. As you might expect the Bamboo is now layered with soot that will not wipe off. This is a grade B culm so there are numerous imperfections. Is the only solution to plane off the enamel? (Randy Tuttle) Heck no. Just use a hotter flame on the same culm. You will nuke the layer you just put on, and it may heat up faster due to the now darker color. (Brian Creek) If you don't want to "nuke" it you can try some 220 grit sandpaper. I run some 220 grit sandpaper over all my flamed culms after flaming to remove the black burned enamel and wipe down with an old cloth. This keeps most of the black dust out of my shop. (Dennis Higham) That should come off when you eventually sand off the enamel anyway. (Jerry Madigan)
Since I've just glued the ferrules onto rod number three, I figured it was the perfect time to file down the nodes on the culm for the next rods. Having just dressed the nodes, I began to wonder if I can still flame the cane. My intent was to fully flame the culm, not just tiger-striping; but with the enamel removed from the nodes am I risking serious damage to the power fibers? My other question is that I was finally able to take out the second rod I made for some stream time this past weekend. I committed the grave sin of slightly overlapping the male ferrule. While the rod doesn't fly apart, it creeps apart and needs to be pushed back every so often. Is there any way to tighten the fit? I seem to recall something about gently pounding the female ferrule between two lumps of soft lead. I hope not to screw up rod number 3 too much. It's a 3-piece 6'0" 4-weight that I'll be taking to Japan during the summer. I've been in touch with a couple of Japanese rodmakers and hope to get together with them. If anyone has any advice about fishing in Japan, or people to contact, I'd appreciate that, too. While this will be my fourth time there, I didn't have the time to explore the fishing possibilities before. (Rob Foster) Gently squeeze the male between the jaws of a four jaw lathe, you might wish to practice on a rod you don't like. Ideally, someone else’s rod you don't like! (Robin Haywood) Although I strongly believe that heating the nodal area causes severe structural weakening, I have flamed a culm after filing the nodes down for an even dark color along the length of the entire strip. If you choose to do this, I suggest using a spiral staggers for node placement. Nodes are rather peculiar, they are the strongest part of the bamboo until heated, then they become the weakest. Many people might suggest squeezing or swaging the ferrule but this will only cause the ferrule to be out of round. The only real solution short of replacing the male is to nickel plate the male slide and re-lap. If you don't have the capability, I can do his for you. (Jeff Fultz) You can do it either way. Filing the nodal ridge (just the ridge) first then flaming will give you a dark tone. Or, you can flame first, then treat the nodes. Since most nodes require at least some sanding, they show up as golden on dark background. I like that look, and flame before I do anything else to the culm. The discussion about how to deal with nodes has been the topic of hundreds of posts: I file just the nodal ridge, then displace the node using heat and Brian Smith's node press. If you don't have a node press, file a shallow arc in the pith and use a standard vise with smooth jaws. That way you are displacing material and not crushing. If anything is left after that, I may repress, file it gently or just take off a bit with a plane when I remove the enamel. Depends on my mood mostly. I did one rod by just planing off the nodes. It broke during sanding, right at the first node group down from the tip. It was a 3x3 spacing. Since then, I try to remove as little material as possible. Too much information .... (Jeff Schaeffer) I have corrected the problem of slightly loose female ferrules by using the ferrule puller sold by Golden Witch as a sort of pliers to gently compress the female ferrule until it was tight once again. Works for slightly loose ones real well. You can easily make one by drilling a series of small holes in a piece of 1 by 2 and then sawing down the center of the holes. Start with small size 3/16 and progress to 5/164. attach a strip of leather to the end to act as a hinge and round the other ends as handles. (Saunder Hutchinson)
Is it possible to include the steps of flaming, soaking, and heat treating all in the same rod making process? Seems that all three can provide useful benefits to the finished product. The problem I have is that I am not sure if these three processes are compatible with one another. Does soaking somehow diminish the effects of flaming? Do you need to heat treat before soaking? Will heat treatment after soaking/pressing cause the nodes to pop back out? Thanks for any advice you can offer before I start on this first rod. (Kyle Druey) I've used this procedure on quite a few rods, with no apparent problems. After the culm was split into its approximate halves, the nodes filed/sanded somewhat, I grind out the inner dams with a 90° angle die grinder and a 1" drum with 36 grit sanding sleeve. I then flame first the outside, then the inside of the culm half. I split into strips, then soak the strips for 3 days minimum, afterwards working the nodes. Then its on to the rough beveler, bind, then heat treat. Whether the nodes pop back after heat treating is dependent upon how good a job was done on the nodes in the first place. (Martin-Darrell) I do all three on each rod I produce.
I have not have had a problem with nodes re-bending; nor have I had a rod take a set (even though several of the trout rods have caught native Deschutes river steelhead - and landed them). Try everything until you find the methods that suit you best. (Chris Obuchowski)
Hello All, I am almost tooled up and ready to go. I have everything but the final steel forms (kind of a big thing to be missing). Anyway, a few Questions: 1. Flaming. I have a new heat gun, but do not have a torch to flame, and I want to make a caramel colored rod. Can I use the head gun, cranked-up hot, to color the cane? I am thinking simply "flaming" with the heat gun. Possible? Stupid? 2. Planing Forms. As a newbie with limited amount to spend, I am looking at the forms from Blauvelt, Bootstrap and a third maker, whose name I cannot recall right now - basically same price as the other two. Will any of the three work? Is one better than the others? I have seen discussions of bootstrap v. blauvelt. Any comments on the third mystery form maker? And, what the heck, anyone selling a planing form? 3. I have a 6" digital caliper, accurate to 0.001. Do I also need a micrometer? What will a mic do that the calipers won't? (David Steinberger) Never tried it but I suspect that you could flame the cane enough to change the color. Problems I forsee when doing it this way is that it would take too long and you may heat the cane too much. Remember, you are trying to burn through the enamel surface. An adequate torch won't cost more than $20 at Home Depot or similar store. You can quickly scorch the enamel away without over heating the cane. I have the Blauvelt forms and can assure you they are better than necessary for a beginning rodmaker. I am sure that paying twice as much will get you better forms, but I am not sure twice as good. No experience with the other lesser cost forms. Your digital micrometer is perfectly adequate. Probably what 95% of all builders use for the task. (Steve Shelton) I use my barbecue and flame the cane on hot charcoal. Stay with it and turn it, as if it were a steak and you're all right. (Geert Poorteman)
Has anybody had experience heat treating using Darryl’s method of torching the pith side of the culm. And if so. How did it affect the planning process. Did it dull the blade prematurely? (Ren Monllor) I flamed the inside of my first 3 rods and have done it on a few since with good results. I found that I had to sharpen a tad more than usual, but it wasn't that much different. The only real difference is that you are roughing and finish planing heat treated strips. My nodes planed a bit easier with less tear out, but I think that was more my lack of technique and experience than the heat treatment. I also soaked the flamed strips and just let them air dry after they were roughed, and this may have cut down on the blade wear. I think it is definitely worth exploring. (Don Peet) I’ve used it on 5 rods, and baked 2 in an oven. No difference in planning or performance that I could tell. I belt sand of the charred portion and use a bench plane to get the bulk of the material off, before switching to the block plane. I like Sir Darryl’s method. I think it makes splitting easier & the pith seems to act as an insulator protecting the cane from over baking. I like the feel of it too, lets me remind the culm who’s boss early on in the process. (Jon Babulic) Yes you have to sharpen up more for sure. But it’s an OK way to go if you have not got a oven. (Gary Nicholson) John Long (one of my mentors) says you don't need to heat treat if you flame. I made 2 rods from the same culm, flamed the whole culm at one time, but only heat treated one. I'm no expert caster, but they cast the same for everyone who has tried them, and no sets in either after 5 years. (Neil Savage) That's probably true. Paul Young made thousands of rods in his career using the "ring of fire" to flame them, with no mention of subsequent oven tempering, and his rods have held up well to this day. (Chris Obuchowski) Oops, hit send too quickly. Daryl Whitehead and the guys at Bellinger Rods flame only too. (Chris Obuchowski) You can download one of the best articles on heat treating and it's effects called Bamboo in the Laboratory by Wolfram Schott from the Power Fibers site (here). It may change the way you look at heat treating. I know it did for me. (Ken Paterson) Excellent article. Thank you for leading me there. (Ren Monllor) In his interview with Joe Beelart for Oregon Bamboo, A J Thramer said that it's not necessary to heat treat in an oven if the culm has been flamed. He stated "either or." When a person with very near 2000 rods made speaks, I listen. (Will Price)
I have some strips 3/16 and 1/4 in. I originally thought I was going to make a blonde rod but having just finished one I am now thinking it would be nice to make a flamed rod. So I am wondering if it is OK to just flame the strips or is that not a good idea. I didn’t want to try it without some input. (Rick Barbato) You flaming the strips with the hot air pistol, you have a very beautiful result. (Alberto Poratelli) That could work. Be careful about charring the edges though. I'm pretty sure you can't do it with a torch, you'd burn the edges too much. (Neil Savage) I've never had any luck flaming with heat guns. Flaming 3/16 strips with a torch usually results in charcoal. Your best bet would be to save these strips for another blond rod and flame another culm. (Tom Kurtis) If you are only looking for a different look than your previously made blonde rod and you only have strips, you could go ahead and make the blonde blank and then browntone it. (Greg Reeves) I use a small butane fueled micro-jet (think cigarette lighter cartridge). Trade name Solder-it. Got it at Lowes. It's hot enough to do quick flaming but doesn't have the energy of a propane torch or heat gun. I cautiously use it to touch up lighter areas on flamed rods to achieve desired color. (Lee Koeser) I wouldn't take a chance on flaming strips that small. But if you want to build a darker rod it would be very easy to ammonia tone the strips or go ahead and build the blank and then browntone using a product like Jeff Fultz Browntoner (no financial interest etc., etc.). Wouldn't have the mottled effect that flaming gives but I think you would pleased with the outcome. I much prefer a flamed or browntone rod over a blond rod, of course that's just my personal preference. (Will Price) I can't speak to the success of this from firsthand experience, but Darryl (the "Sir D" Darryl) I believe it was, once showed a picture and described flaming individual strips one at a time by setting a cement block on top of them, and they were sitting on a cement drive, and flamed single strips without burning the edges by having their edges thus 'protected' top and bottom from excessive overheating. It may be somewhere way back in the archives if you can find it. (Ralph MacKenzie) Maybe place the strips in sand with just the enamel on show would also work. (Gary Nicholson) Darryl flamed from the inside out, burned the pith out. (Pete Van Schaack)
I'm starting to think about the next bit of cane that I'm going to start working on. I've made blonde and flamed rods, so I'm looking for something a wee bit different. I know of the "banded" flaming technique (for lack of a better term), but I'm not sure how close to do the flaming. There have to be other interesting methods as well. Does anyone have some input??? (Todd Talsma) I once saw one of Rob Hoffhines that was flamed in a spiral pattern. Cool looking effect. (Rich Jezioro) It's easy. Flame the thing, then go back over and blacken parts of it by going over it again. How close? Enough to blacken it. Touch the tip of the flame to the cane. Make the black streaks narrow and diagonal, and put in some splotches of black. Go different directions- Google German WWII fighter aircraft and look at the mottled camo they had. That is about the best way to describe it. Or, think of it as a tortoise shell. Remember, this will all be staggered so it will end up being very random. I am sure that you could do a pattern that would end up with a spiral look after staggering, but I am not sure how to that. Probably you would do parallel bands of black like a caterpillar. Anyway, that's the way I do it. (Jeff Schaeffer) Check with Marcelo Calviello on Sante's board. He does that tiger striping quite often on his rods. (Mark Wendt) A long time ago I saw a rod that had a flamed sort of fish net or spider web design of very fine, meticulous lines that was incredible - but I can't remember who or when and the process was top secret. I sure would like to know more about that. Anybody remember what I'm talking about? (Darrol Groth) Heh, long before the process was 'top secret', Rob Hoffhines brought one to Grayrock to show us. Of course, Rob brought a lot of things to Grayrock to show us, what a talent! (Larry Blan) Look towards the shores of Italy, those guys had some super beautiful flame work at the New Jersey Show. (Ren Monllor) A number of the Italian rods as well as rods by other European makers are flamed in intricate patterns by using a heat gun on bound strips prior to gluing. The parts of the strips covered by the binding thread (cotton or hemp) remain light while the areas in between can become as dark as desired. I have been warned not to try such "flaming" with a torch because the binding thread goes up in flame. Presumably, a concentrating nozzle for the heat gun would be useful and the heat gun would need to provide a high enough temperature. (Tim Anderson) Reading this I thought about a friend of mine telling me that he had heard of someone flaming a culm in a snow storm. Don't know if this would work and to what extent. Then I thought back to a former life as an auto body repairman, (remember I'm really old) when I learned the trade you learned to do combination paint and body. I remember some of the custom paint jobs and how they were done. In particular I remember lacing! The way this was done was to use a lace cloth placed on the panels then painted over with lacquer the lace was then taken off while the paint was still somewhat soft leaving the pattern, it was then buried with clear coat, the result was a real cool lace pattern. So what I think you need to do is cover the culm with a wet cloth (fishnet?) and then flame over the whole mess, the result would be a darkened culm with lighter pattern where the wet cloth masked off the flame. I'm good! :>) If someone tries this let me know how you come out, I'm sure it will work. (Joe Arguello) If you could rig a motor, slow turning like a rod wrap dryer, and slowly turn the bamboo giving the bamboo an over-all even flame, the color of light tan, them come back and darken areas in any pattern you like. I once flamed a rod in a barber poll pattern. The results were OK. I've wrapped foil around the bamboo and tried a preconceived pattern. Results were bad. I once tried brown shoe dye and flaming and that was not good at all. It's fun messing with the attempts and if you get it right please share your method. (Mark Dyba) Todd, Marco Giardina does it, maybe he will chime in. (Neil Savage) The procedure is simple. I made a staggering of the strips with the 2x2x2 method. I made circular bands flamed large 3" with an interband of 2". Dark flaming like the monks robe. After splitting and staggering, you have a spiral effect in the blank. (Marco Giardina)
I am finishing up my first couple of flamed rods and while I like the look of them, I would like to try and get a more even coloring of my strips. I tend to have spots on the flats that are darker than others which I am guessing is because I had more heat to that section with my torch. I use the same torch as recommended in the Cattenach book. It puts off a somewhat small flame as opposed to the gigantic roar of a flame from a weed killer type of torch. Do I need to get a different torch? I have seen pictures of people’s rods that look like they have been stained because the color looks so even. How do I achieve this look without browntoning a blond blank? I would like to be able to get a different range of colors from Honey to Chocolate so to speak. Right now I just get a dark somewhat mottled look. (Greg Reeves) I had the same issue with mottled blanks. I tried several torches to no avail. The best I have found is the weed burner, the trick is to hold it close to the cane, maybe 1 to 2 inches. Because of the width of the flame it is easy to see what tone you are producing on the cane. Oh, and go lengthwise rather than circular. (Jerry Foster) If you need a even color just stain it. (Gary Nicholson) What I have found is that you need to find a culm that is pretty straight, file or grind off the nodes then flame the culm that you have split in half. The mottled look comes from having high (nodes) areas which need to be further sanded down and get lighter, to low spots (areas next to nodes) which come out darker because they don't get sanded as much when you remove the rind. Flame length wise and at the same speed. Hope this makes sense and helps. Now the best way to get an even color is to ammonia tone the strips, but that's a different issue. (Joe Arguello) I think that is the first time I have heard the words 'small' and 'flame' used in the same sentence when describing Wayne's torch. (Larry Blan) With the Bernzomatic TS 4000 that Wayne recommends in his book, you can get a nice, even flamed color. You can vary that color from barely darker than blonde to charcoal black. I hate to say this, but with experience you learn how far away from the cane to hold the torch, and how quickly to move it. I use that torch. I start at one side of the check split, and make a pass, rotate; make a pass, rotate; until I reach the other side of the check split. I work from one end all the way to an inch past the first node, then turn about 1.25", and make another pass, trying to keep the darker areas touching each other. The torch's flame is never quite perpendicular to the surface of the bamboo, but angled toward where it's going so that the heat warms what I am about to flame. To get a very slightly darker than blonde coloration I first warm the culm by quickly running the flame up and down a few times from 4-5 inches away. Then I hold the torch about 1.5" from the culm, and move it about 3 inches per second.
To get a little darker color, I move a little slower.
Even darker, I move more slowly yet...
Getting this dark without charring can be tricky...
What it comes down to is practice. Save the cutoff ends of your sections and use some of them for flaming practice. All my students practice flaming to light, medium, dark, and ruined. One more thing... I never trust flaming alone for heat treating. I always heat treat till the pith just barely, almost imperceptibly, changes to one shade darker. That takes less time for darkly flamed than for blonde rods. (Harry Boyd) For the most part, you’ll see that many like the mottled look. In Ray Gould’s book Cane Rods Tips and Tapers he goes into some rather cool ways to achieve exactly what you want. At the show in New Jersey, I met an excellent rod maker who had a variety of beautiful tones on his rods and he explained that he used Ammonia and heat. Gould explains this in his book quite thoroughly. I’m going to take a serious look at this as I’ve seen the results and they are absolutely beautiful. (Ren Monllor) Hal Bacon turned me on to the easiest way to flame cane I've found yet. It requires a lathe and a couple of homemade cones (wood works) with a shaft you can chuck in the lathe on one end and pass thru a hole in a stand at the other. The cone needs to be made so it fits tightly into the ends of your culms. I found I had to drill a small hole in the headstock end of the culm and screw it to the cone or the heat from the torch will make your check split expand and the culm to come loose. Arrange the stand end so the culm turns as straight as you can get it, turn the lathe on slow and start at one end and work your way to the other. With practice you can run the flame in a close spiral up the culm for an even tone or space it further apart for a more mottled look. By playing with the size of the flame, the speed of the lathe and the distance you hold the torch from the culm you can come up with most any shade you want, all without killing your wrist holding and turning a culm. If this helps anyone, thank Hal, it was his idea. (John Channer) Yeah, it's tricky to get a even med-dark flame. After a certain tipping point, the color of the enamel is just black, and you can't tell what is going on beneath. I had pleasant results with my first ultra-light flame job, and I went back to taking a wormy-butted junk culm, cutting it into sections at the nodes and practicing/comparing. I also filed the nodes-something I usually don't do as I like the nodes in gold. Anyway, I was surprised I was able to learn something, and (so far) the rod is really looking good with the string and glue off. Nice to make something that looks different! I've always wanted to get Payne's color, he must have used some ammonia or staining. It has more peach than brown tones, so I'm pretty sure it's not propane or MAPP flaming. (Rob Hoffhines) I played around with a culm last night. We made a campfire in the back yard and I thought I'd give flaming over an open flame a shot. I haven't done anything to the culm other than the open flaming yet, but so far, it looks fairly good. It just took a little while to get the culm warmed up over the fire. It was a nice way to do some bamboo work while spending time with the family! (Todd Talsma) I've found the flaming thread very interesting. Seems like a lot of work though to get a different tone to a rod. I've never flamed bamboo and probably never will. It's not that I don't appreciate a different tone on a rod, I do, but I question getting there by subjecting the bamboo to more heat than heat treating. After the magic of heat treating more heat doesn't enhance the structural integrity of the bamboo, if anything it starts a degeneration process and if carried to extreme ends up as a brittle rod or charcoal. To me, it's easier and less detrimental to the bamboo to use stain or dye for a different look. With today’s products you can get any tone or color you want. If you get to dark, you can take it off. If you flame and get it to dark, well, you're stuck with it or start over. Why torture yourself and the bamboo? Anyone agree or disagree? (Don Schneider) I agree, why subject a fishing tool to a process that may hurt it as a tool when a safer process is available. (Joseph Freeman) Adjusting the heat treating after flaming is part of the process. What you get from flaming is a color and a pattern(or lack of a pattern) that you just can't achieve any other way. All the stains, dyes and chemicals I've seen used to color bamboo just don't give the same look, they all come out looking blotchy and muddy, like staining pine or poplar without conditioning first. (John Channer) In my case the flaming serves 2 purposes. It gives me the color I prefer my finished rods to have and MOST importantly it Is my heat treating. I don't have an oven. If I ever want to build a blond rod (which I don't foresee happening but it could) I'll just flame the pith side using the method shared with us by the late Darryl Hayashida. Improper flaming may be detrimental to the bamboo BUT no more so than improper heat treating in an oven. It seems that every time this subject comes up, everyone forgets the fact that many "icons" of the past used flaming and their rods are in high demand today with probably the most notable being Paul Young! 'Nuff said! (Will Price) When I build a rod, I flame as a cosmetic procedure, primarily, but also as a partial heat treatment. I work from the center out to the ends of the culm or half culm, and it is quite amazing how much liquid is pouring out the ends by the time I am finished. I use a fairly big burner on my gas torch, and with a little care it is possible to get as even a finish as you want. I do happen to have a fan forced oven, so I do use it, but reduce the time in the oven to about 50% of what I would estimate for full oven treatment. Obviously, blonde rods get the full oven treatment. I am one of those heretics who sees no bar to scraping/planing the enamel surface to planar flatness. In fact, I fail to see how the strip can possibly be made to sit accurately in the form if the whole 3 surfaces, including the outer surface and its nodal vestiges, do not sit flat and true, and I think that can only be achieved by gentle, controlled shallow planing. If you leave this correction as late in the process as possible, so that you are flattening out the smallest possible arc, you should remove very little other than charred rind and a minimum of outer power fibers. The cosmetic effect resulting from this barbaric perversion is very pleasing indeed, and I do agree with John Channer that it cannot really be matched by staining and dyeing of the outer fibers. The proof of the pudding, as they say, is in the eating, and in well ovr 100 rods I cannot determine any inferiority in those rods treated as described when compared with those earlier rods which were handled more traditionally; and neither do I see any "name" rods which have not been flattened on the enamel side. Hope this helps somebody. Thanks to those of you who wished me well after my stroke - it appears to have been fairly minor, and I am doing pretty well, though perhaps regaining full function a bit slower than I would like. Ain't that the way of it? (Peter McKean) I always barbecue my cane. I fry it over an open charcoal fire and then split it to make nodeless. It gives an uneven color, which I now actively seek, so I have rods in tones from almost straw color to almost pitch black. If you heat too long, not only does the cane start burning, which is obvious, but the binding between the fibers also disappears, and they break easily. So almost black is good black is a little too much. (Geert Poorteman)
Here's a question a newbie posed on one of the forums... Do you knock down the nodes before flaming to get a darker, more consistent tone on the 'boo? I've never done that, and I like the variance in colors when you don't knock them down... but does anyone have experience with doing it that way? (Mike St. Clair) I always file down the nodes after splitting the culm in half I then flame to get that even color. Works great, you just have to remember to keep the torch moving at a consistent speed and ignore the node areas when you go past them. You can get a very even color doing it this way. After the entire culm is flamed I then split the culm. That's how I do it, doesn't make it right or wrong for that matter. (Joe Arguello) My culm will have one drying split down it's length and I flame after I file each black nodal ring off. Keeping the culm intact helps me rotate it smoothly on my saw horses for hand filing. After an even color flaming and then splitting into strips, I end up filing the node a second time just prior to rough planing. This helps to flatten and seat the strip in the form and the node color will go back to light. So even with flaming, my nodes end up as a light contract to the darker bamboo. (Doug Alexander) I know I do. (Ren Monllor)
I have just found a compelling reason for flame coloring cane. No, it is not to adjust the 'chemistry' or 'structure' of the cane it is not even aesthetics. I have discovered that blond cane produces splinters that are exactly the color of my flesh ouch! (George Wood)
I have done some searching but don't seem to be able to find a tutorial on flaming patterns. I know I can do a random pattern, tiger stripes, and an overall blackening but is there somewhere I can go to see some unique, or at least some good looking samples of flamed cane before and after it is processed into a rod? (Dick Steinbach) No pics here, but........if you want to experiment, here is some food for thought. Back in a land far, far away and in a different time I used to be an Auto body repairman. We used to use different cloth lace material, which we would wet and drape on a panel we wanted to create that type of pattern on, (called lacing) you would then spray lacquer over this and it would mask the panel creating an interesting lace pattern. You could do just that, or maybe use some type of wire screen to lay over the culm thus masking the flame. This will give you a good amount of control of what type of pattern you may want to create. I even heard of someone (can't remember who) who flamed a culm in a snow storm to get a unique pattern. Hope this gives you some ideas, take it from there. And as always we want to see pics of the results! (Joe Arguello) The guy flaming in a snowstorm was Rob Hoffhines. Made a very pretty speckled flaming pattern. (Dennis Higham) I think that was also in Wayne's book. I've played with a mist spray bottle and hit the drops of water with the MAPP gas turbo torch. (David Dziadosz) Check out the Italian Rodmakers site. They have flamed rod sections still in the string to produce a different kind of effect. (Scott Grady) If you like to see a possible technique to have a regular flaming pattern. After the flaming, if you use a 2x2x2 staggering and the right proportions between the staggering distance and the size of flaming, you have a spiral effect flaming pattern. (Marco Giardina)
Need some assistance here. I have a customer that would like a zebra stripe effect on a blank. He sent me some pictures and the flamed stripes go around the entire circumference of the blank. Not staggered as is the case with flaming the culm. I can flame culms but, have never flamed a glued up blank. Thinking some heat from a alcohol burner may lightly flame the blank without affecting the glue. The stripe doesn't need to be black, just a darker shade. Any suggestions on a technique would be much appreciated. (Pete Emmel) Here is a suggestion but not something I've tried. Jeff Fultz used to sell a cane browntoner that you could you use to dye the blank rather than flaming. I guess you could spiral wrap 1/8" or 1/4" masking tape or painters tape (if available in 1/8" or 1/4") around the blank from butt to tip and apply the browntoner, wipe any excess dry and then carefully remove the tape. The amount of darkness could be controlled and even sanded to provide a lighter banding. In fact you may have to do some sanding to prevent the appearance of sharp bands from the dye. (Bob Williams) Could also eliminate sharp bands by wrapping with rope, cord and or thread. (Grayson Davis) I have seen very interesting results attained using a heat gun on a glued up blank. (Tim Anderson) Stagger the strips, then tone with a torch or heat gun. Make sure the strips are sufficiently oversized to allow for charring on the edges. Then plane and glue. (Chris Obuchowski) Brown tone would be the way to go IMHO. However, it will only penetrate the surface with a very fine layer. I personally would not apply it until you are ready to wrap, and the you must be careful to not scratch the surface with the guides. (Jon Holland) If you haven't sanded the enamel off yet then you don't really know what you have. Split the culm in half, split a strip off the edge of one of the halves and sand the enamel off before you make any decisions, you might find it's not as ugly as you think it is. (John Channer) I wrapped plain masking tape around some strips that I was trying to straighten in an oven and the part that was exposed to the air turned slightly brown while the area under the tape did not change. The tape was three or four layers thick. It might work with your stripping problem. (Joe Redburn)
I saw a pretty neat spiral flamed rod many years ago. I wish I could remember who to credit with the idea. What he had done was to spiral a length of cannon fuze up the blank, then counter wound it with close turns of copper wire to hold it close to the blank. The fuze is then lit, and burns it's way up the blank. I think I would try it first on a scrap section... Definite potential for a Nunley award. (Tom Smithwick) Somewhere -- and I can't seem to lay my hands on it right now -- I came across pictures of a spiral flamed rod where the already glued up blonde blank was simply flamed using a small butane torch, turning it, I assume, as you move up or down for the spiral effect. This would not, of course, give anything like razor sharp lines, if that's what you want. Wherever I did come across it, I was keeping this in the back of my mind (dangerous territory!), since it seemed like a good plan for nodeless blanks. Heat temper in the oven, plane, glue, bind, then spiral a bit with the butane torch -- not going deep -- for effect. Sand off the enamel after. That way, too, I wouldn't have to worry about trying to match up the color on scarfs on an already torched rod. Until I get better at more evenly torching the culm, I find that bit can be tricky and I'd like to find a way of working around it. (Bob Brockett) I think it was on a web site of one of the Italian rodmakers - I seem to think in the fall last year. I am sure I bookmarked the link at home. I will check when I get home. (Greg Dawson) The IBRA article showed a section flamed when the glue binding thread is still attached. Maybe one of our European brothers will confirm. (Scott Grady) The flaming technique that you have seen in a IBRA article it is not made on a section when the glue binding thread is still attached, but on the triangular untapered strips bound by the binding thread made after the passage in a beveler. The flaming is made by a hot air torch - very slow and boring operation - to create a fuzzy flaming effect. (Marco Giardina) The first step is to create the circular flamed and the second with the staggering to have the "spiral" effect. The tutorial is only in the Italian web page, but, you know, it is better one picture than 100 words! (Marco Giardina) It was indeed your web page I was thinking of. Took a while to dig it out of my "favorites" tonight and then I read my email. Should have been the other way round. (Greg Dawson) If your customer wants the flamed stripes go around the entire circumference of the blank without the spiral effect, the simplest system is to prepare the strips like usual, made the staggering, then put the strips on a flat surface with the enamel up and then flame the strips. (Marco Giardina) When the customer sent me pictures and I recognized your work, I knew I was in trouble. I told him he was putting me under pressure to try and make a blank as nice as yours are. This is an interesting project: I am building the customer an 11' 4 piece blank. He is going to finish the rod as a float rod. He will use a center pin reel. (Pete Emmel) Using Fuse wire is a neat idea. As for flaming a glued-up blank, in my experience it takes a VERY deft touch to apply the heat enough to color without burning the corners. Better to split your culm in 2 halves, lay it out for staggering, and then flame the 2 halves side-by-side. This avoids the problem of burning the corners of staggered split strips as Chris suggested. You have to be pretty exact and consistent doing this for the dark spots to line up perfectly, though. Here's a link to a hex bamboo reel seat I flamed after glue-up. You can see that even applying flame lightly and on a large bamboo section (more mass to absorb the heat), I still burned the corners a little more than in the center of the flats. It's hard to avoid and once you've done it, it's too late.
I haven't yet succeeded in flaming a glued-up blank (particularly the thin tip sections) without burning it up, (although I know some guys have, somehow...) (Lee Koch) Burnt corners or not, that is an attractive seat. I didn't think of the problem with the corners. Only makes sense that would happen, since you're stopping/pausing at each flat and the joints would naturally get a bit more time under the flame. Can't think of a way around that....oh well. Still, looks good to me! Thanks! (Bob Brockett) I heard somewhere that some Kentucky rifle stocks were made of simulated tiger maple which was made by wrapping a kerosene soaked rope around the wood and setting it on fire.. There would be a definite potential for a posthumous Nunley if the rifle were loaded. I understand that some people could pass these stocks off as tiger maple pretty easily. I don't see why this wouldn't work with cane. You could vary the size of the rope all the way down to heavy string and the timing could be worked out for either blanks or culms. (Doug Easton) Actually Doug this was not done to the gun stocks but to the ram rods. This came in vogue about the middle of the 19th century in some regions where guns were built. No one knows where or when this originated. This was most often seen on half-stock percussion rifles & would have been definitely out of place on on a carved & decorated rifle such as was produced in The Golden Age of rifle building. I have been building muzzle loaders since the 70s & I have seen many original guns since then & I have only run into this on one rifle several years ago. (Bret Reiter)
I'm about to commence rod number six and want a rich dark flamed finish this time. I started to flame number five but chickened out and it finished up only lightly done. So my question is how much is too much? How do you tell when it's time to stop? Even though the bamboo is the cheapest part I'd rather not set it on fire. I've read Mr. Cattanach's advice and got a torch with a wide flame but after that I'm at a loss. Thanks for any advice. (Simon Reilly) Check out Harry Boyd's write up on building bamboo fly rods. It’s what I followed the first time I flamed some bamboo. The major thing I did different than Harry suggested was to use a brass bristle brush to clean off the soot and ash afterward instead of sandpaper. For me practice may not have made it perfect but it was a really big help. I got a $3 bamboo pole from a garden supply store and practiced on that first. It was a good confidence builder before starting on the real stuff. (Joe Hudock) I have a rather uncomplicated approach to things and this is what I do. I light the barbecue until it is burning well. You need a wide bed of flames. And then I grill the culm. Turn it around a little every now and then, so it doesn't burn. I like different shades of brown on my rods, and go even to almost black. The smell tells you when its OK, and the color. You want a nutty smell, and a brown to dark brown color. When you reach the end of the culm, you'll see sap oozing out, of the cut end. It may foam and bubble. This is normal. I then split and do the rest. It is best to stay with your culm in your hand. It will of course burn eventually, as it did on my barbie several times, when I turned my back to it. (Geert Poorteman) I've actually flamed a culm over a campfire in the back yard. Let the fire burn down mostly so that you have the hot coals. Worked pretty darn well for an experiment! (Todd Talsma) I use a weed burning torch... talk about a broad flame!!! It sounds like a jet taking off when you fire it up, but that doesn't answer your question. When I flame dark, I flame to a point that I darken the enamel, but do NOT flame to a point that enamel takes on a silvery appearance on the surface. In my opinion, and this is just my opinion, when you heat the surface of the bamboo to the point that it gets silvery or shiny, then you've gone too far and started damaging the fibers... Now, this is just MY opinion. What I like to do, and it's easy with the big weedburner torch, is lightly flame, to a light caramel color, then flame a little more to a dark caramel color, then flame a little more to a deep caramel, then if I want it really dark, flame a little more to a chocolate brown color. You can stop at ANY of those stages and get completely different looks to your rod. For my personal taste, I have come to like a medium caramel color on the finished rod. I get this by flaming to a dark caramel color. When you sand the enamel off, you'll have quite a bit lighter color than the burned enamel appears to be. Test flame on some scraps or end cuts. Try doing it in stages and then sand the enamel off and see what color you have... or think you have. If you like it, take a damp cloth and wet it slightly. That will give you the color it will be with varnish on it, which will be a little darker than your dry sanded color. The key to flaming is getting the color you like consistently. Playing with your scrap will help you get a feel for the amount of flaming it takes to get the tone you desire. (Bob Nunley) Yeah, I nearly agree with Bob entirely, differing only in that I remove the enamel with a worryingly sharp L-N Standard block plane set so fine as to be almost not cutting, rather than sandpaper. I used use a L-N 212 scraper but find that I get much better control with the plane. But it has to be SHARP! My reason for this is, and NO, I don't sacrifice "power fibers" willy-nilly, that in doing long sweeps in removal of the black stuff I can pretty well get the nodal humps flattened off as close to perfect as I am capable of doing. Keep the flame moving all the time, and complete the whole culm or section before you go back to darken more. I work from the middle to the ends, as I find I push more liquid out of the ends that way. (Peter McKean) Thanks for the tips and links guys, The culm is now a nice dark brown and split ready to go. I used a weed burner on a 5 gallon tank and moved quite fast to prevent burning. Bob's tip about silvering on the enamel gave me a nice visual to look out for, really useful, I wont forget that one. Splitting seemed easier as well, I got really nice thin, straight strips with little difficulty. Lots of bamboo left over.Does flaming help prevent the split wandering or was this culm more co operative than usual? Assuming I dont make any of my usual fubars I might get two rods this time. I love the idea of the barbie or the camp fire methods but I'll stick with the weed gun for now, I'm not that brave. (Simon Reilly)
I've flamed some bamboo for my sweetheart's first bamboo rod (she asked me soooo nice, I couldn't turn her down). Anyway, after I split it and all, it came out a beautiful medium brown. My problem now is that it is a real chore to straighten! I have to go back over each strip 4 or 5 times before I'm satisfied. Is this a common side effect of flaming? I used a weed burning torch like many of you guys on the list, so I wonder if you've noticed this? Or did I miss something? Maybe too hot? My wife loves the color, so I'll keep at it till its done, but I'm thinking its not worth the trouble. Any thoughts would be appreciated. (Paul Rheaume) I have not noticed that. I would suggest you check the tension on your binding cord and belt. (Timothy Troester) I don't try to straighten my strips except at the nodes if they have a bad kink, I soak, rough out, bind and dry them in the MD fixtures in my oven set @ 125F. They come out straight. Saves a lot of time trying to straighten strips. I also soak my tip strips after heat treating them to plane them down to almost finished size then dry again and final plane. The second soaking is done while planing out the butt strips. No time lost, makes planing a lot easier. Thanks to the late Darryl Hayashida for putting me on to soaking the strips. It has made planing a lot easier for me. (Tony Spezio)
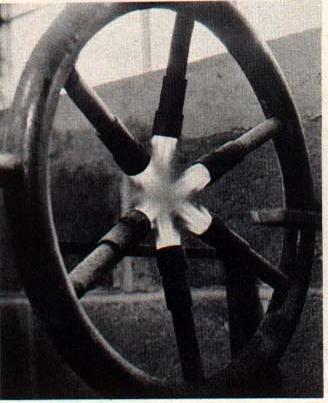
Is there not a number of ways to flame a rod? Several methods occur to me: 1] Cool torches - kerosene types From #1>#5 the time decreases to change the color of the cane. #4 & #5, you basically wipe the color on like painting. The cooler torches takes a much longer time. #4  just change the color for several thousandths thick. The cooler torches changes it deeper. So, cooler torches basically temper, hotter torches just change the color and require further heat treating. To sum up - all flaming isn't equal. I use #4 & #5 methods and heat treat in a convection oven. (Don Anderson) There used to be a picture on the internet (I think it was at FAOL but I could be wrong about that) of Paul Youngs "ring of fire." He had a circular pipe with holes drilled approximately every 1" on the inside circumference. This was being fed by Pentane gas and there wasn't much space between the culm and the pipe. The culm was definately flamed at point blank range as it was pulled slowly through. (Will Price) Ring of Fire
(Larry Blan) Those are essentially the large Bunsen burners I use in the lab. You could rig them up using some pipe to connect them. (Doug Easton) Looks like wagon wheel with a HELLUVA hub! (Art Port) Now see.............I like that........could make one! Hummmmm (Joe Arguello) Ring of fire + Black pipe oven.......Hummmmmmmm!! (Joe Arguello) Keep thinking Joe. Out feed of the ring of fire to the in feed of the black pipe convection oven. You could CNC automate that process... (Mark Wendt) Careful Joe... I took that same picture to my local propane guy a few years ago, and he warned me in strictest terms that something similar with high pressure gas like what is available today would be nothing more than a bomb. Not saying don't do it, just give it some research. Butane is unavailable most places. Propane is your only choice. With propane, I think you're asking for trouble. (Harry Boyd) Ring burners for glass lathes for scientific glass blowing typically use an oxygen/natural gas or an oxygen/hydrogen mixture if a higher temperature cleaner burn is needed for working fused quartz. I haven't used one hands on but I've been around where they are used, and I don't recall them being particularly dangerous or problematical. (Mike McGuire) Ring burners are dangerous. Just the design of the Ring of Fire is just a wee bit, uh, problematical. There's no supports or braces on the individual ring spokes (burners) and if one happened to get bumped in just the right way, and developed a leak, you could have problems. (Mark Wendt) Yeah BUT glass requires much hotter temps to plasticize than bamboo requires to browntone. Unless you invented a system that would zip the culm through fast enough to prevent charring I don't think it would work (think another method to cause flying projectile). Care to test this out Bob? Might provide a chapter for The Snake Rod Vol. ll ROTFLMAO (Will Price) I built a ring of fire in about 95 or 96. When I "fired" it up... well, I bulged one panel on my garage door, and could hear normally again just about the time the arm hair and eyebrows grew back. As the Latino foreman said in the movie "The Big Country" when Gregory Peck asked him about riding a old horse named Sunday, "Got any advice?' He replied "Si, Senor... Don't Do eet!" (Bob Nunley) Bob "Danger Rides into Mt Home" Nunley aside, the design of the Ring of Fire is what causes the problem. It's really not much more than five weed burners tied together on the inside of a huge manifold, which carries the fuel to the burners. Back in the day when I used to work for my Dad in the propane biz, we built some strange burner setups for industrial use. If'n I was to design a ring of fire like Youngs, I'd still use a ring to hold the burners in place, but have individual adjustment valves for each burner mounted on the throat of the burner. Probably also a smaller ring manifold too, the only purpose being to get the propane to the burners, leaving the bigger ring to be the burner "holders." (Mark Wendt) . . . which kinda segues naturally into (another dangerous) discussion of whether it's possible to do a better job of straightening using a pressure steam chamber in conjunction with the MD extrusions. A rodbuilding friend with extensive woodworking experience, including bent wood furniture, suggested that he could get perfectly straight splines by lashing them to the extrusion and cookin' 'em in a pressurized steam chamber, along the lines of Joe's black pipe, equipped with a pressure cooker-style relief valve, pressure gauge, throw in some water and cook with a torch, a la Joe's black pipe tutorial. My first reaction was that he'd be creating a fairly effective bomb, a la the scenario Bob just described, but, then, I'm not a boiler engineer or in any other way equipped to offer an opinion. Has anyone tried this and/or know any theoretic basis why it would NOT work? I'd imagine one would stagger nodes, cut to length, soak, do nodes, rough plane, and . . . cook away. Thoughts? (Steve Yasgur) Steam bending hardwood at atmospheric pressure is a time honored method from way back. I once suggested that before electricity, steam bending (straightening) was likely the method of choice for old timey rod makers. (Dave Burley) It is thinking outside the box and may be one of the best ideas so far. It would be much more practical to pursue than worrying about planing on 1" centers. So we plane on 1" centers, first time we get a change of season the dimensions will change anyway. Steam on the other hand.... brilliant! I am surprised that hasn't been pursued sooner. I have used hot water to bend wood before, works great. Why not steam? Shouldn't be all that hard to engineer. You would have to get a relief valve to defuse the potential bomb. Wife might be upset if I set up a black iron still in the kitchen. Might have to use my propane turkey fryer as the heat source. Let's see; pressure cooker to stainless tubing to black iron chamber with the pressure cooker relief valve and thermometer on the chamber. (Pete Emmel) Those dimensions will change equally across those 1" centers... ;-) (Mark Wendt) This is amusing.. another argument that when I hand plane the elements don't affect my rods. Only the ones held to tighter tolerances. And your last quip continues...But it may separate a professional production maker from an amateur hacker. serious hobbyist. (Jerry Foster) My thoughts? Sound great! Yaz, I encourage you to build said pressure chamber and get back to us with the results, even if you must have Cheri type your emails since you've lost all the required appendages to your experimenting. Does anyone think I could convert an old corn still into one of these things? Just asking. (Bob Brockett) Well, I solicit engineering input because I've done enough personal injury suits and read sufficient of Brother Nunley's exploits to pull up shy of the line in some areas. Pressure vessels bein' one of those. (Steve Yasgur) "Does anyone think I could convert an old corn still into one of these things? " I was thinkin the other way around would be better. (Dave Burley) Doesn't Chris Bogart have the original Preston Jennings steam node press. Could be wrong about both. (Jerry Foster) I'd forgotten about Young's "ring of fire". Do recall Hardy's large oven and another internet video of a guy using a lazy flame from burner ring. The Pentane gas thing does confuse me a tad. The Boiling point of pentane [where it becomes a gas] is 27.7C for isopentane and npentane is 36.6C. Either the info in the picture was incorrect or he was using some other hydrocarbon gas. I'd suspect that he may have used butane which is quite common in the southern states. In the northern reaches of the US and Canada, butane is rarely used except for asphalt plants. Propane is the hydrocarbon most of folks use because it becomes a gas @ -43C. At any rate, all types of flaming are not equal. Time & flame intensity will both effect the depth of the chemical/color change. (Don Anderson)
How do you guys get your strips flamed dark enough that when you sand off the enamel it's darker than chocolate milk? (Bill Walters) If you're going for that dark a color dark, wouldn't it be easier and more controllable to simply dye the bamboo using aniline dye than to fool around with a torch and run the risk of charring it? (Eric Wolfsbane) I used a weed burner ($20 from Harbor Freight) and heated the enamel until it was black but to get the strips that dark expect to char a few. I don't do it anymore. I feel that blonde rods show off clear or translucent wraps much better. (JW Healy) I also use a weed burner set on a cooler flame (yellow flame) but I do it in steps. I will darken until dark honey color then allow to cool. Then I go over it again until it is as dark as I want it. (Marv Loopstra) If you want dark flaming I suggest using a handheld bernzomatic propane or map gas torch from Lowes or Home Despot or whatever hardware store you prefer. It gives a more concentrated flame. Higher heat and easier to control than the Harbor Freight weed burner. Get the flame spreader if you can find it, if not no biggie. Move quickly. As soon as the enamel blisters MOVE! Its like painting but slower. The effect will be something like that moment when a marshmallow catches fire. You will know it when you see it and do that all the way up and down the culm trying to do so evenly. For a good video explanation, Wayne Cattanach demonstrates this well in his DVD set. (Wayne, if you are reading this pop a few on eBay this weekend and thank me later). (Scott Bearden) I've flamed a quite few, some really dark. I got to the point I thought in order to make them look good I had to blacken the hardware, use black guides, and it seemed hard to get the color even. The weed burner does help. It just seemed, to me, that I was covering up the natural beauty, (crap, I hit the wrong key!)It just seemed, to me, that I was covering up the natural beauty of the nickel silver and the bamboo. Flaming cane is just something I don't do much of anymore. As Dave sees it! LOL (David Dziadosz) I flame my culms with a burner that looks like a young oil drum, and I use that because I get a good even exposure to heat with fewer overheated patches. I work from the middle toward each end, and even with 5 - 10-year-old cane I am amazed at the amount of fluid that pours out from the ends.I do not regard it as a cosmetic procedure at all; I find unflamed cane harder to split accurately and generally harder to dress accurately and to prepare for planing. It always seems floppy by comparison, though no doubt that is purely a personal impression.I hate it when I am asked to make a blonde rod, though less so since Daryl introduced his internal flaming technique, which improves things a lot, but is so damn messy.If it was purely a cosmetic procedure I doubt I would ever light a burner. Pet hate - "tiger stripes". They would put a maggot off its lunch! (Peter McKean) Your brief description of your flaming instrument "....burner that looks like a young oil drum..." has me curious. Can you give me some more details please? Just curious, what does a 'young oil drum look like? (Don Schneider) Here is a picture. (JW Healy) When you flame your cane, do you still heat treat? Or is flaming, also your way of heat treating? (David Dziadosz) Read Wayne C. book. He flames his bamboo cane and also heat treats it.When did this change. If you want a blond rod, you would not flame as much or very little depending on what you want. (Lew Boyko) I flame, then heat treat. It's about the only way to ensure that all of the cane is tempered. (Mark Wendt) I flame, rough out the strips and then temper. To ensure compleat temper at all the strips and also the binding/tempering saves time in straightening. (Matthew Grallert) I flame temper...no heat treating. My technique is to cut a culm in half (two 6 foot sections for tips and butts) then I flame the outside of one half culm at a time, starting at the narrowest end. I slowly move down the culm (working a propane torch flame across the culm perpendicularly, while simultaneosly rotating the culm). It takes me about a half hour to inch my way down a half-culm. I don't let the cane's enamel blister or get any red hot spots...so one has to stay quite focused during this operation. Always keep the torch/flame moving. In the end, the outside of the culm is very dark brown-black. When the enamel is scraped off in later steps, the cane is a medium brown with a slight mottled effect (which I'm after). No further heat treating is necessary, as this technique is much more than cosmetic. Any further heat treating with this method could run a risk of making the cane too brittle. My rods have held up fine for the past 18 years. :+) [In the interest of safety, please remember to always wear eye protection, gloves (the cane gets very hot) and always work outdoors when using propane gas.] (Bernard Elser) Continuing on Bernard’s safety notes, burn on gravel, concrete and always from other flammable surgace. Made in the USA http://www.leevalley.com/en/garden/page.aspx?p=47306&cat=2,2300,44822 http://www.flameengineering.com/Red_Dragon_Propane_Torch_K.html fyi – for Safety, CSA lab in the Cleveland is very good, so the above works well, safe and made in the US. (Dave Wilson) Yes, I still heat treat; but that alone does not seem to produce the great amount of bamboo "juice" as the flaming.And, as I said, I would rather split and work flamed cane - it's a fair bit harder, but I prefer that. Again, personal preference; I tried soaking cane strips for a while early on, but didn't like that at all. (Peter McKean)
I recently gave away my HF weed burner that was used for my flaming. Before I get another one, I thought I would see what other torches people might be using. (Scott Grady) I flamed my bamboo some 10 years ago, a bundle.... I used what I believe was plumber's torch as I borrowed from my neighbor. But it did work good and I could control the flame very well and get the chocolate color I wanted... (Lew Boyko) I've been using a Turbo Torch Propane with a T-6 tip. The tip is about an inch across so it puts out a large flame. I have a smaller T-4 tip, 3/8 inch, but don't use it the larger tip works much better. The ideal came from Cattanach's book where it talks about flaming (page 20). The book shows a T-7 tip, but I couldn't find one that big so I went with the T-6. I think its the compactness of the flame, and the control you have with the handle that makes it work well. (Floyd Burkett) That is that I had been using but I am getting rid of it because I don't like it. I am also going with something else. I am going to go to a plumbing supply house & checking out a plumber’s torch. (Bret Reiter) Just a heads up since I’m in the biz, before you go to a plumbing wholesaler (which likely won’t sell to you anyway) or a retail plumbing supply house, you may want to study up on exactly what you will encounter for choices of equipment and gases before you get there. For gases, the choices are propane, mapp gas, and acetylene in order of heat. Note that flame temperature and heat output are not the same thing. Then there is the “cone” temperature spread. There are plenty of websites that explain all the science in great detail (as a side note, we haven’t used propane for soldering copper for decades, it’s just too slow - although I know it’s still common in some areas of the country). For propane and acetylene applications Turbo torches are the most common in the industry. Typically, a separate bottle of gas, with a regulator, hose, handle, and different size tips for the handle depending on heat output/spread. Last I checked, the largest Turbo torch tip for acetylene is an A-32, they cost about $150.00 for just the tip. The rest of the torch set up comes packaged many different ways and can be bought with one or two standard tips complete with reg, hose and handle. These start around $125.00 or so and go up to over $300.00 depending on configuration. Quite an investment if you go this way, and there are numerous options including self igniting. I don’t make flamed rods, but I have experimented on cut off culms. Acetylene has the highest piercing flame, and I have used mine with an A-32 tip, and you need to learn to move fast if you go this route. Comparing a weed burner to one of these is like comparing a VW to a Ferrari. Mapp gas torches can be bought to mount directly on a hand held bottle, just like propane. You typically see the ones for propane in a hardware store. This is the middle of the road between a weed burner and acetylene. Personally, I felt the most comfortable with the propane weed burner set up. (Tom Vagell) So what's wrong with the HF torch? (Lowell Davis) May not be the HF weed burner in general, but mine specifically. Sometimes lights, sometimes not (without a lighter or something). Head / nozzle often seems to leak / catch on fire / back burn or however you would describe that. Scares the @#$%@# out of me. I mostly oven temper only now, so no biggie. (Chris Moore) I find it hard to control the flame velocity on mine. (Bret Reiter) I’ve got an old 1911 Otto Bernz gasoline blow torch that works great, nice flame and doesn’t burn the cane to cinders. I tried using a propane torch but thought the flame was too concentrated, my blow torch gives a very even tone to the bamboo. (Lee Gomolchak) See, that was what I was looking for when I bought the weed burner, that type of flame. The weed burner I'd either lie flame or freaked flame thrower. (Bret Reiter)
I’m looking to replace my plumber's style propane torch for flaming culms with a larger weed burner style similar to the one in this link. However, it seems that some people use them without complaint, but others state the Harbor Freight offering is unsafe. Is there another online retailer that sells a better made version? Frankly, I don't know what to look for as a way to evaluate whether the item is safe or unsafe. (Ron Delesky) Look at Lee Valley. (Ron Grantham) Get an old style blowtorch, they work great and you have better adjustment on the flame. I’m using a 1911 Otto Bernz torch. (Lee Gomolchak) Okay, so when you guys flame your culms using this flame thrower do you just use it benign or do you squeeze the trigger to really get it going? (Bret Reiter) I seldom used the turbo(?), only when I found a spot I had missed. I also found it much easier to hold than a propane torch. (JW Healy) I have the HF Weed burner without the igniter and it has never been a problem. I don't imagine any of them are too safe (they are, after all, miniature flame throwers) but if you you use one in an open area like a driveway and pay attention to what you are doing not much bad can happen. The gas stops flowing when you let go of the trigger. (JW Healy) I realize the inherent danger of the item. After all it is a torch. However, I meant safety in-terms of cheap fittings/hose, etc. that made the item unsafe by design. (Ron Delesky) I felt mine was well made. (Matt Fuller) I have a HF version. Seems well made, fittings are brass, instructions are clear including the use of plumber’s tape on one of the connections. Just used it on 6 culms. (John Dotson) I bought a weed burner at Home Depot so I would assume it is available on line. (Jim Miller) I have the HF weed burner with the ignition button and have never had a problem with it. I use it mostly for burning leaves and starting stubborn bon fires, but I think it would work fine for bamboo. (Matt Fuller)
I'm new to the craft and I used one of those propane powered weed burners to flame my first culm. I'm going for a very dark rod. After I finished I started looking at a few of my books and saw warnings about going too far with the flaming process. My question is, how do you know if you've cooked it too much? My bamboo is pretty brown now. (Jeff Evans (10/29/2016)) Go online and see if you can find any photos of Paul H. Young rods and his flaming process for comparison. He got them pretty dark and they are still going after all these years. (Hal Manas) It’s not too difficult to tell by the color of the enamel. If your enamel has turned light brown, that’s okay. If it has turned medium brown, that’s okay. If it has turned dark brown, that’s probably okay too. Even if it has turned almost black, that’s probably okay. But when it begins to turn a silvery gray, that’s going too far. As has been said, you should be able to remove the enamel and still see some brown tones to the bamboo. If the bamboo under the enamel appears black, you may have gone too far. (Harry Boyd) If your bamboo is still brown you're ok. A few years ago, I read from either Mr Boyd or Mr Nunley I'm not sure which, that the culm gets a silvery grey colour when you go too far. I've used this as my reference since and it works perfectly. I flame down to a deep brown and make sure that I don't see silver flaking. Rich dark brown blank, zero failures. (Simon Reilly) Flaming is more of touch and freely kind of thing. The hotter the flame the better. Think of "painting" on the color. Lower heats take a lot longer to get brown and therefore can or will destroy the lignin binding the power fibers together. Hot torches are best. (Don Anderson)
I’m looking to replace my plumber's style propane torch for flaming culms with a larger weed burner style similar to the one in the this link. However, it seems that some people use them without complaint, but others state the Harbor Freight offering is unsafe. Is there another online retailer that sells a better made version? Frankly, I don't know what to look for as a way to evaluate whether the item is safe or unsafe. (Ron Delesky) Look at Lee Valley. (Ron Grantham) Get an old style blowtorch, they work great and you have better adjustment on the flame. I’m using a 1911 Otto Bernz torch. (Lee Gomolchak) Okay, so when you guys flame your culms using this flame thrower do you just use it benign or do you squeeze the trigger to really get it going? (Bret Reiter) And it is much easier to hold than a propane torch. (JW Healy) I have the HF Weed burner without the igniter and it has never been a problem. I don't imagine any of them are too safe (they are, after all, miniature flame throwers) but if you you use one in an open area like a driveway and pay attention to what you are doing not much bad can happen. The gas stops flowing when you let go of the trigger. (JW Healy) I realize the inherent danger of the item. After all it is a torch. However, I meant safety in-terms of cheap fittings/hose, etc. that made the item unsafe by design. (Ron Delesky) I felt mine was well made. (Matt Fuller) I have a HF version. Seems well made, fittings are brass, instructions are clear including the use of plumber’s tape on one of the connections. Just used it on 6 culms. (John Dotson) I bought a weed burner at Home Depot so I would assume it is available on line. (Jim Miller) I have the HF weed burner with the ignition button and have never had a problem with it. I use it mostly for burning leaves and starting stubborn bon fires, but I think it would work fine for bamboo. (Matt Fuller)
|