Bamboo Tips - Tips Area |
|
< Home < Tips Area < Machines < Lathes < Tooling
I just ordered a 7x12 lathe and want to know what accessories I need to order to make reelseats and ferrules? (Tim Stoltz) Okay, I've made six ferrules, so I think I have the basics down. Tools I got and actually use on the lathe - from littlemachineshop.com: live center approx. $25.00 From McMaster-Carr: Carbide tipped tool bits: from $4.18 to 5.00 each Slotting saw no. 3044A11 $6.40 Chucking reamers of various sizes to match the size ferrule you are making - usually the female slide is 2/64 larger than the bamboo mounting size, e.g. for a 13/64 ferrule the OD male and the ID female is 15/64. So you need a 13/64 drill and a 15/64 chucking reamer. Around $2.00 for a drill, and around $10.00 for a reamer. Brass hexagonal rod stock approximately 9/16 inch diameter to make an indexed holder for the tab slits. No.8952K113 $12.50 for 3 feet. That's all the tools I use to make ferrules, other accessories may make it easier, but these are the tools I use and I get the ferrules made. (Darryl Hayashida)
I just picked up the 7x10 mini lathe from Harbor Freight. They are now red in color. I do have to say that it is well made and was well protected in the box/crate. I went to the store and said that the lathe was on sale on their web site. He said they would honor the price $329 on line but I had to have a print out of the ad. The price at the store was $399. I just missed it being even lower in price $279 a few months back. I thought I would have to go home, about 30 minute drive and print out the ad, but my brilliant wife suggested we go to the library and go on line. After getting a new library card I was able to go on line and print up the ad. Back to Harbor Freight and home with the lathe. Nothing broken, damage or scratched. It was in perfect order. I understand this is not the case if it it mailed to you. So I will be picking your brains on how to work this thing. It has been since high school that I have even touched a lathe. My first question is what kind of cutters should I get and what size? (Adam Vigil) I have the Grizzly 7x12 too. Same machine, same company, longer bed. Here's the list of stuff I got for my machine for rodmaking.
Most everything else you can make, IE. mandrels, jigs, etc.. Here are two sites I have found VERY helpful- Little Machine Shop - They have stuff that can be tough to find for mini lathes and milling machines. Varmint Al's Page - Good page for modifications and troubleshooting for the mini lathe-pour yourself a cup of coffee before you read his page, it's great! Hope this helps Adam, I love my lathe, so much so that now I'm looking for a bigger one!!! The 7x10 does all that you will need for rod making though. (Eamon Lee) I have the 7x12 Grizzly version, but I am pretty sure it was made by the same company and has the same features, only the bed length is different. The specs with mine said it used 3/8" cutters, but mine actually took 5/16ths and it does make a difference, you have to use the correct size cutter, the cutting edge needs to hit the center of the workpiece or you will have big problems. I got a few 5/16ths HSS blanks and a set of 32 carbide tipped cutters, about 25 bucks for the whole deal on sale from Enco, you get a half dozen or more of the various configurations, including the all important 60d thread cutting bits. What you don't get in the carbide sets is a cut off bit, that's why I got the blanks, so I could grind my own and any other special shapes I want. (John Channer) I really like the Valentine cutters from Sherline. They use a diamond bit and fit in a 3/8" cutter holder. I got mine on AJ's recommendation, and they have been great for ferrules. Really smooth. Expensive at slightly over $100, but they never need resharpening and I was still on the first cutting edge of mine (after 6 months of mild use) when SOMEBODY RIPPED ME OFF AND TOOK IT! Left the tool holder and took it. Watch out for utility guys and visitors. I think HSS is just fine for almost anything. It can get really sharp. Just used my HSS cutters in the lathe to turn a new point for my quad forms tonight. Worked like a charm. (Bob Maulucci) You may want to check the issue #6 of Power Fibers for a great article on Ferrule Making "101". It is the first comprehensive article on the subject that I've run across. I did a practice run with a piece of brass stock, making a female ferrule, and what it told me was that my 9x19 Grizzly was not lined up properly. (Don Greife)
This is meant just as a 'heads up', and by no means as any type of absolute, can't do without, only way to do it type of post. Here are the Brownell stock numbers for two little devices you will find very helpful in setting up your lathes! For aligning the height of a cutting tool relative to the centerline of your head stock: Pg. 142, catalogue #55 -- Item # 749-100-000 called 'Machine setup gauge' $26.95. For aligning headstock with tailstock: Same page and catalog # -- Item #080-641-002 called 'Lathe Center Buttons' $22.66. There is one other tool that you might want to consider: Same, same: Item # 122-160-100 called 'Tru Tapper' $49.95 This tool allows you to align a tap with a hole you have drilled on your drill press without removing the work from the drill press, thus you will be tapping/threading a hole on the same axis as you just drilled it. These are just a couple of (believe it or not) inexpensive tools that I use to keep from pulling my hair out while using the lathe or having to drill and tap holes. These are by no means the ultimate answer, and I'm sure the real machinists on the List have better ways to do these operations, but these items work for me in my little hobby shop!! No financial yadda, yadda. (Mike Shaffer)
Just purchased a new Homier 7x12 and I am trying to figure out the correct tool bit size for this machine. Little Machine Shop says that the newer Homier should use 5/16" tools, but 5/16'' tools look like they would only be marginally secured (like by half the width of the allen screw hold downs). It does not really look like 3/8" tools would be that much better a fit. The distance between the center of the tool post and outside edge of the tool post is 5/8" as is the height of the tool post slot. Am I missing something here? Like a tool holder? Or should that be necessary for a square bit? (Jeff Ragan) Go with what Chris of Little Machine Shop recommended, he knows his stuff with these hobby lathes. I have the older version of the Homier and it uses a 3/8 bit... you will most likely have to shim the tool bits some, the lathes are made in China and designed for metric tools. Good luck and have fun. (Kyle Druey) When I got my 7x12 Tony Spezio told me to get a quick change tool post. To me that was sound advice. Not only faster tool change but no shims needed to adjust height of the tool bit and I can use 3/8" bits for most things. (Don Schneider) The most important thing here is that the cutting edge of your tool should be right at the height of the centerline of the work piece. However you accomplish that (right size cutting tool, shims, Quick Change tool post, etc.) should give the same result. The Quick Change tool post is the most expensive & the most flexible (can use any and all size cutting tools without fiddling with shims) way to go. In the long run a Quick Change tool post will be your best solution. (Charles Schoettler) Little Machine Shop has a Quick Change Tool Post with two holders for a bit over 50.00 and additional holders three for 35.00. Comes complete with spacer. I would not be without them. Solves a load of tool bit problems. (Tony Spezio)
I'm learning to grind my tool bits for my new lathe, but I'm not too hot on grinding cutters for threads. Especially for internal threads. So, for those of you who make threaded reel seats, what kind of tool to you use for the locking ring/nut? I'm not seeing too many pre-ground or indexable cutters or bits for internal threads. Is it a normal indexable boring bar with a thread cutting insert? Or are y'all grinding your own bits? (Jason Swan) Internal 60 degree tool bits are available from any good tool supply house. MSC and J & L stock them. Even my local tool supply carries them. For the external threads I invested in a 5/8" tool holder that uses triangular vertical bits. I cut both 60 degree and Acme threads with the same holder. (Jerry Young) Check out the KBC Tools web site depending were you are they may have a local outlet. Great place. I never want to leave when I am there. I do know their catalog does have the cutting tool you need. (Adam Vigil) I use one of the 3/8" boring bar that uses a 1/8" square bit. I sharpen a 60 degree end and cut it to about 1/2" long. After I bore the inside of the workpiece to the desired inside diameter, I put in the 3/8" boring bar and cut the threads. Best advantage is the price. It's cheap. (Onis Cogburn) I use the same set up as Onis and it works great. One thing I would highly recommend for safety is wear safety glasses when grinding or shaping bits, especially short little ones. I have a chip in one pair to prove the need. (Don Schneider) If you can get a tool ground that will produce a full thread for. That is with root and crest rads on the tool. It is then so simple to get matching internal and external threads. Turn the external thread first then bore a hole the correct size and then screw cut that. It is a simple job to make the bore correct. All you do is subtract the thread form depth x two from the external thread major diameter this is the bore size. By screw cutting to depth of form you will find you have a perfect fitting thread. It is not so good using tools ground to a vee, you don't have the good fitting radius crests. (Barry Grantham)
I'm going to get the Homier 7x12 and was just wondering if anyone has a list of what I'll need to get in terms of accessories and tooling. I'm going to do all of the standard rodmaking stuff: Ferrule stations I'm still looking for a good knurling tool and cutoff tool for my 7" Grizzly. (Brian Creek) The cutoff tool and the Scissors knurler from Little Machine Shop work fine for me. (Tony Spezio) I recommend Frank Hoose's web page. He covers both the mini lathe and mini mill. (Onis Cogburn) If you build NS Ferrules you need a source for Rod or tube. I use 5/16" rod and get it from Sheffield Knife Supply, PO Box 741107, Orange City, Florida. (Email) (Web site). The Nickel Silver I buy is #N528, 5/16" rod. It is $3.75/foot in the 2003 catalog. I buy it in 3' lengths and cut it myself to reduce waste. REGULAR DISCLAIMERS. (Don Greife) When I got my mini lathe, I prepared the following accessories/tools for the lathe. I dare to list them to recall my English vocabulary. Please anybody correct if something is wrong. Lathe oriented accessories:
To make ferrules:
To make wood inserts:
To make reel seat hardware:
Others:
end of the list. (Max Satoh) I am just getting started making NS ferrules on my Homier Lathe and it is a true learning experience since I have never used a lathe before. Here is a list of items that I have purchased to get started making ferrules:
Most of these items can be purchased at the Little Machine Shop on the internet. I have not gotten into cutting ferrule stations, reel seat hardware or wood inserts. They are next on my list. (Tom Peters) Like someone responded a week or so ago, the lathe isn't the expensive part. (Bob Williams) For ferrule making you will need the chart from Bogart’s web site for the SuperZ. You will need to purchase a good set of drill bits and then by some straight reamers from a tool supply company like KBC. You will need a good cutting oil and some cutting tools, jewelers saw and arbor. All of these can be purchased from a tool supply company. But the important thing you will need are a digital caliper and micrometer. This will give you the accuracy. Also learn to tune your lathe to insure it is in alignment. Then practice on aluminum. (Adam Vigil)
How are ye chucking your NS slip ring-sized tubing? Is it safe to use my standard 3-jaw chuck that I have, or do I need to invest in other tooling? (Joe West) The chuck on my South bend lathe is capable of distorting the tubing. I prevent this by gripping the tubing with a simple collet or sleeve. The sleeve is made from a piece of aluminum 1 3/4" diameter x 2 1/2" long, with a close fitting hole for the tubing bored through the center. There is a saw cut the length of the sleeve which permits the sleeve to close tightly on the tubing. This way the chuck applies pressure to the sleeve which in turn grips the tubing over its entire circumference and not just at three points. If you are going to do some knurling you need to support the tubing over its length with a close fitting mandrel. One end of the mandrel and tubing is driven by the chuck and the other end of the mandrel is supported by the tailstock center. Unsupported, the pressure of knurling will distort the tubing. (Ted Knott)
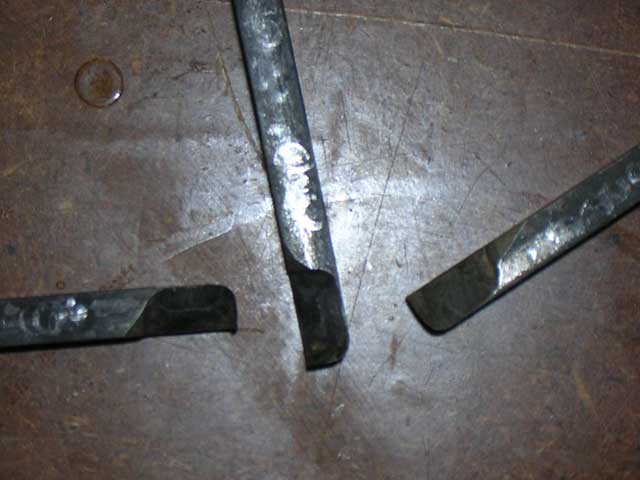
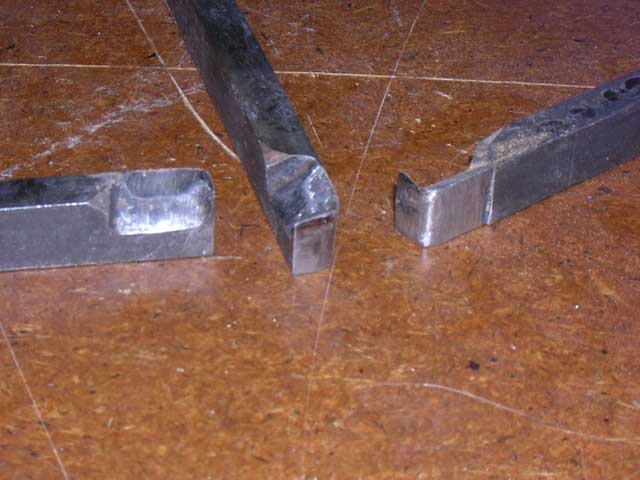
Just wondering if anyone has worked out the optimum shape for a cutting tool when cutting wood inserts for reel seats on a metal lathe? Would the same tool be the best for cutting ferrule seats into the rod shaft? (Tom Smithwick) I use a round nose bit with a slight rake. (Tony Spezio) As Tony says, a rounded bit works quite well. If Rick Funcik is listening, maybe he'll join in. Rick is a talented professional woodworker and showed me the bits he uses. They are as Tony describes. Miles Tiernan taught me that the point of the bit should descend slightly till it meets the work at the centerline. I find that works really well. (Harry Boyd) I was taught to round off the nose of a tool bit when grinding them but I've actually never understood why this is the preferred shape. It's the last operation in shaping HSS bits, but always seems odd to me, as if I were dulling the point of the bit. Any comment? (Bob Milardo) I was told that you want the point rounded so when you make a cut to a 90 degree shoulder, the transition is round, reducing the stress fracture ability at that area. (Chad Wigham) On a tool steel bit, a slightly rounded nose is good for finish cuts. It takes a wider swath of material than a fine point tool bit, so it's less likely to leave tool marks on the material. You'll still have the sharp edge on the front of the bit which does the cutting, though you can't be as aggressive with the tool cut with a rounded bit as you can with a sharper pointed tool bit. (Mark Wendt) I think Mark covered the reply very well. The rounded nose can also be used on metal too. I use it when cutting aluminum to get a smooth finish. Brian Creek sent me the photos of his lathe tools. They also have a rounded nose and are made to cut towards the head stock. By rounding the nose as I do on my cutting tool it can be used to cut towards and away from the headstock. I have people here for the Sowbug and we went to the shop last night and turned out a couple of inserts. They were amazed on how smooth a cut the bit made. There was very little final sanding to finish it up. (Tony Spezio) I have had a similar 'end grain tear out' problem when turning burl walnut. The metal lathe tool I was using was a 3/8" HSS that I'd ground to a round nose with about 15 degree rake and turned at 2000 rpm. So, I went to a wood working seminar and described my problem to one of the professional turners there. His response was "A smooth turning can only be achieved with a tool designed like a wood turning gouge. I now have a new tool post and will attempt to mount a gouge in it. My walnut burl is just too good to screw up any more of it. (Don Greife) I'd check my local library for books on wood turning. I don't like a response that it "can ONLY be done with..." There are usually more ways than one to skin a cat. For example, if one wanted to spend the time, the whole thing could be done with sandpaper strips, either glued to pieces of wood, or just hand held. (Neil Savage) Another option to consider for turning wood inserts on a metal lathe is a wood turning tool rest that attaches to the tool post on metal lathes. It's item number 82570 at Micromark.com, and reasonably priced. If you have a couple of wood turning tools already, this could work. If you have ever made a few wooden pens, from kits, turning a reel seat seems to be very similar. I was about to make the reel seat on the metal lathe but decided to make the first one on my 20 year old Craftsman wood lathe by drilling the center bore of the maple blank first, then mounting it on a hex bolt as a mandrel, with metal spacers on each side, and mounting the bolt into the lathe chuck. (I used the same bolt as the mandrel and turned the mortise with a fingernail bit on a router by using a simple jig that is described in Wayne Cattanach's book) I center drilled the end of the bolt just enough to accept a live center on the lathe tailstock while turning. The hex bolt head became slightly loose in the headstock chuck as the turning progressed, so I stopped to tighten the chuck 4 or 5 times, but it came out well enough and the marred hex bolt is disposable. I polished and sealed the wood with Hut wax, left over from making a few wooden pens several years ago. I don't know yet if it will swell or not when wet. (Paul Franklyn) Here are a couple of pictures.
(Brian Creek) Nice, and thanks for the pics. But why not simply round off the entire blade so one can cut both ways with one bit? Works great for me, but I usually don't know what I'm doing! (Jaz) Think about the angle of attack of the bevel of a roughing or spindle gouge on a wood lathe. You want a very sharp, very steep angle to peel the wood off, like an apple. Rounder would work as well, but these are easy to make with just a thin grinding wheel freehand. (Brian Creek)
As I patiently wait for my new lathe to arrive I am starting to collect the required tooling to machine reel seats, ferrules, etc. I am following Darryl H's list of basic tools from "Tips" and he mentions a brass hex rod (9/16" diameter) that is used to make an indexed holder for the ferrule tab slits. Well the rod arrived yesterday and I went looking for info on how to create said holder. I found the following from Max Satoh while searching the archives... Serration: Prepare a hex shape alloy and hole it a little bit larger than female OD, and cut one side and file the cut. Length will do by 10~15mm. Tape around each ferrule to fit the hole of hex cut ring so as to the hex cut ring will hold the ferrule tightly. Hold the hex cut ring with quick change holder and set it on the quick change post. Each surface of outside hex shape will lead you into the correct angle of serration. Cut the serration at the center of ferrule by 0.2 mm metal saw. Turn the hex cut ring one side next in the quick change holder and cut next side of serration. Do this for three surface of hex cut ring. I understand the design of this holder but would appreciate any additional pointers for it's construction. Do I have to make a new holder with a different sized hole for each different sized ferrule I make? Perhaps someone on the list has a photo or two online somewhere? On a side note, rod #1 is currently resting nicely in my drying cabinet. I would like to thank everyone here for giving so much time and information to help us fledgling rodmakers. (Dave Riker) There's another way to cut tabs on ferrules. You can index your lathe with a plunger that engages the headstock gear. Just remember not to Nunley yourself and turn the lathe on with the plunger engaged, keep the lathe unplugged. Make sure the gear on the headstock is evenly divisible by 60 degrees (or 90 degrees for quads). A Dremel clamped to the toolpost & you're in business. I've never made ferrules, but I used this method to make a 6 jaw wooden chuck for my rod turner. (Ron Larsen) I made my holder out of the largest size hex coupling nut that would fit in my tool post. Bored the hole/threads out so that 1/2" nylon bushings fit. Bored/reamed each nylon bushing for different size ferrules. To keep your fingers out of harms way, slit the bushings by drilling a 1/2" hole near one end of a 1x2, insert the bushing and slit with a band saw. Near one end of the coupling nut drill and tap for a set screw. To use: Fit the appropriate size bushing over the ferrule, insert it in the coupling nut and tighten the set screw. Mount the coupling nut on the tool post. Mount an arbor and silting saw in the lathe chuck. Line everything up where you want to slit the ferrule and feed it into the saw to the desired depth. Rotate the coupling nut to the next flat and repeat till done. (Don Schneider) What I have done to make serrations is to use a hex steel rod about two inches long, drill a hole through the center of the rod bigger than any ferrule you will ever make, drill and tap a hole on top one of the sides that will hold a plastic hex screw that can be tightened to hold the ferrule that is inserted into the center hole of the rod. I use a jewelers saw on an arbor that is inserted in the lathe chuck to cut the serrations. I make one cut on two sides and then loosen the rod in the tool post and then rotate the rod to the next side. You then only have to make three cuts to get the 6 serrations. This works very well for me and is very close to what I have seen on the ferrules that I have purchased commercially. (Tom Peters) Using surgical tubing / O-rings sounds like just the thing to tighten up the ferrule to hex stock fit (and provide some measure of protection as well). Don, if I didn't have 36" of brass hex to burn through I really like your idea of using reamed-out nylon bushings. Tom, it helps to now know that I only have to make 3 cuts (cut both walls on each pass with saw blade on the ferrule's center axis), not 6. Ian, using the cross feed mounted Dremel also sounds interesting. I'm going to check my saw blade, could be it will mount right up to their arbor. (Dave Riker)
I have my lathe. There doesn't seem to be much logic as to what accessories came with it. Can I buy any MT2 live center for it? Also, do I need a special cutting bit for reel seat spacers? (Lee Orr) Which lathe did you get? Check out Little Machine Shop for all your lathe wants and needs. Chris carries the MT2 live centers for a decent price, along with a whole bunch of other stuff. Chris is a great guy, very knowledgeable, and is always adding stuff to his line of goods. Mrs. Claus would say I've spent quite a bit of money with LMS for my toys. I tell her it's tools. As for the cutting bit for inserts, you might have to grind your own from a blank tool bit. Tony Spezio showed us a very nice working tool bit at last year's SRG, that is basically a roundish grind. Perhaps Tony could post a picture of the tool he showed us. (Mark Wendt) I bought the 7x12 from Cummins. (Lee Orr) That's a nice little lathe. What accessories did they ship with the lathe? There's been talk on the mini lathe list that they aren't shipping as many accessories with the lathe as they used to. (Mark Wendt) From memory (I don't even know how to turn the thing on): Faceplate I'm confused as to why a live center wouldn't have been included in place of some of the other stuff. (Lee Orr) That sounds a bit normal. Did they supply a dead center? I've yet to see a lathe offered with a live center. I agree that would be a nice addition. It was one of the first things I bought for my lathe. Haven't used the dead center since. I could understand a dead center for the head stock, if you are using a face plate and a dog to turn your work, but a dead center for the tail stock, to me, is one of the more useless lathe attachments. Two things for your lathe that will make it much nicer to use - get the live center, and a Quick Change Tool Post. Being able to raise or lower your cutting tools via the QCTP is sooooo much nicer than having to shim the tools. And being able to move a lever, pull the tool holder out, pop a new one in, crank the lever back is very convenient. The steady rests are handy when you are turning longer pieces. If you have a 3" chuck on the headstock, you might consider upgrading to a 4". Gives you a lot more options. One thing you'll quickly find, is that you'll end up spending more in tooling than what you paid for the lathe... ;-) (Mark Wendt) Most lathes do not come with a live center. If they ship with a center, it is typically a dead center. Live centers come in many different flavors, the manufacturer keeps the initial cost down, and lets you pick your poison. The widgets, accessories and accouterments that go along with a lathe will end up costing more than the lathe, in most cases. (Larry Blan)
I have my lathe and I'm slowing learning to use it. Harbor Freight has a 20 piece tooling kit for about $45. It has a knurling tool, boring bar, parting tool and some other stuff. Will that work for reel seats? I know that the quick change is better in the long run. (Lee Orr) If it's like the Harbor Freight tooling kit I got shortly after purchasing a Harbor Freight mini-lathe, it won't fit your lathe. The tool holders are way too big for the mini lathes. The one I see at Harbor Freight requires a 7/8" tool post. The mini lathes have about a 1/2" toolpost and take a 5/16" tool bit. (Robert Kope) Yes, that was it. OK then would the Harbor Freight quick change setup for $90 be worth buying. It seems to have everything I need. (Lee Orr) In short order you will need a live center and drill chuck. The QCTP makes life a lot easier, not only for changing tools rapidly but to eliminate the need to shim tools to the right cutting height. (Don Schneider) Do you have a grinding wheel? If so then I would give you the same advice given to me by Mark Wendt. I got my mini-lathe a month ago and have been having a ball. The QCTP is definitely a must have in your future but to start off just order some tool blanks and grind them yourself. For real seats take a look at Tony Spezio's reel seat lathe bit. This produces a finer finish than any of the standard tool bits. It works like a wood lathe scraper tool. It really isn't hard to grind your own. If you do get a live center, try to find one that has a center that is removable. I machined an aluminum bar so that after drilling the reel seat blank I had one piece that I could chuck into the three jaw chuck with a a shoulder to rest against, followed by reduced radius slightly under what I wanted the final diameter to be for the reel seat (.068 to fit the Tony Larson butt cap and ring set I bought) reduce further to a nub equal to the drill hole (5/16 in my case). The other piece fit into the live center and reversed the previous process. You could then put the blank on snug up the tail stock and finish turning it. Lots of other methods using mandrels of various sorts. I would recommend getting some center drills to start your holes aligned correctly. (Ralph Tuttle) Here is what I have so far: Dead center I have the spacer turning down and have managed to turn out some sliding rings using aluminum tubing. What I think I need: Knurling tool - but I guess that isn't a must have I bought the large capacity scissors knurler. Major fun what you can do with it and I presume necessary for any serious hardware making. I made some knobs for an adjustable reel seat jig that turned out looking like those that are on stereo equipment. Scissors type seems the way to go since it puts less torque on the spindle. If you buy the QCTP, they usually come with a parting tool holder and a boring bar holder but you will soon find yourself wanting at least 4 or 5 tool holders: for your left, right, 60 degree, Spezio cut and knurler! I used one of my old short wood lathe parting tool clamped in the tool post until my cut off tool arrived. Once you start making tools and jigs you will want, not need: transfer punches, collets, boring bar, fly cutter..., then you will have to have a minimill. (Ralph Tuttle) Forgot to add a couple of tips. You can get a 3/4"x3' soft wood dowel from your local hardware store for a buck. Provides many great practice pieces for learning how to chuck, drill and turn your blanks and then you can use those to perfect your mortising technique. If you don't have time to scrounge around for scrap metal, I found that most steel and aluminum places have a separate section that sell drops and remnants (now that you have a metal lathe there is no such thing as scrap!). Mine charged me $2 a pound for various rounds of aluminum and brass and they would even cut them for me. (Ralph Tuttle) I'd like a knurling tool and they don't seem to be so expensive. Cut off tool. No way. A good hacksaw works for me while the lathe is running. You are not cutting down huge items. Solid stock not much more that 5/8” and tubing up to 3/4”. I would like some end mills, but I have yet to figure out how to attach my milling attachment so have not bothered. Center bits are invaluable. (Ralph Moon) Let the fun begin... When you sit back and look at it, the lathe, (and now my mill) is probably the cheapest part of the equation. The tooling is where you are going to sock your money away. As Ralph mentioned below, a QCTP, while not a necessity, really makes life on the lathe soooo much easier. I've got a mixture of indexable carbide cutting tools, brazed carbide cutting tools, and hand ground HSS cutting tools, and the QCTP really takes a lot of the cussing and swearing out of setting your cutting tools to the correct height. No more shimming, you just dial the nut so the tip of the cutting tool is at the correct height, tighten the jamb nut against it, and away you go. I haven't used my dead center very much since the purchase of the live center I have. The knurling tool has come in handy for a few things I've done. The mini lathe isn't built sturdy enough for constant use of a bump knurler or the old standard knurling tool. Little Machine Shop sells a scissors knurler that works great with our little lathes. If you get a QCTP, then I would get the P1 or the P1X cut off blade the LMS sells. Cut off tools are handy, but you can also use the common hacksaw to part larger stock on the lathe. Center drills, get one of the 5 packs from either LMS, J&L, MEC or Enco. I've gone to a 4" chuck on my lathe, since it had a larger throat. A 4 jaw chuck can come in real handy at times too, but it's a bit more work to center up the piece since each jaw is tightened independently. You'll need a dial test indicator to set one of these up, but it is more accurate than a standard three jaw chuck. Boring tools will come in handy too, if you decide to make your own reel seat hardware. What are your plans for the end mills? (Mark Wendt) I was looking through the Power Fibers article on aluminum reel seat hardware and it called for end mills. Basically I have no idea what I'm doing. A book would probably be helpful. (Lee Orr) Ah, I gotcha now. The end mills can be handy for milling out the end caps to a flat bottom. You can also accomplish the same thing, albeit with a few more steps, by drilling the end cap to the desired depth, and using a boring tool to finish out the inside. The issue you'd have with using the end mill is having a holder of the correct size, either mounting it in your tailstock, or your tool post. Course, the same could be said for having the correct sized tool holder for a boring bar mounted in your toolpost. (Mark Wendt) I would say that you do not need an end mill unless you are doing some milling (slots, grooves, flats) or are trying to get flat bottomed holes for reel seats or ferrules. In that case you may be better off to use a boring bar to enlarge a hole or to make one flat bottomed. You can get boring bars as a bar that uses HSS inserts/tool bits, or pre ground with round shanks that may fit the QCTP that you have been asking about. I think that Harbor Freight sells the boring bars as a set of various lengths and widths. Or check eBay for these sets. (Mark Babiy)
I have been using HSS tools exclusively, but there are quite a few sets of carbide tools on eBay that seem reasonably priced. Anyone have any experience with carbide tools on NS reel seats and ferrules? Is it worth the extra cost? Or is HSS better for machining NS? I would like to get some opinions before I order anything, and the "tried but failed" shelf is rather full of stuff. (Jeff Schaeffer) With the exception of the tool I use to cut my convex on my sliding bands, I use HSS to make the rough cuts and a diamond bit to make the final passes. Got my diamond bit off of eBay pretty reasonable. The one I have is used by the Remote Control car guys to turn the commutators on their electric motors. Does good, just don't EVER touch it to ferrous metal of any kind. It will chip and then it's an expensive paperweight. (Bob Nunley) I think HSS is better than carbide in the results I have had. It can be sharpened better. However, I like the diamond Valentine bits best of all. They were recommended by a famous maker, and I had been so happy with it that I almost bought another when my old one disappeared. Jerry Young saved my day with some new cutters that he sent. (Bob Maulucci)
I just picked up a mini lathe and was wondering of anybody could recommend a good source (in the USA) for bits. Also, does anybody have a recommendation on bit material? I was thinking of getting bits tipped with Tungsten Carbide. (David Gerich) www.Mcmaster.com and www.mscdirect.com both have them. Type "2474" into the McMaster search window, it will bring up that catalog page which has some good info. Carbide tipped tools last a bit longer but they are harder to sharpen when they dull. (Mark Shamburg) Either HSS or carbide can be touched up with a diamond hone. Grizzly has a set of 3 for $14.25 U. S. that includes coarse, fine, and extra fine. I've had mine a couple of years now and I liked them enough to get 3 more sets, one for the cottage and 2 for gifts. Usual disclaimers. (Neil Savage) I read of these Grizzly diamond hone sets for $14.25 on this list some time ago, probably from you, and I bought one with some other stuff. I used them yesterday to change the angle on my L-N plane blade and it was relatively quick and painless. I can certainly recommend them. I use the scary sharp system for my normal sharpening. I also use one of the new Veritas guides to set the angle. I recommend that also. (Hal Manas) Many highschools have 'phased out' Industrial Arts and Technical programs that may have lathes and other machine tools that are no longer used. It might be worth investigating how these pieces of equipment are 'disposed' of. Chances are that school districts must offer them through public auction, but if so, there should be notice of such pending auctions. South Bend, Atlas, Hardinge lathes are all out there somewhere, and are usually in excellent condition, not having been used commercially. One feature worthy of serious consideration for an inexperienced person is a 'quick change gear box'. Change gears can be a bug-bear, when setting up for thread cutting. (Vince Brannick) Try littlemachineshop.com. (Floyd Burkett)
A few questions about lathe bits. What size is everyone using, 1/4" or 3/8"? What about indexible bits, are they useful? HSS or Carbide? What one bit is common for turning down ferrules to size? Is there a good place to buy them other than Harbor Freight? I have a 7 x 12 from HB with a QC tool post. I just bought collets, reamers, drill bits etc., and just realized I may not have the correct tool bits for turning the ferrules down. (Scott Bahn) HSS works just fine for making ferrules. You can grind it to any shape you want. Indexible carbide tools are OK but for what work we do for making ferrules the cost is not justified. The HSS can be sharpened sharper and you will get less push than you will with carbide. Use the largest tool your tool post will accept. You can get good tools from MSC, Travers, Enco, and a host of other tool suppliers. You can probably find them locally where you live. I no longer make ferrules from bar stock but the little trimming I do on the ferrules I make I use HSS tool bits. (Jerry Drake) For those who are sharpening their own bits, here is a link to a nice little chart of the tool bit angles used on various materials. I have had good results on Duronze using the angles for brass-bronze. I haven't yet turned any nickel silver so I can't comment on that but it should be similar. (Rick Hodges) I use 3/8 carbide bits from HF with satisfaction. (Mike McGuire) Since you are using a HF lathe, the pat answer is going to be 3/8". That's going to put your tool at center line. You might not want it there but if you don't I'm sure you can figure that part out. As for Carbide or HSS...You are pretty much stuck with whatever shape of carbide tool you buy. It CAN be changed but it's a pain. HSS lets you design whatever shape you want with a bit of ease. You'll sharpen more frequently with HSS but big deal. Also...not ALL HF type mini's took a 3/8" tool. I think some where set to 5/16" but I'm not aware of any that took a 1/4". I'm too lazy to get off my ass and measure mine. I have two HF mini's. I use 3/8" (I think) in mine. One is 15 years old the other is about two years old. They both cut on the center line. Oh...OK, hang on...well hell! They are all 5/16". NONE are 3/8". I'm assuming you have looked at Littlemachineshop.com? HF won't help you in the least on this and of course you didn't get any kind of manual. Nice little downloadable manual from them free. Get it. I was happy to get fifteen years of work from mine before it took the last dump. Now my Atlas won't take anything larger than 1/4" but that ain't the question you asked. Have a nice Sunday...it IS Sunday right? Oh hell...let me go check. (Mike Shay) Changing the subject slightly, I'd be interested in knowing what shape cutters you folks prefer. I've been using off-the-shelf stuff, but really believe there must be a better configuration. I'm not sure I would know what you meant if you started describing top rake and side rake and relief angles, but would like to try to figure it out. Pictures or links to www.MSCdirect.com (or other sources) would be really helpful. What's strange for me is that different shapes seem to cut best on different days. On my Atlas I find bits shaped like the blue ones on the bottom left here work best. On my little watchmakers lathe, bits shaped like the yellow ones in the top row, center, work best. What works best for you? (Harry Boyd) I've been using indexible carbide tool bits/holders for a few years now. I can also get HSS indexible inserts for the holders too. A lot of how well a tool bit cuts depends on the mass and rigidity of the lathe, and how well the "slop" is tuned out of the machine. What might work real well on one machine, may not work quite as well on an identical make machine if the machine is worn, not adjusted correctly, or has other issues. I've got a buncha HSS tooling that I've ground and reground, and just can't seem to get a decent cut, and I've got another drawer of HSS tooling that cuts like a dream. Go figure. (Mark Wendt) Or, if you have a Quick Change Tool Post, you can use 1/4", 3/8" or 5/16", as long as you have enough travel on the adjusting bolt to raise or lower the cutting tool. Which then opens up a lot of possibilities. (Mark Wendt) For turning down outside diameter Duronze round stock I use a 1/4" HSS round nose bit that looks just like this one. (Doug Alexander) A bit ground like the one Doug points out below is also good for turning reel seat inserts. You don't want a sharply pointed cutting tool for turning wood. A rounded one like that, or one with an even more pronounced "round" leaves a very smooth, almost sanding free surface. I've got a 3/8" HSS bit that has a radius from one side to the other, with relief along the entire curve, and some decent rake. I get a very smooth cut from it, with no ridging or "threading" (that would happen if you used a sharp pointed bit), and I can take a pretty hefty Depth of Cut with it, and feed it pretty quickly too. Before use, I hit it with a diamond hone, and it stays pretty darn sharp. Not plane blade sharp, but pretty sharp. NB - this is for use on a metal lathe, not a wood lathe. (Mark Wendt)
Do 118° and 135° bits have different purposes? Used for different metals? One preferable to the other? (Larry Tucker) I'm certainly not a machinist but will try and tackle this one ... Do 118° and 135° bits have different purposes? Used for different metals? One preferable to the other? Yes ... 118º is the most common angle. Usually these drills require a starting “dimple” in metal with a center punch, otherwise the bit will “walk” or “skate” away from the hole location. Bits with a 135º point will start their own hole in metal and, of course, can be used on many other materials. 135º Brad-point bits provide even more precise starting in both metal and wood. I re-sharpen all my 118º drill bits when they are dull to 135º. (Ron Hossack) The 135° bits are self starting IF they have a Split Point. Most do. I do a lot of drilling in steel to make Planing Forms and I will not buy anything other than Split Point bits anymore. Split Point drill bits cut so much smoother than regular point bits. Of course I pay $3- $6 a piece for the bits I buy for production. I can't afford a full set of those quality bits. TiN Coated 135° Split Point brand name bits but they are worth it for the few sizes I know I need. Split Point drill bits: 1) do not require a center drilled start point. 2) do not require a pilot hole unless you don't have enough power to turn that size drill. 3) drill with a lot less down force required because there is no chisel point flat as in regular point bits. That means that the bit is actually cutting all the way to the center. (Larry Swearingen) It's one of those "kinda depends" things. Here on the wiki page down under the "Characteristics" header is a small chart that gives a range of values for angle points, depending on the material. This is actually one of the better wiki pages describing stuff, easy to read, and accurate. Probably more on this page about drill bits than you ever want to know... ;-) (Mark Wendt) Thanks for the replies. Had a consensus going for 135° split point bits until Mark chimed in. Based on wiki link I should have both 118° and 135° and spotting drills also. This pretending to be a machinist can be expensive. I asked because I recently had a 15/32 HSS 118° bit hang up and shatter while drilling thru 3/4" aluminum. Lathe was turning 600 RPM and that may have been too fast. Thanks again for the info. (Larry Tucker) It is unlikely it was the point angle that caused the bit to shatter. This angle just assists in starting the hole. Likely it was one of many potential problems. Aluminum and brass are both soft metals and unless the chips are being thrown evenly out both sides of the bit you have a problem with an improperly/unevenly sharpened drill. This will cause the chips to fill up one flute or both and bang! a shorter drill, and maybe the other part stuck in the hole.. Many cutting tools just tear these soft metals and some low hardness steels. Increase the rake angle as you sharpen these drills just before use. You can judge how clean you are cutting by looking at the quality of the surface of the hole. With the use of cutting fluid you can speed up the drill speed ( let the drill cut at its own speed - don't press it) to improve this surface quality. Be sure to check the chips are clean and coming from both sides of the bit. I don't know if you were using machining oil/cutting fluid, but you should have been. With thick metal like that you should repeatedly clear the chips by lifting the bit throughout the drilling process. The same problem with metal softness crops up when doing threading. To not break these bits you must use cutting fluid and advance 1/4 turn, back up an 1/8 turn to clear and proceed. I wasn't there, so don't know if these ideas are relevant, but these are common problems. Hope this helps. Remember it is not just the spindle speed you need to worry about, but also the drill size as it is the speed of the cutting edge which is important. In milling metals this is often determined by using the approximate formula RPM = 4CS/D. CS is the recommended cutting speed for that metal and D is the diameter of the mill. Same basic principle goes for drilling. The larger the diameter of the drill the slower the spindle speed. (Dave Burley) One thing I would do is stay away from those big drill bit sets. Most of those are junk drill bits, and a waste of your good money. If you want to buy a drill bit set, buy one of the smaller sets, and then replace those as they break or get dull with good, quality drill bits. You'll find there a small number of different sizes that you use the most anyway, and I usually buy them in packs of 5 or 10, depending on where the price break starts. Then there are specialty drills, like brad point, carbide, and all the "coated" drills. Those I usually buy on an as needed basis, much like I do with reamers, and collet chucks, and end mills, and lathe cutting tools, and indexable inserts, and... One can never have too many drill bits. Or for that matter, toyls. (Mark Wendt) I've always wondered, how do you know which drill bits are junk before you buy them? I look at a catalog like MSC and there are dozens of brands. Or do you have to go to a brick and mortar industrial supply and buy over the counter? Once I bought a set at a flea market that actually untwisted. It was kinda funny. (Frank Stetzer, Hexrod, Taper Archive, Rodmakers Archive) Usually price pretty much confirms what's junk and what isn't. Also, if you go to any of the MSC/Enco/J&L web sites, most of the "junk" stuff has a label like "value" in it. But price pretty much confirms whether something's quality or not. The old adage proves true - ya gets what ya pays for. If you're buying at retail that is. There are some great deals out there on eBay, and other places, and from folks just getting rid of stuff, but if you're buying new, and you want good quality stuff, expect to pay for it. Kinda like bamboo rods... (Mark Wendt) As you know, you don't always get what you pay for in metal working tools, but if you use a big well known American manufacturer you can be pretty sure it will work well. They will carry a high price for that insurance, however. It is often worth the gamble, especially nowadays, to try "import" items from a well known supplier (say MSC and ENCO) and trust that the supplier provides a "guarantee" on the quality, within a limited range. I would not make this recommendation to a machinist who makes his living this way, but for hobby stuff most are OK. A few years ago tempering (and why your drill untwisted) was a problem with Chinese goods, as I suspect they did not have the capacity, but lately, I find these are better. I have tempered some of these in years gone by. Heat them to cherry red, quench in oil, descale, heat to blue/violet on the shank and keep the cutting edge straw yellow. Quench quickly in water. Sharpen carefully to keep the temper, as you should with all these goods before you use them, regardless of their origin. Never expect a tool to come ready to use. (Dave Burley) Was not interested in a set, only some needed replacements. That and was really curious about differences between 118° and 135° bits. I already have too many drill bits. Problem is most are dull or ruined from me trying to sharpen them. And the toyls are now taking up almost all of the work space. (Larry Tucker) Okey dokey. I was just mentioning that, in case some folks didn't realize those big sets weren't necessarily a good deal. Toyls taking up almost all the work space? you say that like it's a bad thing... ;-) (Mark Wendt) You ought to consider getting a Drill Doctor. The one I have sharpens to either 118 or 135 degrees, with or without split points. I would not be without it. (Joe Hudock) I have a Drill Doctor but have never been happy with the results. Sharpened bits will work OK on wood but not so well on metal. Centers don't seem to be centered. I will be the first to say it is probably operator error. (Larry Tucker) No matter what metal you are drilling in, cutting fluid can be useful. Cheap and in convenient small cans/bottles is cutting fluid sold for tapping (cutting threads). Also, to avoid binding up which can result in shattering your bit, withdraw the bit regularly to clear chips. It is easier to get precise diameter holes if you drill first with a slightly undersized bit and then open the hole out with the correct size bit. To save money on having a number of bit sizes, check out sets of wire-gauge bits. The angles will be 118° in all likelihood. (Tim Anderson) You'll never get a "precise" diameter hole with a drill bit. It's just the nature of the beast. In order to get a precise diameter, you've got one of two options. First, drill undersize and ream. Second, drill undersize and bore. Of these two techniques, boring out the hole after drilling is the most precise, and the only one guaranteed to ensure a straight, non-wandering hole. The first will ensure a precise diameter, but the reamer will follow the hole, resulting in a precision wandering hole. One way to avoid most of the wandering drill bits tend to do is to peck drill. Push the drill bit to no more than the diameter of the bit, back it out, clean the swarf and peck it in again. Repeat till you are through. Also, sneak up on the final diameter of the hole you are trying to achieve as Tim mentions below. Instead of using the usual "centering" bit that seems to come with every lathe that has a tailstock and chuck, use a spotting drill. Spotting drills can be purchased with the same cutter angle as your drill bits. Good, heavy sulfur based cutting oils work very well on steels and iron. For aluminum, believe it or not WD-40 works well, as does rubbing alcohol. For tapping, the sulfur based cutting oils work well on steels and iron, and the WD-40 for aluminum. If you want to spend the extra money, Tap-Magic works really well. Be careful with this stuff though - there are different formulations for steel and aluminum. If you use the formulation for steel on aluminum, it will turn the aluminum black and eat away at the threads. Found that out the hard way. Once... (Mark Wendt) Good, heavy sulfur based cutting oils work very well on steels and iron. For aluminum, believe it or not WD-40 works well, as does rubbing alcohol. I use some inexpensive stuff you get at Walmart. It's advertised as 'Odorless and Tasteless' .... figured if my grandmother used to make me take a tablespoon of this stuff nightly and it kept my holes unclogged it would work well for tapping and boring ... Castor Oil ... (Ron Hossack) Almost any oil will work in the short term to provide lubrication, but considerations like flammability (e.g. alcohol) and, in the case of castor oil, I don't know, but I think it has a lot of unsaturation and will form a gummy film unless scruptulously cleaned off. Lots of oils of plant origin have this facility, (think metal ion cured oil paints) so use caution. Counter to this, I do know highly purified castor oil is used in motorbike racing and was the bane of WWI pilots who couldn't wait to get out of the plane after a flight, since castor oil was the lubricant of that up-front engine. And, yes, I too took that castor oil and also cod liver oil treatments in orange juice from an early age and do not like orange juice to this day. (Dave Burley)
I am going to purchase an arbor so I can use the jacobs chuck from my drill press on the lathe. I need a morse taper and a jacobs J33. I am seeing JT33 everywhere. I asked a couple of tech support places and get the too common smart alec responses. Do any of you know that the JT33 and J33 tapers are the same? (Timothy Troester) Pretty sure they are. Here is a link to Wikipedia on tapers, including a table for Jacobs that shows "JT" as the acronym for Jacobs and only one size listed for "33" (Rick Kruger) They are the same. (Ron Hossack) Hope this works... Using cell phone. (Ron Hossack) I got mine at Micro Mart. (Tony Spezio) Tony's source for the rotating chuck. (Marv Loopstra)
For you folks that have machine tool experience. Is there a Jacobs chuck that free spins like a live center on a #2 morse taper? If so, where can they be found? I wish to use one for turning reelseats and grips without burning up the points on my live center. (Jon Holland) Yup! (Marv Loopstra) I was wondering if anyone knows if this will fit the Sherline Lathe. There isn't anything in the "Compatibility" tab at Littel Machine shop for the item listed below. (Phil Crangi)\ Doesn't it say it has a Morse # 2 taper? What taper does the Sherline tail stock have? That will tell you. (Rick Kruger) If this is a typical Sherline it has a headstock with a MT1 taper but the tail stock is MT0. (Ron Hossack) Sherline's website says their tailstock is a # 0 Morse taper, the headstock is a # 1 Morse. (Henry Mitchell) PSI is another option.1/2 in live chuck for 2MT. 3/8 in live chuck for 2MT. I have the 1/2" for 1MT version. I've only used it a couple of times, but it works well for what it was designed to do. (Paul Gruver) That is the best price I have seen for them. I bought mine several years ago and paid double that price for it. (Tony Spezio)
I have a Homier/Speedway 7x12 lathe and want to ask Santa for a four jaw chuck for making quads. Should I ask for self centering or individual adjustment? (Tom Key) The advantage of independent jaws is that you can hold work in different ways other than centrally and once you get the hang of positioning the work using a dial gauge the individual adjusting jaws are no big deal. If you're always going to centrally position the work, go with the centering jaws. (Tony Young) Tony is absolutely right and he was faster with a simple response. I am working on a more detailed response. (Rick Kruger) Looks like Tony and Rick have given you good answers Tom. I just want to say thanks for asking good questions fairly regularly and helping to keep the discussions moving around here. Great question Harry. Caveats....I am not a machinist so parts of this may sound sloppy and kludgey......I do not have a 3D printer or the design files for the bushings (They moved away). I like using a collet chuck every chance I get..... If you already have a collet chuck........make some plastic bushings. These can easily be made on those new 3D printers. (send a file to the printer and instead of spreading ink on paper in 2D it spreads plastic on a platen in 3D). Design a bushing with a .75 inch outside diameter (can be anything that matches a collet you already have) and with the size of square hole you want on the inside and radial relief slits in the corners to allow for the bushing to contract and tighten as you pull down the collet. The relief slits only need to extend down the bushing in the are where the collet bears against. This type of bushing works well if you have a bare joint and can slide it down to where you want to chuck the rod. Another style of bushing can be made from the .5" dia nylon bushings you can buy at the hardware store. Drill an appropriate sized hole and cut the bushing in half length wise. The nylon will grip the rod without damage and will hold the tip well enough to final fit the ferrule slide.... being two pieces it enables you to be able to chuck up the finished tip with guides. (Gary Young) Great thinking Gary. Your ideas also will work with 3 jaw chucks. (Harry Boyd) And could relieve someone working on hex and quads from needing to buy a 4-jaw chuck. (Rick Kruger) Something that I have done is similar using wither a piece of brass tubing from the hardware store or a dowell that I drilled. Put some tape on the rod section and force it into the tube or hole in the dowell Clamp in your three jaw chuck and have at it. If you use a large dowell you can slit it so it can expand a little to hold more securely. Simple and expedient. (Gordon Koppin) If you already have a collet chuck........ There are a few options for collet chucks and I used to have a ER32 set but went with a different setup (MT2 collets). I make quite a few "plastic bushings" but my material of choice is either 1/2" or 3/4" Delrin (acetal) rod. If you already have an ER32 collet chuck I do have a couple of extra larger sized collets I can send to someone so they can try this out. I normally turn down my 3/4" delrin with a 1/2" tenon and insert that into my 1/2" collet. (Ron Hossack) What great ideas, Gary, as usual. While maybe not being a machinist, you certainly "get it". Great advice. No surprise. Went looking for 3D printer reviews. I can see why you may not have replaced the 3D printer after it moved away. Those buggers are expensive, especially to get one with greater printing space. I think I'll stick to machining bushings and other stuff for a while. (Rick Kruger) I make some quads. If I don't have a square collet that will work, I just turn Delrin like Rick and Ron. I have fairly decent size set of drills, so I can usually find a size that works, or bore one to size if need be. I usually make the ID a few thousandths undersized. Maybe 1" long? Face the round stock Delrin, drill it, part it. Then I just put it in my soft jawed vise lengthwise, gently tighten, and cut with a hacksaw. Clean up the ends with a bit of a chamfer so the Delrin doesn't damage the cane if you have a bare connection. With a split bushing of Delrin or a square collet, I like to use a little tape to protect the blank since it is holding the corners, which can be especially sensitive on a quad. Make sure you have the same number of tape layers on each corner of the blank or it may not turn concentrically (if'n your numbers are good to start with). Don't clamp down in your collet (I use 5Cs on my old Atlas) too hard or you will damage the fibers, even with the tape. Also, don't take any heavy cuts or the blank will spin in the bushing...or worse...Delrin is slick! And just a reminder to support the blank spinning in the lathe: I like quads but they are much harder to get "perfect" than a hex and spinning at high speed can get exciting real fast! The 3D printer is a great idea, Gary. I had thought of it for making cap and ring parts--when a metal printer becomes available at a decent price--but it seemed a bit like cheating. Call me old fashioned. But lathe tools? That's a great idea and guilt free. Anyways, split bushings from Delrin are quick, not too difficult or expensive, and effective. (Chris Moore) More ideas. If you are doing a lathe operation on the butt section of a quad that involves ferrule installation, be aware that you need to get that plastic bushing off! :-/. After the ferrule is glued on, your well fitting bushing ID will now have greater ODs on either side of it. Hard to get off without damaging your blank. Consider building up the blank with enough tape so you can get it out safely. This works with bushings and square collets. You can also cut the bushing all the way through, in two halves lengthwise, and use it that way. Or make splice joints. (Chris Moore)
I’ve just begun making ferrules and reel seat hardware (using Duronze -- C642). Pretty good results so far, but I’m wondering if any of you can advise me on the best type of triangular insert to use on this material. (My lathe is a nice, old 12x36 Craftsman/Atlas, fitted with a 250 series quick-change tool post and half-inch tool bars.) Please, for the time being, no debates about tool-grinding vs inserts.Thanks much, in advance, for whatever help you can offer. (Bill Harms) I have used carbide and high speed steel inserts on Duronze with equally good results. I can't tell any difference. (Mike McGuire) I do not have any experience turning Duronze, but my assumption it is similar to brass, bronze and aluminum (non-ferrous). I love carbide inserts for working on ferrous metals. High Speed Steel (HSS) has always been my preference when working on non-ferrous metals. I have been using a set of toolholders and HSS inserts from A.R. Warner & Co. for over 10 years. My go to cutters for these materials. LittleMachineShop carries AR Warner products and I just learned by Googling them that they have quite a variety of HSS insert/toolholder types. All I have is the 3/8" Warner toolholder/insert set, of which I use almost exclusively the left hand cut tool. I have but do not care for or use much the Warner boring bar because it doesn't have clearance or relief. I had to grind more relief, but I do use it when I want a really nice finish on a bored hole. Having a Morgan Hand Mill that comes with carbide inserts that look like they would do well with these materials, I haven't tried them, mostly because the HSS inserts do such a good job. Might have to try then, though, just hadn't thought about it. (Rick Kruger) Well, you know you won’t get a direct answer from me, but… For my titanium reel seat hardware, I have been very happy using "carbide-tipped lathe tools" from McMaster-Carr instead of inserts. I use mostly style AR and the things last me a long time. Even though McMaster-Carr recommends the “tools for all materials” for titanium, I successfully use the ones for steel (for about 1/3 the price) to cut the softest grade of titanium (Grade 2). (Tim Anderson)
|