Bamboo Tips - Tips Area |
|
< Home < Tips Area < Nodes < Filing
Quite awhile back I was filing some nodes on a culm and thinking about how the culm has the tendency to slide around on the workbench as you file. I thought to myself, "There has to be a better way to do this than just having the culm resting on the bench!" So I was wondering if I have this problem everyone else does too and I wondered how everyone else was doing this procedure. Here is what I came up with to elevate this problem. I made a rack to hold the culm while I worked on it. Not only does the culm stay in place but it is elevated too for a better angle to get at the nodes. (Bret Reiter) I have screwed a 2x6 to the edge of my work bench, edge up, that sticks up over the surface of the tabletop. The 2x6 is about the internal width of the 1/2 culm and keeps it from rolling around. (Timothy Troester) I have always used a section of wooden stair rail. It is flat on the bottom and round on tip. It can be configured how you will. Elevated, stationary or loose. . You don't really need a lot. I have gotten by on about 18" for years. (Ralph Moon) I use my Hida star splitter to split to 8s. Then I file the diaphragms in my bench vise or with my disc sander. Then I split down. Then I flatten the split strips in my bench vise. I have been also straightening them in the new Waara jig I got from John Long. Works nicely. (Bob Maulucci) I've been using the Waara Node Press from day one. One thing that you could do to speed up the process of node pressing and straightening, is to do them both at the same time with your Warra Press. This will eliminate the need to have to heat the strips for both operations. That was Bill's line of thinking when he designed the press. Quite often when you heat the nodes more then one time, it seems to make the planing process seem more difficult. The nodes seem to become physically harder to plane. Just try and first straighten the node, and when it cools just enough to stay in place, quickly flip the strip and flatten the node like you want it. With a little practice, you'll find it quite easy to do both operations with the Warra Node Press, great tool. (Jim Bureau) I am using the Waara with my vice (not in the vice, however). I put a cut on the back side of the node to give an area for displacing the node. Then I heat and straighten using the Waara press, and then quickly hit the sides in the vise and then clamp it in the vise to flatten. I move quickly and it is still pliable enough to use both devices one after the other. I then leave it in the vice and go to the next strip. My vice has the V notch for the ridge, and it does such a good job I will not change that process. Thanks Tony Spezio! **I HAVE ONLY BEEN USING THE WAARA FOR LESS THAN A WEEK**, so I do not want to sound like the final answer. I would love to see a real expert like you or John use the press. (Bob Maulucci) Thought I would jump in here with a few things I am doing now that have saved me a bunch of time and in my opinion improved the node situation. I did not invent these operations but incorporated them after reading about them. When I select a culm I decide where I need to cut it for the node pattern on the rod I plan to build. I then cut the culm and split each section in half. It is much easier to split and control the split on half of a culm. I then split the halves into sixths. After splitting to sixths I turn on my bandsaw and in moments the dams are gone! Next I will split the sixths to the rough strips according to how the flaws or leaf buds fall on the pieces. When I have selected the pieces I will make the rod from I stagger the nodes and cut them to length (+). I then give them a good hot bath! Two days minimum in the water before working nodes. I now press my nodes in a notch in my bench vise, and life is good! Smallest nodal strips I have seen on any rods. (Steve Trauthwein) I split the culm in half and knock out the diaphragms with a gouge and mallet. I then split the whole culm up and plane the pith side flush and file the node slightly in the bench vise and heat press. Call me "old fashioned". (Marty DeSapio) OK what I have done is take a 1X4 about 2' long and made a cradle in it. (Bret Reiter) I split first, file nodes later. If you split into strips first you can hold the strips in your vise and carefully remove just the enamel at the node with a file. This allows you to flatten the outermost fibers at the node instead of filing through them to get a flat surface. Of course, splitting first also allows you to bend he strips and hit the nodes on your disk sander to flatten them in a fraction of a second if you don't worry about the surface fibers at the nodes. (Robert Kope) I prop mine up on some old socks filled with sand, and that seems to hold them very stable; has the advantage that it's as cheap as chips, and you can have as many as you like. I use these socks for holding anything roughly cylindrical. I file my nodes minimally at this stage, and finish filing when the culm is down, usually, to eight strips. The reasoning here is that I am then dealing with a strip with less curvature, so I will remove relatively less bamboo in eliminating the node. The old sock full of sand is also a great infinitely variable weight for the binder. (Peter McKean) I know this may be blasphemy, but I've found that a 1" belt sander with a fine belt works wonders and saves gobs of time. I split into thirds, then take the strip to the sander and just kiss the belt to the node. Don't use the platten behind the belt, but take it up a little higher where the belt runs free. If you press it against the platen you will probably take off too much. But up where there is some give in the belt it's pretty easy to control, especially if you take the edge off the belt on other materials to make it kinda dull. The belt tends to curve lengthwise, so the sanded part is less than an inch, closer to half an inch. Takes only a few seconds per node. Really saves time if you do it before you split into individual strips. I also use the sander to hollow out a shallow half moon on the pith side of the node to give room for displacement in pressing. Start on the platen to take out the bulk of the node and slide it up to the free area to gently hollow out the node. The sander has a 1-1/4" port to accept the hose from a small shop vac, which virtually eliminates dust. Only downside is the noise, but it saves so much time, it's worth it. I'd rather be planing than filing. It's one of the few power tools I wouldn't do without ( and I'm a dedicated hand tool user). The Delta cost about $80 from Lowes, Craftsman has a model for $99. The other indispensable power tool is the Medved beveller I just finished. Can't say enough good about this device! Saves time, but better, it gives PERFECT triangles. The beveller is REALLY noisy, though. Use ear plugs. (Bill Hoy)
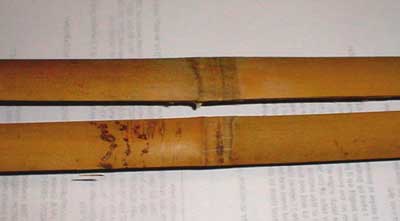
I started filing nodes tonight, and I would like to get some list feedback before I ruin this entire culm. I have no idea what I am doing, so I really don't know what the filing should look like when I'm done, but below is a picture of a couple of nodes that I filed:
This is what I did: split the cane in to 1/8 's (using the super cool Hida splitter - thanks Bob for the tip!), took a split section and started filing nodes as flat as possible with a Nicholson 8 inch "plastics" file, filed about 1/4" off the side of each ridge & until the valley closed to about 1/8" wide. Then took 100 grit sandpaper and sanded out the file marks. I can run my finger nail over the node and the surface is smooth. The profile from the side shows a smooth humped area (no ridges or valleys). The top node was first, the bottom node was six nodes later. I would appreciate any advice on how I can improve. (Kyle Druey) So, the filing doesn't look too bad. It looks like you will have a dip in between the filed sections that is lower then the file marks. You will have to deal with this sooner or later. I would say that you will either have to file the individual strip until that goes away or press the node or both. Personally, I would probably keep filing until I got rid of the deep part. I am assuming that what I am looking at in the picture is a deep part in between the file d marks. BTW the filed sections look normal. Just what I would see on one of my rods. Hope this makes sense. If it doesn't ask more questions. (Martin Jensen) IMHO, you are spending too much time on the node at this stage. Skip the sandpaper, as you will be finishing the surface of the strip later. At the split strip stage, I file about 95% of the hump away, straighten any crooks at the node, and then go to rough planing. After the strip is a triangle, and I have taken a couple full length passes with the plane, I file away any remaining hump. There is often a dip where the cane comes out of the node. These are often about an inch long, and keep the surface of the cane from contacting the form. They can be dealt with by heating the center of the dip, and bending it downward. This will leave the strip bent down at a severe angle as it exits the node. Heat this area and bend it up. The dip will now be gone, and the strip will lay correctly in the form. I don't press nodes, so using this method results in the minimum material being filed off, which is my goal. When the strip is ready for the final forms, I use a scraper to remove the enamel and smooth the surface. Don't worry about final sanding on the strip until the glue removal stage. (Tom Smithwick)
This might sound like a neophyte's question, but I was wondering when those of us who don't build nodeless file down the nodes on our cane. I'm doing mine right now on the half splits of each section because I think it's easier and quicker than after further splitting. Does anyone do this differently? (Dennis Haftel) I follow the methods used by the Austrian rodmaker Walter Brunner. This was reported by Stuart Moultrie, I believe last May after a visit to his shop. No filing on the node but is heated and pressed in a smooth jawed vise with a vertical "V" slot filed in one jaw that accepts the lip of the node. Lip is then filed after flattening. Result is that the material removed around the node area is minimal and the power fibers remain intact. I should add that I had to find a different way of making strips. Some of the culms are in a basement ceiling rack and have been stored six years. Whenever I tried to chisel out the dams I was getting a lot of splits. Now I just split with the dams in place and remove the dam and a short length of the pith with an air die grinder and a carbide burr. Taking out a bit of the pith right on the node area will allow the strip to displace and flatten the area around the node. (Jerry Young)
I was planning on doing some heat treating today buy it started raining in the night and shows little chance of stopping so I decided to start work on the strips for the third rod. A couple of my few culms I have rather pronounced dips next to the nodes and as I've not yet built a splicing block I need to work with them any way. My choices are sand down to eliminate the dips but I would likely get into the power fibers on either side doing so or try to raise the dips. An old wood working trick is to place a drop of water in a small dent to raise it. I was thinking of trying it on the problem node areas. Has anyone tried using a small round file to remove the enamel in the dip but leaving it on either side and letting a drop of water sit on it to see if it would raise the dip? Displacing the node doesn't correct the problem and I've had limited success pressing the node flat enough to remove the dip when it's pronounced. (Wayne Kifer) You want to put a drop of water on each split strip at each node to see if it rises? OK WARNING...heretical comment coming up... I sand all my nodes before splitting. It's just the way I like to do it. (Mike Shay)
I guess I didn't displace the nodes enough the first go around. I now (after heat treating) have nodes that need to be flattened, but I have them at 60 degrees at this point. I can I get them flat again without filing them down more? (Louis DeVos) Since you have already heated the nodes at your initial pressing and then heat treated, I wouldn't reheat them again to re-press personally. It's time to break out the 212 and a bit of sandpaper to get them flat again. (Mike Shay) Before you start filing off the enamel side of the nodes, do a little measuring. If you still have plenty of material to remove I see nothing wrong with gently heating and pressing the nodes again. (Finally found something about which Mike Shay and I disagree <g>) I have devised a little gizmo with a 60* angle to firmly hold the pith apex while repressing the node. Of course, if you're within .050" or so of your final dimensions, I wouldn't start monkeying around with heat and a vise. (Harry Boyd) Good idea Harry. I think you have the right solution to Louis' problem. I used to have a problem with nodes popping back up during heat treating, and I was planning on making an aluminum jaw for my vise with a 60 degree groove for exactly that purpose, but an ounce of prevention is worth a pound of cure. I've mentioned this several times before on the list, but it bears repeating. You will have fewer problems with nodes popping back up if you bind with nylon for heat treating. When you cook the moisture out of the cane, it shrinks. If you bind with cotton, this allows the wraps to loosen and the nodes come back up. If you bind tightly with nylon, the nylon stretches and keeps pressure on the nodes while you heat treat them, and they stay flat. This may not work in a conventional oven - the radiant heat from the heating element might melt the nylon, but I have been doing this for many years in my heat gun oven with no problems. The melting point of nylon is 420 degrees F. In the heat gun oven (comparable to a convection oven) I don't take the temperature over 325. I'd like to hear if anyone has tried it with a conventional oven. (Robert Kope) I only flame with big flame thrower style torch, so I'm not sure this suggestion will help you, but I use my LN high angle plane with a good sharp blade to flatten my nodes. I saw strips out on a bandsaw and then flatten em' with the plane, as they MUST be flat. Also, nodes must be flat on the sides as well ( the reason why I started bandsawing them instead of splitting). I'd take me plane if I were you and attack them. You will not compromise the quality of the strips, as they must be flat and the junk must be removed from them. I've tested many strips and blanks for breaking strength before I ever sold rods commercially. The way I prepare them does not compromise strength or looks, in fact, once flattened with a plane, they will then lay in the form so much better also. (Jerry Andrews)
I am working on rod #2 (#1 is still awaiting glue), so a complete newcomer. I'm hoping that this second effort doesn't turn into kindling. The reason is that at multiple nodes on this culm one side of the node is noticeably thicker than the other, and some of them have dips on one side of the depression. These have confounded my efforts at flattening, it looks like I will have to remove a lot of material from the thick side to get it to match. Is this a job for vertical straightening (?) Any suggestions? (Ray Wright) An old wood workers trick is to use a damp wash cloth and a hot clothes iron set on steam to raise dents and dings. I had a culm that had some dips deeper than what I was expecting, but was able to still make use of it without having to remove too much at the node. I use Tony Spezio's method of soaking for a week, dishing out behind the node and then displacing the node with a heat gun and notched vise. Tony did an article in Power Fibers. (Scott Bearden)
Can anyone suggest a file for node filing. I have several "Mill Bastard" files. Is this what I need? (Jason Moody) They'll work fine, though a double cut will take the node down quicker and the surface can be cleaned up afterwards with a finer file or sanding block. (John Channer) Yes, a Mill Bastard is the file you can use. If you displace the nodes first there will be very little filing and that is done after the nodes are displaced. I do only the nodes I will be using and after the strips are split and nodes displaced. Saves a lot of filing on nodes you will discard. (Tony Spezio) A vixen file is what I use and it works like you won't believe. When you look at the teeth on these files you think they will tear everything up, but they cut extremely smooth and fast with little or no build up. Here's a link to some information about vixen files. They are not cheap but you only have to buy one in a lifetime. (Joe Arguello) It looks like it needs a holder too? I don't see one on that site. (Neil Savage) It works better just like that, no holder, took mine out of the holder. These files have teeth on both sides. Believe me if you get one you will wonder how you ever got by without one! I used these for 20 years in the Autobody biz. (Joe Arguello) They don't have to have one. The holder is really designed to allow the file to be be flexed into a slightly convex shape. Vixen files can be had in a rigid, tanged style in addition to the flexible variety. (Larry Blan) Snap-On tools has a holder for the flexible vixen - according to our local franchise. I don't see one on the web site, though. But, they no longer carry the rigid versions of the vixen file (often recommended on this group for filing forms). (Greg Dawson) If anyone is looking around for a Vixen file, it is probably as well to know that in areas like Australia, NZ and generally areas of British origin, they are known as Dreadnought files. I passed over a couple on the internet before I realized that. (Peter McKean) You should be able to do better on Ebay. That's where I got mine. (Dick Steinbach) I have a question for you. I'm not being a wiseacre but how does it work to flatten nodes with a flexible file? (Timothy Troester) That's a good question, flexible is a relative term, in order to flex that file you have to put it in a holder for that purpost which has an adjustment kinda like a turnbuckle. The file blade is quite ridged. I cut the culms in appox. half lengthwise, (cut through one of the nodes) split my culms in half then file from the center to each edge toward the split edge, then I turn the culm end for end and do it again. hope that makes sense. (Joe Arguello) Yep! Joe, thank you! I tend now to file perpendicular to the nodes, in the direction of the length of the cane because when I started I would sometimes cut into the bamboo adjacent to the nodes. I would love to find a file that cuts faster than my Nicholson double-cut, though it is a good file. I have worn out my medium cut and my fine is about gone. isn't it amazing bamboo can wear out a file? (Timothy Troester) I started to use a regular shoe rasp or 4 in hand rasp as some carpenters call them to hog off the nodes & then switch to a finer file to finish. Something I learned from building guns when hogging off the wood to get the stock shaped & before that in the body shop to get the filler worked down to put the air file to work. Finish it all up with fine sandpaper. (Bret Reiter) A Nicholson 4 in hand is what I use also. There is always just the correct rasp or file as you work. I use it on strips, however, not on the entire culm. (Hal Manas) I just use it on the nodes as well. I guess I should have been more precise in what I was saying. (Bret Reiter)
What is the purpose or advantage of filing the nodal ridge before splitting? Does it split easier or straighter? Does it give you a more even color, or less bright nodes on flamed rods if you do it before flaming? All of this talk about belt sanders has got me thinking about purchasing a 1” belt sander to take down the nodal ridge before splitting but I have never done this in the past. I’m just curious as to why some builders perform this step. (Greg Reeves) I think you do it then because you can. It is easier working on the whole culm than a bunch of individual strips. (Rick Hodges) You hit the nail on the head on all counts and also like someone else has already said it's easier to work on the whole/halved culm than each strip. (Joe Arguello) It may split easier, but it is not necessary. I split the culm into 24 strips, then sand both the node and pith side of the strip with a belt sander. I retired the flat file a long time ago in favor of this method and it seems to work fine for me. Some may argue this is heresy, but I find that filing the nodes off with a flat file a mind numbing a time consuming job that takes time away from other far too important rod building jobs and no one can tell how you sanded the nodes once the rod is complete if you do it right. (Scott Bahn) I HATE nodes!! I split and and cut the strips to length, then I address just the nodes that will be in the rod. Much easier for me! (David Dziadosz) David, a good illustration of Tony's First Axiom: "Why work on something that's going to wind up in the trash?" I also see very little value in doing all the nodes before splitting - doesn't really make the splits any straighter. Besides, since I press/displace my nodes it removes the bump used to press the node. After pressing there is only the little ridge and dirt line to be removed, hence less potential damage. (Darrol Groth) NODES! What are nodes? I build Node-less. Next time you want to build a rod with nodes, put you thumb on the bench and hit it with a mallet. If you want to build node-less, put your thumb on the bench and miss it with the mallet. Now tell me which one feels best. (Don Schneider) Ha! Ha! Don, I've had some bad experiences with node-less. Dealing with the nodes is easier than repairing a scarf joint for an angry customer! (David Dziadosz) I like pain... =8^Þ (Mark Wendt) If you flame, you can have dark nodes if you file first. I prefer to flame, split, then file. I have more control over the node and there is no risk of putting a deep gouge in the culm that may or may not come out later... The nodes can stand out, or be sooted (see Wayne's book for the technique.) Also, I bend the strip over a half-moon shaped piece of wood with little L hooks to hold the strip in place while I file. Easy, and you take off minimal material. Use a trash can as an outline if you want to make one. A John Long trick that really works. (Jeff Schaeffer)
Here is a great file for removal of the node lump. Lee Valley Japanese Milled-Tooth Files. The one I have is a flat files described by Lee Valley 8" Files, 5/8" wide, 5-1/2" cut length in "fine" tooth". An Xfine is also offered. (Don Anderson) I'll second Don's recommendation. I've used both the fine and extra fine flat files for years. They cut like a plane blade. They are much faster than mill bastard files and leave a pretty smooth surface. (Dennis Higham)
I look for simple tooling solutions to enhance rodmaking. I think sometimes we over engineer solutions .. :) Thanks to James Bond for making this video. (David Van Burgel) Nice simple solution. I will do that next time I need to file a culm in the round. I can see when I might need to do that but most of the time I file each strip after I've split to the strips to the size required. (Boris Gaspar) Nice Dave, good upgrade to the one I came up with about 20 years ago except you put rollers on yours. My original idea can be seen on my oven site. I think I may add rollers to mine. Thanks for sharing this with us. (Bret Reiter)
|