Bamboo Tips - Tips Area |
|
< Home < Tips Area < Nodes < Pressing
The best tip I ever found was to only heat your nodes once. First press them with the enamel up for 5 seconds, maybe 3 or 4 on thinner tip strips, then flip it so the enamel is facing the jaws and press while you heat the next node. This was from Paul Whitely quite some time ago. Nodes drove me nuts until I tried this method, it always worked out that whatever bends and kinks I got out the first heating came right back when I tried to get the other direction straightened out. I use a 7" woodworkers face vise to straighten nodes and I crank down on them with all I've got, only the most cantankerous of nodes won't yield to this method. (John Channer) I work in a very similar fashion, and also credit Paul for bringing it to my attention originally. Seems like he originally suggested heating the entire strip in the oven at 400* for 2 minutes, then pressing -- or something like that. Some of the recent threads about removing a little of the pith to provide relief for the nodal humps makes sense to me. Seems that would facilitate, as someone has said, displacing the nodal humps rather than compressing them. Just wondering, do you remove a little pith or just compress the humps like me? (Harry Boyd) I made a jig for my drill press that has pieces of wood that comes to a point right in front of a sanding drum, I can set the distance whatever I choose between the point and the sanding drum,. I run all my strips thru this with the pith side to the drum, it makes them a uniform thickness from end to end, regardless of any bumps or bends, then I heat and straighten. When I clamp down, the strip has no choice but to be straight. It also saves some planing effort, as I thickness my strips to about .20 over the thickest dimension of the finished strip. It takes me about 20 minutes to thickness 18 strips and I think it saves me about 3 hours of aggravation. (John Channer) I do this, as well, but still hollow out at the nodes using the my vertical belt sander. It has a roller that is some 3½" in diameter, so it makes it easy to get a nice dip in the strip. Also, I'm not compressing in the vice but displacing in the vise. Never had a strip break at a node. (Martin-Darrell) I don't bother with the inner nodes at all. Don't even knock them out after splitting in half. Forgot to do it once and I did not have any problem splitting the strips. After the strips are split. On a small bandsaw, I saw out a shallow 1/2 moon on the pith side removing the whole inner node. This gives me the relief for flattening. (Tony Spezio)
Here's a way I found makes node pressing (vise method) go twice as fast. Make a horizontal rack about about 10" wide about 48" wide along the edge of your bench. Lay your heat gun in the center of your bench. You can be preheating the strips at their next crooked node at various distances from the heat (The next strip you'll do is closest to the gun). Benefits are: You don't have to wait to heat the next strip. The cane is heated completely through. You tend to keep track of the next node to do one each strip so you don't find the one you missed after you put everything away. (Jim Utzerath)
Instead of filing nodes you might try this method I use. I think it will work just as well with dry nodes. It will take more heat than with wet nodes. I don't do anything with the nodes before splitting. The culm is split and all the strips are split to size. I don't even bother with the inner nodes. After the strips are staggered and cut to length, the inner node is cut out in a long 1/2 moon shape. I have a small band saw I use for this. Only cut out the pith. The strips then are soaked for 3-4 days. Soaking the strips only requires about 30 seconds over the heat gun to soften the nodes. A plate with a notch for the ridge of the node to fit in, is attached to one jaw of my vise with double sided tape. The ridge is set in the notch and the vise closed. The node is displaced. You will find the fibers in the node will be almost straight with the other fibers in the strip and does not harden up. When out of the vise, the only thing to file off is the node ridge. It takes about 4-6 strokes with a file to knock off the ridge. The finished rod has a very small nodal area. Of course you can always go nodeless. This is not my original idea, I just built on it from some things I read on the list. To see some pictures of this, click here. (Tony Spezio) Here is something that has got me a bit puzzled. The notch in the press. Logic would seem to dictate to me that the purpose of pressing or displacing nodes, aside from removing the bump, would be to bring the power fibers into alignment with the rest of the strip. These fibers being the backbone of the rod, it would seem to me that one wouldn't want to break them on the enamel side of the strip. Therefor, wouldn't pressing or relocating the entire nodal ridge and then sanding off the enamel be the most advantages method? I know opinions differ on this and I would be interested in the pros and cons. (Wayne Kifer) The notch only accommodates the small ridge of the node on the enamel side. The plate is flat on each side of the notch. The notch is about 1/8" wide and about 1/8" deep. It is a "V" notch. None of the node body is in the notch. The only part of the strip that is cut out is the PITH side and not cut into the fibers. Nothing is removed from the enamel side except the small ridge that protrudes from the node. (Tony Spezio)
I have a question about the logic of node displacement pressing, either by notching the strip or a recess in your vice, etc. This must be for cosmetic reasons only? The fibers at the nodes spread toward the surface and toward the pith, when you allow them to simply be pressed back into a void they are not being compressed, it would appear, they are only being moved inward and not being realigned with the rest of the strip. I agree you get a straighter outer surface but when you plane you are removing most of the fiber from the densest layer, which is now the middle of the strip. Less fiber is lost if one were to simply grind the outside surface flat. I also believe that this is not a critical value as the nodes must get around 1000 degrees F using a heat gun, they are probably trashed anyway. I guess that's why the stagger is important. (Jerry Foster) I guess it is for cosmetic reasons, but I do find the fibers are more aligned. The first rod I made I just sanded the raw nodes flat, I think this was on one of the recommendations your post a couple of years ago. It no doubt was the easiest way. The wide node area bothered me in appearance. The first rod has been used a lot and had caught over 300 fish with no ill effects of sanding the nodes off. I just have a thing about small nodal areas and to me a bamboo rod has to have nodes. Just my thing. (Tony Spezio) I have always questioned the validity of heat pressing nodes in the first place, by observation I believe most vintage makers did not heat press the nodes. There are several reasons why I question the process... If your flaming a rod, buy the end of production the node has been heat treated three times and two times by other construction methods... The excess heat and or high heat has to damage the fiber walls, then when pressed is it straitening the fibers are collapsing the fiber structure... This process seems to weaken the node by collapsing the fibers and make them prone to tear out during planning and or other problems during construction... So I ask, are we doing more damage then good by heat pressing nodes? There's no doubt that both process's work and have worked for some time, but other then cosmetic reasons I see not benefit to the process. There's no doubt ( in my mine ) that heat treating the cane is very beneficial to the performance of the rod, but if you heat treated the cane along with the nodes two or three times I do not think it would be beneficial at all... These ideas have been bouncing around in my head for some time and would welcome any research, comments or feedback on this issue... (Dave Collyer) This, I believe, is the great benefit from soaking the strips. Less heat exposure is required to accomplish the task. There has been some question of what, if any, degradation of the strips may occur due to soaking, and I truly have no idea. My empirical observations suggest that there is no fundamental difference. (Martin-Darrell)
I have been talking to Tony Spezio about pressing nodes and the Waara node press. As with Tony I agree that displacing the nodes is a easy and quick method. Then again the Waara press is nice because you don't have to have a vice to crush the nodes. The new found method that Tony uses by putting a notched plate in the jaw of your vice and placing the node ridge in that notch as you press the node. Then filing the small ridge off once you have pressed the node you are left with is a small area has been worked on. Seeing his rods sure makes a believer out of me, for my nodes were never that small after I filed them down. So it started me thinking (and sometime I think this is dangerous) and my designing side of my brain kicked in. Why not have the best of both worlds. So I took the basic idea of the Waara Node press and combined it with the notched plate idea and came up with this new contraption. The details of this handy tool are as follow. First the tool was made from a two pieces of steel welded together. The first piece was 1/4 inch thick 2 x 2 angle iron. The second, was a piece of 1/4 thick bar that measures approx. 2 1/4 x 7 1/2 inches. There were several factors why I chose this heavy of steel but I don't need to go through all that right now. I mounted the toggle clamp on the base and put some 1/4" spacers under the clamp to put the center line of the clamp ram a tad bit higher as opposed to mounting it flush on the base. The clamp ram in my machine is a bit different than the original design because I found out that tack welding a bolt to the face plate (a 1" x 1" x 1/4" piece of steel) was a little hard to keep everything square and plum. So the welder opted to drill a hole and tap it through the plate and weld the all thread on the face and then hitting the face with a grinder or belt sander to make it flush again. Then the clamp ram was taken to the end mill and a 1/8" wide and 1/16" deep grove down the center of the face plate was milled. So that is it in a nut shell. Personally I didn't do all the welding and stuff, that is were I sweet talked a few of the guys at my work to do that for me. I just designed it and made the drawings for them, being that I am a draftsman by trade makes that part of the job easy. It just took me working during one of my lunches to create the drawings. The few scrap nodes that I have press with this machine sure look nice. Once I got done all I had was an area of about 1/4" that was touched by the file and a flat section of cane. I am looking forward to use this on the next rod that I am starting on in the next month or so. Click here to see the press. (Robert Holder)
A few months back Tony Spezio suggested splitting culms w/o treating the nodes, then using a little groove in the jaws of a vice to hold the nodal lip while pressing, and cutting a little relief on the pith side. Using this method, only after the node is pressed flat does one sand off the nodal lip. I tried it a little while ago, and can hardly believe how well it works. I know Bob Maulucci seemed to like the method as well. I just wish I had tried it sooner. (Harry Boyd) Tony really convinced me to try this method, and I think it is a keeper for sure. I found a good way to get that relief in the pith side this week too. Take a big half round file and mount it in the vise. Using both hands to hold the strip, draw the cane, node centered in the middle of the file, towards you. It does the job in no time, and you do not need to keep clamping the strips in the vice, the file is what stays put. It works great. My big half round file has a cross cut pattern so it cuts both ways. This takes all of 5 minutes to do the entire rod worth of strips. (Bob Maulucci) I just touched them to the 1" belt sander. Took just about 5 seconds per node. (Harry Boyd) I use a 1" drum sander mounted in my drill press followed by the "V" groove. Works great, thanks Tony. (Don Schneider) I tried Tony's method two nights ago and was really impressed with the results. I used two magnets on one side of my drill press vise and left a small gap between them (gap size is controllable), it worked fine. Pair of magnets at Home Depot $1.98, results of Tony's method priceless! (Bob Williams)
I had some questions for Tony Spezio about node displacing, but thought the subject was interesting enough to put on the list. Besides, I know that others are using this method and may also have advice to contribute. Tony's article on node displacing in the latest issue of Power Fibers has me interested enough to give it a try, but I still don't get how to proceed after flattening the nodes. On most nodes, the crooks in the strip going side to side are much more pronounced than the bumps in the vertical dimension. After flattening the node, don't the bumps come back when you reheat the node to straighten the strip? How about when heat treating? I haven't tried soaking strips yet, but I've heard that soaked strips shrink by nearly 20% when heat treated. Doesn't this make the string so loose that the nodes go back to their original shape? (Robert Kope) I have two small vises. One is set up much as the one pictured in Tony's article. The other has two wooden blocks of hard maple on one side, spaced approx. 5/8" apart. On the other jaw is a single wooden block of hard maple that will just fit between the space on the opposite side. I use this vise and its jaws to straighten by displacement the doglegs at the nodes. I've been thinking for some time to make a curved set of jaws, as this would allow me to straighten a wider area. Maybe something like Ray Gould has in his book. What I do is heat the node, work the sides of the node, and quickly put the strip into the other vise for flattening the node. It really only takes me about a minute and a half per node to heat and straighten, though invariably some nodes take longer. Soaking the strips for an extended period of time has a great affect on how well the nodes stay displaced. By soaking a minimum of 3 days, though I think 4-5 is better, the nodes stay as they were when I began the heat treating. The only time I've noticed nodes popping back is from not having soaked the strips long enough. I believe this is due to the lack of moisture content of the bamboo, and it not providing a good heat transfer into the strip. The greater moisture content, coupled with extreme heat seems to get deep into the strip, and all the displacing stays put, yet the strip seems to suffer no damage. Yes, the strips shrink by a considerable amount, and yes the string is somewhat more loose than when put into the oven, but no the nodes don't pop back. (Martin-Darrell)
Has anyone been planing a strip only to realize that a part of the strip has a bend reappear, and you want to repress it before you hit that final taper size. Now lets say this strip is planed down to a butt size taper, how does one go about pressing the strip. The strip is nice and wet, from the soaking, so it heats real easy, but holding it in a vice presents problems, due to the triangles. The strip may twist, putting a permanent twist in the strip after it cools. Any ideas for a jig to hold the strip? (Mark Bolan) How about making a V-groove in in a wooden block or aluminum angle to put in your vise? (Danny Twang) I have milled, both 60 degree and 90 degree slots in nylon blocks that are mounted to alum angles and slip right in a wood working vice. Check the straightness on the anvil of the Morgan hand mill before I start planing. (Jerry Young) Why don't you just heat it up and bend it in your hand, or use Max Satoh's jig. if it's a bend it shouldn't take too much persuasion to get back in line. (Mike Canazon) If the "bend" is a sweep and the strip is soaked as you mention, I find I can put a long bend in the opposite direction of the sweep and do it cold with no heat. This usually will take the bend out. If you are talking about a "kink" then the replies you have gotten will work. With wet strips it takes very little heat to straighten a strip. (Tony Spezio) If the strip has already been reduced in size to its final dimension and it's still wet, the straightening should go extremely easily. Forget about using your vise or a jig, and instead, just heat the area in need of straightening, and when it becomes pliable hold it with both hands and press against a corner of your bench. Or you can just prepare a small chunk of wood with one end shaped to a wide radius and clamp it to your benchtop. It's a handy thing to have around for these occasions. Actually, the best advice I could give would be to learn to use your hands for all your straightening. It's really the only way to discover exactly what the bending characteristics of cane are. Vises work well for certain situations, but in producing mechanical leverage, a vise does not provide appropriate sensory feedback, and this can be a problem you don't even know you have if you've never learned to straighten any other way. As I say to others, it's often good to get away from machines and jigs to solve all the problems. This time, it's about you and your cane. (Bill Harms)
I've done some pretty extensive strength testing on nodes. When heated and pressed properly, I've NOT found the node to be a weak spot. If it's not heated and pressed however, it will break at the nodes more often. I also plane my nodes flat once the culm is flamed and the nodes are flattened. In fact, I remove the enamel with my LN plane with a very sharp blade. I find the node to strip transition does not leave a bump, and the entire strip will plane better if it's really flat. I'm not suggesting you tear into a strip and hog out the thing, but if you are careful, the strips can be nicely prepared, will not lose a bit of strength (the enamel has to go anyway), and will be flat and make a very nice rod in appearance. (Jerry Andrews)
Does anybody have some specific circumstances when nodes seem to "pop" back up? I've seen it happen a few times, but with no rhyme nor reason. (Joe West) That usually happens when you don't get quite enough heat in the nodal area when you are pressing the node. Sometimes you have to go back and repress. (Mark Wendt) VERY interesting because I was working with larger than normal strips and perhaps I didn't use enough heat. (Joe West) Everybody has a different way to skin the cat, but I always prefer to do my straightening just after I've run the strips through the beveler (and before heat treatment). This way, the dimensions are reduced to a minimum and they're much easier to deal with. (Bill Harms) How do you run your strips through the beveler with those pesky nodes sticking up? Doesn't that cause the beveler to kinda chew up the nodal area a bit? (Mark Wendt) First, I use my sander to knock off the sharp ridges on the outside of the nodes, and then I just chew away the pithy swells on the inside. If a node has really pronounced dips on either side, I stop a moment and straighten those. Otherwise, I just run the strip and do 95 percent of the straightening after. The resulting dips at a troublesome node may still be present (to a lesser degree), but the beveled strip is still large enough that there's no problem whatever in straightening and final planing. (Bill Harms) Okay, you do some preliminary straightening and knocking down the nodes. When I read your post, I thought you were sticking untreated nodes through the beveler. I did that. Once. By mistake... Had one uuuuuuugly strip at the node. ;-) (Mark Wendt) As a side issue: If your strip is not straight, when you pass it thru the beveler, doesn't the process tend to straighten out the curves, especially the "S" bends frequently found at nodes? If this is the case, then don't the fibers tend to run somewhat out of parallel with the strip? I thought the straightening process was intended to keep all the fibers parallel. (Al Baldauski) Yes, this is indeed a potential problem, and I absolutely HATE to see grain runout at a node. But, I've found that if you split out your strips to a minimum starting-width and your machine has strong holddowns (that are also very close to the cutter), the bends in the cane you speak of will be flattened as the strip passes though. Not so much while the strip is still its full width, but as you make subsequent passes and remove material, the strip yields quite readily to the holddowns. Sometimes you'll see a node that has really strong "S bends," and for these, you'll want to do a little straightening first. Oh, I guess I should say that I have a Medved beveler, and this type requires multiple passes to establish the triangle. I imagine a single-pass, "V-cutter" machine would simply chew straight through whatever was presented. (Bill Harms) As far as beveling making the fibers run out, it seems to me any time you force a split like the Nunley way or putting a screwdriver through the nodes at specific places or any other way you are going to have nodal run out. As others have stated the fibers are short not long and you will have run out no matter what you do. Not a problem. When you plane a strip guess what, you will cause power fiber run out. You are planing across the power fibers not with them. This is one of the myths that are around. Top rod makers have split, or sawed or made their strips in various and sundry ways and made excellent rods. Don't worry about run out. My opinion anyway. (David Ray) Well, yes. Of course there's going to be run out, even if only in the most limited sense. The questions are, how much of it can we control, and shall we be satisfied with a rod that only fishes well, or one that both fishes well AND is constructed to our best abilities? Every builder must find his own level of satisfaction, but mine is to try to address every issue I can. (Bill Harms) I'm afraid it's just the "nature of the beast." As a natural material, bamboo nodes grow with shapes and fiber configurations that are sort of locked inside. When we attempt to straighten these for our purposes, we induce stresses that the material just doesn't appreciate. So, after a period of time (or reintroducing a little heat), the nodes sometimes want to resume their original positions. There's no way of predicting when this will happen or exactly where, but happen it will. It's just one of the things we deal with. The frequency and extent of the problem will be reduced (but not eliminated) as your straightening procedures improve. (Bill Harms) I just wonder if ye olde belt sander isn't just the final answer to this question? (Joe West) Actually, I think it has a lot to do with having strips with a consistent thickness before starting to press and work nodes. Question is what is the ideal thickness for this? Anybody done any trials on this? Just how thin should the strips be, before working the nodes? Once I know this I just might start using my bench planner to get all the strips to the same thickness. I've always had problems with my nodes popping back on me. (Bill Walters) Not enough heat to soften the node through and through. Too much bulk to press or not enough pressure. I displace the nodes and have no problems. Sand out a half moon on the pith side of the node with a round sander in a drill press. This makes the node need a lot less to heat to soften. When you press the node in the vise, it displaces the node in the half moon space. On the jaw side you use for the enamel side of the node, stick a small block the length of the node so that the jaws do not clamp on the strip and not displace the node all the way. I mentioned soaking to you a while back, try it in a scarp strip with nodes. You might be surprised. (Tony Spezio) I'll definitely start displacing, because it seems I wasted 1 1/2 hours pressing all those darned nodes!!! Will definitely soak on my next rod and will let you know. (Joe West) The system I use on the nodes is in one of the back issues of Power Fibers. You can sand them off as I did on rod # 1. The rod has no ill effects but I have a thing about small nodal areas on the finished rod. As you go along you will know what I mean. The first rod was something I wanted to finish in a hurry. After filing all the nodes on a half culm, splitting, pressing and having the nodes reappear, I sanded them off with a belt sander. To me they stand out like a sore thumb, no one seems to notice them but I do. Do what pleases you, we all don't have the same tastes. (Tony Spezio) In Claude Kreider's book all he does is sand them. Doesn't even mention pressing nodes. This book from the 50's and there was a debate about heat treating in it as well. He debates the value of ANY heat treatment, and doesn't discuss flaming at all. (Lee Orr) Re: wider nodes Vs tiny nodes... I think this is like those TINY heads the salmon fly tyers do today. It's some kind of one-upmanship, a counting coup, if you will. IMHO. (Joe West)
A few weeks ago I was pressing nodes and something new arrives. I always do this job "a la Payne". The cane I was working on, gave me 5 more strips that the ones I need to complete a 2/2 rod so I use them to make some testing. I put 2 of that strips to a full stress curve (impossible curve in any fishing situation) and when they break no one of them was broke at the nodes or in the pressed part of the strips. My mind become to work and something pulls me to do something new with the other 3 strips. I pressed all the strips not only the nodes section, I do it all along the strips. What happened??? I finished with 3 strips impossible to break. There are many simple things to discover in rodmaking, just we have to break some rules. (Marcelo Calviello) Interesting stuff Marcelo! Were the strips that you pressed and stressed heat treated or flamed at all before you pressed them? In other words, did you rule out the possibility that it was the heat rather than the pressing that was the cause of the increased resilience? (Chris Carlin) The strips were only flamed. I heat treat after node press and straightening process finish. Now I'm looking to finish some rods on order and try this new method into a new test rod. I'm with a lot of work over here, someone like to give me some help making some test also??? (Marcelo Calviello) I've heard many stories about how heating and straightening weakens the bamboo. I've gone to lengths to make this process as gentle as possible by soaking the strips, and then developing a press to straighten and flatten nodes all at once so they only need to be heated once. I've never done any post-press testing, but your results seem to be different from what folks have experienced with Tonkin Cane. I was amazed how light the rod of yours is that I have. It feels about like a 7' 4 wt instead of a 8' 5 wt. I was wondering how much of the lightness is due to the bamboo ferrule, and how much is due to the cane you use. I recently completed a 7 1/2' 4 wt with a bamboo ferrule. It's lighter than a comparable rod with a nickel silver ferrule, but the difference is not as dramatic as your rod. Perhaps there is some fundamental difference in your cane. (Robert Kope)
I was wondering at what temp is best to flatten nodes and also would it harm the strip if the whole strip was heated in a oven then the whole strip pressed at once. (Bob Venneri) As far as the nodes go, too hot to touch is too hot. Heat each node slowly and then flatten. You wold need a press the length of a strip to heat the whole thing and press the nodes otherwise the strip would cool before you got to the next node. (Pete Van Schaack) When I joined the list some years ago before I made my first rod, there was a post from someone on the list that soaked the strips and placed them all in the oven to heat them for node flattening. He would rake one strip out at a time to flatten them. That would be about six and a half years ago. You might check the archives. He might of posted the temps he used. (Tony Spezio)
I'm not looking to start the whole "sanding Vs pressing issue" here, just asking a question. I'm working with some cane that has been heat treated and toned as a culm. The nodes cannot be pressed, and must be sanded down. For those who sand, what's the fastest way to do so? I'm knocking the node down with a belt sander before I split, and then using a file to take them flat. I'm having to spit out a lot of blanks in a short amount of time, and just looking for ways to cut a little time where I can. BTW, this cane is some tuff stuff, and makes one hell of a rod. Nice crisp action, and has a very nice deep honey color. (Robert Hicks) Well, for what it is worth. I split first then belt sand the nodes and the pith flat. Then rough bevel, heat treat and then straighten. Works fine, and I haven't had any breakage of rods due to weakened nodal areas. I use spiral node staggering. For the sanding part, I followed the technique used in the Golden Witch tapes. (Tom Mohr) That's what I do. I get the impression that binding strips together before heat treating helps straighten and I use a wooden saddle in the vise similar to the metal one I use for splits on my MHM. You can see a picture of it here. The wooden one has a 60 degree grove in it as well and is about three or four inches long (the width of my vise). It helps keep the strip straight and also keeps it from getting crushed. (Dick Steinbach) I don't press or sand; I plane the nodes. Plane from the small end of the strip towards the butt and the bamboo won't tear. I think it's faster than sanding and you have less of a risk of digging a groove in the strip. (Ron Larsen) I do it too. I wonder how many of us do it. It makes better strips for the Morgan Mill. I also think that you get nice looking nodes even on flamed rods. I soak my strips first. (Doug Easton) Use a linisher. This is standard with several of the old school bamboo makers. (Adam Vigil) Please remind me what a linisher is. I knew once upon a time, but can't seem to remember. (John Channer) Here you go for those who do not remember. As for me if the node scar is bigger then a my thumb nail I am not satisfied. I like small nodes because in 100 years that node will still be viewed and scream what a rush I was in to finish the rod. There are a few things people look at on the rod: 1) The finish 2) How straight it is 3) the reel seat 4) the wraps 5) The nodes and the ferrule. Only after that do they care how it cast. Sad but true. (Adam Vigil) Node scars don't bother me much, I've seen a few old high end rods that had much longer node scars than what I wind up with after filing and straightening. The belt sander does look to be a real time saver though. What width belt does anyone favor? (John Channer) It is a time saver. I use a little Delta 1X30 with a 5" disc sander on it. I use 220 grit on the belt and refrain from changing it out. It seems to work best for me when the belt is worn out. I use the belt for sanding the nodes prior to splitting, for flattening the pith side of the node after splitting and the disk can be used to square up a strip pretty fast. I sand the node, flame and then split so my nodes are a bit darker than flaming first and then sanding off the burned, crusty enamel. But hey! That's just me! (Mike Shay)
I think I do a good job at straightening strips. I also heat and press the nodes with great success in leaving a very small scar. After final planing of my strips I have noticed that they lose their straightness, so I have used a heat gun to try and get them back. In the node area when I apply heat, the nodes humps are coming back to where they were when I pressed them...Has this happened to anyone. This presents a problem trying to get them flat. (Bill Tagye) After pressing and heat treating the strips, I don't think they should become unpressed or unstraight. The only thing I can think of, is that they weren't heated enough during pressing and/or during heat treatment itself. Some people who soak their strips have previously complained about having that problem. (Mike Canazon) You have to heat the strips (nodes) all the way through. Takes a bit of time, but that's how you get 'em straight. (Ron Grantham) I find that after the final planing, especially the tips, that the strips tend to bow towards the inner apex. I've been told this is normal. I do my best to put them back in order and masking tape the section in four spots to hold it all together until gluing. Then slit the tape and apply glue roll back up and bind. The masking tape is sticky enough to hold the tip strips in place. (Pete Van Schaack) This may have to do with "plastic memory" where something pressed out of its original shape returns to it when heated. When once straight strips are planed into fine tips they usually do take on a curve. If this curve is gentle I wouldn't worry. If a kink develops after it is planed then maybe it is a strip that shouldn't be. Others' thoughts? (Henry Mitchell) When I first started playing with boo, I had the same problem Bill listed. As many of you know I visit Tony Spezio down in AR quite often. Not only do we enjoy fishing and fly tying but get down to his shop and play with all his bamboo toys. Tony has written about straightening but to be present and see his actual process was very meaningful. The secret (if there is any) is he does sand a half moon (concave) area in the pith side of a strip, behind the node. He uses a drum sander (maybe 2 inches in diameter x 3 inches long) in his drill press. What this does after heating and placing in his special altered vise, is to give the node being displaced, a place to go to. For me it does not hump back up. The vise displaces the node and it stays there. (only if heated enough). For me it was important to see how much to remove. A bit hard to tell from listening, almost (for me) the need to hands on. But when thinking about it, this makes sense. For me working nodes is a no brainer, I actually enjoy the process and am pleased with my results. (Denny Conrad) I've never found nodes to be a "no brainer." Indecision may or may not be my problem. I was pressing & straightening nodes this past Saturday. After the recent discussion, I was trying to find the sweet spot: enough heat to soften the node but not enough to do damage. So it was taking me about 1.5-2 minutes on the clock to soften a node with a Steinel/Craftsman heat gun at the "10" setting. Is this sort of ballpark reasonable? Anyone else actually watch the clock while they are heating a node? (Frank Stetzer, Hexrod, Taper Archive, Rodmakers Archive) All right. Not being the devils advocate or anything here, but please explain to me (as a sander of nodes, *G*) how all this heating and squeezing and pressing is not detrimental to the cane itself? (Dewey Hildebrand) Do you ever heat straighten a blank? If so, is that process detrimental to the cane? What's the difference? (Harry Boyd) Of course. And your point is well taken and valid. My main question is on the pressing and squeezing (please forgive the terminology) and what the effects of that might be. (Dewey Hildebrand) Everything we do to the cane is detrimental to it. Cutting, Planing, Heating, Gluing, bending, none of it is good for the cane but it is just fine to do those things when it is transforming it into a blank. Anyone of them done wrong will cause a problem in the "BLANK" If they are done correctly the desired outcome is achieved (Adam Vigil) I won't say whether your times and temperatures are ballpark reasonable, but I watch the clock too. With my Wagner Power Stripper on the higher setting, it takes me about 25 seconds to soften tip section nodes, and 30-35 seconds to soften butt section nodes. I split to about .250" on butts, and about .190" on tips. As soon as I see the first hint of browning on the pith side of the node, things are usually warm enough. I hold the strip about 3/4" above a jury-rigged fishtail nozzle, and keep things spinning so no one portion is heated more than another. I immediately straighten with a Waara press and any other gyrations and body English required, then reheat for 5-10 seconds before pressing (displacing) the hump in a vice with aluminum lined jaws. (Harry Boyd) I soak my strips and use a heat gun (Steiner 1kw) to straighten nodes. I sand a hollow behind each node before soaking (thank you John Channer!) and wind up soaking strips that are approximately 5' long. I heat a node till it looks dry and feels plastic, throw it in a vise (enamel to the top, pith to the bottom, for 5 seconds - 1,1000 - 2,1000 - etc. and then turn it 90 degrees for another "squeeze" and leave it there while I heat a node in another strip. From there it's repeat, repeat, repeat till I'm done. I've never timed A node, but I can do 2 strips' worth in 5 minutes. (Art Port) I've tried to watch the clock. I have found that for me with a Wagner dual speed on high it takes about one minute for the first press and about thirty seconds for the second press. If only I had Robert Kope's press thingy it would take half as long! (Mike Shay) I guess I should qualify that statement, since Harry was smart enough to say how far over the gun he was holding strips! I forgot to mention that I think I am holding about 2 to 2.5 inches over the gun (Mike Shay) For me it's the longer the better the strip is left in the vice to cool. For that reason, when I press nodes, I use 4 to 6 vices at a time. By the time I get back to the first node I started with, it's room temp and solid. The way I know it's ready to press is when I twist the strip I can see the area across the node flex. I haven't broken a strip in years (regardless of the distance from the heat source) with the twist method and I don't soak. (Brian Smith) I have a contraption which holds the splines over stream for about 3 minutes. I time it with my stop watch (Jim Lowe)
Just finished pressing the nodes on my first blank. Didn't go to bad. Got a feel for it after I busted a node on the first strip. Had extras. I'm putting the strips for the second blank to soak and was wondering what was the best nodal treatment for leaving the smallest possible nodal scar on the finished strip? The books don't really go into it. Input appreciated. (Wayne Kifer) Don't file nodal ridge before splitting. After splitting, heat press the nodes in pony vise with a small vertical notch filed into one of the jaws. Put the nodal ridge in the notch. This should give you a flat node except for the nodal ridge which you then file off using a narrow file. Or, cut a half moon shaped piece of wood; use a standard sized trash can lid to trace the arc. Screw a couple of L shaped hooks into the arc. Put it in your vice with the arc on top. Bend the strip and secure it on the hooks. Then file the nodal ridge. Then heat press whatever hump is left. (Jeff Schaeffer) I just use a sanding drum mounted on a drill press to half moon the back side of the cane. Works fine, is quick and easy, and the sanding drum has lasted for at least 20 rods so far, with plenty of life left in the sanding grits. (Mark Wendt) I just use a narrow file. (Pete Van Schaack)
I took great care to file the nodes on the culms, with a little palm sanding, but not too much of that was used. Mostly the file. What I'm left with is a very, very slight lip, say big enough to catch a fingernail if moving the fingernail across it. A little blip/jump of the little tiny ridge remnant. Now, should I continue working these areas, or what??? (Mike Valla) I usually just leave that little "lip" until after I've split the strips, straightened them and run them through the beveller. Once you begin to sand the enamel off the beveled strips, you can carefully sand these last little remnants off as well. I usually sand just until the strip becomes flat, using 400 grit. I have a custom sanding board that I made just for this purpose. I used a 2" X 3-foot piece of hard maple, and ran it over my router table, using a 60 degree bit. The groove on one side of the board is shallower for tip strips, and the other is deeper for the butt strips. Once I’ve run them through the beveller, I just slap 'em into the groove and sand away. Much easier than trying to sand them on a flat surface! (David Spangler)
I am working on Rods 2 through 5 and find that some things have become much easier. The learning process goes on. I have researched the archives and reread the books and still have not found the temperature at which the bamboo becomes “limp”. The major problem is the node work, preliminary and final flattening of the “rind” side of the cane, and straightening the finished sections. I use an adjustable temperature heat gun and think that I have treated the node properly. I then find that the node area is the site of problems after glue up. Now the questions: What process do most folks use to prepare nodes and straighten the strips? I have read of file, sandpaper and plane as the weapons to use against nodes. I think a new discussion on the preparation of the rough strips would be very beneficial. When heat treating after glue up, it seems this would be a good time to correct any straightening that may be required. At what temperature does the bamboo become “limp” and what affect does that have on the epoxy? Just as a measure of merit, what amount of straightening can realistically be done? When should the section be abandoned? How do people avoid scorching the cane? (George Hills) I'll throw my 2 cents in here. I'm in my second year of rod making and just split out and rough planed strips for rods 9-12. On my third rod last winter I tried soaking my strips - I'll never go back to not soaking. Flattening, straightening, and planing wet strips is just soooooooo much easier. For what its worth, here's what I do. I split my culms without doing anything to the nodes. After they're split, I cut my strips to length for whatever rod I' m making. Then I file the nodes just enough to remove the ridge. Then I soak the strips in a piece of PVC. After they've soaked I pull then out 2 or 3 at a time. I use a 1/2 round rasp to remove a little moon from the pith side of the strip under each node. Then I heat over a heat gun for about 30-45 seconds (I think, I've never actually timed it). I then put it in a vise and clamp down hard with the enamel side facing the vise jaws. I hold that for about 10 seconds. I then quickly flip the strip to enamel side up and clamp down hard again. I then leave the strip until it cools (I use two vises to give it more time to set). When all the nodes are treated on the 2-3 strips I pulled out of the soak tube I rough plane them. I use a first roughing form with a 84 (I think) degree angle to start the 60, and then a second form with a fixed 60. My rough angles have gotten much better since I started flipping my strips with every pass or two of the plane. I try to rough out six strips in a night and then bind and hang them up. I used to really worry about the little sweeps between nodes, but I've found that they seem to straighten themselves pretty well after heat treating. My only problem with any glue lines has been a few chipped nodes. Mostly this was due to the node not being flat enough. One thing I've noticed is that the rods I'm working on now are from a new shipment of cane and the nodes appear to be much better. I ordered the smaller cane from Demarest and the cane seems better than the larger stuff I got last year (not so many big dips next to nodes). Anyway, that's my process in a nutshell. (Aaron Gaffney) I use a standard clothes iron I bought at a local thrift shop for around $2.00 to heat my strips. I set the iron at HI and this puts the temp (on my iron at least ) at 270 degrees F. give or take (I use a digital thermometer to check the temp of the iron). The iron makes it much easier to control the application of the heat and minimize over heating (scorching). It will scorch the cane if the iron is held still so I move it back and forth over the cane. I only use a heat gun for heating large pieces that are too big for the iron (mainly butt sections) or to straighten rough planed strips. I also have used steam (boiling water from a large pot on my stove) to work sections that have been finished (coated with spar varnish). This keeps the varnish from over heating and degrading. I live near Denver so the water boils at ~180 degrees F. so I have to hold the section over the pot for a few minutes to get it hot enough. (Dave Gerich) I use a Coleman sport cat heater. Perfect temp, no scorching, and you can heat several nodes at a time. I then press them in a brian smith node press- the vise has a half moon cutout in the jaws to allow displacement. I do file the nodal ridge first. I do what I can to avoid cutting into the node, but the other extreme is to just plane them off. And the guy who does that makes some fine rods ... I do plane the enameal off using a beveler or a hand plane- it does take off any excess node material if things aren't perfectly flat but I try to get them flat or flat as possible beforehand. The enamel planing occurs before I do rough planing. I also square up really kinky strips on a beveler or with a plane. If the culm has bad kinks, I split oversized strips and square them (this is equivalent to sawing). I try not to abandon strips- if the node work is good, you should be able to rough plane then heat treat to take out the sweeps. My most frequent reasons for abandoning a strip are: the bug hole I did not see, and weird nodes with dips that give a strip with a weak point. Recently Aaron Gaffney and I split a bale of the smaller Demarest cane. This stuff seems to have eliminated a lot of problems- it is straight and none of those weird dips. Great stuff. (Jeff Schaeffer) If you have access to Power Fibers, check out my articles on displacing nodes and soaking strips. If not, let me know and I will send them to you. I have no big problems with nodes. (Tony Spezio) Per chance you want to work your strips dry: I start by flaming the culm and then file nodes flat being very careful not to score the surrounding enamel. This will leave the node area lighter but I like this character in my finished product. After splitting, using my 8 blade homemade splitter, I use a table sander to sand each strip's inside nodes flat. I used to sand the outside nodes but found myself sometimes scoring the surrounding enamel which, if deep enough, can ruin a strip. I then split the 8 strips into thirds giving me 24 total or so. I rough taper these strips while using a alcohol lamp with open flame for straightening. I'm sure you can use a heat gun for straightening but I like the quiet of an open flame. Sometimes I use a machinist vise for squeezing the heated node for flat. This is not always the case as the thickness of the node is different with each culm. With some strips, like the one I am currently working on, my file does a great job of bringing the node, which is about 1/16" higher than the enamel, too flat. I use the same process for final tapering always making sure my strips are straight. After gluing I rarely have a bent section but if I do then I use my Sears Commercial Heat gun for straightening. I will not use an open flame near my finished product. (Doug Alexander)
I have a question regarding the steaming of nodes before pressing. Is is possible to steam just the nodes area before pressing nodes instead of using a heat gun?? I have a small high pressure steam gun and could direct steam on only the node itself. Would it be as/more/less effective than a heat gun? Would it be easier to work on the nodes before/after pressing if I steamed the area first?? (Reuvan Segal) The best way to answer that is to try it. Seems to me someone tried using a steam iron a while back and found that it took quite a bit longer to get the nodes hot enough. My feeble memory may be at fault however. (Neil Savage) I tried this a while back. Took about 5 or 6 minutes per node to get the bamboo flexible. More trouble than it was worth for me. I found it was much more time efficient to soak the strips and use a heat gun. (Don Schneider) I recall someone making a steam contraption that clipped over a node so that he could steam and press nodes without having to steam or soak the entire strip. I also recall someone just holding a node in front of the spout of a boiling tea kettle to steam nodes. (Darryl Hayashida) Following a presentation at the 2004 Merritt gathering I went home and built a couple of steam boxes to assist me in prepping nodes. By the third attempt I felt like I had a good product. In using it I found that nodes steamed for 30-40 minutes were not quite warm enough to successfully press. The nodes still needed to be warmed for 15-20 seconds over my heat gun. One proponent of steaming nodes heats the jaws of his vice. He says the heated vice jaws add enough warmth to make flattening and pressing effective. I can't comment on his results since I have not tried heating the jaws of my vice. Steam is 212 degrees F at sea level, correct? If so, then I think bamboo has to reach a temperature warmer than 212 degrees to become pliable. What that temperature actually is, I'm not sure. I'll make an educated guess that the "pliability temperature" (made-up term) is probably about 275 degrees. Talked with another list member last week who has even tried superheated steam with little success. (what's the temperature of superheated steam? or does it vary?) College chemistry and physics were many miles ago. (Harry Boyd) Steam needs to be put under pressure to become super steam. The greater the pressure the higher the temperature. (Dave McClain) Superheated steam is steam that is heated to a temperature higher than the boiling point of water at any given pressure. Water at 14.7 PSIA (atmospheric pressure at sea level) boils and creates vapor at 212 degrees. If it is piped from the original vessel and heated again in remote pipes, it becomes hotter without and concomitant rise is pressure. I wish I had the equipment to build a system that could do that. But kinda' scary; I've seem broom sticks cut with saturated steam @ 80 PSI. (Wally Murray) I'm sorry. I got interrupted; my point was that you need a vessel that could withstand about 60 or 70 PSI ( plus a safety factor) to get steam of 275 degrees. And that's a pressure level at which most car tires are dangerously over-inflated. I like the notion, but what a fabrication challenge! Imagine opening that oven door. (Wally Murray) It's not just the temperature. Bamboo strips become very pliable just soaking in water. The combination of heat and water - steam - makes them even more pliable. The way I do it, soaking the strips first then heating, means the water is all the way through the node before it is heated. Steaming a dry node I think would take a long time for the water and heat to permeate the node. (Darryl Hayashida) I have had this problem with some of the "uber" cane I have. A quick shot over a hot heat gun softens it up without drying it out much. The steam/ heat gun combo seems to work quite well. (Jim Lowe) You're correct Jim. The steaming and heating over the heat gun a few seconds afterwards work quite well. Trouble is it only takes about 25-30 seconds to heat a dry strip as opposed to 15-20 seconds with a steamed strip. Fooling with the steamer, etc. doesn't seem to be worth the small time savings. The other difficulty I had was that the steamed strips seemed to cool VERY quickly. So quickly in fact, that I found it almost impossible to do even minor straightening before pressing the enamel side. I'm envious of those of you who have made steam work. Wish I could get it to work well for me. (Harry Boyd) Yes, it does dry quickly. My method is hardly time effective - steam, press one side, file, steam again, press the other side, file some more, steam again, straighten. Total time for one node - a whopping 9 minutes minimum....... Why do I do it this way? I hate holding a node over a heat gun, steaming is hands off. :) With 5 splines going at once I have less down time than you'd think once I get past the initial 15 minutes. (Jim Lowe) That last bit may have been me. I steam my nodes using a tea pot. I've got a jig made out of a copper T connector. The base of the T goes into the spout of the pot and the cane is slide into the horizontal portion. I keep it in place using a binder clip. I have 4 pressing stations set up. I steam each node for 3 minutes and then place in a station and steam another strip. Each strip cools for about 10 minutes and then is heated again as I press my nodes one side at a time. It works for me although very heavy cane may need more time to steam. (Jim Lowe) I would think it would be like soaking then heating. I can tell you that soaking the nodes only takes about 30 seconds of heat form a heat gun to soften them. This does not seem to harden the nodes like doing them dry. I would have to say, steaming would do the same thing. (Tony Spezio) I guess every rodmaker has his favorite methods for doing the same jobs, and there are no doubt some (many) who find that soaking strips prior to planing them is a great help, and who wouldn't do them any other way. Personally, I tried it a couple of times and failed to see that it offered me any improvement over my current dry technique, and on the contrary, introduced several complications into the process that I could well do without. That's not to say that it is not an excellent technique for some makers. Similarly, there are those (many) who find significant problems with using a heat source to straighten strips and to press nodes, and no doubt they have good reasons for so thinking. Consequently, they devise other, alternative methods for doing the job which suit their operation better. But for mine, I find that my Bosch 3-speed heat gun used on the middle (orange) setting is quick, convenient, and effective both for pressing nodes and for straightening strips. Depending on the distance between the strip and the nozzle, I can get pretty much as little charring as I want; and having aid that, I must say that a bit of color change doesn't bother me at all. Like everybody who ever used a heat gun or a lamp on nodes and strips, I ruined a few early on, but you pretty soon get on top of that sort of thing, no matter what routine you use. Try 'em all, Reuven, and use the one you like best! (Peter McKean) Water at a given pressure and temperature will become what is called saturated (wet) steam. (Steam at sea level pressure is 212 degrees is saturated). Adding additional heat to the steam produces superheated steam and is used for turbine use (higher pressures and temperatures) because it is dry and reduces metal wear from water droplets. For heating purposes saturated steam is the medium of choice because of the thermal energy available and rarely exceeds 15 PSI at point of use. Using steam to saturate bamboo to reduce charring when using a heat gun is good practice, but using a heat gun at some temperature below 350 degrees will do the same thing and probably take as long. Just my $.02 and many years in the field of thermodynamics. (Lee Koeser)
OK. I've been fighting a battle with straightening for a while and maybe someone has an answer. Here's the deal: I heat with a heat gun until flexible and squeeze with a vise. Yes, I remove a little pith from the backside to keep from compressing things too much. I also sand/file the nodal ridge a bit. I usually squeeze the enamel/pith for about a 5 - 6 count...take it out of the vise real quick and squeeze it from the sides. What happens, almost all the time, is that when I squeeze the sides I get an up and down kink going back the other way. So I heat the sucker up again and repeat. Sometimes I can get it right but many times I end up just heating the cane too many times. This is hard to explain and therefore probably harder to answer but any attempts would be appreciated. I'm guessing that I'm not the only one that has gone through this. (Bruce Johns) You're right, your not the only one. I will be very interested in the responses you get. I have taken to flatening as best I can and then sanding the nodes flat just before I plane. As far as the side to side I can do a good job just as you described, and consider it more important, if you don't get that little S-curve out at the node, it will surely chip when you plane. I'm working with a culm right now that has very little rise at the nodes. Maybe I should pick my culms with that in mind. (Tom Kurtis) Maybe this will help. Try to get all the doglegs out of the node first. Bend it, vise it, get that one node as straight as you can. Then, as your last step, flatten (or displace) the node. You will have to give the node a little more juice from the heat gun at this point to keep it loose. Don't let the node completely cool off & then reheat it. Also, I think you really have to let the node "set up" in the vise when displacing or flattening so that it will remain straight. I use two vises and work on two strips when I straighten nodes. Work on the first node on the first strip & then clamp it in a vise. Then work on a node on the second strip, then clamp it in a second vise. By this time, the first node has cooled enough to be nice, straight & flat. Basically, I'm moving two strips through the strighteing process at the same time. Hope this helps, (Paul Julius) I'm not the expert some of these guys are, but I've found that each node requires 3 or 4 heatings and pressings. I file the nodes pretty well flat (get that line out) and then with the first heating, flatten the node. Once it cools, in the vise, I reheat and work on the kinks. Like I said, it usually takes 3 or 4 tries to get the node flat enough and straight enough for planing. (Paul Gruver) I file the nodes then straighten using a vice or my thumb by pressing on the hot node. Once I have the node flat I use a clothes iron by pressing the hot iron against the cane while it lays in the form. I then lift the cane carefully bending it up to remove any remaining bend(s). (David Gerich) Try squeezing the sides first then squeezing the bump. Do this rapidly. Also try soaking for several days before doing the nodes. You only need a few seconds of heat to soften the node, less heat less problems. I have been doing this for years. Dry them in the MD fixtures after planing the rough 60 degree and you will have straight strips. Another trick is to heat the node. Take the side that has the bend and put the high side of the bend against the edge of the bench and push against the bend while pushing or pulling the rest of the strip in line. Hold it that way till it cools. If this is not clear, I can see about taking a photo of this. I have my heat gun mounted in a small wood stand and use the edge of the stand instead of the bench. Let me know how you come out on it. Power Fibers Jan 02 has my article on displacing nodes that might help. (Tony Spezio) There was a tip somewhere years ago about cutting a “V” in the jaws of the vise for the lip to fit in. I have one of those small Panavise model vises that is dedicated just for this purpose. I made smooth brass jaws for it, about ½” longer on each end than the standard vise jaws that came with it. With a “V” groove, you can press the node on either side very close to the lip. Most will stay very flat after one shot, but I check them again the next day, every once in a while they rise slightly. I really like pressing this way, because it keeps the sanding/filing very short on the node. It also takes very little heat. What I really hate is the little dimples or indentations that are in some pieces of cane, usually above the node about ¼” to ½” up. It is hard to take the enamel off without over sanding the surrounding area around the dimple. This may seem a little anal, but it still bugs me. (Tom Vagell) The article is in Power Fibers Jan. 02 Issue #6. (Tony Spezio) I used to flatten my strips in my forms, enamel side up and then iron them with a hot iron. Works well, but I don't think it is nessecary anymore, (Geert Poorteman)
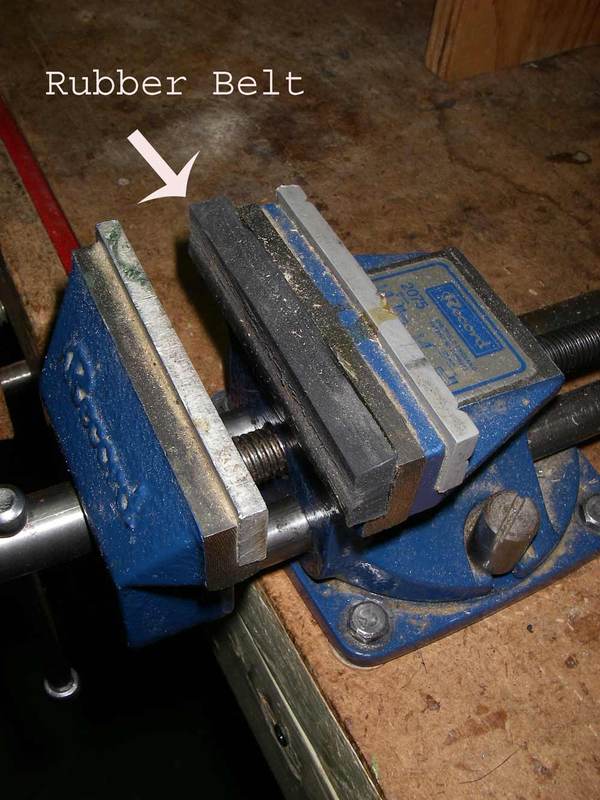
I used to press the nodes with a vise c/w aluminum jaws on both sides that I'd tuned till the jaws were flat on contact. Worked OK but every now and then I didn't get the straightening/flattening that I wanted. So to borrowed an idea off a friend, I equipped one jaw with a 1/2" thick piece of quite hard rubber belting. Now it worked fine. The "flat" jaw was against the node with the rubber against the pith. The rubber distributed the pressure allowing the piece to get equal pressure along the complete surface. I never "vise" till I feel the fibers release. The hard rubber is conveyor belt scraping material needs replacement about every 2 rods. Some contact cement and 1/2 hour and I have a new piece. Further, I find it somewhat tough to get the very short S bends out of the nodes, so to borrow from the same friend, I use a piece of 3/4" aluminum pipe c/w 2 slots in the top the the strip can be laid in and manipulated. The friend some of your know - John Bokstrom. (Don Anderson) I don't understand your description of the "I use a piece of 3/4" aluminum pipe c/w 2 slots in the top the the strip can be laid in and manipulated." Can you elaborate further? (Larry Swearingen) I don't understand this either. Please elaborate. (Neil Savage) I've never seen Don's arrangement, but I think I understand. Hmm, let's see if this works! Picture a piece of 3/4" pipe that looks like this: _________________________________ Now cut two slots halfway through so that it will look like this: ____________ ________ ______________ Insert the bamboo in the slots to hold things steady while you bend the rest. Push this way ----> \ \ Correct me if I've got this all screwed up, Don. (Harry Boyd) Is that the metal version of Max's Tamegi? (Larry Blan) My thougths exactly!! Go here for Ralph Moon's pictures. (Todd Talsma) The arrangement of the straighten was not my idea but John Bokstrom’s. The pipe is threaded and screwed into a closet end cap. It is set vertically and screwed into the work bench. The pipe is about 6" high. If I recall correctly, John showed my the pipe straightener about 15 or more years ago. No idea where he got the idea or created it himself.
Here is a picture. (Don Anderson) Looks like a piece of masticated rubber - that would be about right, tough stuff. (Larry Blan)
I usually use my Kurt machinist vise to compress my nodes, but I am getting spoiled by the shop I have set up in the porch/laundry room. It's heated and air conditioned, perfect year round. So this warranted the tooling up as I really can't bring a 90# vise inside every time I need to work on nodes! Well here is what I came up with. I bought this vise and flattened the jaws, that worked out OK but I was less than happy with the floppy handle that the vise came with, also there was quite a bit of slack in when you would back the jaws open so I added a couple of springs to help pull the jaw back. Now this vise works like a charm. The bolts that hold it down on the bench are tightened on the bottom with a couple of large wing nuts, so you can remove it very easily for room on the bench. Next I am thinking I may have to get a small lathe as the tool room lathe in the garage takes two men and a boy to even move a little. Need something to turn handles, reel seats and ferrule stations. And yes that's the washing machine and dryer in the background covered by a rug! Maybe I could talk the wife into getting rid of them and going to the laundry mat! image Opps forgot who I was talking about! Strike that from the record. Here are a couple of pics.
Something I have added to my machinist vice to compress nodes are a pair of hard rubber surfaces that are attached to magnets that lets me remove them for other vice uses. The hard rubber surface retains the thermal energy for longer pressing and also does not mar the surface of the cane section. I think I picked up the hard rubber vise inserts at Lowe's or some hardware shop. They seem to work for me very well. (Frank Paul) My node vise is a bandsaw. (Bill Fink)
Recently, I have had difficulty with nodes popping back up after I have displaced them, rough planed, and then heat treated. This is occurring on one rod I am working now, but hasn’t happened with such regularity (in fact, it seems as if it’s the same node on each strip for the tip section I am working on, leading me to believe I just had a very challenged node that I didn’t compress enough). What methods have people used to displace them again after the initial angle is in? (Louis DeVos) Are the nodes popping up on the pith or enamel side? On the pith side I work each node very carefully when I am planning; may use my scraper to prepare the node so I don't get lifting of the bamboo when planning. The enamel side is a little tricker, since I generally slightly flatten this side so I get good seating in the planning form groove. One does not want to remove any (well as little as possible) bamboo fibers on the node surface as they are generally weak, but it is critical to have the enamel node surface as flat as possible. Lets say each node is a challenge and going slowly and carefully is my rule. (Frank Paul) The nodes is popping back out on the enamel side. (Louis DeVos) If you are displacing your nodes, you could put the apex of the strip in the grooved area of your vice and press it normally. If not, make a set of sacrificial jaws out of a piece of aluminum and file an area horizontally so the apex would fit in it and the press. (Don Peet) Do you file out a depression on the pith side of the nodes before pressing them? If you don't, try this. It will probably help. (Darrol Groth) Sounds as though you have one particularly tough node. Nodes which pop back up are not pressed (or displaced) at the correct temperature. You either had the node too warm or too cool. Chances are, too cool. My experience and my feeling is that there is a narrow window of temperatures at which bamboo is most pliable. I do not know what that temperature is, but someone recently mentioned 236 degrees F. If that's true, then bamboo will flex and hold its shape in a range of perhaps 25 degrees. At 225 it will straighten just fine. And 250 it will also straighten just fine. But at both those temperatures, the node will pop back out during heat treating. Only at temperatures from 232 degrees - 240 degrees will it straighten (flatten, displace or whatever you want to call it) and remain in that state during heat treating. Of course all these numbers are used only as examples -- I don't know that they are correct. But the principle remains the same whether the numbers are 200 degrees or 400 degrees. The only way I know to find that "sweet spot" is through feel. It's easiest to feel with strips about 1/4" wide. Tip strips are often smaller and thus more flexible making it more difficult to feel the bamboo soften. Heat a few seconds and flex away from the enamel, not side to side. Repeat till you find that sweet spot. Then nodes won't pop back up. With my particular method of heating, the pith edges have just begun to turn brown -- not black. About like light to medium toast on white bread. How do you correct popped out nodes? Depends on how persnickety you are. The easiest way is to simply sand them out. But that does compromise some power fibers. I cut some 1/2"x1/8" aluminum angle to fit over the jaws of my vise. Into one angle I filed a 60 degree groove. To re-press a popped up node I first remove some material from the pith apex. Then heat and press (displace, flatten, whatever) as usual. (Harry Boyd) I have never tried it, but I recently acquired an inexpensive "laser" non-contact thermometer from Harbor Freight which could be used to measure at least the surface temperature. I will be evaluating it as a possible tool for these questions. Theoretically the laser part lets you zero in on the point of measurement. (Dave Burley) I sand the back of the node out with a sanding drum in my drill press leaving a half moon recess. I don't do a thing to the enamel side till after displacing the node. Soak the strips then Displace the nodes using a notch plate in the jaws for the nodal ridge. Softening a soaked node only takes about 30 to 45 seconds. The fibers in the node move to the sanded out area on the pith side leaving the fibers intact. After displacing the node, it only takes a few passes with a file to remove the nodal ridge. This leaves a small nodal area. Will send you some photos off list if you want them. I do run into some nodes that will give me a problem once in a while. This seldom happens so I can say I have no problems with nodes. Like you, it will be from the same culm and the same node on each strip. Some bamboo will just not cooperate. (Tony Spezio) Because of all the difficulties associated with dealing with nodes, I have been playing around with several rods where I just flatten the nodal hump with a sharp plane or/and scraper, and leave it at that. I take a great amount of time with the heat gun straightening the strips and in other preparation, so I am not being lazy here, but it seems to me that the process of heating and pressing is possibly going to cause damage to the nodes. I am being as conservative and light-handed as I can with this removal of material, for all the obvious reasons. I must say that at this juncture I am unable to detect any difference between rods built using the two different techniques for dealing with the nodes. Does anybody else do this sort of thing? Comments? (Peter McKean) A very interesting post and some provocative questions Peter: I have been making rods for a half dozen or so years and have come to the conclusion that I just don't "fit in" to the popular and traditional rodmaking mentality; so as a result of my being out of harmony with the majority I usually just keep my mouth shut on a lot of issues. One of these of course is the one you bring up of "what to do about nodes?" Assuming that in every scenario you stagger the nodes, then you have the adhesive on the strips gripping everything together in parallel lines. Therefore it seems reasonable (to me) to assume that even if that joint is slightly weaker than a heated and pressed node joint, the relative structural damage is negligible and that this would hold true in the case of nodeless rods as well. As with you I am conservative in removing material from the enamel side and I get everything a straight as possible before I put them through my JW beveler. In the final stage of rough beveling I make one or two last passes taking about one or two thousands off the enamel side leaving me a perfectly flat and beautiful surface for my MHM. Do I loose a minimal amount of power fibers? Sure! But in my world that is more than compensated for by the beautiful grain exhibited all along the strip and the lovely burl patterns where the nodes are. Using instruments, some makers may be able to produce evidence that show structural differences between methods, but like you, I sincerely doubt that if using a double blind study in an attempt to eliminate subjective bias on the part of both experimental subjects and the experimenters (and without instruments), nobody but the grand poobaas can really tell the difference... (Dick Steinbach) A pal who seeks after truth (poor man) set out to answer the question when he started building several years ago. He split out 50 splines with at least two nodes on each. Half he flattened by heating and pressing; half by sanding. He then bent the splines until they broke. All broke at a node. Every one broke at the heated and pressed node. We both prefer the neater, smaller look of the heated and pressed node. We've both been grumbling to ourselves since he did this . . . We also both concluded: "No biggy!" Neither of us is familiar with a long line of Payne factory recalls attributable to rods breaking at the heated and pressed nodes. As a practical matter, the difference in method hasn't produced fatal structural flaws for either of us, but then neither of us has built that many rods. (Steve Yasgur) We do what pleases us and we all think our way is the way to go. I just do what I think I am pleased with and feel satisfied doing. I feel there is no "right" way or "wrong" way. Whatever works for a person is the way to go. This is what makes rod making interesting. My way might take a bit more time but I am not a production Rod maker. Just enjoy what we are doing, that is the important part. (Tony Spezio) Cut a 60 degree groove in a piece of aluminum angle to fit over the vice jaws. Then heat the strip and clamp it into the groove. This problem is easier to prevent than to fix. I used to have problems with nodes popping back up during heat treating. The solution I arrived at is to bind the strips with nylon thread for heat treating. When you heat treat, you drive all the moisture out of the strips and they shrink slightly. This loosens the wraps if you bind with cotton and allows the nodes to pop up. Nylon has enough stretch to keep tension on the nodes and prevent them from popping back up when the strips shrink. (Robert Kope)
This may have been addressed at another time, but I couldn't find it. Out of the entire rod making process, I loath pressing nodes - instead of the escapism I seek in rod building, I start daydreaming about work while holding those strips over the heat gun. While in the shower (best thinking place ever), I had the epiphany this morning of trying to do the strip at one time. My idea would be to soak the strip, heat it in the oven (I use a mica strip oven) until hot to the touch (say 3 minutes or so at 250 degrees) then use clamps to flatten the nodes. I have a few Bessey clutch style bar clamps which may do the trick. My questions are 1) will this work? 2) will the brief heating process negatively affect the final heating process after the initial beveling period (IE can I still cook the strips at the standard 15 minutes @ 350 degrees I have been using, or will this create too brittle a strip)? and finally 3) if I soak the strips before hand, should I be able to heat at a lower temperature which would then affect question #2? (Trey Matheu) Good thoughts, but the intent of pressing nodes is to remove the bump and straighten at pretty much the same time, at least that’s what I try to do. Trying to get them clamped and pressing all at once unless you have six arms might be tough thing to do and do it while the strip is still warm enough for the heat to do it thing. (Pete Van Schaack) I agree, I generally spend a few second straightening, then a minute or so pressing. I suppose you could place the clamps in the straightening position (up to 5-6 max), then start again at the other end and move them into pressing mode. Should be just about the correct amount of time. In lieu of that, I have started to apply this neat stuff the McGowan Institute at UPMC is creating called "pixie dust" - a compound used for regenerative medicine I am trying to use to grow another set of arms/hands. Could be useful. (Trey Matheu) Could work, try it out and see what happens. I read somewhere a long time ago about a straightening method that involved using the oven and heating a whole batch of strips at once, I found I wasn't fast enough and overheated about half the strips. I now spend my daydreaming time in front of the heat gun trying to come up with a way to straighten at least a whole section if not a whole rods worth of strips at one time, something involving long pieces of steel, bolts, clamps, thicknessed strips and wet heat, I'll keep the group informed if I ever come up with anything useful. (John Channer) I seem to recall someone using a sheet metal brake, or some such contraption, to press an entire strip at one time. And I seem to recall Marcelo Calviello talking about doing something similar. Also, there is an article in one of the Best of the Planing Form books about heating strips two at a time, then pressing them simultaneously, although I don't remember the specifics. (Harry Boyd) Shortly after I joined the list, which was more than 10 years ago, someone was selling the shop equipment of a late rodmaker on behalf of his widow. Among the tools was a large hydraulic press with a couple of heated plates that looked like they were corrugated. They had a series of 90 degree V-grooves in them. My understanding of operation of the press was that strips for an entire rod could be laid out on the lower plate in the V-grooves. Then the upper plate placed on top of them so that two sides of each strip were in a V in the lower plate and two sides were in a V in the upper plate. Then pressure was applied and the plates were heated and allowed to cool while under pressure. This simultaneously flattened and straightened the nodes in all the strips for an entire rod. This idea of clamping strips on all all four sides at once was the inspiration for my node press. (Robert Kope) AS TOO ....2) will the brief heating process negatively affect the final heating process after the initial beveling period (i.e. can I still cook the strips at the standard 15 minutes @ 350 degrees I have been using, or will this create too brittle a strip)? and finally 3) if I soak the strips before hand, should I be able to heat at a lower temperature which would then affect question #2? My personal view, though not the currently held view of most, is that you can heat/heat-treat once. After that your just getting it hot. Strip soaking might change that. I do not know. I address nodes at a different place in the construction of the rod, partly because I also find less joy in the same process you describe. I have heard expressed on this very forum a sort of Zen-ness reached by some. I do not know any other way to view my lack of Zen in the node pressing process than to think I am absent the same amount of inner peace than those other individuals. (Timothy Troester) Would you share with us where in the process you work the nodes? Not trying to pry information out of you, but I enjoy looking at things differently than the way I do them. (Harry Boyd) Since you asked I will try to describe my process of dealing with nodes. I have always experienced concern about the node heating and crushing or deforming process ever since the first time one went CRACK! And thought, "This ain't right." I am not promoting my way for anyone else. Let me be simple. I split the bamboo into 3 or 4 sections and file nodes. I probably spend some more time doing this than some others but I want to get this done as good as I can before I flame. I flame the sections and then split. I square off the splines and file down the center of the spline to take off the burnt residue and make the spline flat down the center of the spline about as wide as the final spline will be. I do this filing as I can and as needed through this step and the planing-in-the-form process following. I set my planing form to a consistent depth the length of the form and plane my angles prior to heat treating on the forms. I plane on the forms like I was doing final planing except I can take more off at a stroke and must check the angles as I plane. Doing this, the contour of the planed side mostly follows the contour of the rind side. If there happens to be a particularly pronounced node, I will plane more out from behind it which means I am planing the spline narrower in that spot. After this process I bind them. I have some heavier cotton string and I bind them TIGHT!, I ADD WEIGHT! Then I do heat treating. I generally do 350 degrees for 12 minutes. As the bamboo heats up it relaxes and the tight binding pills the nodes into place. This is a careful process for me and tends toward the touchy-feely. Sort of like my grandfather, a cabinet maker, running his hand over the surface of a board and telling you how thick the board was. Now, as I do final planing any unwanted variation in the node, like a hump? Humps are what we are getting rid of, right? These humps are dealt with through planing as the spline gets tinier, the node flattens with the weight of the plane. By this time, except for the occasional node that everyone deals with from time to time, the nodes aren't an issue. Now, I am trying to describe something I have started doing over time that really isn't done in well defined steps. I did not like addressing nodes the way I was taught and so I started being more attentive to things that would help me avoid doing what I did not want to do. I have come to believe that the heating and pressing process makes those areas more brittle and chipping is more of a problem. As was pointed out to me, steaming being an old process, soaking and heating or steaming might be another way to address what were my concerns but I keep two dehumidifiers running in the basement. I am trying to keep moisture out. I think it would be counterproductive to introduce steam or another water source to the shop area. I have tried to describe here my efforts in avoiding the denoding process as I was originally taught. If one of you guys was standing there and I was talking to you instead of to myself this might all be different. Just a little bit of company might have saved me from my process. (Timothy Troester) Steam treatment predated the use of hot air guns. This kept the temperature below or about 212F. (Dave Burley) I wasn't introduced to soaking and steaming until after I had built for a while and I first heard about it on the list. I see where soaking and steaming might change things. I just don't have any personal experience. The longer I do this the more directions I can go and the more questions I have. It is all good back ground if nothing else. There have been discussions I only scanned that later I ran into something that prompted me to go back and reread. Seems our various backgrounds bring a lot to the table. For instance, I know more about glues, without wanting to, than an adhesive "expert" I met once. My questions were directly from some of our discussions and he would scratch his head and say, "That's a good question. I've never been asked that before. I'll get back to you." My granddad was a cabinet maker and I sharpened his plane blades from the time I was a kid. When I started planing bamboo I discovered I didn't know what a sharp blade was. Those internal conversations I have in the basement, while planing bamboo, encompassing topics that otherwise would not have come up. Hopefully, making rods makes us better people if less understood. The rest of the world is lost. (Timothy Troester) Your idea is a good one. I have tried making a machine to do this, but it brings in more issues to the problem. One thing is that the jaws should be heated, then allowed to cool while the strip in inside. One good compromise is the Gator Speedy Air Vise, with aluminum jaws. I have been using this for a number of years now, and my rotator cuffs love me for it. The Waara node press, the node cruncher, heat gun, and the air vise make straightening strips almost too fast. Also, Harry (I think it's Harry) has a Youtube on heating strips. He doesn't overheat them. This is the bomb. If your eyes are stinging, your way too hot. If you want, I can put up some pictures of the air vise on my site. (Chris Raine)
I notice in descriptions of node flattening, some people have a notch in the vise for the ridge. They flatten and then sand off the ridge. Is there an advantage to this over filing or sanding off the ridge before flattening? (Mike McGuire) Personally I think there is an advantage. You end up with a smaller nodal area. This is done when "Displacing" nodes so that the power fibers on the nodal bump are not all sanded off. I have some that will disagree with me on this but it is the way I do it and find my nodal areas are all small. I also think that filing off the nodal bump weakens the nodal area. In the article I did for Power Fibers (Jan 02). I used a band saw to recess the backs of the nodes. I now use a sanding drum in a drill press instead of a band saw to recess the back side of the node. I can send you photos of that. (Tony Spezio) I agree and also handle nodes the same way. I have a small hobby vise (I think it’s a Panavise) I purchased years ago. I threw away the plastic jaws that came with it and bought the optional smooth brass ones. I cut a 60 degree notch in one side with a file. Works great. (Tom Vagell)
Tony Spezio showed me the process of drum sanding the pith side of nodes using a 1/2 inch drum sander and explained his theory about how this allows area for the node power fibers to be displaced instead of crushed. Not meaning to speak for Tony, but his thoughts were that the nodes are not inherently weak areas but we may make them so by crushing that area if we do not allow room for the displacement. I am in the final stages of two rods using this technique. I can report that this approach to node flattening makes the process much easier and my close inspection reveals the power fibers are aligned in parallel beds instead of distorted layers. A side benefit for me since I use a MHM is that the nodes lie very flat with no rebound and thus I have tapers that mic out very nicely with little deviation in the nodal areas. The glued up sections are very flat across the nodes and the tapers more consistent across those areas. (George Wood) Tony reminded me that the drum sander is a 2 inch drum not a 1/2 inch drum. I have learned to split cane without removing the nodes and Tony had a good idea, why treat nodes and waste time if you are not going to use that portion of the strip. After splitting, I cut the strips to length, then remove the node pith side with the drum sander. I then soak for a few hours to days and then flatten the nodes. Rough taper the wet strips which is so much easier than after heat treatment. I take the slightly oversized rough strips and bind them in one of Harry's hex aluminum contraptions, heat treat them. Then final taper the treated strips. The strips turn out straight with nodes flat and not crunched. The more I do this way, the closer I can get to the final taper size to reduce the amount of final milling. I save so much time and the strips seem to hold up well with no node deflection noticed. (George Wood)
I would appreciate some recommendations concerning the proper type of vise to press nodes. The jaws need to be smooth. However, what size vise as well as style (drill press, woodworker, or workshop bench) should be used? (Ron Delesky) I took my standard vice and removed the jaws, beveled the two holes on the back side and reinstalled them. The back sides of the jaws are usually flat. (Wayne Caron) Many people recommend a drill press vise. Replace the removable faces or cover with with hardwood, to minimize damage and if you do not remove the node first, Tony Spezio suggested to me to put a notch into one face into which the node would fit. (Dave Burley) And you might consider a horizontal 60-degree groove in the opposite jaw, in case you notice any of the nodes reemerging after you start planing. I used 3/4" white oak flooring left over from a job and epoxied two disc magnets into the back sides, so the wood jaws will stick to the metal vise jaws, but can be removed quickly if necessary. Remember to make the enamel side jaw a little longer than the pith side, so the jaws don't mark the enamel side. (Steve Yasgur) I use a standard 6" woodworking vise. They are fairly cheap, and have smooth flat jaws that are perfectly suited for the work. (Paul Gruver)
|