Bamboo Tips - Tips Area |
|
< Home < Tips Area < Reel Seat Spacers < Cork Inserts
Saw a photo where someone had morticed a cork reelseat that used two sliding bands. Anyone have any ideas on best way to mortice the cork? (Bill Walters) Last year (maybe two years back), Tony Larson sent me a sanding jig for mortising wooden and cork fillers. It was a simple aluminum block with a channel. I am sure you can devise a sanding block of your own. I used Tony's several times for cork fillers and it worked like a charm. Unfortunately, I misplaced the block somewhere in my mess. (Bob Maulucci) I've had some luck playing with this technique, and although there may be better ways to do the job, I'll just pass along my method. Basically, what I do is make a cutout in the rounded insert, replace it with cork, and then just mortise the whole deal as if it were wood. First, I take a longitudinal slice right through a finished reelseat insert, at a depth and length that would correspond to the shoulders of the mortise (which you will actually form later). The length of the slice will stop with a sharp, 90 degree step at a forward location of your choice, and we'll deal with that sharp step later. File or sand the "platform" you just formed dead flat, and also square the step to the platform. Next, I cut an appropriate number of cork rings in half so that each forms a half-circle. As a separate step, I glue and clamp the half-rings together, cut-faces down, on wax paper. (You can use any glue you prefer, but I've used Titebond.) Let the cork assembly dry, and then sand the cut face dead flat. Then, I place the cork assembly onto the platform of the insert that was formed by the slice I removed. Glue and clamp it both downward to the platform as well as forward to the 90 degree front step. When fully cured, you can "nibble" the overblown dimensions of the cork down so that it roughly matches the diameter of the insert, and then just go ahead with your mortising procedure. The only thing you want to be careful of at this stage is that the location of your mortise closely matches the joint on each side where the cork was glued to the wood. Maybe you will need to make a couple passes to get each joint just right. Your final result should reveal new wood shoulders that make your insert look as if you had used some tricky technique to inlay the cork. When cutting the mortise, you'll pass just to the end of the forward cork, and the roundness of the bit ahead of this point will form a nice transition, right through the wood where you once had that 90 degree step. No problemo. Lastly, you will need to re-form the center hole in the insert, as the cork will have partially closed it up. You can to this either with a drill bit or a rattail file, but be very careful of the finished product because you'll notice that the cork has become quite thin. This matters NOT AT ALL, since the whole thing gets glued onto the rod blank and is very strongly supported once again. Admittedly, all this requires a little bit of fussing around, but so is everything else that gives a special touch. I think you'll like the results - at least I sure do. (Bill Harms) You want a 1/2" fingernail router bit and a router table set up. Check Wayne's book, he has a description of how to do it. Grizzly is a good source for the bit. Another option, and a lot less hassle, is to make the mortice the way Payne and Leonard did, with a file, it winds up flat instead of rounded, but if it was good enough for them. (John Channer) I've morticed several wood spacers with a chisel. It turned out very well. Just as good as the router bit, if not better in some cases. Chisel cost about $10 at Sears. Not sure how it would work on cork. Seems like it work on cork if it was very sharp. (Lee Orr)
Todd was kind enough to post the pictures and description of the jig I use for making cork reel seat inserts (here). If you don't have a set up to make wood inserts the jig can be used for that as well, it just takes more time. (Mark Shamburg) Viewing Mark Shamburg's cork insert jig reminds me of the question: How do you attach the cap securely so that it will not come off under the strain of the reel foot pushing against it? Seems that gluing it to the cork is not enough, that the cork could/would tear away. Obviously this is not limited to Mark's jig, but to any reel seat fashioned in this manner. (Steve Shelton) I do ALA Garrison and mount a short piece of Spanish cedar inside the cap instead of cork on the reel seats that I use with cork inserts. (Scott Grady) I simply epoxy the butt caps on to the inserts. I find that most of the force from the reel foot onto the butt cap is in the radial direction (hoop stress) as opposed to axial because of the shallow taper of the reel foot. I've never had a reel foot exert near enough axial loading to break the epoxy bond loose. I did have one butt cap come off because I did a poor job of preparation of the bonding surfaces and a poor job of mixing the epoxy. I think that had I only messed up on one of them the bond would have been adequate to retain the cap. And in this case I felt the cap starting to come loose and pulled it off myself, before I lost something. (Mark Shamburg) I don't think there is a problem with the cork holding the glue, but on a rodmaking (graphite, before I saw the light on the road to Roscoe) board someone said they always used a wood ring under the cap because of problems with the cork fracturing. I've made them with cork and no problem with the three I've done that way, but I have gone to using wood. (Henry Mitchell)
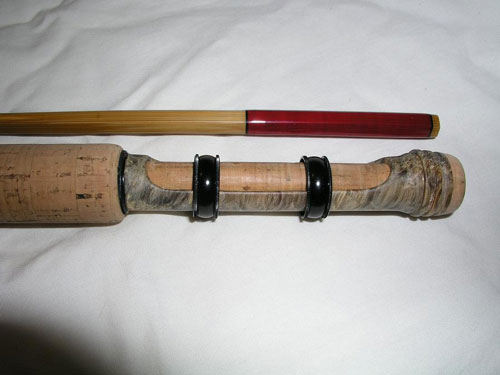
I would like to try and put a cork insert in a reel seat and am wondering if anyone has done this and would be willing to share there methods and glue used. (Rick Barbato) Here is a pick of the latest one I did for the Catskill Rodmakers Challenge, it also has a bamboo ferrule.
(Wayne Daley)
I have been admiring the Bellinger cork-in wood reel seat insert and wondered if any of you have manufactured anything similar. If so, are you willing to share the the process? On a trial run, the router dramatically destroyed the relatively thin wood shell (Bob Nunley... don't try this at home :-)), so I'm thinking that a sanding drum might be a better approach to opening the mortise. Thoughts? (Pete Bates) I center drill the insert with a 1/2" bit and cut the mortis with a 1" belt sander then finish by hand. I use either cork or another wood to fill the insert. There was an article in Power Fibers on this method. I think it was in 09. (Dave Wallace) I've done a few, but was never adventurous enough to try using a router. I cut the morticed area by hand with a file and sandpaper. (Harry Boyd) In Volume 32 (July, 2008) of Power Fibers, there was an article on how to salvage reel seat inserts that had flawed mortises. The author made seats that looked a lot like the Bellinger seats. (Todd Talsma)
So, I just figured out that I can use wine bottle corks for reel seat inserts. I knew there was a reason I was saving those! Nice cork too! Two of them should do the trick. I just ran one cork thru the mortising jig to see what a router would do to it... worked fine, but if I was doing it on a butt section, I think I'd do it by hand with a file. (Pete Bates) Yeah, Pete, but NOW you may have to switch to Resorcinol to match the nice wine-colored stains on your reel seats . . . (!) (Steve Yasgur)
|