Bamboo Tips - Tips Area |
|
< Home < Tips Area < Reel Seat Spacers < Mortising
On light woods, I take a series of light cuts, about three, and nudge the fence a little after each cut until I get to the desired depth of mortise. Hogging the whole thing off in one shot always gets me in trouble....KABOOM! #!*&#! (Eamon Lee) On the subject of wood inserts for reel seats, it just seems to me that one could make a tool to duplicate inserts reel quick and easily. I keep thinking that one could make something that looks very similar to a Medved Beveler. Have a router mounted permanently to a fixture, a fence that would accommodate the insert and an adjustment screw that would allow you to fine turn the amount of cut you were taking. Strap the insert into some sort of carrier on the fence, run it till it hits a stop on the fence and then pull the fence away from the bit. I've made a couple insert with my router but I have to set up each time and it is somewhat of a pain to get it all aligned properly. With the above you could dedicate the contraption for inserts only. Does anyone have any additional ideas along that line or am I approaching the problem all wrong? (Tim Wilhelm) I have a $20.00 Trim Router from Harbor Freight. It is dedicated to making reel seat inserts. It is set up and stays set up. A wood block for each end of the 3/8 shaft that the insert is turned on. A nut on each end of the shaft tightens the insert between the blocks. I think this is the way most makers do it. Little investment, to not have the hassle of setting up each time. The whole unit then sits on a shelf till I need to use it. Total cost including the Finger nail bit about 40.00. (Tony Spezio)
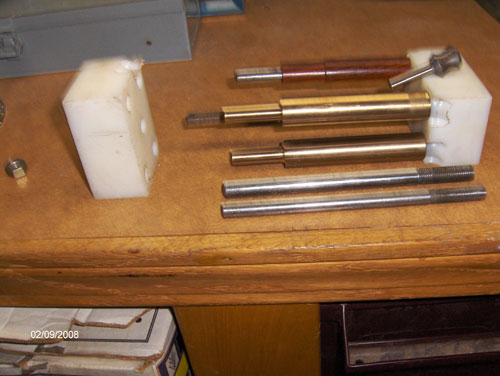
I have started making reel seats, mostly to see if I could actually do it. I have several questions pertaining to wood fillers that I pose to the group: My little Taig lathe has a three-jaw chuck, and I am using square stock, so I had to counter bore the filler first. I mounted it vertically in a drill press, drilled out half, then switched it end-for-end and drilled out the other side. Then mounted it on a Mandrel, knocked off the edges with a rasp, and turned it. This worked fine, but does anyone have any special tricks for counter boring? Bits, jigs, etc. Also, I need to mortise the filler. Where can I find a "fingernail bit" and is there another name to this thing? The folks at woodcraft were helpful, but had no idea what I was talking about when I mentioned it. By the way, I recommend woodcraft figured-maple pen turning blanks for those getting started. They are not as fancy as some, but seem ideal for beginners. I picked the least-figured piece to practice on, and it turned out to have quite a bit of figure once I turned it and applied a coat of tung oil. Definitely good enough for a rod. Now, if I can do metal, I might be on to something. (Jeff Schaeffer) I find it faster (for me anyway) to mortise the reelseat filler with a mallet and chisel then with a router, jig and router table. That is if I count the set up time. If I could leave everything set up all the time this would not be the case or if I made a bunch of fillers at a time. I do them one at a time as needed. (Marty DeSapio) Would you care to expand on this on-list? I assume you are using a 1/2 inch or 5/8-inch gouge to do the mortise. Am I right? (Bill Hoy) No, I use a VERY SHARP 3/8" or 5/16" straight chisel. Once the barrel is turned I remove the piece from the lathe and mount it in a vise (plastic or wood jawed). I trace a reel foot on the barrel and expand it by 1/8"-3/16". I use a knife to slice down each mark. I then use a mallet and chisel to work my way down each side. If I am "lifting" wood I remove the piece and turn it in the other direction. Once the mortise is formed on each side I use the chisel free hand to hog out the center while forming a thumbnail shape. Where the mortise merges with the cylinder I bevel this on an angle. I check my work with a straight edge and the reel foot. Once formed I finish with different grades of sand paper (150 grit to 400 grit). It takes about 40 minute from start to finish. (Marty DeSapio) Get a router and a fingernail bit and dedicate the setup to making mortises in reelseat fillers, it shouldn't take you more than about a minute, half of that being mounting the filler in a jig to run past the router bit. Unless, of course, the process of doing it by hand is therapeutic. (John Channer) I have had a router, fingernail bit, and router table for some time and have made seats with it. I use the router and table at my "real job" so it is not always available in my shop. It seems by the time I get the stuff together I can "whittle a seat". (Marty DeSapio) My Sherline has a wood spur that I can use, so I take the 3 jaw chuck off and use the spur to turn the insert round, but not to final dimensions. I just turn it enough to make it round. Then I put the 3 jaw chuck back in and bore the hole. Once bored I remove the jaws again and use a pen mandrel with a morse taper on one end. That fits in the spindle of the lathe. I've had to turn a couple of bushing's to make the 1/4" rod fit in the hole I've bored in the insert. Now I turn the insert down to size. Doing it this way guarantees that the hole and the outside of the insert are concentric. From there depends on the type of reel seat I'm making. Which may include taking it over to the router table and mortising it or just sanding it on the mandrel. (Tim Wilhelm) I use a center finder (Harbor Freight; cheap) to mark one end. Then I make a short hole. That goes over a dowel mounted in a board centered on my drill press table. I center mark the "up" end and drill to the dowel. I read this trick in one of the woodworking magazines. (Grayson Davis) You can get a Spur to fit the head stock or use it in your 3 jaw chuck. This will have four tangs on it that will dig into the end of the block to turn it. One end of the block on the Spur and the other end in the tail stock center. I use a live center in the tail stock. If you need any shots of the Spur and Fingernail setup let me know. I can send you some. For the Mortise set up, get yourself a 20.00 Trim Router from Harbor Freight and use it as a dedicated set up. I have one set up that stays set up, no fiddling with adjusting each time I want to use it. Set up the block between the Spur and tail stock. Turn the block to 3/4" OD. Put it in a 3/4" collet, a three jaw chuck will do the same. The drill is setup is in the tail stock. On advise of a list member, I purchased several size Parabolic drill bits, these work a lot better than a standard drill bits. I also found the Black and Decker Bullet drill bits work well. After the 3/8" hole is bored the blank is slipped on a 3/8" home made mandrill and the blank is turned and finish sanded to 11/16". The mandrill with the blank is then removed as one assembly and the assembly is installed in the end blocks for mortising. This makes it easy to make the inserts. (Tony Spezio) Got a number of off list messages about the Router I mentioned. Harbor Freight has two types. The 33833 is listed for 45.99. It has an aluminum body. The other is #44914-2RNC. It is better for the Mortise rig. It has a plastic body with a rack and gear adjustment. Much easier to adjust the height of the cutter. It is called a Wood Trimmer and not a Trim Router. The Router bit is # C 1215 from Grizzly (1-800-523-4777 FREE). (Tony Spezio)
I have a quick question about the router setup for making reel seat inserts. I have a nice table and a Makita plunge router. However, I was thinking it might be a good idea to get a fixed base router that I can leave set up on the table so I can keep using my plunge router for other stuff. I was wondering if a 1 hp router (25,000 rpm) would have enough stuff to work hard wood like walnut and maple. I don't want to get to expensive if I purchase a router specifically for the table, but I want to make sure it will do the job without chattering or burning. Will the 1 hp do it? (Jason Swan) I am using the 19.99 Trim Router from Harbor freight. It works as good as my 100.00 router worked. It is a dedicated setup on a 5.00 yard sale router table. Ready to use when I am ready to use it. (Tony Spezio) I know many of you use router tables and we all eventually have to change bits out... hardest part about that is setting the bit depth so that it's perfectly centered after changing. Well, the first time I changed bits, I wasted a few pieces of round trying to get my bit set right... here's what I did. When I finally got the bit set to the right depth, I milled depth gauge out of aluminum so that when I replaced the bit, I just set the top of the new bit exactly the height of the old bit. No guesswork this way and no fighting the adjustment after you change bits. Of course, you have to use the same brand and style bits every time. I actually have two gauges, one for 3/4 radius bits and one for 1/2 radius bits. (Bob Nunley) If you don't have a aluminum gauge made up just use a insert that has the right mortise on it. It takes a bit more setup than Bobs gauge. Just slip the insert on the mandrill and the mandrill holding blocks and work it to where the bit and insert fit together as a match. Bob's Gauge is a lot better if you can get one made. I guess one can be made from hardwood. (Tony Spezio) What I did is to run a piece of waste hardwood through the table saw at the proper depth and drilled a whole the shank size plus one on center, then I cut the block in half and use these for gages. I have these for many different set ups! (Ron Rees)
I was thinking of trying to make a reelseat mortise along the line of REC's rounded profile. I've used the 1 inch 1/2 radius bit recommended, but want to try to do without the rails. Can anybody save me some time in searching and be able to recommend a bit and a source? (Rob Hoffhines) I used to turn some of my fillers like that. This is how I did it. I made a fixture to hold the filler, once it was turned round, to dimension. But, instead of having center holes in each end, I made the "center" holes off set about .100 inch. When you run this in your lathe, it will rotate off center and only hit the one area. You would remove around .080 inch. That's all there was to it. Make up a fixture, with one fixed end, with a "drive pin" sticking out on the inside. This will keep the filler from turning in the fixture. Then, on the other end, make the piece with a hole in it, that will slide over the end of the shaft of the fixture. Drill a hole through the end piece and into the shaft of the fixture. Tap the hole in the shaft, so you can run a screw into the end and this will hold the end on and keep it from turning. This will also keep your "offset" centers in line with each other. (Dave LeClair)
I finally got around to putting together a 'dedicated' router setup to miter reel seat inserts. The first piece I tried to cut in the new setup was a beautiful piece of burl walnut. The fingernail bit (Grizzly-C1215) was new, never used, and the router is a fixed high speed. The bit smoked the seat black. However it didn't smoke a piece of pine. Am I doing it wrong? Any help will be appreciated. (Don Greife) I slowed my router way down with a speed control from Harbor Freight. Works for me! (Dave Norling) I tried one of those when building stile-and-rails doors from maple for my kitchen. It gave me two speeds: weak and stall! (Art Port) Adjust your router bit speed. Different burls require different speeds to avoid burning the insert at the end points of the mortise. I always keep a chart of speeds for different burls so I don't ruin inserts. I also make several at a time and save my very best inserts till last to mortise after making adjustments. (Randall Gregory) I have similar setup and have routed walnut burl, but, I make multiple passes. usually at least 3. The problem I experienced with the burl, was that too big a bite destroyed the piece. (Lee Koeser) Over the past five years or so, I have made all my reel seats with the router. To avoid "blowout" or burning, I would recommend using a 1/2" straight-bit instead of the fingernail. I assume your blank is mounted on an arbor that you rotate as you make each pass. The straight bit doesn't take such a big bite out of the wood, but because it only cuts tangents off the circumference with each pass, you need to make many passes for each complete rotation -- moving the fence back for each set of passes. Sounds like a pain, but you will see that the whole process really goes very quickly. When you reach your target OD, simply zip the blank back and forth across the bit repeatedly, smoothing out all the little ridges. Leave the blank on the mandrel and sand to obtain a perfectly rounded cylinder. Then change to the fingernail bit and rout the mortise in your usual manner. (Bill Harms) 1. You have the right bit, which was your first question. 2. How much material are you trying to take off? I would cut about 1/8" or less for the first cut and 1/16 or 1/32 for the final. 3. the bit may be dull. If you hold one of the cutters perpendicular to you fingernail and slide it across will it scrape a fine shaving? You can hone a carbide cutter with a diamond hone. You lay each wing of the cutter flat on the face of the hone at the edge and work it back and forth. Takes some work if it not truly flat, but you can put an edge back on them. Sharp cutters and light cuts, especially for burl wood. Good luck. (Kurt Clement)
Any tips to avoid burn marks when routing the mortise on light colored woods? Moving the insert more quickly obviously minimizes it, but I'm still having some problems. Wondering if anyone has found an easy solution. (Jim Hecht) I have a separate speed control on my router. It is possible to really slow it down. Especially bad deal to use hi-speed on any fruit woods. I use a lot of apple wood and cherry. Lots of people sell the controls - IE: Trend-line Tools, Grizzly etc. (Jerry Young) That's a tough one. I still get burn marks, on light colored woods. I very carefully sand them off, after I'm finished routing the filler. I haven't found any way to get away from it. (Dave LeClair) I second the keep it moving, but never back up. (Brad Love)
Does anyone have a trick to consistently turning out even mortises on reel seat inserts? It seems like I get the router table set up and turn out one or two decent ones, then a bad one or two. I am using two wooden blocks with allthread and nuts for a jig. Everything looks straight and square. I am thinking maybe there is just enough slop in the jig setup. Maybe the hole is just off center enough on some to cause problems? Anyone have a jig setup that is working well? I have checked the archives for tips, I think I need to check the cupboard for Atomic Fire Balls and single malt. (Jeff Ragan) Check out Bob Venneri's routing jig, although not cheap, it works great and is consistent. (Bob Williams) Are you using a fence on your router table? I used Tony Spezio's idea for jigs when I made mine, and in conjunction with the router table fence, my inserts have repeatable mortises. When are you center drilling your inserts? I center drill mine before I turn them, that way the insert is turned true to the hole. Fireballs and single malt might help, at least after the mortising is done... You won't really care at that point... (Mark Wendt) I had the same problem with the setup I have now after I changed over from the router table setup to the small shaper table I picked up. It seems that the router bit was slipping in the chuck as I passed the inserts through it. I finally got the chuck to where is will not let the router bit slip. Works fine now. (Tony Spezio) Thanks everybody for your responses regarding reel seat mortise. I have been turning the blocks between a live center and a spur to about 3/4" then chucking it up as square as possible in the 3 jaw and boring the hole. This leaves enough to clean up (usually) turning to 11/16". I have noticed that sometimes the hole still isn't exactly centered. Seems to be turning pretty true on the mandrel. I am using a little Ryobi router table setup with what seems to be a pretty decent fence, and I am on my second jig setup. Maybe you are on to something with the loose chuck thing Tony. If it was easy... (Jeff Ragan) I rough turn the square blank between a spur center and a live center first. I just get it round enough to be held in the 3 jaw headstock. Then I center drill it and put it on a mandrel to turn it to final dimension. Seems to be a lot better than trying to center drill the square stock first. (Gordon Koppin) One problem I have had is uneven mortises when the diameter of the insert is not exactly true or at the correct measurement. Check that.. (Ed Hartzell)
I noticed that Gary Dabrowski mentions mortising a spacer by turning. I would presume that one would need a four jaw chuck to do this. Anybody know if it can be done with a three jaw chuck? (Ralph Moon) On some of my early rods I cut the mortice in the reel seat filler in my lathe. The tool bit was turned 90 degrees in the tool holder so that a longitudinal cut could be made. The filler was gripped by the 3 chuck and supported by the tail stock center. A pass was made with the tool longitudinally removing a thin shaving, the chuck rotated a few thousands, a second pass made, etc. until the required width of mortice was achieved. A little clean up with a chisel and sand paper produced a decent mortice. The lathe of course IS NOT TURNED ON. (Ted Knott) I guess you can make it by yourself, very easy. If you have Japanese magazine "The bamboo fly rod", which I sent some of you in 2002, you can see the plan and photo on page 121. For who don't have the book, I brief the plan below; The scroll chuck will bite a round disk, this is jig1, which has a notch placed at the place a little shift off the center of jig1. The notch is a round bar (10 mm or so) which diameter should be same to the bore of the filler you are going to turn. There is another round disk, this is jig2, the same size notch is place at the center of the disk. At the back side of the disk, you can see a hole. This hole is to push the jig by the point of live center. The hole is center-drilled at the exactly same distance shifted off the center of the desk, that is jig2. I tried to depict it below; left is scroll chuck.
This will make oval style finger nail on your filler. Another idea is needed to stop moving the filler around the notch, while turning on the lathe. If the notch is tapered, the filler might not be moved around... The jig material is black wood (hard wood) on the magazine. (Max Satoh) Yes it can be done, and IMO, it makes a much nicer mortice than a router bit, with nice smooth curves. If You take a closer look on Gary's site, I believe he shows how to do it, or was it in Power Fibers? Anyway, the way to do it is to make a "holder" for the spacer. Use a round stock, approximate diameter 4-5 cm, make a off set hole ø = the size of the spacer, then hacksaw a slit on one side of the hole, all the way through the round stock, this is to let the jaw gently press the wood to secure it in the holder. Ma drawing on paper first, to find how much You need to off set the hole. It is much easier to make than to explain, at least with my humble English:-) (Danny Twang) When you get to Gary's site search his site for "mortise" and it will take you to the article. (Neil Savage)
Can I use a bull nose bit to accomplish the same thing as the fingernail bits on reel seat spacers? (Bill Tagye) If you are talking about a "fingernail" bit, they are great. It gives a different look that is just as cool, and you do not have to worry as much about getting everything aligned. With the specialized bits that produce "rails", height is critical, and a few thousandths off is definitely noticeable. The reel seat you get with a non-relieved bit holds the reel just as well. (Jeff Schaeffer) A bull nose bit cuts a half circle. You want what's known as a fingernail bit. It cuts a much shallower curve (or a lot bigger circle). I got mine from MLCS I think, it's been a while. (Neil Savage) Speaking from experience, the MLCS descriptions are VERY misleading. You're better off spending the extra couple bucks and getting the one's Bob Venneri sells on his web site. The small savings ordering from MLCS will be more than offset when you have to return the one you got for the one you really need. (Tim Preusch)
I have just started making wood spacers and wondered what was the easiest way to center or line up the spacer on the router table to rout the spacer. Since it takes some time to drill and turn the spacer, I don't want to screw it up. I have also found that when turning the spacer on your lathe that instead of using a round nosed turning tool that a left sided carbide facing tool will turn the spacer faster and much smoother. The first time I used the carbide tool I couldn't believe how smooth it came out and required very little sanding to clean up. The tool was part of a 5 piece set that I got from Harbor Freight for a few bucks and had two left and two right sided facing tools and a thread tool. (Tom Peters) I have not found a good way other by trial and error. Once I got it set up right I dedicated the router setup to cutting the mortise. What I would do in your case is turn a couple of spacers out of junk wood. Make a cut, check it out. Reset the router bit as needed and make a cut next to the first cut. If that is not right, readjust and make another cut on the same piece. I was able to get three cuts on one piece of turned wood. It took me about five settings to get it right on the money. Once there, I left it set and was dedicated to cutting the mortise. No loss of the use of a big router. The router I was using is a 15.00 trim router from Harbor freight. The table was a router table from a yard sale for a dollar. Since then I have picked up a small table top shaper for 20.00 at the Grizzly tent sale, I'm using it for my dedicated insert mortising rig. It is set up as the other was. Whatever works on the cutters, I find I do better with round nose cutter. I can always learn something new, can you send me the Harbor Freight part # for the carbide cutters you use. The ones I have may not be the same. (Tony Spezio) There are a couple tricks. Nunley method: make a metal spacer and lower the the router until you touch the spacer. Sort of looks like a washer. Jeff method: save all your ugly spacers. Just put each one on the jig and do experimental cuts until you get the correct height. You don't need to route the whole thing to tell if it is at the right height. And you can rotate it for a fresh surface. At some point, you need a finer adjustment than you can get with most router tables, especially mine which is homemade. I put a couple of pieces of masking tape on the base of the jig (or the table itself), and add or remove tape layers to get that last fine adjustment. Then leave in place forever. (Jeff Schaeffer)
I have a router fixture to mill out for reel seats, and I use the bits the Bob Venneri sells. I am having a problem with latch on router vibrating loose. The Router is a Craftsman and it's brand new has anyone experienced this problem?? (Dave Henney) I had an old (metal) Craftsman I used for some 15 years then it gave up. I replaced it with a Porter Cable . .they are known for denting the wallet. I would ask if the router sound excessively loud. Perhaps there is something causing it to have more vibration than usual. How does the bit cut . .does that seem normal. Perhaps there is debris or something in the collet that is slightly offsetting the bit to throw it off balance. Does the bit itself have any buildup or a chip which might offset balance? I would try just any other bit and make some cuts with it to see if the vibration lessens or if the lock continues to loosen. There could also be such a thing as the spindle is a bit skewed adding excessive vibration. If that all appears normal then you might consider adding some medium set Locktite to the locking threads. The fixture I have is dedicated to just that . . I have a second router for any projects. (Wayne Cattanach) I unhooked the router from the table and took out the bits and the router sounds fine. Then, it doesn't make any difference which bit i put in, the router makes a loud noise. I am not cutting anything when latch pops open. I don't think it has anything to do with bits or if I'm cutting something, because the latch pops open without cutting. I will take the router back and see what happens. (Dave Henney) I have a Craftsman router on a router table that I got when I bought out an elderly friends shop when he lost his vision. That router also loosens the latch when it runs. I have to keep checking the latch when using it to make sure that the adjustment doesn't change. I have been seriously looking at the Porter Cable router that I see at my local Sam's Club. Maybe it's just Craftsman routers. (Dick Fuhrman) If it's still in warranty, I'd return it and use the money toward a "Professional" or "Commercial" model. The industrial strength models ARE more expensive, but when a piece of carbide is spinning at 25,000 rpm, I want it to STAY PUT. I got a factory reconditioned DeWalt a while back and love it. Rack and pinion depth control with a thumb screw lock etc. Porter Cable is also good, I just personally like DeWalt. Also, the high-end Craftsman models (Craftsman Professional) might be better. (Neil Savage) I just thought I would throw this in. I got by doing a lot of inserts with the Homier 9.95 trim router that Homier sells at their truck sales. It can be ordered but there is 8.00 shipping. The 19.95 Harbor Freight Trim router will do the same thing. I used that setup for a couple of years till I made a dedicated set up from a small shaper table I picked up at the Grizzly Tent sale. Two of my friends are still using the Homier set up with no problems. (Tony Spezio)
I am trying to make some reelseats out of Ebony and every time I go to mill out the wood it flies apart. I’m using Bob Venneri’s fixture and I am using a new bit. I have ruined about $20.00 worth of Ebony. (Dave Henney) I think that for a wood like Ebony, you need to stabilize the wood. Pentacryl is good for this or the Plexiglas dissolved in Acetone and soak the wood in that would work. (Dick Fuhrman) For something like ebony, I wouldn't try to drill it. I'd split the blank on a bandsaw, route a semicircle in each half and glue them back together. (Ron Larsen) Why not make a flat profile to the reel area as I have in the past? Just used a big file to flatten the sized cylinder. Has a nice, antique look to it. Just go slow and be careful. (Joe West) Being in the luthier business I work with a lot of ebony. In fact today I planed ebony cello fingerboards for nearly 8 hr.. While I fear I can't be of much help I will offer how I treat ebony. Making a reel seat must have many problems in common with making tuning pegs. If there is very much run out huge chips will tend to fly off. Use the highest possible cutting angle. Making the very light cuts with the sharpest possible tool. My block plane irons are beveled at an angle that affords a cutting angle of about 75 degrees. This high angle eliminates the majority of tear out. You might try pre forming as much as possible with saws and rasps and or finishing up with file and sandpaper. Pay great attention to orientation of the grain. If you can see it. In the best ebony grain is very hard to discern. The best ebony is very fine grained to the point of grain not being visible and has a waxy look and feel. There is almost no good ebony to be had even to the luthier trade which has been buying all the best of it for the last 500 years and there are other species which look similar and are sold for ebony. Pin holes and slight tear out, and that is the goal or about the best one can hope for to reduce problems to the level of slight and occasional, can be invisibly repaired with instant setting super glue the thin stuff not the gap filling. Sand the offending area with 220 sandpaper gently until the holes are filled with dust. Then add a drop of glue and continue sanding gently. With luck the problem will disappear on the first try but often repeated applications will be needed. I could ramble on and on about ebony it is a frustrating and fascinating problem but my ramblings may be of no help. It took me months to figure out how to do what I do to it. But it is only wood and I don't find it much more challenging than bamboo to plane. (Ken Pendergrass) For what it is worth, I have a bunch of ebony and I have always had a hard time shaping it. Now I usually laminate it between pieces of more stable hardwood, and that seems to work. I think there are lots of small fractures that are just hard to see. Also, ebony (not macassar, but the really black stuff, I think it is called gaboon ebony) seems to be pretty unstable when it comes to temperature fluctuations and such, and that causes it to do funny things when it heats up. Not the info you were wanting. If you are set on ebony, you should stabilize it. (Jason Swan) I made ebony violin, viola and cello pegs as a luthier. What I did was put a 1/4" turning gouge in a tool post holder and used the metal lathe as a precision wood lathe. the cutting edge has to be above the center line and tilted up and then it turns beautifully. The tunting gouge ends up laying on its side in the old type tool post holder and works like a champ. (Pat Coffey) I used to do some gunstock work and often used ebony for fore grip tips and grip caps. I always found that the ebony worked better with metal cutting tools, hacksaw, mill files and twist drills. Also if I left the work for more than about 30 minutes, I would spray the piece with cheap spray-on varnish. the really black stuff would check while I ate my lunch. Always save your sanding dust to fill holes, but it may not be a good idea to breathe any of it. I know people who had a very bad reaction to some of the exotic woods, and you never really know what you are getting, anything that looks black is called ebony whatever the species. One last point, try your finish on some scrap, I have had some "ebony" that kept the finish from curing, it stayed sticky for a month until I dipped it in a bowl of Japan Dryer and even then it was another week 'till it cured. (Harry Walters) What is Japan Dryer and where do you get it? I am having the same trouble with Cocobolo not curing and have used acetone before putting Tru-Oil on and it still will not cure. (Tom Peters) Depending on where you live, you may have to go to a paint & wallpaper specialty store, but I saw some at Home Depot or Lowes (I don't remember which) a couple of months ago. It was in among the solvents in the paint department. I'm not sure what it is, but it has been around a LONG time. (Neil Savage) Your question sent me to consult Bob Flexner's Understanding Wood Finishing, an excellent, reasonably priced reference. Oil based finishes depend on O2 to cure and the oil in oily wood retards this process ("polymerization'). According to Flexner, you are very right to prep the wood with a solvent such as naphtha or lacquer thinner to remove surface oil (and get your finish on quickly before wood's oil has time to bleed back). Another solution would be to use a less oily finish (hence, less 'curing') than Tru-Oil - perhaps a phenol-alkyd spar. 'Kicking' it with Japan dryer or cobalt may help. Hope this does. (Darrol Groth) Darrol is correct varnish doesn't dry it oxidizes. The ultimate catalyst for this process is ultraviolet. Luthiers often make varnish which doesn't cure unless exposed to UV. Most use a UV cabinet powered by florescent sun tanning tubes if not industrial paint drying tubes. However you can't look at the tubes even to determine if they are working. The really powerful ones will blind right now. I don't think the Tru-Oil cares what you put it on. I wonder if your supply is expired, contaminated or something. For texts on varnish making and supplies shop where the luthier shops go here. I don't remember if they have Japan dryer but they have others. The sicatives are mostly stuff like lead oxide. If memory serves Kremer has a liquid version so you don't have to worry about dust in the air. (Ken Pendergrass) If the Tru-Oil is not drying it's because the Ebony is too wet or oily. (Dave Henney)
Folks... What is the appropriate size for thumbnail bits used for reel seats? (Jerry Partrick) I'm using the Grizzly model C1215 fingernail bit as recommended by Tony Spezio. (David Bolin) I was going to get a router set up, but after mastering a chisel I'm going to pass. I can cut a reel seat fairly quickly with a chisel and get a perfect fit no matter the diameter of the wood. Just food for thought. (Lee Orr) I have found the best one for me is the one offered by Bob Venneri that he calls his "modified" bit. I believe it is the one he uses for his reel seats, which are considered among the finest in the business, and he demonstrated it at the Catskill gathering last fall. I bought that from him as well as the fixture that he custom makes and demonstrated there as well. He has offered the fixtures once in a while on eBay when he makes up a few and the bits are available on his web site. Great guy, a real contributor to our craft, and for me, an amateur newcomer, his bit and fixture have enabled me to consistently make reel seat spacers that I feel good about. (No financial interest.....yada yada yada) (Jim Rowley)
I am just getting started to make reel seats. I bought one of the custom finger nail bits that was part of a group order a few months ago. The question that I have is what the dimension of the reel seat should be: .650 or .687 for this custom bit. (Tom Peters) .650 in diameter. (Dave LeClair)
I've made a shoebox full of inserts lately for my downslide reel seats. For years I have morticed the inserts with a fingernail bit, just like many of you do. I have tried a number of jigs for holding the inserts, both expensive and simple. Those similar to the ones described by Tony Spezio in his Power Fibers article seem to work best for me, but no method I have tried is fool proof. Sometimes no matter what I do the mortice does not come out properly centered. I wonder if somehow that is because the insert may not always be turned in a way that is concentric with the center hole. Last week I made a half dozen or so inserts and rather than mortice them, I just sanded a sort of rounded over flat spot, similar to the way Payne and Leonard made their downslide seats. It looks cool to me, and is amazingly easy to do. Here's my question -- do the mortised seats actually work better? Do those little raised channels actually assist in holding the reel in place? Just curious. I haven't actually done any experimentation. (Harry Boyd) I had the same problem on my dedicated mortise setup and it drove me nuts. I did not have the problem on the "Mickey Mouse" setup I started out with. I finally found the problem. The mortise bit was slipping in the chuck. It was just a tiny bit at a time. You might remember I mentioned that the shaper table I am using came from a tent sale at Grizzly (something that was returned), I now know why it was returned. I just put a bit of Locktite on the cutter shaft and the chuck jaws. That took care of it for me. I have made a few of the inserts like the ones you describe. After turning them, leave the insert on the arbor, open the chuck jaws and insert a thin shim between the arbor and one jaw. This will offset the insert. The amount of off set will be determined by the thickness of the shim. Without a tail stock support, a light cut will have to be made as not to flex the arbor. I found about two passes will do it. If I was going to make a lot of them, I would get a "live chuck" tailstock attachment and shim the tail stock end the same as the headstock chuck. (on the same flat) I used the off center mortised inserts to make the "flat" top inserts. The shim is placed 180 degrees to the mortise. I have also taken the (off center) 11/16 inserts and turned them down to 5/8" inserts. Not cheap just recycling. LOL As far as being better, I can't answer that. (Tony Spezio) Dunno if you got one of the handouts from my reel seat hardware machining workshop at this year's SRG or not, but Gary Dabrowski did an outstanding job in creating the handout (get it here). He also happened to include a drawing for making an eccentric turning fixture for reel seats. Might be something to look at. (Mark Wendt) On a couple of the rods I've built I've taken some inserts that I mortised and sanded off the ridges. I like the look too, and think they hold the reel just as well. It may take just a touch more care when attaching the reel but I don't find it moves around much on me. (Mark Shamburg) I have done mortises and flats, and someone gave me an oval one. They all work fine. Except for flats, which work better. One prerequisite to getting a good mortise is to turn the reel seat blank on a threaded rod- tighten nuts and spacers well so it is rock solid in place and can't rotate. Then the wood will be turned center to the rod. THEN, take the threaded rod/turned blank and put that in your mortise jig. I tried turning them on a pen mandrel, then putting them on the threaded rod for mortising and every one was off. (Jeff Schaeffer) I turn the wood in my metal lathe using wood centers. Once I have the piece turned to the diameter I want, I cut the filler to length using my band saw. Then I mount the filler in my lathe chuck and drill the center hole. Doing it this way, I know that the filler is drilled exactly on center. I've tried doing it with the threaded rod way, but it doesn't come out as perfectly centered as doing it this way. Maybe it's just me? (Dave LeClair) I, too turn on a metal lathe. I use a round rod, 1/4" unthreaded and a pair of collars I made to fit. 2 setscrews in each collar. I put a collar on the shaft, add an O-ring that is a snug fit, the seat blank, another O-ring and the second collar. I jam the collars up pretty tight to the blank. One end of the rod has a center drilled dimple in it, done on the lathe, the other end goes in the lathe chuck. I use a set screw to hold the rod in the fixture on my router table, and (so far) they've been centered fine. (Neil Savage) That sounds like a good way to do it. I like the idea of the round rod, versus a threaded rod, which a lot of guys use. The threaded rods just don't seem to fit the wood right some times. As long as the center hole is just slightly larger than the rod, so there is no play between the rod and wood, should work good. (Dave LeClair) I too use a mandrel for turning the seat, then the same mandrel goes to the router table or shaper for the mortising. I like to drill the hole in the blank first, and use the hole as the reference for all further steps, then I know it'll stay concentric. 3/8 threaded rod is a handy mandrel material, because it's easy to lock it all on with nuts on each end. But between the nuts and the wood workpiece, it's good to leave a spacer that isn't hard enough to damage a router bit! You can buy nylon spacers from smallparts.com or someplace, but I just use a short scrap of 3/8 ID air hose. Maybe 1/2" long, then if a turning tool or a router bit hits it, no prob. My mandrel is also extra long; so the ends outside the nuts can then fit into the handle/blocks used to rout it (Just like Tony showed me, and much like Venneri's video.) If one of the nuts is an inch or so long (called a "coupling nut" then it's easy to grab that hex nut with your chuck for turning. But, Harry, that might explain how your mortising step isn't quite concentric. Chucking on the threaded rod would be accurately centered, but chucking onto the hex nut may not be that true. Hasn't yet been a problem for me, but I think it could. For setting the height of the cutter, well, I justified the cost of a great router-lift table, the Bench Dog, which is super stable and true. Bob V, you asked why some of us cut the mortise in two passes? I like to save the second pass for a VERY light cut, so it comes out nice and smooth, no chatter from flexing the arbor or anything. Because it's not easy to sand the bottom of the mortise later. (I think it was Brett R who made some little concave sanding blocks for this job once? Whoever, THANKS!) To do a second pass as a very light cut, I'll first put a layer or two of masking tape on the face of the blocks which rides the fence, do my preliminary cut, then remove the tape for the last smoothing cut. (Rick Funcik) Another issue: I drill the insert first because I haven't figured out a way to get a Sherline lathe to hold a finished insert for center drilling without marring the surface. If you do the "drill halfway through, flip the insert, and drill through the other half" trick, you can still get things screwed up. Your two bore holes may not meet. You can tell because the blank goes on the threaded rod part way, then gets stuck and has to be screwed on. I am convinced that this bends the threaded rod a few thousandths and gives you a 3 to 5 thousandths difference in diameter between the forward and rear of the insert. This is enough to screw up the mortise - it is deeper at one end than the other. I ream out the insert by moving it up and down on the drill bit a few times so it slides on the threaded rod and does not have to be turned. This is dangerous and I have had a few ripped out of my hand. I take multiple passes because I want to be sure that the mortise is even. Like Dave LeClair, I add or subtract tape from my fixture if the initial cut is off. I have to do it this way because I have the world's cheapest mortising setup- a harbor freight laminate trimmer ($19.95)and a plywood router table. It does not have that much power, and I want the surface inside the mortise to be as smooth as possible because that area is hard to sand without messing up the mortise rails. Or I am too lazy to develop a fixture or technique for getting in there. I think that Neil Savage's use of a round rod with a setscrew collar may be the way to go. Stronger, straighter, less prone to bending, and more elegant. So Neil, where did you get the parts for yours? (Jeff Schaeffer) Actually, the allthread should work too if you center drill one end and put the other end in your lathe chuck. The tailstock center should keep the rod from whipping just as well as it does on a round rod. The only problem I see is that my lathe has aluminum soft jaws and the allthread is kind of hard on them. That's why I use the round shaft. Of course, you want to get a STRAIGHT piece of allthread. The 12" lengths the hardware store sells are straighter than the 3' sections, at least in my experience. (Neil Savage) I use a 5/16 x 8' bolt. With the hex head cut off it is round for most of the shaft length and has threads on the end for a nut tightener. Chuck short in lathe jaws and mark for live center on threaded end, works great. (Chad Wigham) I have mandrels of different sizes for different size holes in the inserts. One thing they all have in common is on the shaft end that goes in the 3 Jaw chuck is they are all the same size as the fingernail bit curvature. When I put the mandrel in the jig to mortise the insert I can align fingernail bit by moving the router up/down till the curve in the bit is touching the large part of the mandrel evenly. The shaft on the left end of the mandrel is turned down so there is no danger hitting the bit, as long as I have my stops set correctly that is, but still has a shoulder larger than the hole in the insert. The other end , right end, is threaded and has a center. Made a cone shaped collar to tighten and hold the insert on the mandrel. I pre-drill my 4 sided insert stock using a 4 jaw chuck, them mount it on the mandrel to turn. Without removing the turned insert from the mandrel I mount it in the jig to mortise. End result, the hole is in the center and the mortise is in the right place. (Don Schneider) One more suggestion to add to the others. Drill your hole first. All the way through. Same diameter as you would for threaded or round stock. Next, turn a piece of aluminum with a stub the size of the hole you drilled, a shoulder the diameter of the dimension of the final insert and turn down another shoulder to put into you lathe chuck. Stick one end on the stub and if you have a live center then you can just put it in your tail stock and you can turn each one to the exact size and it will be concentric to the hole drilled. I have a live center with interchangeable points so I turned on to fit that and turned a stub to fit in the insert hole. No messing with washers and nuts and tightening. (Ralph Tuttle) I use the threaded rod too, except I have one of those long nuts (not sure what they're called, 2" long) on the end that goes into the chuck. (Scott Grady) I had to work around the short bed Sherline thing. I use a wood turning center in my head stock and live center in the tail stock to turn a square blank down to a round blank small enough to fit into the bore of the 3 jaw chuck and seat against the shaft (about 3/4 inch diameter seated about 3/4 inch into the chuck). I mount the round blank in the chuck and tighten it down fairly snug. The marring doesn't matter since it's way oversized at this point. I mount a Jacobs in the tail stock with a short bit to partially bore the blank. I can bore about 2.75 inches of the blank. I remove the blank and clamp it in a vice and use a longer bit in a hand held drill to finish drilling out the remainder of the bore. From there it goes on an all thread mandrel with lock nuts on each end to hold the blank in place. I mount the mandrel in the lathe with the 3 jaw chuck on the head stock and a homemade live center that fits the end of the mandrel on the tail stock. Tighten everything up and finish turning the blank down to the finished size. From there the mandrel is mounted on another fixture (without removing the blank from the mandrel) to cut the mortise on a bench top router shaper with a fingernail bit. (David Bolin) I need to correct the last sentence of this post just in case someone is trying to follow this. I do not use the same mandrel for turning and mortising. They are both all thread but the lathe mandrel is shorter to fit the bed of the lathe and the mortising mandrel is longer to keep the fixture and hands well away from the router bit. (David Bolin) Your exchange of posts on this topic have once again proven to me why I love this list. Do you have any idea how long a newcomer like myself would be trying to figure out this little detail? Probably somewhere around forever. And in this case, how disappointing it has been to me to put all the labor into a beautiful round insert only to ruin it by having the mortise off just a little. (Jim Rowley) I hope that our information helped you with your fillers. I hate wasting beautiful wood myself. (Dave LeClair) That's why I have a few "sacrificial" inserts laying around the bench. I mount one of 'em up and give a light touch to the router bit to see where it's cutting before I put the "good" piece on the jig. (Mark Wendt) Here's my question -- do the morticed seats actually work better? Do those little raised channels actually assist in holding the reel in place? Just curious. I haven't actually done any experimentation. I've made thousands of slide band seats over the years, mostly mortised, but some turned off center, like the old Paynes and Leonards. I don't see anything on either type that would make the reel stay on better. Once the slide band is slid over the reel foot tight, the reel isn't going anywhere and the sides of the mortise won't make any difference. I think it is just the preference of the reel seat maker, whether he likes the looks of the mortised seat or the other type. Myself, I like them mortised. (Dave LeClair) Sometimes no matter what I do the mortice does not come out properly centered. I wonder if somehow that is because the insert may not always be turned in a way that is concentric with the center hole. When I cut my mortise in the filler, I use a router table and a fixture to hold the filler. I make one light pass and then I can tell if the filler has to go up or down and if it needs to go up or down higher or lower on either end. Then I use strips of masking tape on the bottom of the fixture to raise both or either end. I should say, that the fixture was set up with a few strips of masking tap on the bottom of both ends to begin with, so I can also remove a strip or two, to lower both or either end, if I have to. By doing this and making a couple of light cuts and adjusting the tape accordingly, then you make your finished cuts and the filler will be cut perfect. (Dave LeClair) With my routing fixture I take the cut in one pass. Why do you take more that one pass? (Robert Venneri) Good to see you around, my friend. I too take only one cut. Well, I usually stick a piece of tape on the morticing fixture. Then make one pass which removes 99% of the wood. Then I remove the tape and take one more pass removing that final 1%. (Thanks for the tip, whoever pass that along. Rick Funcik?) (Harry Boyd) This brings up a question I've had in my mind for years. For the real machinists on the list (I'm just a rod maker that does some machining...) what's the difference between a fixture and a jig? (Mark Wendt) Isn't a jig a dance that you do after the successful use of a fixture? (Bob Williams) That is entirely apropos to woodworking as well. Typically, a jig holds a tool, a fixture holds a part. Now, if you get around any machinists doing high precision work, be very careful about how you toss those terms around. :) (Larry Blan) Hmm, left part of it out. Try a jig holds a tool, or guides the work into a tool, while a fixture holds or "fixes" a part in place. (Larry Blan)
There is no question that the custom fingernail bits with relieved blades do a neat job for reel seat spacers. But they are hard to find and challenging to use. You don't have to do it that way. 1. File or saw a flat mortise. I have seen this on cork reel seats, but not often on wood inserts. It does an amazing job of holding the reel. 2. A big fingernail bit can cut out an oval- no rails, but it holds beautifully and is much easier to do. If your rails are off even a bit it looks bad. Ovals are easy. You can also rescue screwed up rails by filing them off an making an oval. 3. A standard fingernail bit in smaller sizes leaves a flat mortise with a semicircular hump down the middle of the mortise. People tend not to use this, but it holds the reel very well. the reel foot sits on the flat and just touches the hump for support. Some years ago before I began making reel seats I bought some from a major company as part of a group order. Beautiful mortised inserts with perfect rails. None of them would hold a reel at all. The mortise was too shallow. So good looks are great, but don't forget it has to hold the reel in place. (Jeff Schaeffer) Also, if you're into antique tools, you can find wood bodied planes with the correct shape. Kind of a steep learning curve though. They're called "hollows" from the shape of the sole. (Neil Savage)
Can anyone direct me to a source for the fingernail router bit you use for mortising reel seat inserts? Been to all the local places nobody seems to know (or care maybe) what I'm talking about. (Tom Kurtis) Several of us have used part # C1215 from Grizzly Imports. You can have the bit re-ground to different shapes if you so choose, or stick with the bit straight from Grizzly. (Harry Boyd) I got mine from Robert Venneri. (Neil Savage) I have a couple with the ground wings but prefer the Grizzly C1215 fingernail bit. (Tony Spezio) Another source someone may have already mentioned. And there is free shipping from them. (Ron Hossack) Thanks for the heads up Ron. Their price is similar to the bits I got from HF including shipping, if I remember correctly, and they look like they may be better quality. If anyone can confirm this I'd appreciate knowing. TIA (Wayne Kifer) I have purchased a number of bits for MLCS and have been happy with the quality. Never tried any from HF, and doubt that I ever would. MLCS sells only bits and related woodworking items, not everything under the sun. (Steve Shelton) The 5/8 modified and 5/8 finger nail Router bits are in stock. I had few guys that wanted them at the Catskill gathering. any one still interested drop me an email and I will get you more info. (Bob Venneri)
Anyone have any tips on setting up a router for milling reel seat inserts? I'm having trouble getting the bit centered on my inserts. (David Huntress) That can be a bugger and waste a lot of insert material. Here is what I found that works. Turn a blank to the size you want. Make it longer than it needs to be. Put the assembly together and put the round insert against the router bit. Raise or lower the bit till the insert rests in the curve of the bit. That should center it pretty close. Now on the one end of the insert, make a test cut just enough to see if the bit is centered (reason for making it longer than needs to be). In most cases it will be. If it is not perfectly centered, adjust as needed. If the line at the top is wider than the one at the bottom, the bit needs to be raised, if less than the bottom it has to be lowered. If the bit needs to be lowered and doing it is a hassle, you can apply a layer of tape to the bottom side of the insert holder. If the other way, you will need to raise the bit. Hope this is clear enough to understand. If you are going to make a number of them, I would do it all in one setup unless you dedicate the setup to making the inserts. See my article on making the inserts and the setup in Power Fibers Vol 15 Apr 04 and Power Fibers 25 Oct 06. (Tony Spezio) No question that Tony's method worked for me, as have virtually all of his suggestions that he has shared through the various formats. However, I am now using the fixture I bought from Bob Venneri at the Catskill Gathering, and would highly recommend it for simple, totally consistent results. (No financial interest, just real happy with the fixture that removed all the frustration from the process for me) (Jim Rowley) You could possible measure and scribe a center line on the router bit, make a jig to scribe one on the turned insert and then align the 2 before plugging in the router? (Stephen Dugmore) I had planned on making a jig for the bit height after I get it centered to make set up in the future easier. I think I've got it pretty close, just wasn't sure if there was a better method. The only other issue, cutting depth and being able to fit a reel foot under the rings, but I suspect that will be a trial and error process as well? (David Huntress) Actually, scribing a line on the router bit shouldn't be too hard (except it's carbide!), just take your dial or digital caliper, measure the height of the cutter & divide by 2. Getting a semi-permanent line scribed on it is the real problem. Maybe on the steel part? (Neil Savage) I just posted the way I do it. Not sure you could make an accurate line on the cutter. It might be able to be done by someone but I don't think it would be me. (Tony Spezio) I'm inclined to agree, Tony. Trying to measure and mark two different theoretical points just never seems to want to work out in practice. We're about as likely to get it spot on as we are to solve the climate change issue on the Rodmakers List. There are a number of ways to approach it, but unless you are using numerical equipment to begin with, I think it is easier to make test cuts. (Larry Blan) I turned a rod that the ends fit into my jig with a radius that matches the bit. Pretty simple, mount the rod in the jig and move the router bit up/down to follow the rod. Put the regular rod in the jig for the size hole for the insert and it come out right every time.
Being one who has to make things complicated at times, my jig will hold 4 inserts at one time. Make a pass, turn the jig 90° and make a pass etc. till all 4 are done. Speeds things up when making a couple dozen at a time. (Don Schneider)
I do the mortise on my reel seats with a 1/2 in fingernail bit. This does a great job, but I would like to do one without the ridges at the edges of the mortise. You know where the cut goes off the edge of the seat. Has anyone done this and what do you use. Larger fingernail bit? What radius? (Joe Arguello) If I’m not mistaken you’ll need to make or acquire a set of offset mandrels that would let the reel seat blank rotate off center on the lathe. In essence spin in an off center fashion. As you bring in the cutter it will cut material off of the “high” side of the blank. (Ren Monllor) I use a 1" radius fingernail bit for no-ridge mortise. Works on .650 & .690 inserts. (Chad Wigham) This is what I was wondering, I considered using the offset turning method but was concerned that the edges would be torn out or chipped. The sanding method works and I have done this but would like a more consistent method. Being that I have used the 1/2 in fingernail bit with a great deal of success I was sure that this is the way I wanted to go I just didn't know what size or radius to get. I really like the real seat to have the fine lines on the edges just don't want the grooves if that makes sense. (Joe Arguello) When I need to make a seat like that, I just sand the edges off the mortise. Fast and cheap. (Mike Shay) I made one with an antique wood bodied plane. Of course, you have to have access to such a plane... (Neil Savage)
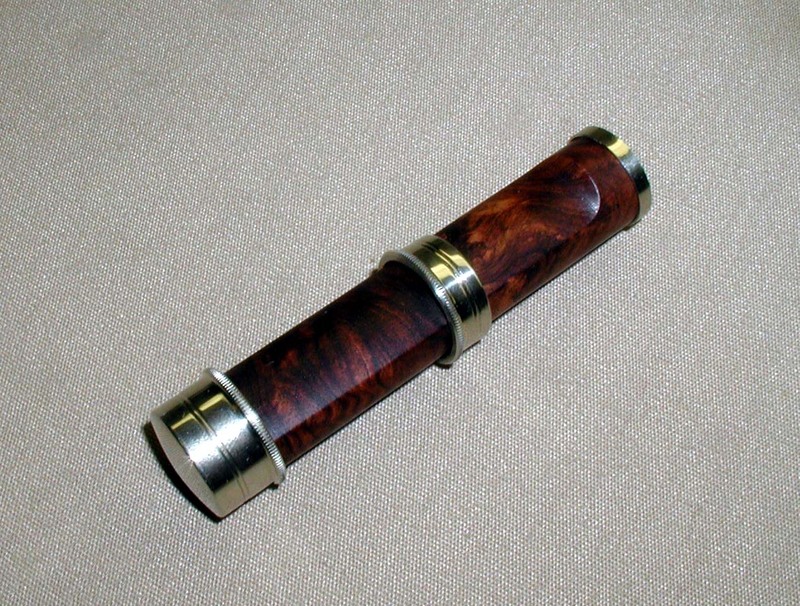
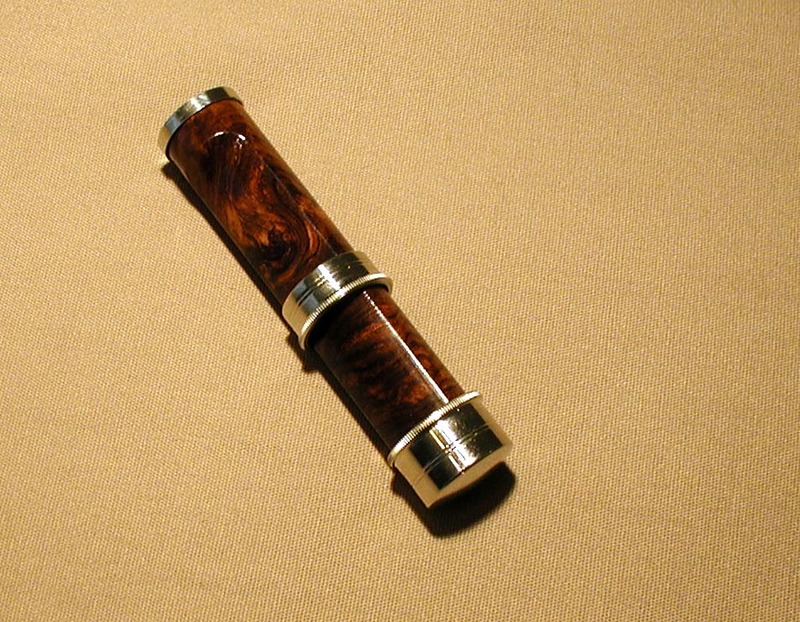
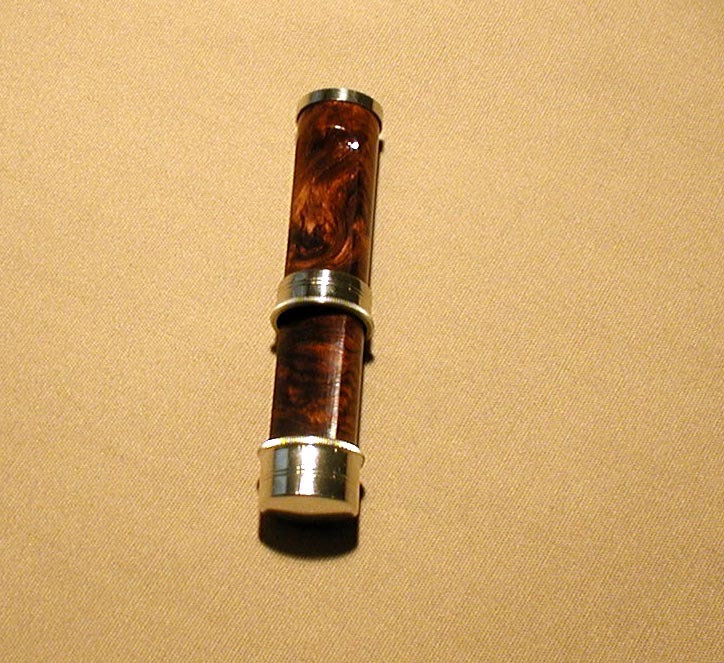
Thanks to everyone who responded to my earlier email about the mortised reel seat. Here's what I was after, this is a hurried pic so it may not give a real good look but I think you can kinda get the idea, the filler is just oiled for a quick pic.
Can anyone recommend a fingernail bit (model number) for cutting mortised reel seats and a source for it. I am using .687 Diameter rings. (Don Green) Check with Bob Venneri. (Pete Van Schaack) I use the 1/2" #8882 from MLCS. (Ron Larsen) I have seen the replies from the list about router bits. Want to let you know that the 1/2 bit is too small , the 5/8 and 3/4 bits are OK if you want to make an oval cut. If you want a mortise cut for slide bands and screw locks you will need a 5/8 bit then have it modified by someone to get the dimension of .535 which can not be bought from any one. I have been making seats for 12 years now and this is what I use. (Bob Venneri) Try Grizzly Industrial. They have them in 5/8 and 3/4 inch sizes for around $16-17.00 ea.+- (Jon Holland)
For those of you that chuck your reel seats onto a rod and mortise them...ala Tony Spezio's jig,... how do you get a precise height measurement of the mortising bit. For me the router is a pita to raise and lower, and loosening the bit to raise and lower the bit is very inaccurate. So its been a trial and error thing with me. Shave off a few thousandths then adjust height of bit. Any suggestions? (Mark Bolan) Mine is a PIA, too. I made my jig like Wayne's, with a block of wood on each end. I make a few sacrificial fillers out of junk wood and use one to get the bit as centered as I can, with the error being a touch on the high side, then I just shim the jig with layers of masking tape until I get it just right. Not exactly high tech, but it does get the job done. (John Channer) I use a center gauge. When you can hold a center gauge, between the center of the router bit and the reel seat, horizontally unsupported you are dead center. (Larry Downey) Not quite sure I follow you on this., can you take a photo or elaborate a bit more. My brain is numb this morning. I can't visualize the center gauge between the router bit and the reel seat unless you mean the point in the center of the arc and the "V" on the reel seat. (Tony Spezio) I am not to good at this but I will try. If you mount the spacer on a moveable jig, similar to the on you had in power fibers, then set your router to the approximate height, then take your center gauge place it on the long side horizontally in the middle of the oval cutout in the router bit, rise or lower the bit until you can hold the gauge with no support between the spacer and the router bit. It takes a lot longer to explain, than to do. The router bit is oval has an exact center, same for the spacer, so if you can hold a thin piece stock between the two you should be exact. (Larry Downey) Good question. All this time I've been doing it by eyeballing how the bit lines up with the rounded blank - b'guess n' b'golly. Tony adds and takes away shims of metal tape to the bottom of his fixture. Something that has helped me was to drill out some dowel test sections to try the bit on. Once I get the bit set, I try to leave it. This doesn't always work - I screwed up a couple nice mesquite inserts the other day thinking that my dedicated set up was set. Musta bumped it sometime. I'll be interested what others have to say about a more reliable way to get it set up right. (Darrol Groth) What I do is put the drilled out blank in the vise in my Bridgeport, take 1/2 the diameter of the blank and 1/2 the diameter of the bit. I then just touch the top of the blank with the bit and crank the table up to whatever measurement I need................right down to .001" I really don't see why this is so hard! Oh sorry guys........got carried away I guess a Bridgeport is kinda overkill to mortise a reel seat. But it does work well!!!!!!!! Really just kidding.............please don't hate me!!!!!!!!!!!!!! (Joe E. Arguello) Use the depth or step feature on your calipers to measure the height of the bit. Each individual bit will be different, but it should get you within a couple of thousandths. (Larry Blan) I use one of Bob Venneri's aluminum jigs for mortising reel seat inserts and it does a great job. However, I still have problems getting everything set correctly. The next time I get everything aligned correctly and cutting perfectly I'm going to make a setup block out of a 1" thick, 6" long piece of rectangular UHMW plastic. Then the next time I need to set everything up I can use the setup block to get the right router bit height by aligning the bit it to fit in the mortised grove in the plastic and then adjust the fence until it is tight against the back of the setup block. I have some UMHW setup blocks that help me when I use locking joint router bits. (Bob Williams) Lots of good info in the replies, I will just add this. Why not make a dedicated setup. Get a 20.00 Trim Router from Harbor Freight. Mount it centered on a 12" square piece of 1/2" plywood Make a fixed fence from 3/4 X 3/4" or 3/4X 1" stock.. Make this setup dedicated for making the seats. Once set up, leave it. I used to just clamp the plywood to the work bench when using it. I find that if I take the arbor shaft mounted in the holding blocks and center it in the router arc. you will be pretty close. Mount a longer than normal insert on the shaft and just make a 1" long cut on one end of the insert. (I made an trial insert from a length of hardwood dowel.) That will tell you if you are high or low. If the ridge is thicker at the top, that means the bit is too low, raise just a little and take a second cut about an inch long. If the ridge on the top is shallower than the lower one, instead of moving the router, apply a layer of tape on the bottom of the insert holder. I used aluminum tape. Take another 1" cut and check for center. Add another layer of tape in needed.. If you would rather play with moving the router that can be done also. You can also add several layers of tape to start and add or remove a layer till you get a centered cut instead of chasing the router. Once you get it set up, leave it. The centered cut on the trial section can now be used as a guide. The most you can have invested is about 25.00. I still have part of my original set up that I changed to making splices for nodeless strips. I was able to pick up a small Router-Shaper setup and now have that dedicated for my reel seat inserts but I have made many inserts on my "cheap" setup. I think there might be some photos on Todd's site (see here). (Tony Spezio)
I know most of us mortise our reel seats with the router at full speed, but I have a milling machine on my lathe which allows me to choose whatever rpm's I desire to do the job so my question is what is the best speed to work with? Should we adjust for differences in hard woods or soft woods or burls etc? (Dick Steinbach) If you can’t vary the router speed you could try taking smaller depth cuts. Actually different woods react differently and the direction of the grain and feed rate also makes a difference to the smoothness of the cut. To slow a feed rate may burn the cut. You just have to find what works for you. There is a combination that will work. (Don Schneider) It depends on the kind of wood, and also on the kind of cutter you will be using. Carbide needs to turn faster than HSS to make a nice clean cut. (Mark Wendt) It's just that I was hoping there was a magic bullet which would save me from chewing up some nice wood. I will just make some test pieces and make some notes for future reference. (Dick Steinbach) I use my Bridgeport to mortise reel seat inserts with no ill effect, honestly I have not really concerned myself with the speed! I am using a carbide router bit and turn it at a normal speed, can't really tell you what that is off hand but it is the most common speed I have always used for normal milling. I simply pinch the insert, which has already been bored, in my Kurt machinist vise, center the cutter to the blank and take two or three cuts. I move the table toward the spinning cutter until it touches the blank or starts cutting, I then zero the dial and take two or three cuts to add up to .100 in depth, this seems to be just right but you should experiment to find what works for you. But to answer your question, I really don't cut at a high speed or feed. Oh, you might want to move the blank into the cutter. (not climb cut) Hope this helps. (Joe Arguello)
Here is a a link to get $14, carbide fingernail bits. I got mine with free delivery. By the way these are half inch shank. (Dick Steinbach)
Does anyone have a source for reel seat mortising bits? I have tried to contact Venneri via phone, e-mail and on-line order with no success. (Steve Krumpos) MCLS has them for fifteen bucks, free shipping (1/2" shank) sawdust@mlcswoodworking.com They may have it in 1/4" shank if you ask. (Dick Steinbach) I got mine from Tony larson at Rush River rods. he sells 2 types. (Jim Sobota) I got mine from Grizzly Industrial, part #C1215 (Tom Kurtis) I was able to by one from Venneri about two months ago. I had trouble doing so though, just as you are describing. I tried a PayPal order from his site, only to be informed when I hit the "submit" button on the final PayPal page that the merchant was no longer doing business. Even a phone message did not work. In the end, an email did the trick. It was a slow process though, because it would take a week or so for him to reply to my emails. Once we reached an arrangement, I had to send a check. Then it took a few weeks more for my package to arrive. Not an easy process to be sure! (Tyler Beard) Grizzly has the unmodified finger nail bits, both 1/4 inch and 1/2 inch shafts. Their catalog numbers are C1215 for the 1/4 inch ($17.95), and C1218 for the 1/2 inch ($17.95). If you have, or have access to, a bench grinder, it is a snap to modify them. You simply relieve the top and bottom edges of each of the cutters to about 45 degrees. The only other thing you will need is a cup of water to quench them in periodically before they get too hot. I don't think MCLS has them with the 1/4 inch shaft. (Frank Schlicht)
I recently bought myself a bunch of fancy woods and have been experimenting with my lathe designing different handle shapes so on my bench today are over two dozen reel seat sets and several with matching handles. I plan to sell off the single reel seats and keep the sets for some small rods. If anyone is interested please contact me off list for pictures. I also bought three router bits and have been experimenting with them as well to see what satisfies me best on the seats. It has been fun and instructive. Right now my least favorite is the fingernail bit because it is so fussy getting it lined up right and when I do I find that my reels twist easily on the seat rather than sitting firmly. Two rods are soaking now and I will begin tapering ASAP. I also acquired a new shop vac this week and a new belt sander so I have spent some time playing with them. (Dick Steinbach) I for one would appreciate hearing your thoughts and conclusions on the router bits you have been testing. I too am less than enchanted with the fingernail bit but have not had the time or inclination to figure it all out. Guess I am looking for a freebie here. Feeling generous? (Steve Shelton) When I posted my reel seat tutorial, I stopped short of the mortised part. The reason being is that I do it on my bridgeport and I didn't want to do a tutorial that not everyone could follow. I will talk a bit about that though. It is easy to get the fingernail bit lined up perfectly this way because all you have to do is measure the width of the bit and the width of the reel seat filler, add them together and divide by 2. Then you take the bit and just touch the filler and move the table up by the figure you got by your division and you are centered, I then move the bit in until I just start to cut and move it in another 100 thousandths and you are done. Back to the bits. I got away from the 1/2 " radius bits because you need to get them perfect or the rails don't look even. So I went with a 23/32 radius bit you can find at ACE hardware. This makes a nice mortise without rails and it holds the reel very well. You also can be off a touch and it doesn't matter. Here is a link to a reel seat I did this way and I will be doing a tutorial on how to achieve this without a Bridgeport. Stay tuned!
Do I need to get a 1/2, 5/8, or 3/4 bead fingernail bit for making reel seat mortises? (Larry Lohkamp) My 5/8 works for me. The tough part is aligning it correctly with your inserts. (Brian Morrow) Grizzly model number C1215. (David Bolin) I'm just involved in that right now. It seems to depend on the diameter of the filler and whether you want a flattened sort of result or an actual "sided" recess. I have an "Arkansas Tony" (Thank you Mr Spezio!) type set-up that works fine for larger sized barrels, and the router's locked as though I'd glued it in place with Epon. Now I just started working on a narrow barrelled seat and the fingernail cutter's radius exactly matches the barrel's so it won't cut anything worth cutting. I could change the cutter, but that'll screw up my preset jig. So now I'm going to construct another router table top with another smaller router so that the existing filler holder will sit on it and I can mount the "flattening" sized bit into that and lock it down. A fair amount of cheap dowelling gets eaten in one of these adjustments - hence the severe lockdown! (Art Port)
I need some help ordering the right fingernail bit for mortising reel seats. It seems that many of you use the 1215 bit from Grizzly. MLCS had their bits on sale with free shipping so I ordered #8884. This looks way to big. I think that Grizzly and MLCS use different measurements to define their bits. Has anyone ordered a fingernail bit from MLCS? Which one did you get? Most of my seats use .687" hardware. MLSC Woodworking Bit (Matt Fuller) Both the MLCS and the Grizzly bits have a 3/4 inch cutting bead, which is the critical measurement (other than shank size!!!).The ones' Bob Venneri sells have had the upper and lower vertical cutting faces ground back at about a 45 degree angle, which does make the cutting radius look smaller. You can grind these back yourself if you have access to a grinder. Just be sure to periodically quench it in cold water to keep it from overheating while grinding. (Frank Schlicht) If it's carbide tipped, you won't need to quench it. But, you will need a good hard grinding wheel! I have some cheap diamond wheels that work good on carbide bits. I was talking with H Boyd about carbide tipped plane blades. I asked about losing the temper when they are brazed. Carbide doesn't lose it's temper when heated. (David Dziadosz) The Carbide grinding stones I have are Green, I think that designates a Carbide stone. (Tony Spezio) Are they the aluminum oxide wheels?? I think that's what is used for carbide. Doesn't sound right, but?? (David Dziadosz)
I am looking for the best fingernail bit for my router table for routing my reel seat inserts. I need one with a 1/4" shaft. Does anyone have any suggestions? (Phil Crangi) You are looking for a fingernail bit, and MLCS has them only in 1/2" shank sizes (don't ask me how I know!). You are looking for their #8884. It has a 3/4" cutting height. I have a brand new one, 1/2" shank, with the plastic cutting head film still on it that I will part with it for $17.00, and will pay postage. I think I still have the plastic package that it came in. If interested, email me direct. (Frank Schlicht) Yes, that is the one I ordered, but I think the radius is too big, at least for 5/8 reel seats. Tony Spezio though I needed the #8882 if I was ordering from MLCS. (Matt Fuller) Try Grizzly industrial. I know they carry both 1/2 and 1/4". (Brian Morrow) Just the usual Grizzly #1215. I haven't researched this thoroughly, mind you, but I would just bet that Freud makes the Killer, End-o-the-World fingernail bit that won't quite use up your Home Equity Line limits. Regardless, I can tell you that the Howells/Cattanach/whomever modification is a good thing to do. I believe The Lovely Reed has a picture of this. (Steve Yasgur)
I need some help ordering the right fingernail bit for mortising reel seats. It seems that many of you use the 1215 bit from Grizzly. MLCS had their bits on sale with free shipping so I ordered #8884. This looks way to big. I think that Grizzly and MLCS use different measurements to define their bits. Has anyone ordered a fingernail bit from MLCS? Which one did you get? Most of my seats use .687" hardware. (Matt Fuller) I use the Grizzly ¾ and it works out nicely once you get it lined up correctly, but then again I’m working with 5/8” inserts. (Brian Morrow) Why not use a bit made for making reel seat mortices? Bob Venneri, a list member makes them. (Rich Jezioro) That is exactly what Venneri sells, ‘cept twice the price. (Brian Morrow) MLCS has had free shipping for quite some time, even if you are just ordering one bit. I use #8882 for my 0.68 to 0.70 inserts. I have considered getting the #8883, but this one works. Unless you need the modified rail profile that Bob's bits give you, these are good bits for close to a quarter the price. (Larry Lohkamp)
Need some help here. Is a 5/8" fingernail bit what I need for mortising a ring and cap insert? I have seen a tutorial for mortising an uplocking seat, but can't verify that a 5/8" is used for the ring and cap seats. Would one of Robert Venneri's 5/8" custom bits save me time? (Pete Emmel) I have Bob's modified bit. I use it in conjunction with the fixture that he makes available from time to time, and I am very happy with the results I get. It took a process that was kind of hit or miss with me and made nice results pretty routine. (Jim Rowley) Along these same limes I am considering a dogleg gouge with curved and reversed cutting edge for hand mortising my inserts. I believe there has been some discussion here previously about such a tool but I haven't been able to find one. I would also have one made if I could find someone who could make it for me. Does anyone have any suggestions on this subject? (Phil Crangi) Although not a gouge, I am toying with trying this molding plane from Lee Valley. (Louis DeVos) I could probably forge you one out of 01 steel, if you PM me a drawing/photo I could tell you if I could make it. (Ron Petley)
I now have a lathe and am able to turn some reel seat inserts. I was going to mortise the inserts using the fingernail bit and router until I was given a reel seat for Christmas that I really liked the looks of. Instead of being mortised with a fingernail bit and having rails, it was just rounded over. The person that did this did it by hand with a file and sandpaper which I could do but I figure there has to be a mechanical way of doing this. I read through the archives and found that there is a way to do it by doing what is called eccentric turning. Basically you turn the piece in a jig or a chuck that holds the insert slightly off center. I found that you can actually buy an eccentric chuck but I would rather not pay the money for such a specialty tool. Can someone explain to me how to make the jig? Also, is the holding ability of the oval or eccentric mortise less adequate than the fingernail router bit mortise? (Greg Reeves) You can use a finger nail bit that is large enough that the edge cutters are wider than the insert thereby not touching the insert and IIRC there is a router bit for molding called a 3/4 round that will also give the elliptical or oval shape that you are describing. With the proper height adjustment on the router bit you can utilize the same jig used when mortising. (Will Price) Why don’t you just use a larger fingernail “half radius” bit than the one you use for rails? (Don Schneider) As others have suggested, you can make the style of mortise you want using a fingernail bit with a larger radius. If you want to do it by eccentric turning on your lathe, this is a good excuse to buy a 4-jaw chuck. It takes a little more time to chuck a piece in a 4-jaw chuck than a 3-jaw chuck, but it is more accurate and much more versatile. I'm not aware of any difference in the holding ability of the two styles of mortises. (Robert Kope) Realize that you must still move the tailstock end of the wood insert in unison with the headstock, or you will cut a taper. (Ren Monllor) When you offset the work piece in a 4 jaw chuck, you can't use the tail stock, even offset. The reason being the work piece will be rotating on a circle concentric with the bore, but at a larger diameter. (Mark Wendt) If you have a 4 jaw chuck, you can mount the reel seat insert on a mandrel, and offset the mandrel from center. But turn the piece "sloooowly" as you cut. That's a lot of wood sticking out of the chuck. (Mark Wendt) I've been on holidays and just catching up with this stuff now but I've turned eccentric mortise reel seats using a fixture that fits into a 3 jaw chuck. The fixture is based on a drawing by Gary Dabrowski. There are plenty of details to making eccentric reel seats that are specific to the type of timber you wish to use that are not written in bamboo rod making pages that I had to learn by trial & error. I'm not sure I can attach photos here for this but see this post on the rod building forum I put up to help you with visuals to assist with this post. (Boris Gaspar) It is really quite simple to do. While the stock is still square, you mark the "dead center" on both ends and then mark a separate center on each end that is just slightly removed from your dead center mark. Be sure the "off center" centers are on the same side of your dead center mark! I recommend that you draw a vertical line across each end to help keep things properly oriented while marking the "off centers". You first turn the "dead center" and then shift centers to the other marked centers and turn again. You will now be cutting on only one-half of the stock, the "high" side, as it comes around. Go slowly and stop and check frequently until you get the round-over you desire. You may have to play around a bit to find the best distance from "dead center" for your second centers. Keep us posted on how well it works for you. By the way, the Escoulan Eccentric Chuck is made in France and it is not cheap. (Frank Schlicht) My profound apologies to all. Guess I have been turning wood too long and, therefore, take some things for granted. I failed to mention how to mount the stock in my earlier post. I personally cannot envision how would could mount the stock using either a 3 or a 4 jaw chuck. To be able to use either a 3 or a 4 jaw chuck, you would have to be able to mount one on the tailstock, as well as one on the headstock. I use a spur drive in the headstock and a live center in the tail stock. This enables you to maintain two turning axes parallel to one another and close together fairly accurately, which is what has to be done to turn the desired configuration. Hope this clarifies things. (Frank Schlicht) Yeah, that's what I was trying to say too, and my reply was poorly worded. Knew what I wanted to say, but didn't quite get that across. (Mark Wendt) Y'all are making this way, way too hard. First, it's really not hard to cut the mortise with a file. Just do it. Second, if you just hafta turn these on the lathe that isn't hard either. First turn the blank round and drill. Then make two off set centers. Now start with two 1" long pieces of stock the same O.D. as the stock, say .6875" in either steel or good aluminum. Center drill one end of at least one of those. Now set these off center in a four jaw chuck and turn a "stub" on one end about 3/8" long to the same dimensions as the through bore on the insert. How far off center you put them in the 4-jaw chuck depends on what depth you want to relieve the insert. Do both at the same settings on your 4-jaw chuck. To use, chuck one of the centers with the off-set stub in either a 3 jaw chuck or a big collet. Use the other with one end center drilled against the live center in the tail stock. Turn the lathe on and go to work. Ralph Tuttle has some cool little off set centers like these. Maybe he'll jump in and refine what I have said or post some nice pictures. (Harry Boyd) Take a 3/4” aluminum rod and turn 1/2” x 1/2” stub on one end. Center drill to accept a live center. Reverse chuck the stub and mark the center. Take to your mill or drill press. Line up to the marked center point. Move it one direction 1/10 to 1/4 depending on how flat you want the mortise to be. Center drill and then drill and tap for a 5/16th bolt or whatever you use for reel seat holes. Cut the head off the bolt and screw in. Make a pair of these. Insert the bolt into each end of the reel seat. Make sure they are aligned. Chuck up one end and use a live center on the other. (Ralph Tuttle) This sure seems like a lot of trouble and wasted time to me. I turn my reel seat fillers on the rod and from the time I stick the rod in the lathe, I can turn the filler to size, hand cut the mortise and sand it out to 1200 grit within 15 minutes on soft woods and usually within 20 to 25 minutes on harder and burl woods and I'm not just turning straight fillers. Mine have two steps on them and "step up" to match the handle diameter. When I'm finished, my mortises are precise and my diameters are dead on spec. I just don't see the advantage of setting up a lathe to do an offset cut when this is so easy. (Bob Nunley) What tools do you use for shaping the mortise by hand? (Greg Reeves) First, I do the entire thing on the lathe. I turn the stock round (1" or a little less) and to length and center drill it. I then glue it on the rod along with the cork and when all is cured, put it in the lathe and turn the cork and filler down to the dimensions I want. I just use simple wood lathe gouges and chisels to turn the filler. Once I get it to dimension, I lock the chuck in place so that I can stay true to one flat, then take a double cut file and work it down quickly removing about .060" (talking about a .687 filler) making the reel seat area FLAT. I then move to a finer file and working from the edges, round the mortise. I actually cut a little "thumbnail" looking place at the front end of the mortise just for decoration. Once I get it really close (I want the mortise to be .065" deep, for most reels), then I change over sandpaper, 200, then 400 then 600 then 1000, then 1200... just work it with sandpaper until I have a very fine, scratch and mark free finish. Varnish and go. I know it sounds difficult, but you can cut a very accurate, very sweet looking mortise this way and turning it on the rod in the wood lathe, EVERYTHING is well aligned with the bamboo. (Bob Nunley) When I stayed with Sir Robert prior to this year's SRG, I got to spend some time with him in the shop. What he describes is entirely true. It's a lot easier to do than it sounds, and it really doesn't take all that long to get from a square reel seat insert piece to the finished product. The longest we had to wait was for the glue to dry. (Mark Wendt) APOLOGIA # 2: I guess I am too close to the forest to see the trees. Once again, I left out a critical element in my earlier comments on the subject. Turning a morticed insert using the method I have mentioned will almost certainly require you to drill the bore using a drill press and a good sturdy vise for same after the insert has been turned, unless you glue a waste block piece to each end of the blank before you start turning, and mark your center locations on the waste blocks. The only other way I know of for doing it on the lathe would require an independent-jawed 4-jaw chuck. (Frank Schlicht) Now that I have answered the original question to the best of my ability as a wood turner, let me further say that I would never go to the trouble required to do one on the lathe. IMHO, nothing beats the fingernail bit; particularly if you can dedicate a router specifically for this purpose. Too many steps and too many pieces of equipment required to do the on the lathe as I have described. (Frank Schlicht) Turn round, then mortise with your fingernail bit. It is then easy to file/sand off the rails leaving you with a nice eccentric. I figured this out when trying to save a nice reel seat with an uneven cut... Of course, an eccentric turn is smoother and more precise. But it can be done more easily from a mortised seat than you can freehand. (Jeff Schaeffer)
I recently turned my first insert out of curly maple. Now, I am thinking about trying to turn or cut (being new I do not really know) the insert so that the feet will have a groove as to sit on. I have read I need a router and a 5/8 jig. What is the best or easiest way to produce a reel seat that has been mortised? (Zac Denton) I cut mine by hand, but you can look on many web sites and find good mortising jigs to do the job. The best I ever used was Bob Venneri's jig, but you can make something much simpler... all you need is a router and router table. Check out the Todd Talsma's Bamboo Rodmaking Tips web site, in the contraptions section. I have not gone through it, but I bet you can find something in there. (Bob Nunley) Hylton's book on "Ultimate guide to a router table", P77: He does not recommend a router table for normal mortises since set up time makes it a non-efficient use of the table router.vs the plunge router. This may not apply to the use in rod mortising. What say you table router users? (Dave Burley) The reason is because you are NOT cutting a mortise. You are cutting a grove. A plunge router or mortising tool is good at mortises but lousy at groves. Anyway, I use a plane I made. It wasn't hard. I took an old Sawzall blade, squared it up to a 1/2" wide strip, and ground the reel seat profile into one end. Then, using an old wooden molding plane as a model, I built a plane body to fit the blade. The hardest part of using it is clamping the reel seat insert so that I can plane it. Also, the finish is a bit rough, so I have to use my xacto knife to clean up the edges. Some light sanding is also needed to get a really nice finish, but it is a workable system. (Paul Gruver) Nice one Paul. Yes you can use a molding plane if you can find the correct shape. Paul is correct the hardest part is holding the insert in a suitable jig with a fence, even with a router you have to clean it up. AND THERE'S NO NOISE. (Gary Nicholson) I guess I am the only one who does it my way: I made a jig for my HF milling attachment and chuck up the bid I like and it cuts beautifully within a few seconds. I usually make several at a time. (Dick Steinbach) Thanks for the correction from Mortise to Groove, now if we can just get "groove" incorporated into the rod building lingo. Wiki says: "Groove - a slot or channel made with the grain, usually on the end-grain in preparation for a tongue and groove joint" Doesn't look like an exact definition of what is being done, but there may be a wider definition and Wikipedia is not the end all by far.. The term is new to me but that would not be surprising in this ancient, industry dependent lingo.. I have a book called "The Woodplane Book" by Garrett Hack (Taunton Press) and I think (but can't find at the moment) called something like "Making Wood Planes" that is very good also. These may be useful in helping to design a plane for just this purpose. As you know, plane angle is a critical part of the design as well as the throat and wedge and blade extension in getting good clean cuts. Ditto sharpness. These design variables are dependent to a large part on the hardness of the wood and the amount of grain swirl and such. So check this book out. It may allow you to design a plane specific to this purpose. There is a section on specialty planes that may be of interest in your design work. Hope your design work is successful. Sort of a Gruver Grover {8^) (Dave Burley) I suspect the reason you are having trouble you are having with the definition of "tongue and groove", if you have correctly posted it here, is because it says "...usually on the end-grain...". WRONG!!! IT should read "EDGE-GRAIN". Think the long edges of real-honest-to-goodness hardwood floor planking. THAT is TONGUE-N-GROOVE!! One edge pf the plank will have a groove IN it and the opposite EDGE will have a TONGUE on it for alignment. You most definitely are cutting a "GROOVE" when you mortise. (Frank Schlicht) I erred grievously in my earlier response. When we "mortise" a reel seat insert, we are actually cutting the tongue of a tongue and groove joint; NOT the groove, The Groove is the curvature in the underside of the reel foot. My apologies. Again, it is cut with the grain: not across the grain. (Frank Schlicht) I know of a rodmaker who does his reel seat mortising with a file. (Peter Jones) I have always thought that doing things by hand give the finished product just that a custom hand made look. If you are careful, take your time, and do a good job, I feel that the finished product has much more character. Now that is just my opinion, some of you have seen my rods, and I'm sure as I sit here some like them, some don't. That's OK that is what defines a J.E. Arguello rod. I have seen some rods that are flawless and simply beautiful and most would be more than happy to own one, just not my style. That my friends is what makes life so great. I guess that's my long winded way of saying a file is a fine tool in the hands of one who learns how to use it. (Joe Arguello) A hand made piece of furniture is always worth more than any top end mass production piece Its the quality work produced from the hand tool which make it unique I agree. (Gary Nicholson) Yabut... It all kinda depends. That plane you use, or that file that certain rodmaker uses was probably made by a machine. I've made many jigs and fixtures to assist my rod making with a machine. When I turn my ferrules and other hardware on the lathe, or use the mill to slit the ferrules, they're still hand made on a machine. I'll be posting pics pretty soon of the progress I've made on my CNC saw beveler, both on Clarks forum and on one of the picture hosting web sites. The machine is "handmade", and "homemade." (Mark Wendt) Don't get me wrong, and don't forget that I'm the guy who really needs a Bridgeport and a Tool room lathe. I do mortise my fillers on my Bridgeport. I guess what I was trying to do is encourage those who don't have these tools to not let that stop them, there is always another way and some very fine work can be had that way if you get out of the cookie cutter mode and think out of the box. You don't have to make reel seat fillers that look like they came out of a machine or like everyone else’s. Anyway my latest acquisitions are a Mig welder and a new post vise (4"x4"x36") for forging knife blades. Oh yeah and when I bought the steam engine I was in that flea market buying an old hand cranked post drill (really cool) now what the hell do you need that for if you have a Bridgeport you ask! Well don't get personal ............... I just need it! (Joe Arguello)
I have been turning some Huon Pine (local timber, very dense, smooth grain, very highly thought of here, great boat-building timber, not too soft) for a reel seat insert for a client. Someone once gave details on how to set up a jig to cut the mortise, but I am blowed if I can find it. Any clues where to look. (Peter McKean) Try this page on the Tips site. Hope this helps. I'm doing the same thing; hopefully by the end of summer have a decent jig ala Tony Spezio made. (Bob Brockett) This may be what you are after. Boris in Sydney has made one of these up I believe, he posted the information on another forum some time ago. Hope this helps. (Norm Knieriem)
I need some help ordering the right fingernail bit for mortising reelseats. It seems that many of you use the 1215 bit from Grizzly. MLCS had their bits on sale with free shipping so I ordered #8884. This looks way to big. I think that Grizzly and MLCS use different measurements to define their bits. Has anyone ordered a fingernail bit from MLCS? Which one did you get? Most of my seats use .687" hardware. (Matt Fuller) Both the MLCS and the Grizzly bits have a 3/4 inch cutting bead, which is the critical measurement (other than shank size!!!). The ones' Bob Venneri sells have had the upper and lower vertical cutting faces ground back at about a 45-degree angle, which does make the cutting radius look smaller. You can grind these back yourself if you have access to a grinder. Just be sure to periodically quench it in cold water to keep it from overheating while grinding. (Frank Schlicht) If it's carbide tipped, you won't need to quench it. But, you will need a good hard grinding wheel! I have some cheap diamond wheels that work good on carbide bits. I was talking with H Boyd about carbide tipped plane blades. I asked about losing the temper when they are brazed. Carbide doesn't lose its temper when heated. (David Dziadosz) The Carbide grinding stones I have are green, I think that designates a Carbide stone. (Tony Spezio) Are they the aluminum oxide wheels?? I think that's what is used for carbide. Doesn't sound right, but?? (David Dziadosz)
I am looking for the best fingernail bit for my router table for routing my reel seat inserts. I need one with a 1/4" shaft. Does anyone have any suggestions? (Phil Crangi) You are looking for a fingernail bit, and MLCS has them only in 1/2" shank sizes (don't ask me how I know!). You are looking for their #8884. It has a 3/4" cutting height. I have a brand new one, 1/2" shank, with the plastic cutting head film still on it that I will part with it for $17.00, and will pay postage. I think I still have the plastic package that it came in. If interested, email me direct. (Frank Schlicht) Yes, that is the one I ordered, but I think the radius is too big, at least for 5/8 reelseats. Tony Spezio though I needed the #8882 if I was ordering from MLCS. (Matt Fuller) Try Grizzly industrial. I know they carry both 1/2 and 1/4". (Brian Morrow) Just the usual Grizzly #1215. I haven't researched this thoroughly, mind you, but I would just bet that Freud makes the Killer, End-o-the-World fingernail bit that won't quite use up your Home Equity Line limits. Regardless, I can tell you that the Howells/Cattanach/whomever modification is a good thing to do. Believe The Lovely Reed has a picture of this. (Steve Yasgur)
Question....for those of you who make your own reel seat inserts and router them with a mortise how do you keep from getting burn marks at the top where the cut starts? I've got a new fairly new Bob Venneri's modified fingernail bit and have tried everything I can think of - light progressive cuts, climb cutting, fast feed, slow feed - and nothing seems to work. Thanks in advance for your advice. (Tom Key) I quit mortising with a router a couple of years or more back, but used to and there is a pretty simple solution to the burns. Put 2 or 3 layers of masking tape on the fence side of your mortising fixture for the first pass where you're taking off the bulk of the wood. You are basically just shimming it out a little. You will get burn (depending on type of wood), for second and final pass, take the masking tape off. This way you're taking off a very small amount of material, can do it more smoothly and quickly and don't get the burn you do plunging in to cut the entire 70 thou or so in one pass. (Bob Nunley) Bob what are you mortising with now? I am down in Chile and don't want to buy a 250v router. I am contemplating doing an offset cut on my lathe with an independent 4-jaw chuck and making a tailstock jig, but wondering if you have an alternative suggestion. I don't really like the sharp lines of the fingernail bit anyway, so I've been cutting my mortices by hand with 80-grit sandpaper and a sanding block - it's a lot easier and accurate than one might think, but it just takes a long time. (John Rupp) I actually mortise by hand with a mill file and sandpaper, but I only do this because I want my wood mounted on the rod before it's turned to size and mortised. Mortising with a router, if you do the filler separately, is much easier. You do need a lathe, however to do my method. Here it is, plain and simple as I can make it. I mount a 1" round piece of wood on the rod (cork goes on at the same time), so I have rough cork and reel seat mounted. I then turn the piece in a wood lathe until It's .850" all the way down. I turn again until it's .750 all the way down except for the last 1/16th inche of the wood where it meets the cork. Third turning, I turn it to .680, again leaving 1/16" from the beginning of the first "step" to the cork... so now I have a filler turned .680 with a "Divine" style step going up to the cork (I do NOT use a NS Cork Check like most. I work my wood to meet the cork and blend). Next, I lock the lathe down so that the flat I'm going to mount my guides on, and then of course the reel, is straight up. I simply take a mill file and cut down the height of the mortise flat. I usually go .075" to the flat as this will accommodate MOST of these "so called" standard reel feet out today! I then take the file and round off the mortis until my reel foot model (just an old 2 screw hardy reel foot) sits well in the saddle. When I get that fit right, I then go to sandpaper... 400, then 600, then 1000, then 1500 then 2000, and it's ready to varnish. It actually doesn't take me much longer to run a reel seat than what it took me to type it out, and I type pretty fast! If you have any questions or there's anything that I didn't explain well enough, just let me know. We can either discuss here or you can give me a call and I'll walk you through it a couple of times. (Bob Nunley)
Need to replace a fingernail bit. where can I purchase a 5/8" finger nail bit with the correct profile? (Skip King) Have you tried Grizzly? (JW Healy) The only one I know that would have the CORRECT profile bit would be Bob Venneri. He has them ground to the correct profile. Email is rvenneri@hvc.rr.comTell him I sent ya...No other bit will have the correct inside diameter. (Don Smith) Try MLCS for the fingernail bit. (Clifton Ausbrooks)
Does anyone have a picture of their jig they use to hold the wood insert while they are mortising? I have had several members show me their’s, but looking for some jig to hold the wood and not turn while running through the router. I hope this makes sense. (Lew Boyko (11/9/2016)) Tony Spezio's is the best I have seen. You can find a photo of it on the Tips page. (JW Healy) That is a great jig! (Tony Young) For mine, I simply took a piece of hard rock maple about 2" x 4" X 6" and drilled a 3/8" hole through the length, and off-center. I made sure that all faces were flat and smooth by first running the stock piece through my joiner/planer. The center line of the hole was drilled such that the the outer edge of the insert blank was flush with an outside edge of the jig. Once the hole had been drilled, the block was then cut in half length wise. The two halves are connected with a piece of 3/8" All-Thread rod, and the insert blank is clamped between the halves by means of washers and nuts. The two clamp pieces are adjusted such that they both lay flat on your router table, and the edges flush with the insert blank are all flush across the 'face' of the arrangement and against your router fence. Turn your router on and run the jig and insert along your router fence to produce a nice mortise on the insert. Somewhere Tony Spezio has an excellent article, complete with photos, of this set up; including his 'dedicated' router for just such work. Hopefully, he will chime in and direct you to it. In it, he does an excellent job of explaining the "benefits" of a dedicate router just for this task, as I recall. (Frank Schlicht)
|