Bamboo Tips - Tips Area |
|
< Home < Tips Area < Reel Seat Spacers < Wood
All of these questions about burl wood and Bill's slick method for making reel seat spacers got me thinking about the wood. For those of you who use your own wood, do you have to do anything to prepare it? I have quite a bit of nice cherry wood from my back yard that I thought would make nice spacers. However, I don't know if I need to dry it first, or if a season in my car port is sufficient. Are there any opinions out there (that's funny!)? (Jason Swan) Actually, I don't have a strong opinion, but I have been told to cut my pieces (or slabs) into slices of about 1 1/8" thick. Allow these to air-dry, with good circulation all around and in moderate temps. (out of sunlight) at the rate of 1 year per inch of thickness. You'll hear of other techniques too, that might be better or quicker. (Bill Harms) Best bet is to send it to someone like Wood Stabilizing Specialties and have them stabilize it. Basically, what their stabilization process consists of is an Acrylic Impregnation. After they do that, it won't chip, break, or blow up in the lathe. Cost is really cheap considering the process. you can see their web site at www.stabilizedwood.com I haven't been to the site in awhile, and can't remember if they have prices on there or not. I can tell you that 2 years ago, it cost $12 a pound to get it stabilized. Just cut it to the dimension you want (I cut mine to 1" x 1" x 4 1/4" allows for plenty to cut off and round to any size filler even if your bore is off center) and ship it to them. Usually turnaround is pretty fast. I have about 20 blocks of Cherry Burl and 50 blocks of Maple Burl I need to send to them. Don't know what I'll ever do with that many, but I do like to turn my own when I can. (Bob Nunley) I usually like to dry my wood at least 3-5 years before I use it. This is air dried of course. You may be able to find a lumber company near you who will kiln dry it for a small fee. There is one in South Bend, IN who has done some for some friends of mine. I usually wax the ends so it does not dry to fast and split. I have some beautiful slabs of maple I have had for 15 - 20 years. (Bret Reiter) I've just tossed it in the rafters in my basement. Rather cool, but low humidity most of the year. When winter hits, I toss it on top of one of the heat ducts. I haven't dried any real green wood this way, but it's worked fine for everything else. (Larry Blan) One thing you can do is turn a project on the lathe while the wood still retains moisture and save the shavings from turning. Imbed the turning in the shavings and it will dry slowly enough not to crack or distort. Of course this is relative to the amount of moisture, size of turning, humidity of air surrounding etc. I did have some luck with this procedure myself. (Steve Trauthwein)
I've come into some short ends of antique, antebellum-era heart pine. 6"wide, 2” thick. Came out of the roof of an old warehouse recently demolished in New Orleans. No flood damage to the roof. This is wood from the virgin long-leaf pine forests. Beautiful stuff. Anybody have anything to say about using a ‘fatty’ wood like pine for reel seat inserts? (Reed Guice) Well, by now it's probably as cured as it's going to get and most likely harder than a lot of hardwoods, if it looks good, I wouldn't hesitate to use it. (John Channer) I owned a 1920's era house at one time that had floors made out of the stuff. It was harder than flint, and held a varnish finish just fine, use it. (Tom Smithwick) Just made a heart pine insert myself. Only problem I had was routing the channel for the reel foot - it kept splitting along the sap lines until I routed it with the vertical grain centered on the bit. For aesthetics - I wanted the vertical grain on the sides - but just couldn't get it to work. Not sure if that makes sense but that is as best I can explain it. Also - sanding pine is quite a chore - clogs paper instantly - so get it very close to final dimensions with a tool - or buy lots of sandpaper. (Tim Aaron) Just made a heart pine insert myself. Only problem I had was routing the channel for the reel foot - it kept splitting along the sap lines until I routed it with the vertical grain centered on the bit. For aesthetics - I wanted the vertical grain on the sides - but just couldn't get it to work. Not sure if that makes sense but that is as best I can explain it. I think I'm following your train of thought here. I turn a lot of what is called 'Blue Pine' and this has a lot of sap wood in it and the colors can run from blue-grey, yellow, tan and carmel in the same piece of wood. It is almost always necessary to use some type of CA (cyanoacrylate or superglue). I turn it roughly to size and then use some thin CA and spread it on the wood. Turning will now be easier. Also - sanding pine is quite a chore - clogs paper instantly - so get it very close to final dimensions with a tool - or buy lots of sandpaper. I use drywall sanding screen to rough sand and then I use a sandpaper called Abranet which is an open pored sandpaper and I will sand from 180 - 600 grit before applying a finish. I'm still on my original set of Abranet after 50-60 blanks ... good stuff. (Ron Hossack) As someone who has bought Abranet from Ron and used it, I can only second his opinion! Great stuff! (Steve Yasgur) Or use the 3M "Gold" sandpaper. That stuff hardly ever clogs, and can be clean with a whisk brush, or by knocking the sanding block on the table. Great stuff! (Mark Wendt)
Has anyone out there ever used Bubinga wood for reel seat spacers? I had not seen this wood on any component makers web sites. It is some terrific looking wood. Also, is 1x1 by 3.5 inches the proper size the wood would need to be cut for spacers. I need to go see a gentleman with a industrial band saw and want to make sure I get these cut appropriately. (Tim (Flex the Hex)) I've made many seats out of Bubinga over the years. The wood turns nicely, but you want to watch out for the dust when sanding it. A lot of these types of wood are dangerous to breath in the dust. May want to wear a mask when sanding it in your lathe. Most reel seats are 3.5 inches long, so I usually cut my blanks around 1x1x4 or sometimes even a bit longer. (Dave LeClair) Make sure your tooling is sharp. High speed steel won't cut it well. It can be really hard stuff, and can chip out. Beautiful results, though. (Greg Kuntz) I'm with Dave on this one - I've turned reel seat inserts out of a bunch of different exotic hardwoods - cocobolo, pernambuca, rosewood, and quite a few others. I wear a respirator (the same type used by painters with the changeable filters and such, I think mines made by 3M, but there are plenty of other good ones out there too). Leave it a little long. I always cut my inserts about 4" long, and 5/4's per side. Gives a little extra room to allow for shrinkage if the moisture hasn't stabilized completely in the wood, and if I happen to drill the "center" hole slight off center. Not that I'd ever do that, no sir, no way... ;-) (Mark Wendt) One other thing I forgot to mention - these exotic hardwoods can be a real pain the arse to get a finish on, because the wood is so oily. Been a while since I've played with bubinga, so I don't remember of the top of my head whether that wood is oily or not. If it is, there are a few different ways to take care of this problem. One is to use a finish that is designed for oily woods, like teak oil. You'll have varying degrees of success with this kind of finish, as some of the woods that are oily take this finish quite well, and other woods that it won't harden on at all, or it takes forever to harden. YMMV. Another technique is to use thin or medium super glue, applied with a paper towel while the piece is turning in the lathe. Sand it down after a goodly amount soaks into the wood and hardens, and then just buff and polish it out. (Mark Wendt) You can get away with 3/4 x 3/4 but I would make them at least 4.5 to 5 inches in length. Funny things can happen at the ends when making reel seat spacers and the extra length leaves one the ability to "cutoff" the screw ups. Just ask me how I know. (Frank Paul) I've used Bubinga a couple of rods. The blanks are 7/8 in x 5 in. I turn my blanks on a small wood lathe with standard turning tools properly sharpened. I turn a hosel from the extra length and use in front of the grip in lieu of a winding stop. Nice looking. (Lee Koeser)
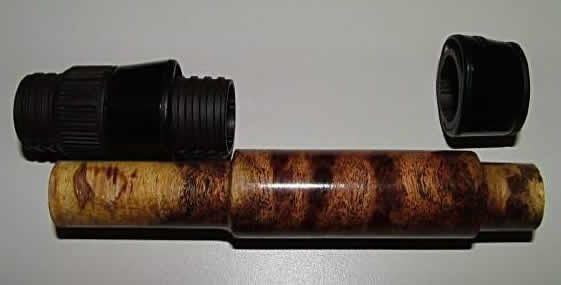
Does anyone know what kind of reel seat wood this is?
It is very good looking. (Wayne Vierhout) I think the wood is what is called called Lace Sheoak by one supplier and it is one of the many attractive Australian woods. What is called Australian Silkwood or Lacewood can look very similar. The reel seat insert I made from a Lace Sheoak pen blank from Lee Treeworks looks very much like your photo. (Tim Anderson) Looks a bit like lacewood. (Chris Carlin) Palm? (Conor McKenna) If you send that jpeg to these guys, they will definitely be able to tell you or get you real close. Hope this helps. (Bob Brockett) I have a piece that looks like that, sent to me from down under, it was referred to as Sheoak. I used it for a knife handle. (Ron Petley) When I was a kid, back in Queensland, in the northern bit of Australia, we would have called that Silky Oak, and it came from a tree called a Sheoak. This is a different tree from the ones known as sheoaks in other places (almost everything is different in Queensland from what it is in other places, including, I suspect, chromosome counts). My memory is not what it used to be, but I think it is a member of the Casuarina family. Silky oak is used as a cabinet makers' timber of just so-so quality. It was a lot more popular between the two world wars and just after WW2, than it is now. I guess it was cheap and easily harvested. It is pretty soft wood. (Peter McKean) Having just recieved quite a few pieces of Aussie timber in a pen swap from Banksia, Sandal, Red and Brown Mallee, Ancient Swamp Kauri, Wandoo Burl I would it certainly looks like what I have labeled here as "WA Sheoak" ... I'll assume that the "WA" stands for Western Australia and don't know if it means that the timber from the eastern side of the continent is of a different variety ... For further reading .. Sheoak. (Ron Hossack) Ron that mallee should make some great looking pens. I have made reel seats out of both the brown and the red mallee and I really like them. Highly figured and the wood is hard enough that it doesn't need to be stabilized. Aussie rodmaker Nick Taransky favors it as well. (Will Price) I like both the brown and red mallee burls but I'm really interested in turning this new one, Wandoo Burl as it looks to have some spectacular figure. Not long enough for a reel seat but an excellent candidate for worthless wood casting. (Ron Hossack) Your memory is good Peter. Casuarina is correct The wood was also used in boat building particularly as struts in small row boats. Luckily I only grew up in QLD not born there so my chromosome count is 'normal' At least that what the doctors told me. (Nick Kingston) I live in south Florida and we have a tree here we call Australian pine, also called causurina. It doesn't make very good lumber because of the way the grain runs. It looks a lot like a type of mahogany. However it isn't a soft wood, in fact it's as hard as a banker's heart. It has a lovely grain when finished. I will cot some small pieces and see how they look and send pictures. (Phil Crangi) You serve to jog my memory a bit more. You know what kids are - every single thing has a local "kid name", few of which are consistent or right. But as I say, you refresh my memory - Sheoaks are those wispy looking trees that grow in sandy areas we had thousands of them at home on the farm, growing on sandy ridges. They are also plentiful on the dune areas adjacent to beaches. Silky Oaks, though, are rather bigger trees, with irregularly shaped leaves, which bear yellow flowers in the spring and summer and are responsible for a host of allergic respiratory conditions due to their high pollen yield. Now it is going to take me about a day to sweep out of my brain all the detritus of memory that extracting that one has scraped loose! One such is a large occasional table made from silky oak that my mother had in a sitting room; I remember that she replaced it with something altogether less flashy, and that the last time I saw it was in my stepbrother's shed with paint tins on it. (Peter McKean)
I'm trying to make good of a sad situation. A heavy snow storm in December took down a section of a Bradford Pear in my yard, which in turn broke some pieces off a shrub with reddish-pink wood. I have cut the limbs up into manageable pieces. I also have a few pieces of cherry limbs. I have 2 questions for those that turn reel seats. 1. Is Bradford Pear considered a hardwood? 2. What do you use to seal the ends of cut pieces to dry without checking for turning? (Chuck Pickering) Paraffin wax is the product of choice for sealing woods. (Brian Morrow) Try Anchor Seal. You can use it on the portions of tree that fell as well and it should keep the tree from dying. I'm pretty sure you can get it from woodcraft. (Don Peet) Welcome to the damaged Bradford Pear Club. Pear wood is indeed a hardwood by definition and is like other fruit woods often prized as a wood to turn and as a decorative wood inlay. Preserve it by painting both ends with paraffin wax dissolved in some paint thinner (use a vegetable peeler to get thin shreds of wax for rapid solution) or put on the melted paraffin wax directly. Paint or varnish will also do if you get a good heavy coat. Now, unless you want to collect more wood from this beautiful tree, have it seriously pruned about every two to three years back to the shape it was two or three years ago. Do this in the summer or just after bloom and it will put out buds which will flower in the next Spring. This is a pyramidal tree with long central branches and in the wind and snow the leverage is just too much. I prune mine to a ball shape, so I have shorter branches in the top and I get a beautiful cotton candy ball of bloom in the Spring. (Dave Burley) I got some Bradford Pear the same way several years ago. It is a beautiful turning wood with a fine, tight, smooth grain. It does not have a lot of "character" but accepts stains well. I've used it to make tool handles and various nick-nacks. The only problem I've had with it is that some of the larger branches that I left outside to air dry, after several years, became infested with bugs and dry rot (a fungus) which ruined the wood. I had little problem with checking while drying, although painting the ends with wax is a good precaution. I would suggest spraying the bark with a insecticide and a fungicide (rose spray should work) before putting it in storage to dry. Drying rate is 1 year per inch of thickness. (Paul Gruver) I'd suggest getting the bark off if possible. All kinds of "critters" hide under bark. (Neil Savage) Not sure about #1, but for #2 you can seal the ends with wax. (Mark Wendt) Nothing works better than a good thick coat of latex paint. It seems to work best if old and thick. (Frank Schlicht)
I just finished drying some wood inserts in a small toaster oven. Worked pretty good. Took several loads to dry about fifty. This batch was for practice, and they're for sale. I have a bunch more to cut up. These are from an old, huge Elm tree, grown in Montgomery County in Missouri, on my father in law's farm. It's been mostly dead for a long time. Part of it was still alive. The electric company thought it should come down. It has wicked a lot of moisture from the ground and was pretty wet. The ones I cut up this time is pretty much straight grain, some is wavy. I think it has a really nice color that would look good on a cane rod. Some that I have will have a more wavy grain pattern, because they're crotch pieces. I just wanted to do a trial run on cutting and drying pieces for reel seat inserts and pots for friction turkey calls. I also will have a couple burls that need to dry a little before I cut them up. I'm hoping to pay for the new band saw I bought for cutting wood!LOL I also found a really big burl on a Black Oak tree that's dying, been hit by lightening. Also, another is on a Walnut (I think), I don't know trees that don't have leaves! LOL If anyone is interested, contact me off list, please. I'll have more as I cut more. (David Dziadosz)
Has anyone ever used Rosewood for reel seat inserts? I keep thinking that Rosewood may be too heavy and cause a balance problem. Any Help would be appreciated. (Tom Peters) The answer is yes, at least one of the woods that is called "rosewood." I drill out my inserts to 3/8", so they are relatively thin walled and not very heavy no matter what wood I use. (Tim Anderson) For longer, heavier, rods I think a bit of extra weight in the reel seat can actually help to balance out the rod, bringing the center of gravity closer to the grip. (Steve Dugmore) For the 80% of my reel seats I use woods of the Dalbergia family - Rosewood Rosewood is a compact wood perfect for turning. No cracks, no splitting. Heavy, but not too heavy, in my opinion. You can polishing the wood and arriving to a glass effect. Only a negative aspect: rosewood can produce allergic reactions. 70% of the world population is more or less allergic to the Dalbergia dust. So, protect yourself. (Marco Giardina) I will confirm what Marco said. There are many great varieties of rosewood and many of them will make you sicker than a dog!!! Not only the rosewood families, but many burl woods will do this. Just wear a simple dust mask to make life easier. I use one turning any of the rosewoods, Junipers, Thuya, Amboyna, etc. (Bob Nunley) Actually it's a good idea to wear a dust mask for any turning or sanding operation. The fine dust can get in your lungs and cause problems even if you're not allergic to the wood and/or resins. (Neil Savage) There are about a dozen different "true" rose woods, among which are: Brazilian Rosewood (endangered); East Indian Rosewood; African Kingwood; Cocobolo; and, Tulipwood. Most, if not all, of these have been used as reel seat inserts; with Cocobolo being at the head of the list today. Steve makes an excellent point in his response about additional weight at the reel seat end being beneficial is valid. (As a sidebar, Pfleuger reels were designed to have split shot added to the inside of the arbor for just this purpose.) (Frank Schlicht) My rod building buddy placed over 1 oz. of lead in the wood filler of his Para 14. The dang thing was still way tip heavy. (Dave Wallace)
I had a peach tree in my yard die last summer about the time a thread on how to spalt wood was in progress here. Since the tree was mostly on the ground, instead of cutting it up, I decided to let nature work on it for a while. Before I cut it up to see if any spalting took place, I thought I would see if anyone has used peach wood for reel seats. If so, does it need to be stabilized before turning on a lathe or is peach hard enough to work without stabilization? (Will Price) Most fruit woods have excellent turning characteristics. I've not turned peach, but it is a close relative of cherry, which I have turned, and plum, which I've worked in other projects. Look for interesting grain, get as close to the heart as you can (better colors, more dense), cut it into 1” x 1” x 6" billets and dry thoroughly. I have baked small pieces of cherry in the oven for several hours at 180f to drive out all the moisture. Boring the center hole first will help in drying, and may help resist checking. (Paul Gruver) Baking at low temps work just like kiln drying. DON'T drill first; the wood will contract/shrink unevenly due to grain density and your bore hole will warp out of cylindrical; don't ask me how I know ;) (Chris Obuchowski) FYI - anyone thinking of cutting up large pieces of wood for reel seats, wood that is NOT Burl or of an otherwise complex and interesting grain pattern, should really consider crosscutting or quarter-sawing the wood into blanks. This will highlight the end grain pattern and even very uniform woods like maple and fir end up making beautiful seats. (Chris Obuchowski) Hazarding a guess here regarding your Peach wood. I also think, from my working with Crab apple and Plum from my yard, your Peach would be a finely grained and relatively hard, dense fruit wood to work with. You wouldn't need to use any stabilizer provided you cut your blanks into 1" x 1" x 4" (or a bit longer) pieces and allowed them to dry slowly and away from direct sunlight. They'll bend a bit as the stresses settle and hopefully won't crack too much if dried slowly in a warm room for some time. I'd give them a year with the ends waxed for sealing as soon as you cut them. Moisture enters/leaves wood a full 10 times faster via that end grain and cracks begin quickly, which only grow. I've done some of that Crabapple and some Plum and have had really good luck using this method but that was in other woodworking duties long before my fly fishing took hold. Plum is some truly fine wood, with it's reds and purples and if I recall pear and peach each have subtle, fine characteristics of their own. Good luck with this and please don't let that ol' Mother Nature get to spoiling your log before you can give it some care yourself. Embarrassing and long story short regarding the spalting of sugar maple..... Many seasons back I took a couple of (cough, cough) Hard Maple (Sugar Maple) logs out of the woods that had been cut by the farmer. W/O thinking to test them (hard/soft trees) and knowing how one can induce beautiful maple spalting by stacking freshly sawn planks directly atop one another w/o spacers between them for drying, and leaving them stacked for a year or so...I waited...patiently. A year later I unstacked 'em, thinking of all that beautiful, hard maple spalted stock in front of me. I found a lot of so-so-dried, punky SOFT maple boards that reminded me of sh!tty cardboard! (I've never told anyone this before............*Grins*) Good luck. Your stuff should be really nice. (Jeremy Gubbins)
I have asked at a few online forums & read quite a few woodworking forums and find I have conflicting info on turning ebony. Some swear blind it will crack, if not almost immediately then eventually. Others have reminded that clarinets and other wood instruments have been successfully made with ebony etc etc. So what do I make of that besides there being more to it. Have any of you blokes turned ebony for reel seat inserts? If so, how did you find it? Has it been successful as a reel seat? Does it take kindly to water, etc etc. (Boris Gaspar) Has it been successful as a reel seat? Does it take kindly to water, etc etc. I have had both experiences. I had one small board that was hard, and worked about like maple, and another that was brittle and would fall apart if you tried to work it. I thought the brittle board might have been partially rotted, then dried, but I'm not sure of that. I did get a couple seats out of one area of the bad board, and they were fine. If you can saw the stuff into a reel seat blank, and drill the center hole without blowing the stuff up, you will probably be fine. Be aware that the dust is toxic to some people, including me, apparently. I liked the look of the stuff, but quickly decided it was an expensive headache. (Tom Smithwick) I have 2 reel seats turned from ebony & they are fine. Also the chanter for my bagpipes & the practice chanter I use are both made from ebony & they are a lot thinner walled than reel seats. Water does not affect the chanters & actually probably makes them sound better. (Bret Reiter) I have asked at a few online forums & read quite a few woodworking forums and find I have conflicting info on turning ebony. Some swear blind it will crack, if not almost immediately then eventually. There is a saying among pen turners and ebony. 'It's not if it is going to crack but when'. I can't speak about a reel seat BUT, every pen I have made out of ebony has cracked. None right away but over time ... This could be because the thickness is so small on a pen as compared to a reel seat so there may not be the problem. On the BL5 inserts that I use I turn to 0.665 and I normally use 3/8" for the bore that would leave a thickness of 0.290. I think I'd use a smaller bore and leave the wood thicker. This is one of the nicest woods to turn ... I think I'll make a reel seat as a test bed and see what happens. (Ron Hossack) I have made same reel seat using ebony without any problem of cracking. Of course seasoned ebony. It has a tendency to want to split only in large pieces, not in a 4" round reel seat. Ebony is very easy and comfortable to turning. Dense and strong. You can have a really nice polish like glass. Usually I buy my woods from eBay. If you want a black reel seat - any way ebony is not only black - you can also consider the possibility to use Blackwood Dalbergia Melanoxylon. A little more rare and expensive then ebony, but firs class wood. Very stable. (Marco Giardina) Thanks for all the replies. Marco, thanks for the 'blackwood' suggestion also. Bret, I hadn't thought of bagpipes and the moisture they must accumulate over time. Nice to have access to all your experiences. I will have a go at making a few inserts and see. I'll let you know how it goes. Peter, unfortunately I'm not going to be able to make it this year. I could if it was in Sydney! Must work on that sometime... (Boris Gaspar)
Was in wood insert building mood. Got a whole pile of blanks and got them done. Then I decided to start on some of my own wood stockpile. Got some 1" planks of Zebra and Rosewood [I think]. Sawed the planks to blank stage with a jig saw. Too lazy to set up the table saw for a small job. Clamped the plank to the Shopmate and got to work. I'm left handed. About 2 hours later, the area under the signet ring on my right hand started to itch like crazy. Took the ring off and the finger was bright red. Looked like it had burned. Later, the top my right forearm started is itch as well. There were small red spots all down the top of it to the wrist. About 2 hours later the top my left foot really started to itch. I was wearing sandals in the shop. And the worst part. Just after the sawing, the previously drank coffee needed draining so guess what else got saw dusted. I had a allergic reaction to the saw dust. The saw dust went through my long sleeved shirt and my sock burning area skin area that it touched. Each area effected took from 1>3 weeks to heal. The hands were not effected except for the finger where the ring captured the saw dust. I know that Rosewood isn't all the great to breathe, but I'd never heard or read about touch. Just another day in the rod shop. (Don Anderson) It was most likely the Zebrawood (Zebrano) not the Rosewood. (Larry Swearingen) The wood toxicity chart I have lists Rosewood as being twice as potent as Zebrawood. (Al Baldauski) If my feeble memory serves, there are several different kinds of "rosewood," African, Brazilian, etc. and they probably don't all have the same toxicity? (Neil Savage) The so called "Rosewood" - true Rosewood - are woods of genus Dalbergia. The wood is not toxic, but it is allergenic. That is bad: toxicity can be eliminated from the organism, allergic sensibility is more difficult to remove. 80% of the population in the word is allergic to genus Dalbergia. The more allergenic wood of the genus is Cocobolo Dalbergia Retusa. In general the allergic reaction is produced by the inhaling of the dust, but same people can have allergic reactions also by dust contact with the skin. Use carefully this type of woods: like all allergenic products, in the time, the following reactions can be progressively more serious. In general tropical woods - and not only tropical - can create health problems, but the Dalbergia dust are on the top of the list. (Marco Giardina) And of course some woods called "rosewood" are not. A god reminder to have an efficient dust collector and wear a face mask. (Dave Burley) I wasn't aware of any Allergy Documentation as it applies to various wood species. I was just going by personal experience as a custom furniture maker, retired. I have worked with a lot of the "Rosewoods" myself and in larger shops and never was aware of any allergic reactions from them from breathable dust or skin contact. BTW I love the smell of fresh turned East Indian Rosewood. Walnut too. I used to turn bowls in my spare time. However it seemed that when ever we had a Zebrawood job everyone in the shop would get some sort of reaction. Myself, I always got a "stuffy nose reaction" to Honduran Mahogany. I couldn't stand to work in a hot shop with a respirator on and the little dust masks were just useless so...... That's one of the reasons I got into CAD drafting in the early 90's, to get out of a dusty shop environment. Bamboo dust doesn't seem to bother me now though. (Larry Swearingen) Here is one of several web sites that have allergy/toxicity data on wood species. It seems most wood can produce allergic reactions to one degree or another and of course it depends on the person too. The only wood I've worked that cause some problem was black walnut. I didn't react to it but the dust was sure bitter in my mouth. (Al Baldauski) That's almost as bad as chopping up jalapenos and habaneros for chili and not washing one's hands before using the toilet... (Mark Wendt) I've done that !!!! :( (Al Baldauski) It's an... interesting sensation. (Mark Wendt) Yeah, I think that's how the Mexican hat dance started. The hat was used to hide the irritation :>) (Al Baldauski) Could be where the "AAAAAIIIIIIYYYYYYEEEEAAAA" scream originated too. (Mark Wendt) My first guess is the rosewood ... any rosewood especially Cocobolo causes the reaction you describe ... never had a problem with Zebrawood but two fellows I know ended up in the hospital because of allergic reaction to rosewood ... I think I had uploaded a list of toxic woods to this site. (Ron Hossack) The recovery is complete. I've used Zebra for years w/o incident but the web site posted shows a possibility of increased sensitivity to the wood. Before Al posted the web site, I made a shim for my wife's fish tank feeder out of a scrap of zebra. No troubles. I guess that landfill is the place for the rosewood. (Don Anderson) I can't remember who had the allergic reaction to some wood this week but here is some info on the rosewood family and some of the woods that can cause it. (Ron Hossack)
I have just purchased a block of Redwood burl and was just wondering if some of you have worked with this wood. My questions are is it a problem to turn and how should I cut it up for reel seats-with the grain or against the grain. Any help would be appreciated. (Tom Peters) If the pieces that you have purchased is a true burl, you don't have the problem: Burl is without regular grain, but it have an incoherent and random pattern. If you see a regular pattern of the fibers, it is wood and not burl. In this case I personally suggest a cut and turn against the grain. (Marco Giardina) Redwood burl can be a bit finicky at times. Sometimes it turns real nice, other times, it can be a real bear. Using CA glue on it will help the times when you want to pull your hair out. You can also use the CA to glue back the hair you've pulled out... Being burl, there's no real definitive grain pattern. Slice the burl hump in half, and look at the wood. Sometimes looking at some of the internal patterns makes it a little easier to decide on how you want to cut it up. I had a walnut burl hump that I had to slice in half before I decided how and which way I wanted to cut. (Mark Wendt)
Having no experience working with a hardwood burl, and having been asked to make a reel seat from one, I'd very much appreciate some advice. A local farmer has offered to allow my cutting a rather large burl from a roadside Maple tree that has signs of dying. No doubt there is still a lot of life in the old tree, and it's more than likely that the burl itself would require 'seasoning' before it could be used. The question is how, and how long after cutting, would the wood be suitable for making blanks? Also, is there any 'right way' to go about making blanks (1x1x4) to accentuate the grain and color pattern? There may not be much color contrasts in the Maple, but I'm looking for a Cherry burl as well. (Vince Brannick) Wow, nice. Some guys get all the luck! I'm not experienced with burls per se' as I've not been that fortunate to stumble across the opportunity to harvest any but I have had a good bit of lumber drying of some harvested trees, mostly walnut, cherry, butternuts (over a dozen all-totaled) as well as some crabs and plum trees from my back yard. This was in the late '80's and I have much of the planks left. I had them custom cut on a friends' Woodmizer bandsaw mill (little saw-kerf/loss per slice) and this is what threw me into the drying arena. My suggestions and they are only suggestions, go like this... Get to the cutting as soon as you can to minimize cracks developing. Get it out of direct sunlight/drying quickly. Depending on how you have the burl sliced (being able to handle it etc. for the size, I'm guessing likely using a chainsaw (ugh! but...) slice the burl into flat 1" slabs, as best you can. Get a flat side made and square things up and do your best guiding the cuts. The thicker 1" slabs will allow for some drying twists etc. so if you go skinny you might end up losing too much trying to be frugal. Tough call... Anyway, after slabbing it up, keep the wood out of any sunlight. Space the slices with 1" sq. x ?? length spacers approx. 6" apart or even a bit closer as burl is full of tension, like cherry is. I used 12" on my boards but I'd go closer with this stuff. And stack it up keeping the spacers aligned on top of each other and on the last slab include the spacers again and put a good bit of weight on the lot to help keep the top few from warping too much. I used a couple tool boxes and some cement blocks balanced on the 1" spacers. This saved the top few layers, especially in the cherry since it's full of stresses. What you're looking for is for the wood to dry slowly to minimize cracking. If I were mine, I'd also cover the pile with some clear plastic covering but leaving the ends open to breathe. Let this sit for a full season or more. Then you can likely saw up one test slab into some rough 1" wide x ?? long pieces and set them aside in a warm shop for a couple of weeks to normalize and go from there. Just guessing here... Burls are different from anything I've dealt with before and if it were me I'd err on the safe side. Just don't be in a hurry. Give it time and dry it slowly. You don't need to flip it over as I've heard in the past b/c the spacers will do the breathing. That said, my friend Dave Norling has defied most all I've come to know about raw wood and has taken some rough/wet blanks of cherry and cut them oversize and put them atop his water heater in his basement and let them sit for "awhile" then turned seats out of them. They turned out pretty nice! ----(He ought'a be made to drink coffee w/o any sugar in it!!) *G* Anyways, take your time. With burl, since it has no definitive grain orientation, I doubt cutting it one way or the other will gain you much of any preferences. Those with more experience with burls might not agree with that and I'd defer to their suggestions to my entire post here. I just want to hear you did the right thing and got some wonderful stock to make seats etc. out of. Sorry for the ramble but it's a passion of mine and you have a WONDERFUL chunk of stock I'm sure! I'd take care of it and I'll read along to see if those more experienced with burls have more to add/clarify. (Jeremy Gubbins) Thanks to all for the plethora of info that has been forth-coming regarding the question about using a hardwood burl to fashion reel seats. I'm very surprised at the number of responses. I'm now in a dilemma about whether to proceed or not. The lengthy drying time would preclude meeting my immediate need, but the challenge to actually successfully accomplish the task is very tempting. "To cut or not to cut", that is the question. Whatever the answer, I want to express my appreciation for all the excellent correspondence. (Vince Brannick) I cut down a Russian Olive tree and found the core to be quite beautiful, I also was faced with the delema of not wanting to wait for years to try this wood out. So I did a Google search on Microwave drying of wood, there are several articles and I have had great success with a coule of the methods or variations thereof. Here you go and have fun, turn this wood in minutes instead of years! http://mgorrow.tripod.com/microwave.html http://www3.sympatico.ca/3jdw8/microwavedrying.htm (Joe Arguello) Thank you for the links. May I ask, have you experimented with an actual burl? I appreciate your admonishment not to subject an expensive specimen at first, but I'm wondering if a burl might not react differently than a (more or less) straight grained piece of wood. What are your thoughts about that? OUR (get the inference?) microwave doesn't have 'settings' by temp, or high/med/low. So IF granted permission to cook something inedible in OUR microwave, it would require consultation with SWMBO, and then (with permission granted), knowing what food preparation corresponded with burling the burl. Hope I haven't burdened you with irrelevancy, and I do appreciate your interest and help. (Vince Brannick) Does your microwave have a button labelled "power" or a similar word? All of the microwaves I have owned or used have had one. "High" on my current microwave is the default setting or it can be achieved by pressing <power> then <9> then the time desired - this gives 90% power. Similarly, <power> followed by <4> is 40% power aka "defrost" on my machine. High/Medium/Low would be 100% or 50% or 10% power or similar settings. My machine is 900 watts - your machine may have a different power and/or different programming options. (Greg Dawson) Thanks for these links. I've saved them in my "Wood Stuffs" folder just in case I ever need to ref. them. I'd heard of this microwave drying before but never gave it much credence so didn't save it. I learn from you boys all the time. Thanks. I've just finished flattening the sole on a few Stanley's but still couldn't resist picking up one last one since it looked so nice. It is. It's the only way I know of to compare them to the L/N's that I have. I've heard various prefs. Guess I'll have to find out for myself. I need to stop this pretty soon now...*G* (Jeremy Gubbins) I have used an old Toaster Oven with good success. (David Dziadosz) Another idea I haven't tried yet. Is a propane fired smoker cooker an option? Low, controllable heat for long periods of time, and ventilated. Should make a good kiln for reel seat inserts and pots for friction turkey calls. (David Dziadosz) Thank you for the suggestions. Do you do this with blanks you've cut from a burl? You are welcome and yes I've done burls. I wish I could give you an accurate amount of time but I can't. I usually throw them in there and forget about them until I remember I have some in there. But I think about two weeks would be more than enough unless the timber is really wet. Some advice given me indicates that burls require a very long time to properly 'season', and may rupture over time if not completely cured. I had all but abandoned the notion, but now I'm not certain whether to proceed or not. Appreciate your interest. Just about any wood is going to develop cracks and splits and twists as it dries so that is why I cut them oversize. You can buy Anchorseal but save some $$$ and just get the cheapest latex paint you can find as it does the same thing. I think cracks and splits adds character to the timber. Here is a piece of mesquite burl I was going to toss because of the caverns in the wood but filled it with coffee grounds and turned it. (ignore the skeletons, I like these for my personal use as the reel stays put <G>)
While not a reel seat it will give you an idea how cracks and fissures enhance the character of the wood.
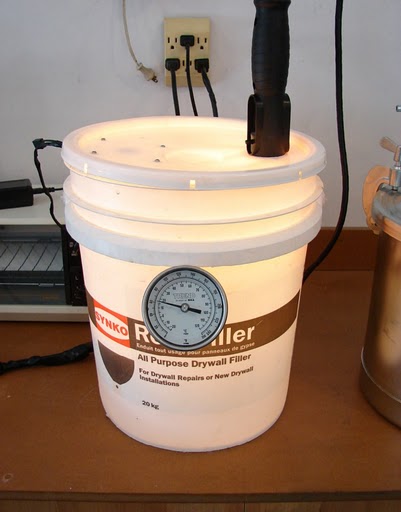
Here is a pic of a small drying pot ... this is not mine but where I got the idea. Simple to make with a Shop Light and a Case Fan from a computer
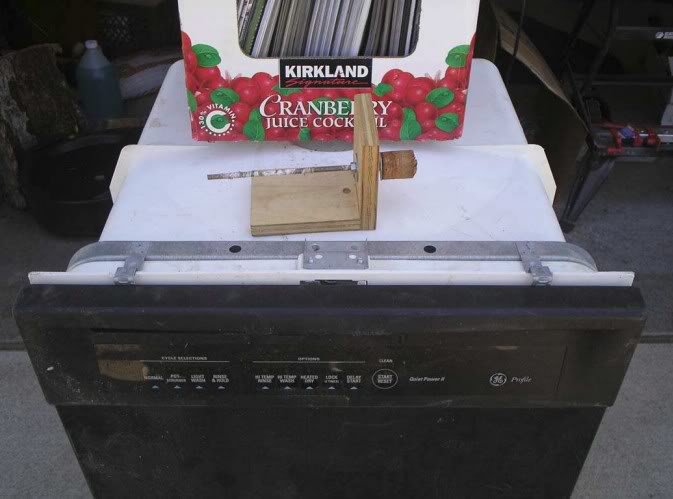
I use what I think is a chemical bucket from a pool supply as it is larger than 5 gal. For large amounts of wood, I use an old dishwasher I pulled the pump and motor out of and shoved a shop light up from the bottom.
In North Idaho they have conveniently placed a garbage disposal sites and every time I pass through on the way to Montana I stop and check to see what is being tossed into the numerous dumpsters ... my wife just utters a loud groan, the grandson thinks it's neat as he gets to see his 6'0" grandpa go diving! (Ron Hossack) Fill with coffee grounds? I just have to ask about that one. I've never heard of using coffee grounds for a filler. And a word or two about what we do with burls up here in on Vancouver Island in a bit colder climate. Most people leave them whole and let them season for a year or more. For those who have access to a lumber company with a kiln they can sometimes get the kiln operator to throw a burl in with the lumber and dry it that way. A couple of days in a kiln and the moisture content of the burl is right where it should be throughout. Many people used to collect up lots of burls for coffee tables and clocks and the like but as that sort of went out of style it's not uncommon to fall upon one of those collections lying around that never did get used. Also, if you go into a second hand store or thrift store around here you will often find a maple burl coffee table for sale for about 50 bucks. A lifetime supply! (Don Ginter) Fill with coffee grounds? I just have to ask about that one. I've never heard of using coffee grounds for a filler. It's my number one filler ... I also use wood shavings. I also mix brass shavings with the coffee grounds for some woods I get from Home Depot when they cut keys and I take a ziplock baggie and get some. Just pack the hole with the coffee grounds and then use thin CA on top of it. (Ron Hossack) In case you missed the message from Scott Bearden, here's what he wrote: "stay away from kiln dried burl, like it was the plague" (or something to that effect). (Vince Brannick) I did miss that but I'm really interested in why he would say that. I think kilns take the wood down to about 15% without any great amount of checking. From there, the wood will change a little up from that figure or down to stabilize with the environment. If you can post Scott's criticism of kilns I would be interested. (Don Ginter) Can you help with a description of some experiences you've had? (Vince Brannick) I remember seeing large sections of walnut burl at Frost Hardwood in San Diego during the 70's. Usually about 2" thick for Table Tops I would imagine. They must have been cut green and than left to air dry back in the covered yard. They looked really great to start. Then after sitting unfinished for a few months would start showing lots of big cracks. It would seem to me that you would want to cut to your rough blank size as soon as possible to eliminate extra drying stresses involved in large pieces. I used to do a lot of Bowl Turning with different woods. Burls, Cocobolo etc. A large chunk like a bowl is NOT going to be dry inside when you get it. Just look at what happens to a bowl shape if you take it all the way to finish before it gets stabilized by drying. What was originally a perfectly round form takes all kinds of interesting shapes after drying out further. If you wanted a symmetrical shaped bowl it was necessary to rough out the bowl oversized and then let dry and shrink for at least a month. Then turn to final dimensions. (Larry Swearingen) Here is the deal. There are actually several completely different kilns in use today, some use steam, some use chemicals, some use ultra-low heat. All have varying effects on the wood. But the bottom line is that kiln dried wood was invented for the purpose of selling more wood faster. Properly air dried wood takes about 1 inch per year. Warehousing lumber to dry naturally is expensive because it takes time and real estate (space). The other issue is pests or mold getting into the wood while it is drying. So from a saw mill perspective, not only do they have to create a huge reserve of wood and store it, but they have to risk losing some of it. From a financial standpoint, kiln dried wood is very attractive to a business that needs to pay bills now, not 10 or 20 years from now. I don't like it personally because my experiences have been twisting, splitting, warping and cracking on some but not all kiln dried lumber. That is not to say all air dried lumber is superior. So let's talk about the performance of the wood from a woodworker's perspective. If the wood is allowed to dry slowly over a long period of time, it ages much like wine or cigars. If you store it in a woodpile outside, or in a damp basement, or next to a window, you are not going to get very good results. However, if you keep it in a fairly stable environment all year around you should expect consistently good wood to work with. If it is stored outside to age in say an uninsulated shed, you run the risk of having problems if you want to turn it into a desk. The problems may not show up for a year or two, but eventually as the wood acclimates to the indoor humidity and temperature of your home, it will expand or contract accordingly. A good example of this is a house "settling" and why that process may take many years, sometimes decades (and also why you get the resulting cracks in the walls). If you install new wood flooring in a house, you are supposed to let the wood acclimate for at least a week before you install it, and even then you leave a 1/4-inch gap around all of the walls to let the wood move. This is just covered up by trim, so most people never know that gap is there, or for that matter how much it moves over the years. The other thing to consider is what our reel seats will be doing. These are not desks, wood flooring or porch swings for that matter. They are going to get dunked and submerged in water more often than we want to admit. For this reason, many rodmakers and reel seat companies choose to stabilize or impregnate the wood with a resin. My experience has been that the air dried wood was much easier to work with and the appearance was much better than the kiln dried, but that is my opinion and very subjective. Another thing to consider of how highly sought after submerged lumber is. This is a very lucrative market and for a reason. The air in the cells were replaced with water and minerals and over 100 years or more the tree was allowed to cure in probably the slowest, least invasive way. Among the many theories people have about Stradivarius, one that has come up is how his wood was treated. There are many theories mind you, but one story goes that he was buying lumber that was used for boats and rafts and then sat in water for decades before it came to him. There is also speculation that he used some chemical process. So it gives some things to think about. Most of us don't have decades to test that out. My advice would be to gather nice specimens of wood and trade for something that is already age cured. I have a lovely chunk of burl from Al Medved that I will probably cut up in another year or two. Patience isn't easy, but I think the rewards are worth it. (Scott Bearden) That's very interesting and not just the part about air drying over kilns. I didn’t know that some kilns use a chemical process. Around here they don't, they use steam and they are interested in getting out large volumes of wood in a short time as you suggest. When the wood comes out of the kiln for construction lumber purposes it is about as stable as you can buy. Much of it is finger jointed which makes it even more stable. One of the big problems with our Douglas Fir and Hemlock for building is that if you leave a pile of lumber in the sun you end up with a pile of skis. You just have to get it nailed down when it's wet or it becomes a pain in the behind. The other big problem with our coast species is that it has to be chemically treated to prevent fungus growth when shipping and the chemicals they use are really bad stuff. As to air drying being superior to kiln drying, I would certainly agree. If a person can wait for a year or two, then that's the way to go. However, some are anxious to get going with what they have and hence they resort to microwaves and ovens, etc. This is where the kiln comes into its own IMO. And not to say that a person shouldn't leave the kiln dried piece to season further for a month or two so it can acclimatize. And a word on cutting up your wood into blank size pieces: Burly wood 'will' check as will wood that still has the heart center more than wood that does not. So we cut the heart out of exotic wood that we mill into lumber usually. With the burl we leave it whole because we then have the luxury of cutting around the checks to get the most out of the piece. My experience is that when cutting up into small useable pieces as one would to make reel seats, one often ends up with a whole pile of checked pieces. I think it's sort of a tossup but don't cut it up into small pieces until it has at least partially dried and seasoned. If a person has the luxury of waiting a long time then I would suggest leaving it in timber sizes of 6x6 or better and let it do its thing for a few years. (Don Ginter) All this talk of burls and figured woods is sure to end up messing my little piggy bank acct. up one way or another. I'll likely go fiddle/f-rting around some auction sites to see what I can scrounge up and I might come away safe/clean if I do it before a rich cup of coffee in the morning! I know over at a local wood store a few weeks back I nearly walked out with a chunk of some fancy, schmancy wood, a name that I can't even pronounce. I'd bought a Tormek 7 so my wallet was way low already! But it was close. Maybe a trounce through a local lumber yard might be in order soon. I'll just want a look around. That ought to do damage enough, knowing me! Thanks for the renewed interest. My planes are finally sharp enough to be able to doodle with some good stuff and get satisfying results. Looking at some of the pics. you guys put up on the various boards is so very rewarding. Even some simple woods are made to be just beautiful. Thankfully cane doesn't have gnarls to it. I love the fine grained simplicity of a bare blank well enough! Can't help it. (Jeremy Gubbins) Aren’t there some woods you can wander through? (instead of 'stores'). It's hunting season around here, and although Posting is rampant, there may be some areas open to hunters. The woods should be a prime source for a variety of species, with a variety of abnormalities. Once located, the owner may (or may not) be amenable to an offer you may make. Worth trying perhaps? Wish I were back in my hunting prime days. (Vince Brannick) Here are a couple of posts you can read about using DNA and newspaper to dry green wood if you care to. This is really wet wood. Shouldn't be to expensive for a gallon of DNA from your local BORG Box Elder Project - B (Ron Hossack) The DNA (denatured alcohol) is extracting the water from the wood, so the ratio of the container to wood volume is very important to the predictability of the method, as is the thickness of the wood. Weighing is an important part of this method.. The DNA should be able to be recycled, if it makes economic sense with a drier like silica gel or unslaked lime. It is reasonable to dry the alcohol chemically first if it is not totally dry. The silica gel can be reactivated in an oven once all the volatiles have been allowed to evaporate. As with volatile organic solvents dry in open air with lots of circulation. (Dave Burley)
Can anyone tell me if the wood sold on Ebay as Pen Blank wood sufficient to make reel seats from. (Jim Tefft) Most pen blanks are 7/8 which is a bit smallish. Look for "jumbo pen blanks" or better yet, blocks of wood in bigger sizes you can cut on a band saw into the right sizes for blanks, generally 1 by 1 is a good size to start. There are good deals out there if you are patient, I have bought some absolutely killer koa on eBay for way less than I'd pay at woodcraft or most exotic lumber suppliers. (John Rupp) That depends on the size of the blanks and the source you are buying from. I find the best way to buy wood on eBay is to comb the various dealers (and there are some wonderful ones out there), looking at the photographs of individual pieces of burl, checking the dryness, size, etc. and then computing how many blanks you can get from that piece. You will often find you can get the best ambrosia, lace, birds eye, tiger, burls, etc. for only three or four dollars apiece if you cut them up yourself. (Dick Steinbach I have used, for reel-seat inserts, pen blanks from other sources than EBay with good results. Best are blanks which are listed as being at least 3/4" x 3/4”; 1" x 1" is better. It is a nice way to try different wood species without paying much for the trial. Warping makes some of the pen blanks, which would otherwise be okay, unusable. That is a risk you need to accept when ordering without being able to inspect the blanks. (Tim Anderson) Take a look at this, maybe it will give you an idea or 2! (Joe Arguello) If you're just starting to use a lathe for turning real seats, there is no need to buy wood especially while in the early stages of the learning curve. There are several sources of free wood to learn with and sometimes you will find interesting wood for reel seats. My firewood pile, friends, and neighbors wood piles are good sources of wood and some of it can be interesting. I have found red maple, curly and highly figured woods of several species. Another source is dead limbs, the ones on the tree tend to be drier than those in the ground but either will do. All of these are free sources. (Rich Jezioro) Local cabinet makers are another good source for free or dirt cheap wood and it's kiln dried so you don't have to wait for it to dry out. Sometimes dumpster diving works very well. Regarding wood-pile scores, I'm living down in Chile I found a hunk of really amazing curly stuff I have no idea what it is in the woodpile at a cabin I rented. It's kind of like curly maple with hints of pink and yellow. They are burning stuff for firewood that I think would sell for over $15 a board foot at any lumber yard in the US! You just need to develop an eye for what curly wood looks like in "the rough" it's a bit different than milled lumber. (John Rupp) Just be especially careful turning/sanding unknown woods to protect yourself from possible toxins! (Neil Savage) Nice find indeedy! I've come to taking along a pocket knife on odd occasions when I think I'll be scrounging around. You did well! Grab it up and save it... (Jeremy Gubbins) Many good suggestions. You might take the one that tells you to get some wood that is not expensive to start with. I have gotten some Osage Orange from a fire wood pile that made some beautiful inserts. I had beavers leave wood on my dock that turned out some nice seats. Have used 3/4'X6" pen blanks to make the .687 inserts for Larson's hardware. I do as Joe does, cut them in half and glue on a 1/2". You have to be sure you center the hole on the 3/4" blanks. If you should be a bit off and get a flat area, the insert is not scrap. If going to cut a mortise, the flat area is where the mortise will be cut. If not, dress the flat area for the reel. (Tony Spezio) Check Power Fibers Vol 15 Apr 04, Vol 25 Oct 06 for info on making seat inserts. I have even made then from corn cobs. Vol 30 Jan 08. (Tony Spezio) I go to Rich at Greener Lumber. He has several varieties of wood in 1 X 1 x 6 blanks. I especially like his old growth mahogany. His store is here. No financial interest, just a happy customer. (Mark Steffens) I’ve turned a lot of pens, duck calls, bowls, and other similar small parts over the past several years and there are few ‘lessons’ that I’ve learned that some of you might find useful. First, if you are turning green burls you have to be sensitive to the fact that the wood is going to move a great deal as you work it. Any wood with a highly figured grain will develop a VERY irregular internal stress pattern as it dries and these stresses are relieved by cracking, and at times the cracking can become almost explosive. Additionally, some woods, like Spanish Olive, will exhibit substantial dimensional changes as they dry. One common way of dealing with these problems is to rough turn the part leaving a good measure of material for waste – for reel seats I’d suggest turning the green material to a diameter of no less than 1 inch. Then you set the rough turned parts aside to dry for several weeks or months, depending on the variety of the wood and the drying climate. Repeat this process by turning the material down closer to the final dimension, let the piece dry again, and then you’re probably ready to turn to final dimension and apply the finish. This process can take over a year to complete and there is always a substantial danger that your piece will suffer a catastrophic split/crack while it is drying. To solve this problem of dimensional change and cracking the PEG (polyethylene glycol) stabilization process was developed. In this process, the material is soaked in a PEG solution for a significant period of time (days to months depending on the thickness of the material and the temperature of the PEG bath) and as it soaks the PEG displaces/replaces the water in the green wood. After all the water is displaced you can work the word as though it were dry, very little dimensional change will occur (which prevents the development of internal stresses and resultant cracking), and the PEG impregnated wood will accept a finish very well. Completed PEG impregnated parts maintain very good dimensional stability for a long period of time over a wide range of temperature and humidity fluctuations. The PEG impregnation process works well, and PEG is easy and safe to work with, but it takes a long time to process the wood unless you’re dealing with thin sections and/or you can elevate the temperature of the PEG bath (70 degrees F is pretty much the minimum acceptable temp and 120 degrees F is usually the max recommended temp for the PEG bath). One potentially messy issue with PEG is that a lot of ‘bugs’ apparently find the glycol to be a nice place to live, so you have to circulate the PEG solution through a filter and a UV sterilizer, or something equivalent – standard aquarium equipment works OK for the filtration and sterilization part but aquarium heaters won’t get your PEG temp high enough. For pen blanks and duck calls, I’ve found that commercially stabilized wood works very, very well. The most common method of commercially stabilizing wood that I know of is to soak the wood in C-90 under high vacuum. C-90 is manufactured by Loctite, it’s pretty spendy, and its un-fun stuff to work with. You can buy a complete outfit including vacuum pump, vacuum chamber, gauges, fittings, etc. for about $2K and I think the cost of the C-90 is on the order of $400 or so (but I haven’t checked lately). So it’s possible to do C-90 stabilization in your own small shop, but it ain’t cheap. Another method of stabilizing wood that can work well is to soak the material in a solution of acetone and Plexiglas. In my experience this method works best if the wood is dry (as in kiln dried) to begin with. Soak thin Plexiglas shavings (or small Plexiglas particles, such as saw dust) in acetone until they dissolve (a thin, low viscosity solution will soak into the wood fastest but I think a thicker solution will result in more substantial impregnation) and then soak your wood in this solution for several days (keep the container sealed to keep the acetone/Plexiglas solution from drying out). This process can work pretty well if you turn your part down to near-final dimensions before soaking, that way you only have to impregnate the material to a relatively shallow depth (you’ll have to quantify the details by your own experimentation). And one final method is to use an epoxy stabilizer. I think the Rot Doctor (you can find them on-line) sells the best material but we have a lot of sources to choose from (even Minwax sells a ‘wood stabilizer’, but in my experience it isn’t worth much). These materials are widely used in the marine industry to repair dry-rot damage and in the construction industry to repair wood damage caused by insects, fungus, etc. These materials are epoxies that are substantially thinned by various, sometimes ‘proprietary’ solvents to reduce their viscosity. In my experience, it is best to start with dry wood, turn your part close to final dimension, soak your turned part in the mixed solution for the recommended period of time, and then let the impregnated part cure. An easy and convenient way to try out this method is to thin a good quality epoxy (I prefer West System Epoxy because it’s good quality, consistent stuff, it has a relatively low viscosity to begin with, and you can control its ‘pot life’ by selecting the desired hardener) with acetone, soak your part in this thinned epoxy solution until the epoxy begins to set, pull your part out of the solution and wipe off any excess epoxy, and then let your part cure for a couple of days. Thinning epoxy reduces its cured strength but that’s not something we really care about in this application. When turning highly figured wood it is common to uncover voids in the material, and/or have the material crack or chip. Wood turners routinely use cyanoacrylates to fill-in or correct these blems. Apply the CA (thin to fix cracks, thicker stuff to fill in voids or chips), let it cure (there is usually enough humidity in the air or in the wood to kick the CA), sand off any excess, and then keep on working. The CA dries clear and after it’s finished it is usually near to impossible to detect. So there are a few methods of dealing with highly figured wood (green burls are by far the most difficult because they are inherently so unstable). If you don’t want to get involved with a lot of specialized equipment and processes, my suggestion would be to buy stabilized pen blanks which are readily available from several sources. Penn State Industries, for example, sells pen blanks in a reasonably wide variety of woods and you can usually find ‘stabilized’ blanks in maple burl, buckeye burl, and a couple of other species. These stabilized blanks cost $1 or so more per each and, in my opinion, this extra cost is well worth it when you’re making reel seats. Also, if you’re lucky you will be able to find stabilized blanks in the larger 7/8” or 1” format, which is much preferred over the standard ¾” blanks that are used most commonly for pens. I hope you find one or more of these comments useful. I’d be very interested to hear about the experience any of you have had with these, or other, techniques. (Bryan Coles) I bought a slab of green Boxwood some years ago from a list member. Cut it into 1 1/4"X4" blanks. Turned them to 1". Layered them on an old BBQ rack in my house heating air intake at the heater. I had them there for about three winter months and turned an insert. It worked out fine. Turned the rest of the blanks this year. All came out just fine. The boxwood dried well in the air intake other wood might not. (Tony Spezio) Boxwood is EXCEPTIONALLY cooperative stuff. In my experience, if we’re talking about the same stuff, you can do almost anything with it. Unfortunately, the boxwood that I’ve used has very little grain to it, the main reason it’s so cooperative, and I like stuff with more figure, color, and energy in it. And it’s this figure, color, and energy that leads to all the problems. Stated another way, in my experience if you want ‘fancy’ you have to be prepared to work for it. (if you’re talking about box elder burl, which makes really nice reel seats, then these comments won’t apply). (Bryan Coles) I am not sure if it was Boxwood or Box Elder. I know others bought it too. I can send you photos of the last batch I turned for a list member. The wood has some grain in it and also has pink and purple stripes through it. It is a light colored wood. I know some others bought this wood, might be they know more about it than I do. It did make some beautiful inserts. (Tony Spezio) I was just given a bunch of flaming boxelder (also dried some Walnut burl and Spalted Maple) that was wet as can be. One week under our forced air heater at work and they are dry as a bone./p> I make my own soup of plexi + acetone but I mix mine so it is very thick. When I need to stabilize I just scoop out some and mix more acetone and then treat the wood. My favorite method at the moment is simply some carpenters white glue mixed 50-50 with water and then I apply vacuum until the bubbles stop and the wood is penetrated with the solution. (Ron Hossack)
I have come across a large windfall tree, boxelder, I believe, covered in burls for nearly 20-25 feet of its trunk. The tree is about 3 ft in diameter. Of what value should this be to me? I want to get some more wood from it, but it comes at a little cost, so want to be careful of my costs. Would anyone else be interested in a chunk? This is near Rexburg, Idaho, so you'd have to come here to get it. I've cut off a few smallish pieces and can send a photo or two of those, but it looks suitable for reel seats (and other wood turnings, even bowls up to maybe 25 inches in diameter, if you are inclined) I can't use the whole tree and hate to see it go for firewood. And I don't have a chainsaw, much less one big enough to cut this thing. The tree has been down about a week, so drying on the ends, but still quite green. I was hoping to try microwaving a small piece to see how it survived that method of 'drying'. I can have the tree milled, to various sizes, but I can't use that much wood of any dimensions. Cutting 4-inch slabs (or any other thickness) probably means I have to seal it in some way. And oh, a 4-inch slab, up to 30 inches wide and 8-10 feet long is a little much for my back, as would be a bowl blank as big as the tree would allow. (Sam Nielson) Wow Sam, really fortunate find here. I think I might know a little of your predicament having such a vast quantity of some likely fine-looking stock so available to you for playing around with.
Maybe it is me or maybe it is the tools I have but it appears that spanish cedar makes a poor choice for a reel seat wood. It's really fuzzy. I'm making fuzzy reelseats, eh? (Timothy Troester) I find I have to use sand paper to get to the finished size on softer woods. Sometimes turning faster and cutting slower will help. (Scott Grady) Call them "suede", Tim; they could become hugely trendy! (Peter McKean) Ya, the plastic rod guys were all excited about grips that were flocked a couple of years ago. (Scott Grady) So Timothy makes his reel seats suede; :-) (Peter McKean) I would, indeed, to tell the truth, (Ever'body be knowin' that . . . ) (Steve Yasgur) No, Steven, no! Though I would not Not any good at rhymey prose, But I would agree with Yaz the Lawyer, It will reduce the coats of finish and sanding in between, You can buy the filler tinted or some that dries clear, Or something like that…………;-) (Gary Young)
I cut down a juniper tree/bush last summer and want to make sure the insert blanks are dry before turning. Is it possible to dry them out using the microwave oven? Is so, what's the power and time so I don't overcook? (Tom Key) I'm not an expert in this area, so I would be very much interested in hearing more about this. My first thought is that this would not be such a good idea. The general principle of the microwave is to excite the electrons within the structure. If there were to be any sap, I would think that the expansion would cause damage to the structure of the wood. thoughts...... (Kmann) There have been in the passed list members that have done this and talked about it. Basically it is done in short bursts over time. There are instructions on the internet do a search on drying wood with a microwave. It probably is not a good idea to use the kitchen microwave. It really could go bang! I have not done this, drying wood with a microwave. I have gone bang. (Timothy Troester) I've done this a few times with decent success. I put my green blanks in a brown paper bag and then give quick 15-20 second zaps on high. The trick is knowing when they are dry, but the bag will show you. After a zap in the microwave, you should see some moisture left on the bag. Change bags before each zap and when no moisture is left, the blank "should" be dry. I have always (after I warped a few) cut them about 1.5" long because any warping, for me anyhow, always seemed to occur at the ends. The extra length took care of that as it could be cut off. I hope this helps. (Don Peet) It works as others have explained but, it can stink up the house and the inside of the microwave though. Take it from one who has experienced it! Wife was NOT happy! (Wayne Blake-Hedges) I know you asked about the microwave, but it can also be done in a standard oven set on a low temperature. Preheat the oven to about 180f to 200f, and pop the inserts in there for 3 or 4 hours. They will ooze a bit, so put something under them. A lot less hassle than using the microwave. It does take longer, but it's not like you can't do anything else while they bake. (Paul Gruver) There are a number of articles on the subject on the internet, simply Google "drying wood in a microwave" and you will have more information than you want! I have done it and it works great. Better than trying to explain the process I will start you off here. Good luck, and have fun.... don't burn the house down! (Joe Arguello) Rather than taking the risk of blowing up the wife's microwave I bought a toaster oven from Walmart ($20), I set it to 150 deg F and let it cook overnight. (Lee Gomolchak) Short answer is yes with short 15 second bursts. Longer time can and will result in a nice little fire to roast marshmallows on. Oh, I suggest trying this when the wife isn't home ... some women frown upon men abusing their kitchen gadgets. (Ron Hossack)
I spent the better part of last weekend clearing 50 yo lilac from my yard. I saved some of the larger pieces (up to maybe 5" diameter) to cure for burning or projects. It is tough stuff. Hard and twisted. I see some potential for reel seats or other projects. There is a strong contrast from the outer wood to the core wood, and in some cases a significant redish hue to the core wood. Has anyone used some? Is it worth saving or better for burning? (Conor McKenna) Never used the wood before for anything...never even occured to me. Does the lilac wood have any fragrance like the flowers? Some woods do like walnut, oak, sassafras. (Ed Gamble) Thank goodness the answer is no. I can't stand the smell of lilacs and we have a few in the backyard and the wife keeps cutting those things and putting them in vases around the house. (Ron Hossack) Save it, it's good stuff! If it's twisted, it could give you cause for concern so focus on the straighter stuff if you can. I'd strip off the bark and dry is very carefully/slowly out of direct sunshine. Cut it into smallish pieces that you can use for a given project making sure you have a couple inches on each end to remove for the splitting that will happen. I haven't made anything yet with the lilac that I've saved. Mostly the pieces I have aren't yet cut. But, I have cut a stump and a few thicker limbs. I cut them into 1 inch x 1 inch by whatever length I could get. Of those that I cut like that, many of them have continued to twist and warp as they dried. Not sure how many will even be in good enough shape to try to do anything with.Since lilacs are typically a cultivated thing, you need to be careful cutting them. Being that near to humans, they have a tendency to take on human offcasts. The stump I cut had a small can opener embedded in it. While cutting it the table saw blade hooked the opener and threw it sailing by my left ear. I actually felt the air swoosh. Still not sure how that happened. I was already wearing a face mask shield because of grit embedded in it. Wire is very commonly embedded in it.My suspicion is that until the wood is completely dry, it would be terrible to use. And even when dry, I'll probably consider 'baking' pieces in the oven to make sure. And I think you'd need to stabilize it for sure. (should anyway.) I suspect that any pinks/reds in the wood will fade away. (Sam Nielson)
I'm trying to figure out what's the most commonly used wood insert reel seat used by rodmakers. Any ideas what on what It is or how I'd find out. I'm looking to make an alternative insert and I'd like to concentrate my efforts on the most used hardware, at least to start with. So, I'd like to hear any opinions and suggestions on figuring this out. (Eric Wolfsbane) I use cork. (Bill Lamberson) Well, anything you fancy, really, but it needs to be well seasoned. I don't seem to have the trouble you do because I buy what I need.... pre-made, too! No help I know but being of good convict stock (Australian), I enjoyed your wicked sense of humour (note spelling!). Sorry I don't live on Cape Cod as I wouldn't mind chasing some stripers as well. Living in 'America's finest city' (San Diego), I have to chase mine on Lake Skinner, which is at the end of a water aqueduct from up north. (Tom Lucas) I use a Garrison-style cap and ring from REC, Bellinger, or Brookside. All seem to require the same spacer. (Bill Lamberson) For what little it's worth, before I started turning my own I used mostly REC stuff. CRN Catskill Cap and ring, Garrison style NGMD and NSUS uplock. But the IDs are all different, one size insert won't fit all. (Simon Reilly) I use hardware from Bellingers, CSE or, occasionally REC. I use all uplocking and downlocking types, sliding band and screw-locking, depending on the rod and the user's preference. I think my all-time favourite is a downlocking, single sliding band reel seat with a Garrison-style butt cap and a cork insert. This hardware I get from REC. My go-to is Bellingers. I find both the service and the product to be excellent. Same goes for ferrules. (Peter McKean) I doubt very much there is a standout supplier. I would guess that the biggest suppliers to cane rod makers are as follows (I don't know the order): REC I'm sure others are using PacBay or any of the suppliers to MudHole, Cabelas, etc. You might try as Tony has implied: investigate the specs of the above and see if you can determine some commonality in size, then provide those (0-3wt, 4-6wt, 7-9wt diameters and lengths for example). The diameters he suggested are pretty common. Might leave a little overhang on the shoulders so folks can tune them to some degree. Might provide different lengths for classic reel users. Hope this helps. (Chris Moore) A very good supplier I have found is Angler's Workshop: You might want to check with the list's Tony Young. He is quite knowledgeable and will take the time to sare what he kows. Also, he makes great hardware. (Rich Jezioro)
|