Bamboo Tips - Tips Area |
|
< Home < Tips Area < Tool Building < Ovens < Design
I have been researching ovens and got quite confused. There seemed to be some disadvantages with the mica strip and heat gun ovens, turning end to end, cold spots, etc. I considered Don Anderson's convection oven, but since I am new, it seemed a bit complex. I was intrigued by the iron pipe method and it seemed easy and practical since I am not a production builder. I used 3/4 inch copper 5 feet long and inserted a 1/2 copper tube inside. I spaced the inner tube with a double layer of the same gauge thickness of copper on each end as to provide an equal air space between the two tubes. I also made a similar spacer placed at the mid point. This spacer was not a double layer, but a single layer with a slight build up of solder. This insured that the outer piece of copper would slide on with ease. All of the copper spacers or shims were soldered on to the 1/2 inch tube, and then filed and ground to insure an easy fit. Instead of wooden plugs at the ends (I did this on both ends), I used 3/4 inch male adapters soldered on with the threaded side towards the end. I then tapped the inside of that adapter with a 1/2 inch pipe thread. I picked up two barbecue thermostats at WalMart. They are called Grill Care, Made by the Grill Care Company and of course manufactured in China. The package reads heavy duty temperature gauge with easy to read dial, part # G703-5203. The cost was $14.99 each, these gauges will then thread into the copper male adapters after tapped. The adapters just slip fit onto the outer copper 3/4 pipe. No need to solder. The probes fit nicely into the 1/2 copper tube which I let stick out of the 3/4 inch tube by about 3/8 of an inch. Make sure that the entire tube allows for the probe length so that the desired rod lank will fit. The probe length is approximately 2 1/4 inches, so add 5 inches to the length of the inner tube. The outer tube is about 1 inch shorter than the inner tube. I drilled a 1/16th hole about 3 1/2 inches from each end to allow for steam and odor escape. I sealed the space at each end between the two tubes with wood stove gasket material (rope like) and glued it with the included gasket glue. When heated and dried, this seal can be sanded down so that the male adapter female end will slip over it nicley. I purchased two copper clad split ring hangers which I spaced 12 inches from each end. I then put some threaded eye bolts into their receptacles and tied on nylon kite string to them and ran the string up to the ceiling and attached it to swag light hooks. The heat does not bother this string. Now for the test documentation. I placed several bamboo skewers throughout the length of my 5 foot inner tube. I tried a heat gun at first, but it would only get the temp to about 200 and I could see that this would be too time consuming. I then fired up my old torch I used when I built swimming pools for 20 years which I used to solder copper. It is an acetylene and oxygen torch, but a propane would be fine. I need to get a wide flame defuser for my torch, but I dealt with what I had. I monitored both temp gauges at each end and they had reasonably close readings. I worked the flame back and forth in no particular rhythm. Just making sure both gauges were about the same. I did, however guard against getting the middle of the pipe too hot by not always doubling up on it during the passes. Once the temp got up to 325+ I kept it there for about 5 to 7 minutes. Remember that this oven is not preheated and the bamboo does cook some while it is coming up to speed. I had the pieces in there from start up. I thought the small diameter skewers would be a good representation of rod tips. When I pulled one of the male adapters with temp gauge attached off the end and poured out the skewers, they were uniformly cooked. No uneven coloration and no burns. They would spring back when bent, unlike the green ones I was really super excited to see that this was a reliable method (as long as you monitor and are careful with the procedure). It is also extremely cost effective when you are not cranking out a lot of rods. My cost was about $60.00. I did have the torch and realize I will have to fill my tank now and again. That considered, it is still a great and inexpensive method even if you have to go out and buy a small propane torch. Since I am Swedish, and Scandinavians are born skeptics, I put this oven to the ultimate test. I made up some pretzel dough and rolled it into the skinny snack size shapes. I greased the inner tube with a gun cleaning swab and I poked about 20 of these suckers (salted) into the inner tube (a pain in the ass) and fired up the torch. This time I went up to 325F and kept it there for 15 minutes. I opened the end and shook out the pretzels. To my amazement they were uniformly cooked with no burn marks. I opened up an Alaskan Amber with a shot of Makers Mark on the side and scarfed down the pretzels. Guess I need a longer tube. (Scott Nilsson)
I have been using a Cattanach style oven as described by Wayne in his book. It has semi worked for the first eight rods I built. I began to have real problems with the last rod. It seemed to take much longer for the initial heat up and then hold the temperature when the strips were put in the oven. After heat treating, some of the sections were noticeable darker in the middle. I heat treat after running the sections through the beveller. The tip sections are some what smaller in diameter than the butt sections and seemed to be affected more. I have reached several conclusions based on what I've seen. First I think my heating element is going south. Second, I feel there is a hot spot in the middle of the oven. Third, I feel I need to heat strips of the same size or remove thinner strips sooner that the thicker ones. Forth, and most importantly, I need to come up with a new and improved oven. I made a second oven using a heat gun for the heat source. It consists of a six foot 6 inch outside single wall duct pipe with a five and a half foot 4 inch duct pipe in the center. The inner pipe is held in the center of the 6 inch pipe with "finned" round pieces to allow the air to run down the length of the tube. It has a "dunce hat" of the end where the heat is introduced by the heat gun. The inter tube has a 1.5 inch chimney towards the end of the inner tube. The outer tube is insulated and sits in a plywood box. Both ends are capped with an insulated cap. I've had many problems with this design. The end where the heat gun blows in runs about 100-125 degrees hotter that the far end. The temperature never equilibrates. I've added insulation under the dunce hat and increased the outlet vent to match the size of the inlet. None of this has resulted in any difference. I've purchased some 1 inch blanket insulation to wrap the heat gun end to keep it from getting so hot from the initial exposure to the heat but haven't had time to modify it again. Frankly, I'm ready to trash this and cut my losses. I've begun building an oven based on Mark Wendt's design as posted in power fibers but decided I would not install a PID in an effort to help contain the cost factor. I've not been able to find 40 inch 800 watt heat strips. The closest I've come are 38 inch 1000 watt strips. I figured I'd just crank the thermostat down a bit to reach the same temperature. Does this sound reasonable? I also bought an extra heat strip to replace the one in my current oven. It's shorter than the original and 1000 watts instead of the original 500 but thought that could be compensated by lowering the thermostat. Thanks to a friend I'm also planning on installing a small fan to circulate the air and place a baffle down the middle to separate the heat strip from the cane side in order to help even the temperature in the oven. Sorry to be so long winded. Does any of this sound like I'm on the right track? Thanks in advance for your input. (Don Hansen) If you don't mind starting over, here's an approach to making an oven which has served me quite well for both heat treating bamboo and for heat setting epoxy. The cost of everything it took to make it including a PID controller came to around $150. I would be happy to answer any questions you might have about it. (Mike McGuire) The center hot spot problem has been reported before. The usual recommendation for evening out the temperature in a heat strip oven is to add air recirculation. David Bolin has his fix on his blog. I went down the same route with heat gun ovens and could not get uniformity over the distances I wanted in either version I constructed. Some claim to have decent uniformity, and I don't question their honesty. I just couldn't duplicate their success. My dream was to construct an oven similar to the horizontal diffusion furnaces I used to work with. Mike found usable high temperature heat tape to use as elements. I achieved some success at reducing end heat loss and was able to use even spaced turns in my version. My version will hold 1 to 1.5 C over a full 5 feet, as ,measured with a calibrated thermocouple. Whether you fix your heat strip oven, modify your heat gun experiment, or switch to direct heat, a PID for about $40 on the auction site is a good investment. (Larry Lohkamp) I am one of those whose honesty Larry doesn't question. My heat-gun oven will maintain, without any cane in it, temperatures within a couple degrees Fahrenheit over the three places I have for inserting a thermometer. Inserting cane give a quick and large drop next to the strips as long as any water is still coming out of them. My oven is insulated. So what does my oven have to do with yours? Well, Larry has given the key and that is air circulation which, with a heat gun oven, is a given. The uniformity of my oven is probably because my heat gun can blow a lot of hot air. Of course, there are those who say that about me, too! (Tim Anderson) While a lot of air circulation may be a sufficient condition to get temperature uniformity, I think I have demonstrated that it's not a necessary condition. In my oven, the high thermal conductivity and the small volume of the copper tube plus some insulation achieves the same result with a lot less power consumption. Any oven no matter what the design will have a temperature drop while water is being vaporized from the cane. The 540 calories/gram heat of vaporization of water ensures that. Compare that to to the 1 calorie/gram needed to raise the temperature 1 degree C between the freezing and boiling points. (Mike McGuire) My heat gun oven is based on Jon McAnulty's design which appears to be identical to the heat gun oven you described. Mine holds temps to about +-5 degrees over the entire length of the oven but only if I bring the heat level up slowly. My heat gun (Harbor Freight) has 6 heat settings and two fan speeds. I set the gun to 700 degrees and use the low fan speed for about 45 minutes to get the oven heat up to 350 degrees then lower the heat gun to 550 degrees setting which keeps the oven temp at 350 degrees. The oven rests in an insulated plywood box and is used horizontally. When I used a higher heat setting or the high fan speed I got temp differentials similar to yours. I don't know if this info helps but you may be able to save your heat gun oven by getting a different heat gun. (Jim Healy) I had a similar problem with my heat gun powered oven initially, about 70 to 80 degrees difference top to bottom. I then added another tube (actually a piece of metal down pipe) to the interior of the main tube. The heat gun went into this extra tube at the top and the tube finishes about 3 inches above the lower entrance to the "cooking' tube. To put it in a more simple way, I added a tube so that the hot air from the heat gun was delivered near the bottom of the oven rather then the top. I use a relatively simple 3 heat Black and Decker gun and I find this stabilizes at about 340 after about 20 minutes to warm up. Variation between top and bottom is 5 - 10 degrees. and it drops about 25 degrees for a short time when butt section put in but comes up again in less then a minute. I put the section in for 4 minutes, take out and turn around and then for 3 minutes. With my set up this works well. This might be worth a try before giving the oven away. (Ian Kearney) This describes my oven except that mine powered by an 2 speed variable controlled heat Wagner AND my oven is insulated with good insulation (I had a source for ceramic, but good fiberglass would do) and covered by an outer pipe. It maintains temps within +/- 5 degrees once stabilized. To recap: My design has a 4" diameter inside tube which is 3" or 4" shorter than the 6" diameter main tube, covered by insulation and surrounded by a 7" or 8" diameter outer support/insulation tube. Works fine, has no parts to go bad except the heat gun, cost me little, was easy to build. (Rick Crenshaw) Yes indeed. I constructed mine according to Frank Neunemann's original instructions in the Planing form (Best of the Planing Form page 80). The only differences are: 1.) I used 4" diameter gas vent type B rated for 1" clearance from combustible materials for my outer pipe. I used no further insulation. When my oven is running at 320 the outside is unpleasantly warm to the touch but wouldn't burn you. 2.) I used an extension elbow on the top end of the inner tube to route the hot exhaust air away from the heat gun. 3.) I poured about 5 lb of Sackrete cement into the base of the unit to make it more difficult to tip over and to serve as a heat buffer. I find that the temperature difference from top to bottom during operation at all temperatures (I measure at the middle as well) is nil. As mentioned in a previous post, it is very important that the air path be unobstructed and the heat gun must have enough power and adjustability to maintain a steady temperature. Mine is a rather cheap one. It has two fan speeds and a "thermostat" but the thermostat doesn't work very well. I serve as the thermostat. I load the bamboo at room temperature and heat it to 320 by setting the temp to the highest setting. Once the temperature reaches 320 degrees F I regulate it by adjusting the heat output. I wonder if a PID controller would work with this setup. I would think that one would want to control only the heating element and not the fan. This would require that invasive surgery be done on the heat gun. (Doug Easton) You can get PID controllers on eBay for about the price of regular home oven controllers. A PID controller and a solid state relay can be had for around $75. (Mark Wendt)
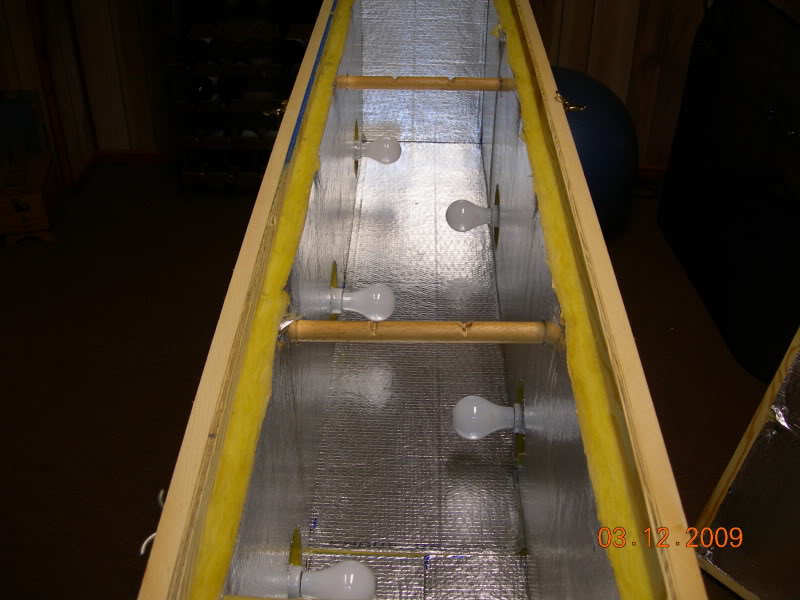
This oven was built by Ted Barnhart, who is not on the list. He uses it to heat treat, and at lower temperatures to heat set glue. He can get it to 350° F, I think using 100 watt bulbs, but maybe 150, I'll have to ask him. He has a dimmer switch built in to the system to control temperature, but also switches light bulbs to 60W for lower temperature work. Ted claims that this system is better than a thermostat, because once you get adjusted, the bulbs stay on all the time, and the heat is more even. The box is 5 feet long, 15 inches wide, and 18 inches high. It's made of 1/4" plywood, lined with 1" foil backed insulation, the kind that contractors now use to make ductwork. He lays aluminum angles on the notched dowels, and puts the rod sections in the angles, bound in place with a wood strip on top to hold them firmly. So newbies who might be thinking that you need a EE degree, and a bunch of explosive appliances to get the job done, it ain't necessarily so... (Tom Smithwick) Thank you, Mr. Tom! I've started out nodeless here, but saved about 2 dozen full culms for after I build some kind of oven. And yes this recent discussion has left me even more confused than my usual foggy state and a tad intimidated. Now this is something I can handle. Wondering if those regular bulbs were replaced by those heat ones you use in bathrooms...what do you think? Thanks much! (Bob Brockett) I KNEW someone would question the type of bulb! (Larry Swearingen) Yeah, and what's the tolerance on the bulb wattage?????? (Al Baldauski) Prolly won't work. The gummint's mandated CFL's and no incandescents above 100 watts... ;-) (Mark Wendt) In the acoustic wood bending, normal bulbs are just fine, and 100 watts is 100 watts when converted to heat. (Dave Burley) I have seen 3 of these Light Bulb Ovens, everyone had standard light bulbs, and they work quite well. (James (JED) Dempsey) Light bulb ovens are fairly common among the bow making crowd for curing epoxy. most use a foil lined wooden box of sufficient length to put a bow in. the top is hinged and 3 to 4 100 watt light bulbs are attached to the lid. there are 2 or 3 forum sites for bowmakers. you can probably find plans for one of them. Bowyers call them heat boxes, not ovens. (David Atchison) Light bulbs are used in acoustic instrument making to heat the ribs (sides) and form them. I use a modified version which has a heated belt to substitute for the bulbs. (Dave Burley)
|