Bamboo Tips - Tips Area |
|
< Home < Tips Area < Tool Building < Planing Forms < Rough Forms
I am making a roughing form. We know how Mr. Garrison makes his. Not sure how guys like Jeff W. and GoldenWitch (horizontal mill with 60 degree cutters???) are making theirs, but here's my way. I bought a 60 degree router bit (Whiteside #1550) I routed the 60 degree strip in a piece of 2"x2" maple. Now the apex of the triangle is not sharp. So, I made a screw-cutting lathe tool plane as per the usual sources (Todd's Tips...can't remember the authors, sorry!!) and simply shaved down until the apex was sharp (10 passes, maximum 5 minutes). My screw gauge says it's 60 degrees. For those without table saws, but with a router, this might be a good way for you to make your roughing form. (Joe West) I did the same thing for my intermediate forms. My roughing form is two strips of maple bolted together with a 30 degree and a 60 degree angle (for the first side of roughing my strips. Once I finish one side of the strip (enamel to apex), I quickly move to my intermediate forms. For my intermediate form, I purchased a 1” x 3” x 4’ section of straight and level maple. I ran my 60 degree router bit twice down the 4 foot length of the intermediate form in successively deeper groves (each groove is the same depth for the entire length – i.e. not tapered). Two groves are routed on one side and two grooves are routed on the other side of my intermediate form. This allows me to take down the strips from larger groove to smaller groove to have the most support for the diameter of the strip I’m working on. It’s worked like a charm for me. (Scott Wolfe) I believe that the 60 degree router bit is the quickest and easiest way to make a roughing (or intermediate) form. I made mine from a piece of 2X2 maple with a groove down each face. Each groove is a different depth. By placing the grooves on different faces, I knock the trash out of the grooves whenever I switch faces. Scott, I urge you to try omitting the roughing form you currently use and go straight to what you call your intermediate form. I started out with a roughing form like yours, but found that I get more accurate angles if I skip it and start out with the 60 degree grooves. The "roughing" form with an asymmetric groove assumes that you have split your strips perfectly perpendicular to the enamel. I have never managed to do that. Because it references the angle on the side that you first plane to the opposite side of the split strip, any irregularities in the split surface will screw up your angles. If you start out with a symmetric 60 degree groove and switch the side you're planing every 3 or 4 passes, you wind up referencing your angles to the enamel side, and planing off any irregularities in the split sides of the strip. As you knock the corners off the pith side of the strip, the downward pressure of planing tends to force the enamel against the inside of the groove, resulting in more consistent angles IMHO. (Robert Kope) Well Said Robert and sorely needed. I have never used an asymmetrical roughing form and for the obvious reasons. I find it much easier to attain and maintain a correct angle with my regular planing forms. (Ralph Moon) Really fascinating discussion. In defense of using a wider angle initial roughing form (30 degree & 60 degree) is that the strips I end up with after splitting often have obtuse angles (they don't always angle in from the enamel to the pith). So the wider angle allows me a few passes with a wide open plane (i.e. HOG) to get an inward angle on one side of the strip from enamel to apex. My strips live only a short time on the initial roughing form. However, it's useful for some of my strips after the splitting debacle. (Scott Turner) I have Jeff's and like it. One side for butts one for tips. The only thing is they are made out of soft wood, pine? Mine is pretty well beat up and will need to be replaced after another rod or two. (Pete Van Schaack) You may want to add a straight cut at the bottom of the 60 degree grooves. Take a look at your canter gauge (screw gauge), it has small straight cuts to keep debris from interfering with the measurement. When you use a roughing form you get a lot of little chunks of bamboo which collect in the grooves. I used a 1/16 end mill in my router to make the cut. (Ron Larsen) This is a fabulous idea. For the record, I have a roughing/intermediate form from JD Wagner that I love, but my current workflow is such that I need a slightly different layout. And to those who mentioned the weirdness with an asymmetrical roughing from, I'll say that I can't agree more. Now, Ron's idea is just great. My current roughing forms get impacted with dust and are very difficult to clean without hurting the wood. Excellent!!! (Joe West) Quite a few people asked me for a picture of the end of my roughing form, so... I made this drawing. The grooves are 1/8, 3/16 & 1/4 deep when measured with a depth gauge. The slot at the bottom of the grooves is 1/16. The form is 3/4 x 2", 4 feet long, maple. I find that the strips tend to slip more in the maple form, especially when I get close to final size, so... I glued a 1 x 3" piece of 150 grit sandpaper to a piece of leather & hold down the strip with it. (Ron Larsen) You can use that same bit to make hex rod cases. Find a router table at a garage sale <$10 and go from there. (Rich Jezioro) I've said this before, but here it is again.... My roughing form is almost the same as my wood final form. It's adjustable with 5" centers for the bolts. The only two differences between the roughing form and the final form is that the groove is not a tapered groove and the form is 4' or so long. Read the "Making Wooden Planing Forms" article for instructions. It's a great article by Don Schneider. (Todd Talsma) It was in fact Mr. Schneider's article that helped me out. Thanks to you and him. BTW-- Harry Boyd's idea of using a triangular file to clean up the routed length is a great tip (but not obvious to ham-handed nincompoop like me.) (Joe West) The procedure in the "Making Wooden Planing Forms" article will also work for making metal forms. There is also information of how to make two useful tools, File Plane & Bit Plane. There are several of these tools floating around out there somewhere. At one time Todd knew where they were. The Excel Forms Worksheet, used to setup the forms to cut the groove, is also on the Todd's Tip Site. Like Ralph, I use the butt side of my metal forms to rough strips. I don't use an intermediate/starter form at all. Turn the strip every two or three passes and check your angles often. After a few flips, your 60° angles are established. (Don Schneider) As Don said, I have one of the sets of tools that he speaks of. I think they were the prototypes and I'd happily send them to whoever needs them, as long as I can keep track of them so that they continue to be a "lending library." These tools have crisscrossed the US a few times already. (Todd Talsma) I have both of the tools from Don up here in Canada. Todd, add me to the list of those who have them. I used Don’s article and tools with great success. If anybody needs them let me know and I will mail them out. (Mark Babiy) I have a set as well. They are currently in Colorado. When they return, I'm more than happy to loan them to anyone who needs them. (Harry Boyd) You could also get a 30 degree bit (which is easier to find), cut into the edge of two pieces of wood, screw together and you have an adjustable roughing form. Or you could do a way with the form and use the 30 degree bit to rough the strips. (Jim Lowe) Why not the 60 degree one for the roughing w/o a form??? Is my geometry THAT bad?? (Joe West) A 60 degree groove bit would work because it's a 60 degree included angle, similar to a 30 degree chamfering bit. 60 degree groove bits are harder to find than a 30 degree chamfering bit. (Jim Lowe) Someone (I'll say Amana, but don't quote me) makes a sharp pointed 60 degree bit, too. (Larry Blan) Yep, they do. I look around quite a bit (pun intended). The Whiteside solid carbide one I got is sharp-pointed too, but it just doesn't cut that bottom apex sharp enough (I think if it did, it would be bending some of the natural and physical laws of the universe.) (Joe West) Yes, they are called "sign-makers bits" as I believe they are used to make letters in wood. They are quite hard to control when pushing a board past them on a router table, but maybe multiple passes would work. I have one of those bits here somewhere, don’t remember quite where. (Bob Maulucci) Woodcraft carries the 60 degree bit for $23, and it does have a sharp point at the end. For those who don't know, their web site is www.woodcraft.com and they have stores in most states. I had also searched the web for this bit and I believe it was www.routerbits.com that carried the 60 degree bit for around $16. I just picked one up 6 weeks ago from Woodcraft and made my roughing forms out of a leftover oak flooring plank. (Chris Hei) The 60 degree router bits also come in handy making reference standards of depth gauges. (Ron Larsen) The sixty degree sign-makers bit is available from Woodcraft. I agree with Bob, it is hard to control. (Jeff Schaeffer) I got a sharp 60 degree bit at my local hardware store, it's by Vermont American. Don't know how well it would stand up in continuous use, but to make a rough form it was fine, and not expensive either. (Neil Savage) Forgive me if I come off a little contentious on this, but in my experience hardly anything made by Vermont American is worth buying. It's true that sometimes a tool's use really doesn't matter a great deal, but if accuracy, longevity and quality of materials is important, skip Vermont American. (Bill Harms) Well, I can only say, "It worked for me." (Neil Savage) Or, you can go to McMaster-Carr, J&L, Enco, or any of the metal working supply shops and get a 60 degree metal chamfering bit. Works on wood too. (Mark Wendt) Hmmm... Interesting. Are they sharp pointed? How is the finish quality? Methinks they would be cheaper, too! (Larry Blan) Very sharp pointed. I got about a half a dozen of them given to me by a machinist friend of mine in some different diameters. They're HSS, and give a very nice finish. (Mark Wendt)
I am in the process of making a set of rough forms. From what I've read here it's very simple. I am going to use the router to make the V groove at 60 degrees. My question is how deep should the V groove be. I've split my tip strips to where there are from 1/4" wide. Well some are smaller. Don't know if I can use these or not. I'm new to all this and it just looks like the strips won't work. I tried to make a form on the table saw with two 30 degree cuts on each inside board. When I mounted the pieces together the V is 1/4" deep. Is this OK. Also some of my strips are not straight. How do I even the sides up. How do I go about doing this. (Dennis VanHoose) I'm fairly new to building as well (currently working on rods #2 & 3) but this is what I did and so far it is working for me. Rough form #1 is 1/4 inch deep. I use this one for my butt strips. I don't flatten the strips first, I just begin roughing the strips, checking the angles often and making corrections when needed. Rough form #2 is a tad deeper then 1/8 inch. I use this one for the tip strips. I split the culm accordingly for butt and tip strips so as to cut down on waste and give me extra strips in case I mess up. I made these out of left over oak floor planks with my router. All you really need to do is put the strips in your form and start planing. You'll figure it out as you go. There is a lot of bamboo in 1/4 inch strips, which will give you more than enough room for corrections. (Chris Hei) My roughing form is actually adjustable. I made it based on the instructions that were written up by Don Schneider and can be found here. The only difference in my roughing form and a finish form is that the groove is straight, not tapered. When I built it, I figured that it would be a good idea to have an adjustable roughing form. It sounded good on paper, but I never used it that way. I have one side deeper for butts and one side shallower for tips. I ended up using the butt side for most of my roughing. As far as the straightness of the strips, if you're talking about the sides, just start planing and getting your 60 degree bevels going. Things will fall into place once you get going. If you mean sweeps and crookedness around the nodes, do you best to get them as straight as possible before you start planing. You'll get much better results. One other thing, if you soak your strips, it'll be a lot easier to plane. (Todd Talsma) Take a look at Jeff Wagner’s roughing forms. They have two sets of grooves per side one for tips one for butts. I have one and like it very much. I think the angle is something like 57 degrees. As far as straightening for rough planing, knock off the nodal dams, I plane until flat on pith side, carefully file off the ridge on the outside. Then I will plane the edges until I get a fairly close 90 degrees. Heat and straighten, flatten nodes so strips are as flat and straight as I can get then. Then Enamel side against the steep angle plane until that edge is flat completing the first 60 degree. The flip the strip into the 60 degree groove and plane the next 60 degree. Once that side is done plane and flip until your strip just barely sticks out of the top of the groove. (Pete Van Schaack) You might try this if you have a set of 60 degree taper forms. Open the form till You can get the strip to lay in the groove fairly stable. Plane one side till it starts to look flat. Flip the strip and plane the other side a bit . Before you know it, you will start seeing the angle start to form. Once the angle starts forming, it will lay in the groove a lot deeper. Plane and flip till you have a pretty good 60 degree angle. I would suggest you soak the strips for several days and do the nodes before you start any of the planing. I have yet to use any rough planing forms. I now use strips down to 1/8" so don't discard those narrow strips. Once you get one rod made, all of this will be simple. At one time it all worried me too. (Tony Spezio)
I am new to this game as you will tell from my questions below. Just getting started with the form setup. Nightmare to say the least) catching fish is easy compared to this! When you do a rough plane on a 60 degree form, (that has a 60 degree even groove the length of the form) will the butt section not end up to skinny when it is put into the final taper planing form? Also when making up the final planing form, are the forms closed when you file the 60 degree V into it. Sorry if these points seem trivial to the advanced makers out there. Any help would be appreciated. PS Any rodmakers out there from on the west coast of Scotland that I can get in touch with. (Alistair Dunlop) The grooves in your rough form should be deep enough that you do not plane the strip too thin. You will have an easier time of rough planing if you start with a fairly deep groove. Rough planing is only about getting the 60° angle, established, and removing excess material. It's much easier for a beginner if the strip is fairly straight, and sits in a deep groove. Go to Thomas Penrose's outstanding site for information on cutting the groove in a simple but accurate way. Hang in there, and keep your plane sharp. It takes a while, but you do develop a feel for the material. (Tom Smithwick) Q1) This form produces an untapered piece, of an equilateral cross section which is greater than the finished section dimension at the butt. Unless you overdo the planing! I find that my Medved beveller takes a lot of effort out of this stage, not to mention time. Q2) Open the form all the way through by about 60 thousandths. But set the final tip station to as near 60 thousandths as possible. Using your dial gauge with the thick 60 degree point set it to zero at what will be the final station at the tip end. Move the indicator to the next station and adjust the form to show 5 thousandths on the gauge. Continue, adding five thousandths per station until you run out of form. You stop filing when the gauge gives a true reading of 90 thousandths all the way along. To do the other side turn over and stop filing when all is at 150 thousandths. I am indebted to Don Schneider for his original notes on this, and seriously inhibited by my own scribbled amendments. The trouble is, few of us make these things very often! If you overdo it and make the tip side too deep just file the top surface down the requisite amount. The purists won't like it but it will still work perfectly well. I've not heard from a Scottish rodfangler, but Paul Blakley keeps the UK register of births, marriages and deaths (Known as 'atches, matches and dispatches to my dear old Gran), and I expect he is typing a post even as I write. Keep going, it’s probably actually not really worth it in the end, but you've got to do something other than feed fffing children and since you've started............. It also allows you endless scope for pontification and the acquisition of whole workshops full of new kit. (Robin Haywood)
Is there a reason why people make their roughing forms so short (ie 2-3 feet)? If you have to set up to cut these angles, why not make your roughing form as long as your planing form (6 feet)? That way you can just lay the whole strip in and rough plane it without doing it in 2 foot increments. What am I missing here? (Paul McRoberts) $$$. (Jerry Foster) I'm one of those dodos pushing 83, and frankly the answer to your question as far as I am concerned is easy. It' too damned hard to rough plane the full length of the strip. Taking a full swipe on a strip near completion is easy, but a rough strip --- no thanks. (Ralph Moon) All the other answers are correct, the one I would add is since the rough strip is the same depth the whole length, the strip can be moved in the roughing form. So you can stand in one spot over the form and move the strip along as you rough plane it. (Darryl Hayashida) I wondered that, too, so when I was using rough forms, I just made them 5' long. (John Channer)
I'm ready to rough plane my strips but need plans for the wooden rough forms. I've got all the working tools needed to fabricate them, so if you've got drawings and are willing to share them I'd be grateful. (Tom Key) That depends on whether you are going to make or buy a router based rough beveler, or do it by hand. Check the tips site under "contraptions", I use a router beveler. I rough with a form which has a square groove on each side, one 1/4" wide by 1/4" deep, the other 5/16" wide. This lets you get a good square edge on the strips before you run them through the beveler. If you're going to hand rough, make a form out of 1x3" hardwood approximately 2' long. Drill pilot holes for screws to hold the form together, then rip in half. You want a 30 degree bevel on one edge and 52.5 degree (or 57 degrees depending on which book you read) on the other. The bevel should be about 3/16" deep if you're making trout rods. Or you might try Max Satoh’s Slash Jig. (Neil Savage) I Made my rough planing form from a piece of walnut I had on hand - 1"x2¼"x5'. I cut three grooves with a 60° router bit, in the center of one side ¼" deep, offset from the center on the reverse side with ½" between them are grooves 3/16 and 3/32 deep. This form allows me to rough plane from square to quite small the full length of a strip. By initially flipping the strip frequently it is possible to get good 60° angles. (Steve Trauthwein) Buy a 60 degree router bit, also known as a signmaking bit, and a piece of hardwood about 1"x4". Surface the hardwood either with a planer or a jack plane. Using a router table and signmaking bit, make three grooves in one side of the hardwood board.... One about .150" deep, one about .220", and a third about .270". That'll do it. Takes about 30 minutes to make. (Harry Boyd) Don't forget the relief cut at the bottom of the vee so debris doesn't build up. (Ron Larsen) Good idea, Ron. I've never put the relief cut in, but it would solve a few problems. (Harry Boyd) I made mine from two 1x2"x4'. I cut one side 45 degrees and 60 degrees. The other side I cut 60 and 60 degrees. I used a block plane to get the angles. then I bolted the two together. I've since made a rough machine to do the basic strips, but occasionally use the form. If I were to do it over, I'd make the form shorter. (Terry Kirkpatrick)
I am trying to make the initial rough planing form (wood). I have an older Shopsmith Saw that won't tilt to 57 degrees as recommended by Russ Gooding. Any suggestions on how one might accomplish this task by hand or jig? (Dan Weiman) Set the angle to 33 and flip the piece over? Won't work? Hell... Where's Claude when you need a rocket scientist? Sorry if I offended anyone. (Mike Shay) It should work, you have to put the piece of wood on the opposite side of the blade. (Neil Savage) Try tipping it to 33 degrees and flipping the wood the opposite way to what you were planning. None of the table saws I've used would tip to 57 degrees. (Neil Savage) In my early days in rodmaking, I have done my rough planing in the metal forms, You can get the initial 60 degree by just taking your time starting the bevel. Open the form fairly wide to get a start. (Tony Spezio) I do not know what your setup is but you can always tilt your work instead of the saw. (Timothy Troester) Funny you should ask this question. I just built mine yesterday and ran into the same issue. You know how your board was flat(face down) when you cut the 30 degree angle, well on this cut your have to turn the board on edge and set the saw to 33 degrees (90 degrees - 57 degrees). Drawing the V on the end of the board helped me visualize it. (Matt Fuller) You will find, as I have and many others I have talked to, that the exact angle of the roughing form isn't that critical. In fact I got by for a few years by opening my final planing form a little wider and roughing on it. You just have to flip the strip every other cut until the strip starts fitting into the form, but it does do a very good job as a roughing form. Currently my roughing form is a birch board 12 inches wide and 24 inches long. On one side I used a router with a 90 degree bit (the strip gets a 45 degree cut instead of a 57 degree), one slot cut deeper for butt strip, one cut shallower for tip strips. On the other side I cut in two slots using a 60 degree router bit. The 60 degree router bit is a little hard to find, but can be found as a sign makers bit. To use the roughing board, I shave off one side of the strip at 45 degrees (90 degree slots), which is close enough for the strip to start fitting into the 60 degree slots on the other side. You have to flip the strip every cut for the first few cuts on the 60 degree side, but the strip settles in at 60 degrees very quickly.
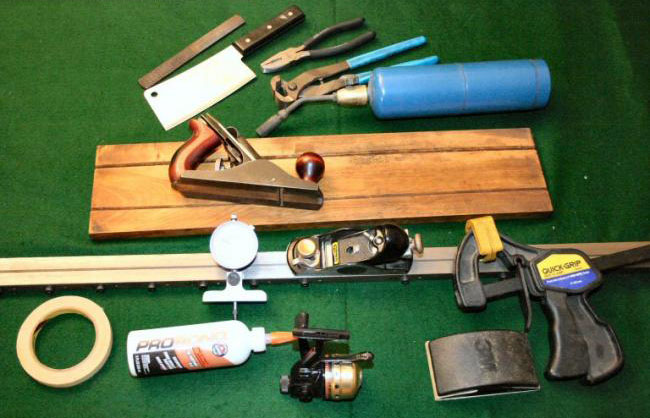
Roughing board in the middle of the picture. (Darryl Hayashida) You know, really the start board is not necessary to get the roughed out strips to a 60 degree angle. I quit using the start form a long time ago and just used the final roughing board to get the strips started. you just need to be careful of the angles and keep flipping the strips over. Of course now I don't even use these and they just sit in a corner gathering dust. One day maybe I will sell them or give them away. Now I use a Bacon beveler & I don't know why I didn't do this sooner. (Bret Reiter) Out of curiosity, what is the purpose of the spincast reel? (Ren Monllor) I don't want to answer for Darryl, but I'm betting it's his motor for pulling the sections out of the dip tank! Mike Shay has mentioned several times that he uses an old fly reel. (Will Price) I use it to hand bind for glue up. The drag on the reel supplies the tension. Anticipating the next question - yes I do use monofilament fishing line to bind. Since mono stretches a little under tension I find I get a tighter wrap with mono. Do not use it for heat treating if you heat treat in an oven. Under heat it will stretch and relax or even melt. The picture is of all the tools I use to make a blank. I did not include tools to make ferrules or varnishing. (Darryl Hayashida) Make them 30's and don't worry about it. (Todd Talsma) Set the saw to 33 degrees and run the piece thru with its edge down, that gives you 57 to the top. You can make your 60 degree rough form the same way, just set it to 30 degrees and put the mating edges down. Though I found that a 60 degree bit in a router works better. (John Channer)
I am continuing the process of building tools, and next one on the list is a roughing form. However, there seems to be a lack of consensus concerning the angle. I have three rodbuilding books, and the degree of the angles listed vary from 52.5/30, 57/30, and 58/30. The only thing they agree on is to utilize a roughing as well as a 60 degree intermediate form, and these seem to be the versions that are being sold. Then others recommend just using a 60 degree symmetrical form. Will starting with an asymmetrical form, and then a symmetrical be helpful for a beginner? If this is case, then what angles should be used on the asymmetrical form? Also, how deep should the cuts be made in the forms for the butt/tip sections? (Ron Delesky) Don't make a roughing form, because for very little extra time you can make a Medved beveler, which will save most of its construction time on the first rod! (Robin Haywood) The roughing form was the last one I made. I just started with an adjustable intermediate form but had to adjust it open more to accommodate the rough strips, then closed it down for the intermediate planing. The roughing form was the easiest to make. I copied the plans from "The Lovely Reed", a good book but try to borrow it through the library since its out of print and somewhat valuable these days. I made my roughing form out of a scrap piece of rough sawn white oak left over from making ribs for my cedar strip Peterborough. I used a table saw and drill press and did the form in about an hour or so, and that was taking my time. I made the 60/30 angles, as was shown in Howell's book as I recall. I think the other angle combinations are related to the number of strips to be split and the nominal diameter of the bamboo pole they are split from. I am not a super accurate splitter so fussing with other angles than 60/30 was not worth it. I also split 18 strips for butts, 24 strips for mid sections and 32 strips for tip sections. I just square up one side of the strip (more or less) and put it in the form. Since my intermediate forms are five feet long, same length as my final form, I had to straighten the long sweeping bends some when I used it for rough planing. The two foot length of the rough form helps accommodate the bends and sweeps in the rough strips. I only flatten nodes and straighten kinks at the nodes before rough planing so the strips are a little bent. Once rough planed they fit in the intermediate form better with some of the bamboo planed off. One side of the rough form is about 1/4 inch deep, the other side, that I use 80 percent or more of the time, is 5/32 of an inch deep. I only use the deep side on 5/16 or so wide strips for the butt section of the rod. I may plane down the deep side of my roughing form to more like 3/16 or 7/32 since the 1/4 inch is a little deeper than I find useful. (Joe Hudock) I have done it both ways using the straight 60 degree angle and the 52.5/30 degree forms. For the most part, I only use the 60 degree angle form and flip the strip after about 5 passes per side. Once I get closer to finishing the rough strip, I may go to flipping after every two passes. This works well for me and to be honest I rarely check my angles with a center gauge. I often wonder how many builders check their angles constantly. After my first couple of blanks, I started checking only after roughing and then again during the final planing process. I do check them but can usually tell if the angle is off without putting it in the center gauge. I think the key is to always have a sharp iron in your plane and alternate the side of the strip you are planing on regularly and consistently. (Greg Reeves) Establishing the initial, 60-degree bevel is one of the few processes that doesn't require a great deal of accuracy. I use a MHM for final planing, but use nothing but a standard planing form to get my initial, 60-degree bevel. Just take a couple strokes on each outer corner of a strip, flipping the strip from side-to-side as you go. If you watch what you're doing, you can eyeball the center of the apex, make corrections as you go, and soon you're down to where you need to be. Certainly, there's nothing wrong with a roughing form, but neither is there much need to fuss about the included angle of its groove. Everything remains greatly oversized at this stage anyhow. Planing the actual taper presents a whole different set of needs for accuracy, but an "eyeballed" 60-degree angle is good enough to start each strip. Just watch your progress, and check with your center-gauge, and you'll see that a perfect apex falls into place soon enough. (Bill Harms) I just eyeball it too. I just use a belt sander with a course belt on it and just hold the strips on an approximate 60 degree angle as I sand away. It work fast and I can even start tapering it at the same time. (Ken Paterson) If you feel the need for a first roughing form and have access to a table saw and a wobble(the cheaper of the 2 options) dado blade, it's pretty easy to set the saw at 30 degrees and make a series of slots in a board that vary from narrow and thin to wider and deeper, leave the hook that results on and it will help hold the strip at the right angle. I don't know how to draw with this thing, but once you make one cut it will become obvious what you're making, just make enough different sized slots to accommodate the sizes of strips you use, don't be bashful about planing the pith side a bit to flatten it out and make it fit a slot. I found that for the 60 degree V groove for the second form that the easiest way to make it was with a router and a 60 degree V groove cutter and the fence that comes with the router. Again, make a series of different depth grooves and you can switch from deeper to shallower to help support the strip, the deeper it sits in the groove the more stable it will be. After a few (or a dozen) rods made with these you'll finally decide that roughing by hand is way too much hand labor and you'll wind up making a machine to rough and maybe even taper with. (John Channer)
|