Bamboo Tips - Tips Area |
|
< Home < Tips Area < Tools < Utility Tools
Epoxy small leather strips to the inside jaws of a pair of pliers. You will have an invaluable tool to be used in helping to remove ferrules and reel seat hardware when doing repairs. The leather protects the nickel silver from scratches scarring. (Jeff Fultz)
Dog owners have a tool like a small pliers that has a blade that forms a circle around a dogs toenail. When the handles are squeezed the circular blades draw together and become smaller and smaller nicely trimming the dogs toenail. It is the perfect tool for trimming tip sections prior to installing the tip guide. (Dave Norling) Along those same lines, I've been using what is called a communication cable cutter to trim my blanks - even the middle and handle ends. Go to the McMaster-Carr web site and search for "communication cable cutter" for a picture. Don't necessarily have to buy it there, though. I got a cheaper one at the local Home Depot. (Darryl Hayashida) Haven't tried the dog nail clippers, but have used those inexpensive yellow handled wire strippers. Either way, I think you are going to get a clean cut. (Pete Van Schaack) I've been using a "razor saw" or one of the saws they sell for cutting model railroad track. Cheap and VERY fine teeth. Makes a nice clean cut. Maybe I'll try the wire cutters or dog clippers next rod, I have both. (Neil Savage) I've found that razor saws work really well , especially if you turn the stock that you're cutting, so that there's a cut around the entire perimeter - prevents splintering, and you end up with a really clean cut. (Greg Kuntz) For tips I use my buck pocket knife, a cadet 303, good and sharp. I roll the blank and angle away from the tip. I saw a picture like that somewhere. was it garrison? (Timothy Troester) I have a really heavy, thick-bladed Japanese knife, designed for slicing meat and fish. It has a bevel on only one side, and has a very hard, welded edge strip which takes a really, really sharp edge. I just rest it on the tip section and roll under its own weight, and the cut is clean and level. I must say I did have some trouble with the razor saws, though that was alleviated by wrapping one thickness of tape around then prior to cutting. But the knife is better, I think, anyway. (Peter McKean) If you have a Dremel tool, use one of the cutoff wheels. every time. Unless, of course, you have an anti-powertool bias [:-)] (Harry Boyd) I'm with the preacher, a Dremel with a cutoff wheel is the berries! (Dewey Hildebrand) Carbide wheel or toothed blade? I almost lost a fingertip to a toothed wheel on a moto-tool, so I'm a little gun-shy. They have this nasty habit of grabbing the workpiece and kicking. (Greg Kuntz) I use the carbide wheel. The pack that comes with the 25 or so little discs in it. Works great, as Harry said. (Dewey Hildebrand) I've had the same experience with Moto-tool blade kickback. Gets your attention real fast! Thought about mounting the Moto-tool on the cross slide of my lathe for this and other purposes but haven't got around to it. How do the rest of you hold the Moto-tool and work to prevent more punches in you "Nunley ER Card" ? (Don Schneider) I've never had a problem at all. I do let the tool do the work. Usually the work is in my left hand, and the tool my right. I use one of the diamond impregnated cutoff wheels now, but have used the fiber wheels and the super-thin, rather brittle wheels too. Never used one of the toothed blades. (Harry Boyd) I use a box cutter knife for the same purpose. (Don Schneider) I use a new razor blade. Roll the tip section under the blade and a nice clean non splinter cut. (Tony Spezio) I use a froe!!!!!!!!! Something about chopping something off that makes me feel good!!!! (Bill Tagye)
Does anyone out there have a table that shows what color of Scotch-Brite hand pads equals what grit of sandpaper and/or steel wool? (Tom Key) Try here. (Rich Margiotta) One of our late members told me a few years ago that research by himself and colleagues at Lee Valley in Calgary showed 0000 steel wool to be equivalent to 600 grit abrasive. (Greg Dawson)
Do I need a bamboo froe? If I want one anyway where can I get one? (Bill Armon) Try a small machete with a dull blade. (Brian Morrow) Froes are not necessary, a knife or nail in board will work. Jeff Wagner is one source though. (Pete Van Schaack)
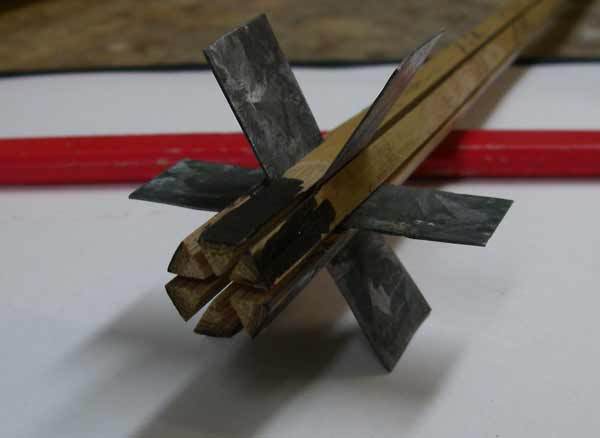
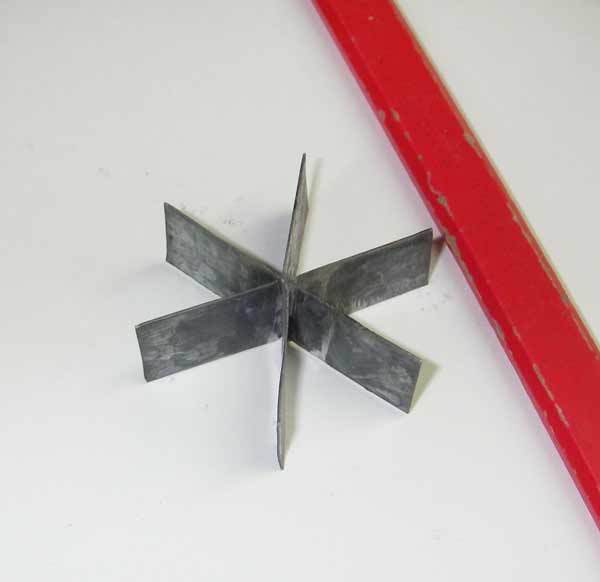
Some years ago I wrote an article for the Planing Form of a simple tool to hold the strips. It was made of galvanized steel. I took 3 pieces about 1" high and 2" wide. I cut slots in each in the center slightly more than 1/2" deep. Two of the piece were bent @ 120 degrees. Each of the pieces were slid one into the other @ the slot. The slot was fluxed and soldered. You end up with a star shaped device that each of the pieces of cane can be inserted and held while masking tape is installed. (Don Anderson) Here are some pictures of a simple strip holder. No more do you have to play around trying to capture the strips. Pop them into place and you're done. Wrote about this thing some years ago for the Planing Form. Not sure where the idea originated. Was fishing with a fellow cane builder. The idea may have been a flight of alcohol induced clarity, an idea he'd seen or one we dreamed up. At any rate, it works.
Someone recently was requesting information regarding what to buy in a new shop vac. I too have had excellent service from Sears vacs. When I was in the toner business I used to buy the largest vac from Sears for $125 and then bought a filter that cost $285 to put in it. Now the same (relatively) filter is available for near $25-35. They are labeled "Gortex" and work quite good. A cyclone separator is also a very good way to go. I think someone else gave the web site for this homemade version. I cannot believe I did not bookmark it but there is a video on Youtube (I believe) that is very convincing. Shows vacuuming a large pile of fine sawdust, opening the vacuum and showing zero dust inside, and opening the cyclonic separator and finding all the dust. I vote for the Sears vac and building your own Thien cyclonic separator. When you look at it you will agree it is cheap to build, when you use it you will agree it is worth much more than you paid for it. You should be able to build it just by looking at the web site above. (Steve Shelton) I purchased one of the small cyclonic separator lids from Woodcraft. It fits on a five gallon bucket. Sort of. Standard 2" size Shop Vac hoses need to be modified on the ends to fit well. With a coupla pipe clamps and some duct tape, it works like a charm. Cost of the lid was less than $25. Add in the modifications and it's still probably less than $40. But it sure does save wear and tear on the vacuum. By the way, this entire Shop-Vac thread is plenty timely. After 6-8 years, my 6 gallon, 2.5 hp Shop Vac is making a funny noise, almost like it is hoarse. (Harry Boyd) Thanks for that heads up on the separator. I made one yesterday out of a 5 gal plastic paint bucket and it works great. I'm amazed. (Frank Stetzer, Hexrod, Taper Archive, Rodmakers Archive)
Sometime back I saw on a web site for bamboo rod building, for lack of a better term an "index card." This card could be used to determine the inside measurement of a tip top and it could also be placed over the tip of rod to tell what size tip top should fit best. Is anyone familiar with this item and or where I could obtain one? (Bill Gates) I've had one of these tip top/ferrule gauges since the mid-80s think and they haven't changed. Which is good, since I don't know what I'd do without one! Here it is from Mudhole. I know others sell the same, so you may want to shop it. Or not. (Bob Brockett) Don't know if this is the one you want, but it may help. (Joe Arguello) It only takes a split second to either (a) measure the inside diameter of the tip top or (b) just try some tip tops until you find the one that fits. After a few rods you will be pretty accurate on intuition alone. The money you save on buying yet another relatively useless tool can be put toward a more expensive and more complicated tool that is much more fun! (Peter McKean) I'm among those who use this little tool on every rod. At less than $5, it pays for itself the first time you buy the correct size tiptops rather than the incorrect size. I suspect I have several hundred, maybe 1000 tiptops in the shop. This little outfit makes quick work out of sorting them by size. And I echo what others have already said, that you need to try several different tiptops, even the same size and brand, because they often fit differently. One more point worth mentioning is that the tubes often have a very slight burr which needs to be removed. A #11 X-acto blade works well. Just force it inside the tube very lightly and give in a quick spin. (Harry Boyd) Spoilsport! You can never have too many toys -umm -- tools. (Neil Savage) Just my personal opinion, but dial calipers work just as well. Plus they have more uses around the bench. Since tip tops are sized in 64's of an inch, its a pretty easy process. Measure apex to apex and use the little conversion chart that usually comes with the calipers. Not trying to be smart, just another method involving a tool with more uses. (Pete Emmel) True enough, but the little measuring thing also tells you the size of that odd tip top you have lying on the bench. I got mine at Cabela's, but Jann's Netcraft and Golden Witch (at least) carry them. (Neil Savage) If you have a tip top of unknown size, stick drill bits into it until you find the one that fits. Drill bits are measured in 64ths. (Ron Grantham) A question for folks on this - so far in my brief rodmaking career I've just selected the first size that doesn't go on the end and then sanded to fit. Generally this gives me a bout 1/2 size large tip tops than those recommended with the taper, for example Garrison 209E was supposed to be a 4.5 but I think I ended up using a 5 (going off memory here). Is it really that big of a deal for the rod action to use a tip top 1/2 size larger than the flat to flat measurement +/- a little? I figure it's best to sand as little as possible, especially since I prefer relatively lighter tips than normal even on my heavier rods. Any thoughts/feedback on this topic? (John Rupp) I never said it was the only way, just one way. If you have a 5.5, you would find a 5/64" would be loose, and 3/32" wouldn't fit. (Neil Savage) That's a great idea, but tip tops come in 64ths and halves of 64ths. I already have one of those little plastic gauges so in a pinch I use that to check the size of my tip tops. I try to keep them sorted, but sometimes things get mixed up. I use Snake Brand guides and the tip tops tend to be just a hair undersize, and they do sometimes have a burr on the inside of the tube. I use a triangular scraper to remove the burr before measuring or fitting them. To select and fit tip tops, I take the flat-to-flat measurement of the rod tip, convert that to 64ths and round up to the nearest 0.5. Then I cut off the difference between the overall length of the tip top and the depth of the tube from my rod tips, and take the corners off the tips until I get the tip top to seat all the way. (Robert Kope) They are so inexpensive that I can even afford to lose them every once in a while. Also, no math is required. (Doug Easton)
How does one actually dull the edge on a froe? Mine is too sharp. It was made in Japan and those guys make sharp blades. Also I am considering wrapping the handle with rattan. Will this withstand the torque applied to a froe during splitting. (George Wood) Use it and it will become dull soon enough. (Louis DeVos)
We've all got (at least those of us who make hex rods - no tellin' for them quad or penta makers) the nifty little 60 degree center gage. One of the things we use it for is to visually check the angles on our strips. Another nifty use for it is for setting up your lathe for threading operations (No way!!!!). One operation you may not have considered is using the sides of the gage as small straight edges. I use the side of the center gage that is marked for the 32 TPI, which coincidentally also seems to have the smallest cutout for the lathe threading tool. Line that side up with your nodes on your strips and you can readily, and visually see if you've got any tear-outs at the edges, or of the node is a little rough, both contributing to glue lines around your nodes. Only takes a few seconds after you check the angles on the strips to align the side the of the center gage with either side of the nodes on your strip to see if everything is hunky-dory. (Mark Wendt)
|