Bamboo Tips - Tips Area |
|
< Home < Tips Area < Wraps < General
As tough as it is to accept things we don't really want to believe, from what I have seen a lot of the more recent "classic" rod makers (i.e., from the 60's - 80's) used nylon wraps. I bought my first quality rods in the 1960's, and I don't remember hearing any discussions at all about silk vs. nylon. The rods were sold for fishing. And the thread is nowhere near 6/0 in size. I have a beautifully finished varnished T&T rod from the early 70's made of pre-embargo cane with what I believe to be nylon wraps, and a few years later when T&T came out with a regular catalog, they were selling thread as "size A nylon, the standard of the industry." The wraps are tight, smooth, and beautiful. I'd like to know what others with more historical knowledge have to say on this. It's obvious that the old rodmakers used silk in the years before nylon was readily available, but even then most of those old rods that I have seen appear to have threads that are larger than 6/0. Is it accurate to say that use of very fine threads is a recent phenomenon? I should add that I do not intend any of this to be a criticism of either new or old rods. Good wraps are good wraps. I personally prefer silk wraps with threads that are a bit larger than is currently fashionable, but I wouldn't hesitate to use nylon where appropriate in restoring wraps. (Terry Finger) The current trend toward very fine thread is just that. The standard for trout rods was A to 2/0. The silk thread thing was a point of wonder for John Weir in the 80's. He just said 'why?' He used Gudebrod 2/0 nylon on his rods. The old Gudebrod 2/0 was a 3 ply thread just like the A was . The newer stuff was just A with one of the plies taken out and didn't wrap smooth like the old stuff did. Most of my earlier rods are wrapped in the nylon I bought from John. Now trying to sell a rod wrapped with nylon draws a gasp at your lack of couth and diminished sense of propriety. Still sometimes wonder why I don't go back to the nylon, still have 4 or 5 of those giant cones left. Everyone knows I have no sense of style anyway. As a BTW John was always amazed at the need to use NS for the reel seat hardware. He thought it was too heavy, aluminum worked better, was lighter, and was readily available. Like most of the past generation, he just built fishing rods. (AJ Thramer) If nylon is used, should the thread that has been pretreated with color preserver be used, or should the non-treated thread be used? What about colors? I have only seen a handful of bamboo rods and all the wraps have been brown. What about dark green, black, crimson, or yellow: would using any of these colors on bamboo be a faux pas in the eyes of a traditionalist? (Kyle Druey) Use thread without color-preserver. You can apply two or three initial coats of ordinary "airplane dope" to the wraps (prior to finishing up with varnish), if you want to preserve the. Or, if you want the color to deepen, apply varnish right from the start. There will be a remarkable difference in the finished wraps. Of course, this goes for silk too. As to color, you can use just about anything (except, that is, for anything blue). Earth-tones seem to look best, but many excellent rods have been wrapped with brighter hues of green, olive, red and yellow. The Leonard "red-wrap," of course, became famous (though that may have had something to do with the rods themselves). If you don't wish to be dictated by tradition, then by all means, please yourself. Wayne Cattanach built a purple cane rod for his daughter, and I gather, everyone was delighted. Besides, if one day, you want to change the color of your wraps, it's no big deal. (Bill Harms) Use what you want , every ghastly color known to man has been used on bamboo rods at one time or an other. You should see some of the god awful combinations that Montague, H-I, Shakespeare and others used to put on rods, there should have been a law! Nylon is much easier to work with and wraps faster because of it's diameter than the fine silks we punish ourselves with, my only complaint is that it looks like rope compared to silk. If you guys are wondering where this all started, I believe we have Tom Maxwell to thank (or whatever) for the current cosmetics craze. (John Channer) I wouldn't know about the historical record on silk wraps. All one hears about is silk (it's almost synonymous with "wraps"), and yet I wouldn't doubt that a great many rods by "the masters" were wrapped in nylon. It used to be possible to obtain nylon in #3/0 and finer, and I still have some, and I still use it from time to time. I am almost ashamed to admit that I've wrapped some of my rods in nylon -- the snob-appeal of silk is so pervasive. Among Dante's rings in the Inferno, current rodmakers seem to reserve the severest punishment for those who would deign to violate our covenant with silk. Indeed, fishing with graphite is but a minor barbarism, compared to the cardinal sin of wrapping with nylon. This is a pretty silly business, folks. Silk is very, very nice indeed, but if you can find fine nylon, there's nothing wrong with using it. In fact, I really do wonder how many builders among us could actually tell the difference. Those who swear they can, often can't. (Bill Harms) So, what is a good brand/size of nylon to use, and where do you buy it? (Claude Freaner) Gudebrod Size A, green is 5896, red is 326 (I believe). Both look nice. The purple is a nice color too, but I do not have the spool handy. I think this is NCP nylon. I know it is from Angler's Workshop. The green looks great tipped with navy, and the red with black. The guys at the WNY Gathering saw the intermediate rod with the green/navy combo. They seemed to like it, and no one said, "Hey, is that nylon!" Disclaimer: this nylon is only used sparingly in the time honored tradition of the silk using masters who have come before us and those practicing at present. (Bob Maulucci) I don't know where to get the 2/0 any longer. Gudebrod used to make it, but they only have A available now. It's a shame. But you could ask around for old inventory. Darrell Lee might be able to help. (Bill Harms) I have quite a few T&T rods. The earliest #2094 is the 94th rod Maxwell & Dorsey made and it has Silk wraps. All others I have are wrapped in silk. That is not to say that a customer did not request nylon. As far as makers I know that wrapped in nylon we have Orvis, Phillipson, Winston (SF models), Amherst and apparently some Howells. (Marty DeSapio) I have wrapped some rods in nylon floss. The results were very good. I don't believe anyone could tell it wasn't silk. It was out of an old box I extracted this floss. I have never been able to find more. If I could I would use it. (Timothy Troester) I use nylon - like it and don't intend to change. Silk is tough to work with, fuzzy, won't burnish well, stains, rots and is generally a pain. So I'm an infidel. Any hope now that I've confessed. (Don Anderson) In Milward's Book he states he uses nylon for his wraps and he challenges anyone to tell it from silk. It is kind of funny... Here we are making Custom Rods and yet if a maker does something different then others his work is held up as somehow "Not status Quo". A maker defines what his work is be it using nylon, gossamer, Naples or 00. If it is not what everyone else is using it is apparent he does not give a damn what others are doing. If he wanted to make a rod like everybody else he would be doing just that. I personally have in my minds eye what a rod should be for me, and this is what I strive for in making my own rods. Others have a different vision. I have seen bamboo rods with varnish on their grips, long reels seats and silicon carbide strippers. These things are not part of my vision of the ultimate rod. But to others it is. I saw Howells rod go for $4500 on eBay even with power fibers showing. Then again Picassos has paintings that look weird and they sell for hundreds of thousands. Who is to say what is right? I know what is right for me and actually I have only seen 5 makers that make rods that I would consider to emulate. This does not mean other makers are wrong in what they do far from it. Rodmakers flinch and wince start to rant at the mention of a rod makers guild and refuse to even think about it because they do not want someone to tell them what they do is wrong. Yet it in many ways is already here. (Adam Vigil)
Can I wrap a rod with only one spool of Pearsalls Gossamer? It is a 7' 2/2. I plan on wrapping the ferrule tabs with it as well. The spool says 45 yards - it sounds like it would be enough but I want to be sure! (Mike Mihalas) Yes, you can, but don't be wasteful!!! (John Kenealy) I do with no problem, but it depends on how much waste you have. Don’t make long cutoffs and don't make long starting tags or you'll run out before you're done. Keep in mind that I do NOT use hook keepers, so that is quite a lot of thread saved. (Bob Nunley) I don't plan on a hook keeper either so hopefully it will work out for me! By the way, am I okay using Gossamer on ferrules or should I think about something heavier? (Mike Mihalas) No problem, I use gossamer on the ferrules also. No cracking problem at all. (Bob Nunley)
What are the pros and cons of using nylon Vs Pearsalls silk (Naples, Gossamer). Is there going to be a noticeable difference in the final product or is silk just used for tradition? how difficult is it to work with the finer diameter silk? color change when varnish? anybody use B&O jasper and have photo's. (Mark Pohl) I won't speak to nylon because I have no experience with it, but over the past several months I wrapped my first several rods with different silks, and I learned a few things. Silk is definitely traditional, and it is beautiful. There is a difference between Naples and gossamer, but once the varnish is on that difference is minimal. The difference IS detectable, but both will give a beautiful transparent wrap. There are several situations where Gossamer will provide better results- tipping, and white wraps that are meant to become absolutely transparent. What matters FAR more than silk diameter is attention to detail and consistency. Your wraps need to be the same length, the silk needs to be burnished, packed, and singed, and the pull through loops should be near the guide feet or they will show. It is easy to make a wrap that looks good dry, but gaps show up when varnish is applied. To prevent this, apply a drop of water or extremely dilute varnish to the wraps after you are finished- most problems that show up will be correctable with the burnishing tool. As for darkening of the silk, this is a problem I am wrestling with now. You can use a color preserver, but most of the threads in the archives have a negative view of this-many people believe that you end up with other problems. Varathane 900 is said to give a semi preserved look to your color (darkens the wrap, but not as much as regular varnishes), but I can not find this product anywhere I have looked, and will have to order it from Golden Witch to even try it. The bottom line is that you may be surprised at how light of a color you need to obtain to get the color you want. Without preserver or maybe Varathane, silk darkens like mad. Working with Naples vs. Gossamer? Both are fine, but gossamer is a challenge. I about tore my hair out working with the stuff. Bob Nunley recommends that gossamer users should by aspirin and other strong painkillers in bulk for the headaches ... The stuff is workable, but expect to spend some time getting used to it, and you need a magnifying glass. But it gives beautiful wraps, and there is a wide color assortment available. However, getting good results with gossamer will most likely require more time- the time you spend getting used to it, and the extra time it takes to produce a beautiful wrap. No question that thicker silks allow you to go faster. But if time was important you would not be messing with cane in the first place. (Jeff Schaeffer) Try the Gudebrod 822 or 840 on your wraps in place of Color Preserver. The 822 is a satin finish and the 840 is a gloss finish. I use the 840 and steel wool the wraps before varnishing. This will work for you on keeping the color without using preserver. I will never use color preserver again. Had too many problems with it in the past on Graphite rods. I have done right at 37 bamboo rods with the Gudebrod product and have not had a problem. This is water base and you can apply several coats in an hour. Some colors will darken about 1/4 shade or less, other colors will not darken at all. It does not make the thread transparent. It is more of a sealer. The one thing you have to keep in mind, the wrap will have to be totally sealed so that no varnish will seep under the wrap at the guide foot. If it does there will be a dark mark in the wrap at that point. (Tony Spezio)
I could use your opinions. is size A silk thread to heavy for wraps on bamboo can I use this or should I use a smaller diameter stuff (0 or 00)? (John Vitella) I like using size A at the ferrules, but it probably would work just fine for a whole rod. (Tim Stoltz) I love using Size A Silk, especially vintage Belding-Corticelli, Paragon, Richardson, etc. The only problem is nailing a color that you can get a bunch of. ($$$) It's easy to work with and I usually tip with Naples or Gossamer. Get on eBay, but be warned, bidding against those grizzled sewing chicks can be brutal! (Eamon Lee) Size 50 is roughly equivalent to Size A. I did some tests several months ago. I marked off about 1/2" on a wooden dowel and counted the number of revolutions it took with each size of thread. I repeated the test with different spools of thread, but the results were almost exactly the same. Here's what I found:
(Rich Margiotta) If memory serves me right, most silk sizes we would find of interest are measured in some dumb measurement called denier, and these are 50 and 100. These numbers correspond to sizes "00" and "000". Size "00" is just a tad smaller that size "A" nylon. Size "000" silk makes a really nice wrap for cane (or plastic) rods. (Don Greife) Something else to remember is how flat the thread lays on the rod. Seems to have something to do with the twist of the thread. While Naples might have more wraps in a given space than say BC 'A' I have found that the BC will fill with fewer coats that the Naples. It seems to flatten out like floss. Just another variable to fuss over. (AJ Thramer)
This is probably a dumb question but could anyone tell me why, besides beauty, a rod should be wrapped in silk rather than nylon? (Bob Amundson) I think it's a good and important question. Though I'm not sure if I reply to your question correctly... In our traditional Japanese rod making, making a round and hollow cane rod, the reason of using silk thread was for strength. Though we may not need such strong binding force of wrapping on snake guide foot, but we had needed rather stronger force of wrapping at the portion of connection and power wraps on hollowed blank. Power wrap was needed on split cane rods when we did not have so strong adhesives in old days. In old days, we used urushi varnish. When urushi is absorbed inside the silk thread, if we use strong type of urushi, the varnish will weaken the thread. So, it was important to use weaker type of urushi on the wraps. Have you taken off your wrap which is varnished with epoxy and polyurethane? Was the thread coming out as thread? Probably No. Thread may be taken out like as a thin sheet of plastic. When we use such chemical varnish, even silk thread is changed to the plastic by absorbing varnish and has lost the original strength as thread. It is al right while it is used on snake wraps where no such strong binding force is needed. So does nylon thread, probably even cotton for snake foot. (Max Satoh) There are likely other reasons but the main one that I can see (the other being looks) is if you bind in nylon the bamboo will dent from the nylon trying to return to it's relaxed state after being stretched during the binding process, just like nylon on a fishing reel spool after fighting a really big fish. (Tony Young) Nope, that's about it. But, being rodmakers, I'm sure we could generate some theories. (Bill Harms) Hmmm, good idea, Bill. The List is slow, and AJ's post was entirely too practical, as is the advice "Build it any way you want to." Can anyone substantiate the postulation that the silk, due to it's lower modulus of elasticity (Young's Modulus) than nylon, actually contributes to an increased power curve in the bamboo fly rod due to increased resistance to stretch as the rod attempts to flatten it's profile during the casting stroke? I submit for your approval that this is the case, and that no one can prove otherwise. >>8^Þ (Martin-Darrell) But, of course -- as every schoolboy knows! This theory actually goes back to an ancient Yangtze discovery whereby the sinues of cricket legs were lashed together with silk to form crossbows. Silk wraps were found to be superior even to graphite-impregnated epoxy. Oh yes, graphite existed in 5th cent. BC too -- formed by charring strips of bamboo taken from Nunley's oven. Oh yes, Nunley was there! Indisputable and time-tested, this theory of silk wraps remains responsible for all great bamboo rods being great! Wrap those same rods in nylon, and they will not cast a line of ANY sort. :>) (Bill Harms) The theory of Young's module is based on seeing the dents left in a rewrap I once did that came to me with with nylon wraps. The wraps were very long and an ugly color and the guy wanted the wraps shorter than they were. There were dents in the bamboo where the wraps were so the silk needed to be wrapped to the same length as the nylon to cover these. It's no problem I guess but it does mean if you ever do a rewrap it has to at least cove the original wraps, again no big deal. The fishing spool part of the theory comes from catching some Samson fish on an ABU 7500 and not trailing the line and re winding it on the boat ride home. Two week later the line was a mass of crinkled and useless 25 lb mono. Lesson, if you get too sea sick to look after your mono line after a fishing trip use Spider Wire or maybe silk?? (Tony Young) Stubbornness and self torture come to mind. I do not think that there is any real advantage. Silk does look very nice. I do all the rods I keep for myself wrapped in nylon. I keep the wraps opaque. I like them like that. It's cheaper, easier to wrap, coat, and fish. I use Pearsalls silks for customer's rods. Is it nicer? I don't think it is significantly better in any way except for salability. My two cents, go ahead and flame away boys! (Bob Maulucci) Don't you think the silk lays flatter and makes for a smoother transition to the flat when varnishing? This leads me to a question: how do you guys smooth out the ridge of varnish that builds up between the ferrule wrap and the ferrule? When I mask off the ferrule with magic tape a "wall" of varnish builds up, when I pull the tape off the varnish ridge stands out like a you know what in a punch bowl. Any suggestions here? (Kyle Druey) I never try to mask off this area when varnishing the wrap. In fact, as I build the finish, I allow a few coats to form a minute "ramp" between the wrap and the metal. After the wraps are finished, I varnish the entire rod including the ferrules, and this smoothes out the transition. (Bill Harms) I don't use masking tape on the ferrule, I use Scotch tape. It is super thin and the ridge is very low that way. Can polish it off in a heartbeat with a little 2000 grit and touch it up with Finesse-It II polish and she's clean as a whistle. (Bob Nunley) Even if I wrap a ferrule, I occasionally get a wall/ring of varnish on the ferrule, too, but not always. My belief is that the varnish is too thick when that happens. I always pull tape after 24 hour of drying. I can easily remove varnish under or touching tape with alcohol on rag. The varnish has some pliability and is still mildly workable. At about 48 hours I have to buff off, with the Dremel, any varnish on metal. (Rex Tutor) There is no reason to use silk other than personal preference and tradition. Nylon will go clear just as silk does. Nylon works better for preserved wraps since the changes in varnish and lacquer. White shellac gives a different look to the silk that can be attractive. It is increasingly difficult to obtain 2/0 nylon to wrap fly rods these days which is a significant point in obtaining nice looking wraps with nylon. As to flat wraps, the recent Pearsalls craze wraps just as round as any nylon. Like many things recently there seems to be the 'bamboo correct' way to build a rod that has no basis in fact or function. As there are many more talented amateur makers (less than a dozen sales a year) than professionals the dictated standards are being driven by builders with virtually unlimited time to expend on each rod. Great if someone wants the resulting work of art but a tough break if someone wants to buy a cane rod to try one out for three digits. Use what you want to in other words. (AJ Thramer) Yeah! I always just let my taste guide me. I like silk. I also like Busch Beer and pork rinds. No accounting for taste. (Brian Creek) I agree with Mr. Thramer. I have seen guys swear they can tell the difference between beers as well as nylon/silk. I think a lot of makers use nylon as it is easier to deal with and let people admire the wraps and think what they will. (Rex Tutor)
Anyone have trouble with either the silk thread breaking or the pull loop breaking if you use silk thread for the pull loop? I have, but have discovered that if you pull the tag end until it just starts under the wraps, and then burnish the area a bit, it seems to pull right under. Any other ideas on this one? (Jerry Andrews) Try using nylon instead. Lasts longer. (Tony Young) You might be using a little more tension than you need (Mike Shay) I haven't tried burnishing, but an idea I got from the list, Harry mentioned it as I recall, is to use monofilament for the pull loop. Since I switched, I haven't had any more problems with pull loop breaking like when I used silk thread or fuzz left around like when I tried Kevlar thread. I had some 6X around and it worked fine, but to go to the extreme (after all, just "regular" stuff just wouldn't be bambooish now, would it?) I switched to 8X fluorocarbon. I'm using Pearsalls Gossamer for silk, and wanted the smaller diameter to leave the wraps a little tighter. Works great. (Ralph MacKenzie) I use tippet material. 3x or 4x I think. (Timothy Troester) I use 4x tippet material for pull loops. One piece usually lasts for a couple of rods. (Steve Weiss) I use 6 lb test line, and I found you should pull the thread through the tunnel right next to the guide, then I pull it tight and pull it out of the tunnel. Silk does break real easy if you try to pull it through on a flat, especially when I use any kind of jasper thread. Just pull your loop through tunnel by guide foot and you shouldn’t have a problem. (Dave Henney)
Is size A silk thread too big to use for guide wraps? (Todd Talsma) Not at all. Many rod companies over the years used size A and 00 (Garrison favored A) of which I can't see a difference in size between. That said I like Pearsalls Naples best (Gossamer for tipping) (Marty DeSapio) I second Marty's opinions. I like the Naples for smaller rods and Size A on larger rods or where I want a certain color on smaller rods. (Naples is only available in a few colors, but they're great colors for wrapping.) Gossamer for tipping. Main wraps with the Gossamer drove me nuts trying to avoid overwraps and spaces, especially on butt sections. If you can work with it, it will look a tad better than Naples (thinner is better as far as appearance goes). (Rich Margiotta)
Does anybody have a technique for fixing a clear wrap that has pulled away from the cane and become opaque in spots. The clear wraps have red tipping. The separation has occurred on a guide wrap and at the apex of the spline joints in three or four places. The separation doesn't extend into the red tipping or into the start of the wrap. It's out in the field so to speak. I suspect the Arizona heat has caused the problem, although the rod has been stored in my safe with the lid off the tube. I don't want to rewrap it if possible. I'd rather try to fix the original wrap. I have a plan in mind which includes a small hypodermic syringe with varnish followed by polishing compound. I'm wide open however, to any suggestion or commiseration. (Jim Harris) Those separations or whatever they are have been on my mind since I saw them last week. I have the feeling that you will end up rewrapping those guides but if so you might as well try something else first. I doubt you will be able to get a hypodermic needle that will be strong enough although they do come in really small sizes. Welding supply stores sell drill bits down to .0135" (maybe smaller) that you turn by hand with a pin vise. You may be able to make a hole in each end of the separation and force varnish or epoxy resin in one hole and out the other with the syringe. Do you know what the wraps were originally coated with? If you suspect the hot dry climate caused the problem maybe you could put the rod in a moist and cool place for a while to see what happens. Is T & T still making rods? With a valuable rod like that maybe the owner should send it back to them for a "factory" rewrap to protect the rods "originality"? All seriousness aside, I do have some suggestions for you to consider regarding the well and pressure tank in your shop. By all means try to have 3 pipes extending out in different directions from the base at about 3-4" off the floor. Mine only has two and sometimes I don't trip over them so I think 3 would be ideal. Another fine point would be to have a power cable going straight up to the ceiling from the pump so that when you swing a long object around you will have something to stop it. (C. Scott Bennett)
Solved the problem of having the guide windings creep over onto the cradles while winding and varnishing guides. Tiny doll size spring clothes pins from a craft store clip onto the blank on either side of the guide and keeps the blank from moving onto the winding. they come in bags of 100 and are only a couple of bucks. Put the cradle in between the clothes pins on the blank and your troubles are over. (Dave Norling)
You've gotta watch the Digger tape and the Garrison tape. Both these characters wrap from their laps, and hold stuff in their teeth! I'm not kidding! These guys were real men. No sissy setups, no sliding thread trays, no expensive Swiss tension devices, they didn't have their blood gasses monitored on the hour, no special anything, just a good old fashioned will to get it done, and make it look right. And trim wraps to boot! But I like it easier also, and IF that stuff was available to them, they would have used it I'm sure. Still gotta watch the tape. Garrison even looses his temper a bit. I didn't noticed anyone spinning anything out of control in their lathes, but, the rest of the tape is really good. (Jerry Andrews)
I've decided to blue the ferrules on the rod I'm working on. It's a Para-17 that's for saltwater, and will have a black anodized reel seat & black guides. Would like some opinions on thread color over blued components. I've used either tan or the Pearsalls classic chestnut on my previous rods - all with silver ferrules & guides. The wraps come out semitransparent, and I'm concerned that this will look funny with dark components. I was thinking of using a darker color thread. Will probably run some tests to see for myself, but thought I'd see what others think. (Tom Bowden) Personally, I don't find the black tabs showing underneath the thread to be unattractive. The Classic Chestnut or Java Brown both look nice, but use the Naples on larger rods. (Martin-Darrell) Don't blue the part that gets wrapped over. (John Channer) I have been using the Gudebrod varnish on the ferrule wraps to keep them opaque. It does darken the color, but I like the opaque look at the ferrules quite a bit. Actually, I like the look on guides too. I use this on my rods that I fish. (Bob Maulucci) I point the tabs with a small jewelers file and wrap the ferrules with the same thread as the guides. I use light colored thread that matches the cane. The pointed tabs show with the transparency of the light thread on the ferrules just as they do on the guide feet. I also use tipping on all my wraps. I like the look. (Dave Norling)
This is probably a dumb question but could anyone tell me why, besides beauty, a rod should be wrapped in silk rather than nylon? (Bob Amundson) There is no reason to use silk other than personal preference and tradition. Nylon will go clear just as silk does. Nylon works better for preserved wraps since the changes in varnish and lacquer. White shellac gives a different look to the silk that can be attractive. It is increasingly difficult to obtain 2/0 nylon to wrap fly rods these days which is a significant point in obtaining nice looking wraps with nylon. As to flat wraps, the recent Pearsalls craze wraps just as round as any nylon. Like many things recently there seems to be the 'bamboo correct' way to build a rod that has no basis in fact or function. As there are many more talented amateur makers (less than a dozen sales a year) than professionals the dictated standards are being driven by builders with virtually unlimited time to expend on each rod. Great if someone wants the resulting work of art but a tough break if someone wants to buy a cane rod to try one out for three digits. Use what you want to in other words. (AJ Thramer) Bingo! We amateur makers do spend a lot of time on a rod contemplating what is to be done, checking every wrap and double checking and triple checking all the fine details. It is the journey I guess that a lot of use like. When I finish a rod I start on another not because I need another rod but because it is another journey. I think all makers need to stop being followers and start being innovators. We all know how to do it the "Traditional way" of years gone by it is time to make some advances and stir things up. I like reading stuff John Bokstrom came up with or Bill Waara, now there are 2 guys who understood rodmaking is an adventure and not a fanatical fringe cult of follow the leader. The funny things is the Leonard, Payne, Powell were all innovators not followers. (Adam Vigil)
I saw the Glen Brackett segment on Grays Sporting Journal the other night on OLN. I was very interested in the section showing a rod being wrapped. Between you and me, I am really a bad wrapper. With that said, can anyone speak to designs for wrappers? I only know of the JW wrapper. Are there others on the market? Maybe I just need to buy a copy of "Wrapping for Dummies". (Doug Hall) In Sinclair's book "Heddon..." there's a picture of the gals in the Wrapping Room doing just that , without any devices other than a thread spool holder. I've read the stories of other companies having just one gal [Granger] do most all the wrapping, totally freehand! I figure it'd be best if you were a gal, or just practice a lot more. Like most things you learn to do, the way you start doing it usually wins out, so I started with an inexpensive spool holder/tensioner from Clemens, and do the wraps free of stantions, guides, etc. or "just freehand". The one item I'll use occasionally is a clothes pin to hold the tension of a wrap by clamping it on the section, then laying down to catch a phone call or take care of "the call of nature" I've been able to work almost exclusively with Pearsalls Gossamer silk, and six turn tipping without problems. With a packer/burnisher and the same silk thread tag pullers, I can do wraps as good as any I’ve seen, but I attribute that to practice. I can see how wrapping systems would help, but know that they, in my mind, are not necessary, and can be very costly. I'd rather put the $ into silk thread. I also found that I adapted techniques I read about over time to "what worked with my fat fingers" to get the process right for me. (Chad Wigham) I once had a ex. Leonard employee show me how Virginia Lures (Spelling?) used to wrap all Leonard rods without use of anything but the spool of thread and a knife. No pull cord or anything else. He learned from her and did all his rods that way. Pretty neat but I think my regular run of the mill way is faster (at least for me). (Marty DeSapio) Fairly simple to make one. Make it as plain or as elaborate as you wish. Mine has a bed with two rails, one rail accommodates three cradles that can lock in any position via a wood screw, the other rail carries a post with two spools of thread that are tensioned by springs and a wing nut. This piece just slides on the second rail allowing it to line up where needed to wrap a guide. (Steve Trauthwein) I made one years ago based on one that was sold thru the "Fireside Angler Catalog". The thing uses a fly tying bobbin to hold the thread and a couple porcelain drawer pulls to pull the thread around for tension if needed. It also has three cradles to support the rod. I never really use the cradles but just hold the blank and turn. I can send a photo if someone is interested. (Marty DeSapio)
I was wondering if there is enough thread on one of these spools to do a 7' two tip rod, signature wraps, winding check wrap, ferrules, etc., assuming no mistakes. (Big assumption on my part). (Bill Bixler) Only if you use short wraps and don't waste hardly any. For me its definitely 1.5 spools! Good luck. (Gary Marshall) Yup, that Sir D I had out with us on the FYAO was done with one spool of claret, with a bunch left over (even counting my mistakes. (Mark Wendt) Shouldn't be a problem, but I would say that until you get really familiar with the thread and wrapping it a good idea would be to have two spools instead of one, just in case, especially on swelled butt rods. I don't remember ever using more than one spool, then again I usually do my ferrules in black. (Shawn Pineo) I've only made 4 rods, but I've had no trouble wrapping the whole thing with one spool. I make my wraps about 1/4" long, with 4 turn tips (I can't get 3 turns of gossamer to stick!) On the other hand, if you expect to make more than one rod anyway, get 2 spools just in case. (Neil Savage) I've had my share of trouble getting 3 turns to stick, but I've manage to make them fairly "easy" lately. This is how I does it: Start by making the loop to pull the tag and wrap it in on the first turn, make the next two turn, cut the thread, into the loop and drag it under and out. Now here is the trick, grab both tags and pull them hard to tighten the turns. Make sure You pull in the direction they exit the wrap. Cut the tags, but leave them 1/2 inch. Now varnish and when cured take a razor blade and cut the tags flush. Help to get a clean cut by pulling the tag gently. It works for me, and I rarely have them come off or have to redo........(Danny Twang) Oh BTW 1 spool should do one rod.....
I'm having a heck of a time finding a silk wrap color that will varnish out as antique gold when I'm all through. I've tried several shades of yellow/gold/peach/manilla of YLI 50 and it all turns out an amber/orange color when I apply my usual 4 to 5 coats of thinned MoW. Anyone have a recommendation for a size 00 or 000 silk wrap that will give a transparent antique gold look after applying varnish to the wraps, then dip finishing? Manufacturer, color #, size, etc, would be appreciated. (Kyle Druey) Varnish almost always "cancels out" the yellow in the thread. In order to preserve the yellow, you'll have to color-preserve in some fashion. I think an intense yellow and blonde or amber shellac might give you the results that you want. (John Zimny) I just wrapped a rod using Pearsalls Antique Gold Gossamer. I used the Shellac 50/50 denatured alcohol mix as color preserver, and only 2 coats, and got a semi transparent effect. I played with it on an old blank, and one coat didn't work, but it may with a heavier mix. Hope this helps. (Chad Wigham)
Been trying to color some short pieces of fine white silk thread with colored markers. So far I haven't had a lot of luck. The markers that I've found are not permanent and the colors rub off on my fingers when I wrap the thread. Wish 'Sharpie' made colored pens. At least I've not been able to find them any place. Need colors that won't bleed through varnish or epoxy. What can I use as a good substitute? Any help will be appreciated. (Don Greife) Sharpie does make red, green and blue, but that's all, no shades to choose from. If you have a craft store nearby, look in the scrapbook area, they use permanent colors (ask my wife -- she uses "Creative Memories" products, the high $ stuff.) (Neil Savage) Have you tried Pantone markers? I use them to alter flies on the water sometimes and they come in a plethora of colors and are permanent. I do not know how they would react to varnish solvents however. I suppose I could try. (good use for all that white silk laying around. The local art supply store carries them, but with Syracuse University a mile away, art supply store take on a whole new meaning. VERY dangerous places! (Eamon Lee) I use Prismacolor markers to color thread all the time. You can buy them at any art supply store. One side has a broad tip, the other side has a fine pointed tip. I use a razor blade to make a small slice in the broad tip and then just run my thread through the slice. I have covered this dyed thread with both spar varnish and two-part epoxy and never had a problem. Prismacolor can be found in hundreds of shades, I'm sure you can find a color to suit your needs. (Jeff Fultz) Sharpie makes colored markers, have seen and bought them at Lowes hardware and Walmart. (Gary Jones) Are you trying fabric markers. A craft store should have some fabric markers that would withstand going through the washing machine. I would think that would work for you except they could be bothered by varnish. (Tim Wilhelm) Sharpie, does indeed make a full spectrum of colored markers The Ultra fine point is product number 37175. They also make them in bold point as well. I use them to keep track of the strips when I build nodeless. (Mark Cole) I have to ask: what were you doing that required coloring thread? This sounds like a secret restoration technique that the list needs to know about. (Jeff Schaeffer) No secrets Jeff, just playing with thread colors to tie extended body flies in the "Tony Spezio" style. He is a great tier and has shown me a lot about flies and rod building. (Don Greife)
I've been trying to get nice, delicate wraps, and I think I finally have the main problem solved. My first rod, for those of you that saw it at the SRG, had some pretty, shall we say, rugged wraps. I'd used Gudebrod silk to wrap the guides, and the silk didn't pack or burnish over very good. I started looking at rods that other folks had made, Al Medved's in particular, and was amazed at the beauty of his and other's work. I decided that from there on, I would strive to become as good as Al at that particular task. I still have a long way to go, but I think I've done a much better job on the last few rods. One of the things that really turned on the light bulb in my head was my first use of Pearsalls Gossamer thread to wrap with. The first attempt I made at trying to wrap the thread, caused many breakages of the thread. Being a somewhat clever individual, I says to meself, "Self, the thread tensioner must be way to tight." So, I loosen up the tensioner considerably, so that there is just the slightest amount of tension on the spool, and it was like a righteous moment! I could now pack the threads, and after burnishing there were no more gaps/banding on the wraps. I also notice it was so much easier to wrap the thinner sections up near the tips, since the thread tension no longer pulled the tip down anywhere near as much as was happening before. The wraps were nice and even, no ugly bumps, and with careful work, nice and delicate. I really like the look that the thin silk gives to the finished rod too. When I showed the last rod I wrapped to a friend of mine, he asked me what kind of tape I used to hold the guides on. I was pretty proud to say the least. While the use of Pearsalls contributed to the revelation, it was the realization that I had set the tensioner too tight that finally made my wrapping much better. (Mark Wendt)
Following is some correspondence I had with a non-rodmaker friend who toured the Sage factory. Thought some of you might be interested. Apparently the mass-producers wrap their rods the same way that many of us do, just a lot faster (at least compared to me). It would be interesting to see how fast these folks could wrap a rod with 6/0 Pearsalls Gossamer! (Tom Bowden) ------ Subject: Cool Experience Hi Tom, I was visiting my sister on Bainbridge yesterday and, what the hey, called Sage to see if they had tours. I got the usual, we do it on Tuesday/Thursday stuff and just kept talking. Well, they came through. Sweet little Kelly gave me a one-on-one tour of the facility. It was damn cool. We started at the lay-up area for blanks and ended at final quality control. I was most impressed with the rod wrapping. Holy ****, they go fast. There was this little Phillipino woman that was putting on guides. When she spun the rod to wrap the thread, it was FAST. I mean blur fast. They have this huge room with banks or rod turners 10' high to cure the epoxy. I had a great time. Sage is surprisingly accommodating. Customer goodwill is cultivated and appreciated. They were really going out of their way to deal with just one person. ------------------------------------ Subject: RE: Cool Experience Sounds like an interesting tour - I'll have to take it sometime. Was the woman using a machine to wrap guides? Or doing it by hand with a rod cradle & tensioning device? Tom -------------- Subject: Re: Cool Experience She was basically doing it by hand, it was amazing. She had the blank in a chuck and motor, she spun it with a foot switch. She would start the thread, spin the thread on really, really fast, then insert the loop and finish spinning. She used a single edge razor blade to trim the thread ends. Wham, bam, done. The rotation speed was so fast I could not see the guide, it was just a blur. The guide said they did 25 rods a shift per person. Practice makes perfect. I know that most Winston Graphite's are wrapped by local Twin Bridges housewives. (Marty DeSapio) I used to watch June Hills wrap rods using a foot peddle machine and she could do a wrap in about 10 seconds perfect every time. (Bret Reiter) I remember a long time ago, seeing a glass rod maker's shop and he had a lady working with the rod held at nearly eye level in a chuck, turned by a foot controlled motor and she was winding just the same. So fast it was amazing. It only takes me about twenty five days to get the first wrap on then I slow down. (Ralph Moon) I wonder if you could make a rod wrapping machine from an old cabinet type sewing machine? (Ernie Harrison) I seem to recall someone telling me that they had a relative that wrapped rods for living. She worked out of her home, and, for the high end rods, she was paid $9 a rod. She could wrap 21 rods a day. I figure she has some job security because I'll never be able to challenge her. (Tim Wilhelm) There is a rod manufacturing company here in town that used to do about 70% of the name brand rods. All the rods were wrapped by housewives in their homes. They were paid per wrap. The rod company would apply the Flex coat on the wraps and pack the rods for shipment. They now manufacture their own blanks. (Tony Spezio) There was, many years back, a well known fly tier in West Yellowstone that tied flies with a foot pedal sewing machine. I saw her do it. She would sit and tie fly after fly with that thing. Ralph Moon will remember her name. I would think that if you can tie a fly you can wrap a rod. (Mark Dyba) Oh, of course.... Machines can be made to do about anything we want, I suppose. We can make them hydraulic, laser, or CNC - even fully robotic. Best of all, no doubt, would be to combine all these, and to have one such machine for each and every process Or how about a machine that would take a raw culm in one end and spit out a completely finished rod at its other? All we would need is a power switch and a good magazine to read. Come to think of it, maybe we could make a machine to cultivate the cane, convey it to our workshops, load the rodmaking machine, and turn the switch on for us. Then we would need only one more machine to develop our markets, package the rods, send them to their destinations, process the checks, pay the taxes and put the remaining profits into our banks. It's fun to daydream about machines, of course, but if actually making rods is the objective (and maybe, for some, it's not), it's pretty hard to beat using one's HANDS. For wrapping a rod, how about a simple wooden cradle and thread that's tensioned through the pages of a book? You wouldn't want to make a living doing it this way, but is that the point? (Bill Harms) I think Wes Jordan tried to build a machine that would take a culm in on one end and spit out blanks at the other when he was with South Bend. Don't know how far they got on it. (Brian Creek) You are playing my song! I make my rods by hand and listen to Mozart. I love the sound the plane makes. (Dave Norling)
I have had to confront an awful truth. I am not very good at wrapping. I routinely have to redo wraps to get them looking right. Garrison used to do it by hand while sitting in a chair, but most of us use some type of contraption. My question is, does the wrapper you use make any difference in your ability to produce good wraps consistently? Or is it entirely a matter of mastering the wrapper you have? Had anyone noticed a major improvement after getting a new contraption? And what brands or styles of wrapper are you using? Right now, I have my old Cabelas rod wrapper, and though I have made some modifications to it (better tensioners), is there one out there that would make my life easier? More important, is there an inexpensive one that could make my life easier? (Jeff Schaeffer) I use an old Thompson spool holder. Its simple, adjustable for large or small spools, and doesn't fray the thread. I clamp the holder to a piece of 2x1 pine, which is gripped in my bench vise. I think getting good wraps is a matter of practice, preparation of the guide feet, and attention to detail. When a wrap is complete I compress the turns with my thumb nail. I purposely over-wrap by 4 or 5 turns because I find the wrap compresses that much. If you've left a slight gap between one of the turns you can burnish the threads to spread and cover it. Every once in a while I get a thread turn climbing its neighbor. I usually don't see this until I've applied several coats of varnish to the wrap. Varnish magnifies your errors. I cut these off and redo it. (Ted Knott) I'll second what Ted has said. Russ Gooding donated one of the Golden Witch reproduction spool holders to SRG a coupla years ago. I bought it in the Silent Auction. That one change has made my wrapping much better. Well, might add to that another 30-40 rods worth of experience. I've bought a coupla the old Thompson/Herter's wrappers off eBay over the last few years at an average cost of $20. All are now gone to friends. (Harry Boyd) I've been looking for one of those old Thompson vises Ted and Harry spoke of. it looks like the way to go. Till I get one, I do it like everything else, by hand. I will say that one of the best tips was posted on the list. I can't remember who, but whoever you are, stand up and take a bow. Wet the the silk (I have no idea how wetting NYLON works). You can see all the wraps very clearly as you put them on. It is just a little more time consuming, but you can see what the end result will be as you wrap. I like it. (Mike Canazon) Sadly, I have had to admit defeat and buy bifocals to see what I'm wrapping. A large, lighted magnifier really helps as well. Ron Kusse maintains men can't be good wrappers and we should just hire a woman with the required manual dexterity and get on down the road. Not to be a sexist (just sexy) I think that there are enough studies in the books showing that the female of our species has much better fine motor skills than we males do to support this idea. I'm just too cheap to pay someone. (Brian Creek) I don't think it has to do with the dexterity as it has to do with patience. Men are not groomed from childhood to be patient, they are groomed to do things in the most time-efficient manner possible. Unfortunately, perfect wraps are not the most time-efficient way to attach snake guides. (Joe West) An anthropologist once explained this to me. Us men have hands and motor skills for things like clubbing mammoths, throwing spears, maybe even splitting a culm of bamboo. The womenfolk have slender, sensitive fingers for activities like gathering, weaving, and wrapping snake guides with 6/0 gossamer. (Tom Bowden) I had at least three other fancy wrapper which all promised faster and better results. They worked well with nylon but not with fine silks. For the last year I have been using the JD Wagner wrapper. It is simply a tensioner for four spools. The results have been better than fighting the machines. The only more complicated one I like is the Sully's. It is nice because you can stop in mid wrap. The best tools for wrapping in my opinion are MagEyes and an Ott light. Those made the biggest difference to my results. (Bob Maulucci) Mastering the tools you have is key to any successful job. Other tools may do it faster but these too must be mastered to produce the desired result which may or may not be better. My wrapper started out as a finish dryer and now incorporates a Netcraft #500 Rod-Wrap Kit. I find wrapping is easier when I have the tension just right for me. (Lee Koeser) I do not know if this will work for you, but my wraps improved greatly when I went to using a fly tying bobbin. I just start the wrap and let the bobbin dangle while I turn the rod and I use the free hand to pack the wraps against each other. The weight of the bobbin gives just about the right tension (at least for me). (Bill Bixler) It was just as I feared, the feedback on and off list suggests strongly that it isn't the device. Back to the wrapping bench for more practice. Come to think of it, most of the problems come when the shop is cold and I am trying to get a rod done by some deadline. Please excuse the whining... (Jeff Schaeffer) I strongly recommended regular doses of the amber fluid of your choice. You will not feel the cold, nor will you be as much of a perfectionist. No one will notice except an anal compulsive and they will find fault no matter what you do. It is their nature. they cant help it. If they can't find fault, they cease to exist. (Rich Jezioro)
Does anyone else get frustrated breaking the little loops of whipping thread when doing wraps? What have you guys tried? I have used same thread, 00 silk, 00 nylon, 4x tippet (my current favorite), and continuous wraps varnished before cutting the tags off (what a joke that was!) Am I the only ham-handed wrapper out there? (Brian Creek) If there were a list contest for worst wraps, I would win. No contest, don't even try. There is/was a also a product by Gudebrod called "G-string" specifically designed to work for pull loops. Strong, but thin and designed to flatten under the silk. Howells raves about it in The Lovely Reed. I have never seen it for sale, or met anyone who had it. But it may exist. it probably works best with strippers, of course. Or you could just reduce thread tension. (Jeff Schaeffer) I wonder, I just only wonder, if dental floss may be rather like G string? I don't have any here, but someone who has may wish to experiment. (Robin Haywood) Have you tried nylon monofilament? I think the stuff I use occasionally is about 7 thousandths, about 4 lb. It's a bit springy and thick, but useful for things like spigot whips where I like to have the tail well caught! (Robin Haywood) I use strands of nylon i pick out of a thin nylon rope of Korean origin and used here to repair fishing nets. It comes in many colors, and the red is nice. With color preserver it is also nice in other colors. It is a bit thick, but that’s OK. In fact, I prefer it a bit thicker. (Geert Poorteman) I pull the thread through the tunnel of the guide foot, then I pull it to the corner of bamboo and then I cut thread. If you are breaking thread then either your tension is too tight or you pull to hard. There's a big difference between Gudebrod thread and YLI. (Dave Henney) I do the' same, but i put little tension on the thread when wrapping. I pull the thread trough to the second flat. (Geert Poorteman) No one else has ever had a problem with that, I don't understand why you would. I've always used a material that Clemens used to sell for loops. I don't know what it was, but it works. (Larry Blan) I use various threads as pull throughs, they all seem to work if the wraps aren't too-too tight. I like to have the pull-through loop under a good portion of the wraps, then as the whipping thread just catches under the wrap before it cut it off leaving a short stub which becomes buried when you pull it through. (Henry Bryan) I think this has gotta be one of the top ten little tips. Started doing this and saved loads of frustration and contumely! Sometimes it helps to pull toward oneself rather than perpendicular to the wraps. And if there is a little stub it can be smoothed down into the wraps w/ dental pick. (Darrol Groth) You know, I tried this and found I was getting a lot more disasters when doing the final burnish. Perhaps I was cutting the mini-tag too short. Just my 2 cents. (Joe West) I had the same trouble. I decided I was cutting the tag too short, seems to work better to get it under a bit more first, then cut. I wrap with Pearsalls Gossamer, because no one told me before my first rod that it was hard to work with. Ignorance is bliss. I usually pull the tag with the end I cut off when starting the wrap (or the one before, or the one before that). I have broken a few, but it seems to be at the exit point, and usually only when I try to use a pull thread too many times. (Neil Savage) I do make the wraps sorta tight. If I slack off how would they stay tight and smooth? (Brian Creek) Burnishing me boy, burnishing. Rule of thumb for tightness of wraps is that the guide should wiggle ever so slightly. I saw a post over on the Rodmaker magazine bulletin board the other day. They would set the thread tension by hanging a sack holding between 35 and 40 pennies for the nylon threads. I would guess you could use between 25 and 30 for Gossamer, and 30 to 35 pennies for threads like YLI. (Mark Wendt) Yeah, Geez Brian, I don't have that problem either. Must be the loose nut behind the thread... Try using Spiderwire in the smaller diameters. (Mark Wendt) I use 6x tippet. (Dewey Hildebrand) As far as I am concerned, there isn't anything better than Pearsalls Naples for the pulling thread. I started using it about a year ago and have had very little to complain about. I know most of the people reading this are probably cringing at the thought of using Pearsalls as a pulling loop but I think that it is thin enough to pass through the wraps unimpeded and strong enough to pull the tag end through without breaking. At $3.20 a spool it will last you literally years. I should qualify my statement by saying I wrap in silk and do not know if it will work with nylon. (Robert Cristant) May be something to that. I use Gossamer because I didn't know any better. Been using the same little strand for two rods now. It's got a nice little crimp in it - you know how you hate to change when you just start to get something broke in? (Darrol Groth) I use a EEZ-THRU FLOSS THREADERS (they are blue in color, made by Butler, and sold in drug stores) used to pull floss under tooth bridges to clean them. It is a tough piece of round plastic with a loop formed in one end and is about 4' long. When near the end of the whipping I insert the loop, wind over it, and when done feed the end of the thread through the loop and pull through. Makes a nice job and never breaks. Can also be used over and over again. (Jack Follweiler) They also work for bobbin threaders. But they are 4", not 4' long. (Neil Savage) Right on Neil they are indeed 4" long. (Jack Follweiler) I like the 4X best. I was just wondering if 5 or 6 would work even better. I just finished a Payne Para with 12 snakes, agate, and tipping. Got a lot of use from the 4x. (Bob Maulucci) I use dental floss. (Don Greife) I used to use a great deal of tension. When I started I used nylon and a little C-clamp contraption from Cabelas to put tension on the thread. When I switched to YLI I continued to use the same clamp, but I had to reduce the tension a bit. Recently I saw a post on this list that suggested the use of a fly tying bobbin and just use the tension of letting the bobbin hang as you worked. This is a wonderful way to wrap. It allows me to move around as I work as well as making it easier to burnish as I go and I don't have to worry about keeping the tension uniform. It is not very tight so I put some Tru-Oil or varnish on each wrap as soon as I finish it so it won't come loose. I have not had one come loose, but it just seems like a real probability. I certainly have no problems with the tension being high enough to break the loop that I make from some of the scrap YLI thread. I have found that if I use a different color of YLI it makes things easier. I used the same loop for all of the wraps on the 5'-10 1/4" one piece Lee Wulff Ultimate that I am working on now. (Hal Bacon) I have always use a pretty high tension in wrapping my rods. So much so that I will almost always break a silk loop, and for that reason I usually use a loop o Size A nylon. I have tried the floss pullers and dislike them intensely. My question is how important is the tension of windings and why. I would not feel at all comfortable winding with only the tension of a fly tying bobbin. , and I said that I do like a lot of tension. How about some morsels to chew over. (Ralph Moon) I will confess that I use the fly tying bobbin and at the same time I create "artificial tension" by wrapping the thread once around one of the bobbin legs before threading through the tube. As I wrap I do so holding the bobbin in one hand while I turn the rod. For the thread loop I use 6x tippet and run it by the guide foot. As a beginner I remember reading the threads about this before, and the general consensus was that tension was not necessary. I too use true oil to hold them on and then finish with 25% mineral spirits and 75% spar. (Bill Bixler) I use little plastic loops (the ones I have are blue) that are sold in drug stores for cleaning teeth. They come in a small box and they are small enough to work well as the loop ends with a solid piece that acts as a "handle" to pull the loop through. You do not need to worry about keeping the thread or leader material together in a loop - they are made that way. They are called "GUM Floss Threaders". I have used these for a long time for whipping threads on plastic and now bamboo rods. (Frank Paul)
I was wrapping a new rod last night and as I did the the whipping l thought, l have never been able to do them in anything less than Five wraps. I know they can be done in fewer, l believe even one wrap. Any ideas? (Gary Lohkamp) I've been able to do 3 turns of gossamer, but no less. Like getting to Carnegie Hall, practice, practice, practice. (Neil Savage) You can cheat by using a sharpie permanent marker to color the thread you're winding with. Otherwise, I think three wraps is the minimum possible (start the wrap over the pull-through thread loop, do three wraps, and pull through to finish). Any fewer won't hold. (Chris Obuchowski) I have done a single wrap. You cross the thread and pull it to the side and hold it with masking tape. After a coat or 2 of varnish you can trim it. The side you want to pull it to is the wrap side. The varnish will trap the thread. (Timothy Troester)
I am wrapping my guides with an emerald green silk (angler's workshop #30) and have had good success. However, when I applied a color preserver some of the wraps darkened (not the full wrap, just two or three turns. I have three coats of preserver on the wraps so they are fully saturated. Anybody know what has caused this!!?? (Al Baldauski) There is a space between the guide foot and bamboo where the thread goes over. If the color preserver isn't completely dry and doesn't fill this space the varnish can bleed through and darken the wrap. (Ted Knott) This darkening has occurred before varnishing and goes all the way around the rod for two or three turns. It doesn't "spread" sideways following any spaces near the guide foot. (Al Baldauski) Are you using water based color preserver? I would guess you got some oil or non water soluble chemical on the dark spots. (Dennis Aebersold) Or, you had something on your hands that you weren't aware of and managed to contaminate a short section of thread. (Bill Walters) There are some things you might try. I have an entire shelf of color preservers and experiments that did not work. After many failed wraps, here is what I do: 1. Avoid color preserver at all costs. 2. If you must, get some clear lacquer from a hobby store. Thin it out about 50%. 3. The first coat must be very light. Just wet the wraps. Let it dry for 24 hours. 4. The next two coats can be heavier (I use the same mix), but do not overdo it, and let each coat dry 24 hours. Do your best not to let it spread onto the cane. 5. Never do less than three coats, and it is critical that you let each coat dry for 24 hr. I think that you may have reapplied your preserver on top of a layer that was still tacky. This can cause all sorts of weirdness, like bleed through or even white spots. Now, the one thing that I do not know is how long the hobby lacquer holds up. I worry that it may start to crack in a couple of years, but it is the only thing that works for me. (Jeff Schaeffer) I have washed my hands before each session but contamination is not out of the realm of possibility. Yes, I'm using an alcohol-based (and water soluble) preserver so it could be sensitive to oils. I guess I'll have to meticulously check my complete environment for the culprit. (Al Baldauski) Thanks for all of your responses. I'm disheartened, now about color preserver, but not dissuaded! I find the emerald green such an appealing color that it will be worth it to me to solve this problem. I'll keep experimenting and let you know if I have success. (Al Baldauski) Try YLI's #255 for 3/0, or their #139 for size A. Or, Angler's Workshop "Sea Green" #SLKA/139 for size A, or their SLK3/139 for size 3/0. They're all the same color. I think YLI supplies thread to Angler's Workshop. I use Helmsman without color preserver and the thread turns a nice Emerald Green. You can try different finishes to achieve different shades of green. (David Dziadosz) So you're saying: use a lighter color with no preserver so when I coat the silk with varnish the thread "darkens to the shade I want" Brilliant! Why didn't I think of that. (Al Baldauski) I've used Tire Silk size 50, color #146 using Spar and Helmsman Spar Urethane without color preserver to get what I consider a nice green, not real dark. (Ed Riddle) I have found that to my eyes the varnish eliminates most of the yellow from the thread. Go for a yellowy green to get more of an emerald. (Bob Maulucci) I don't know anything about that, but I do know this thread turns different shades of green with different finishes. Helmsman darkens it more than, say, Zar, because it's a lighter finish than the Helmsman. I've finished several rods with these green wraps and I think the ones wrapped with the 3/0 looks better. I mostly use it for tipping with antique Gudebrod Brothers Champion Silk #832. This makes a nice brown wrap with a green tipping. Looks good on a blonde rod. YLI doesn't use "color names", they use "color numbers". So, if their thread has a name, someone is labeling as they see it. Angler's Workshop calls it "Sea Green", but it looks more like a "Turquoise" to me! The reason I used it to begin with, is I wanted to match the wrap color on a rod I had made for my son on his 9th birthday, with a fishing vest that I had bought from Orvis. The color name they had for the vest was "Teal". Angler's Workshop's Teal thread wasn't even close, but their Sea Green was a near perfect match. I tried several different color preservers with very poor results. I no longer use CP's on silk, except for a very few times. It did work on some B/W Jasper that I used to refinish an old Granger. (David Dziadosz) I really don't think it was contamination. It could be the preserver you used. The only CP for silks is Al’s Wrap rite. It could also be the dyes in the silk thread. Most of the time if I use CP and part of the wrap stays dark then I assume the CP is not dry yet. If anyone has the dirtiest hands that’s me because I use them for my legs, and I very seldom have problems with contamination. Also the worst CP to use starts with a F and 2nd word starts with a C. (Dave Henney)
I'm currently working on rods 2 and 3 and I'm not happy with the way the wraps are darkening up on me. I'm very pleased with how my wraps turned out on my first rod. On my first I used a red gossamer silk with black silk tips. After wrapping I applied three coats of undiluted Helmsman semi-gloss. I then dipped the rod three times in a diluted Helmsman semi-gloss. I am very happy with the result, great color contrast. On rods 2 and 3, I'm using a blue and green nylon with black silk tips. Both looked great before I applied the first coat of Helmsman. Maybe the light was just not good last night, but I could swear the nylon darkened up. I'm not getting the contrast with the black silk I'd hoped for. Should I be using a blue and green silk instead of nylon to avoid the darkening? I really don't want to use a color preserver. Maybe I'll just go back to silk. That stuff sure breaks easily though. Nylon has been such a pleasure to work with. (Mike Ealy) Green nylon seems to darken to almost black, I haven't used green silk. I wrapped two rods completely in gossamer, that requires a LOT of patience. In the future I think I'll reserve gossamer for tipping and use a thicker silk for the wraps. I agree with not using color preserver, when I've redone wraps that had been CP'd they came off too easily. (Henry Mitchell) Silks tend to darken as well. I think your options are color preserver or go with colors a few shades lighter than you are presently using. (Robert Cristant) I started a "thread" (see above) regarding dark areas on my green wraps. If you filter thru the responses, you'll get some good ideas on obtaining the color you want. The consensus seemed to be: don't use color preserver if you can avoid it. Choose a lighter color than you want and it will darken up depending on the kind of varnish you use. I'm in the process of evaluation different shades on green 3/0 silk, varnish, not CP. Some combo has got to be right. Dave Collyer, whom I chose to copy, mentioned he uses no CP and his wraps are super! (Al Baldauski)
I did a big color test stick on scrap cane and found this:
What are some of your favorite wrap colors, or color combos. I'm having difficulty deciding what to purchase for my next rod, and since color matching isn't a strong suit of mine... Also, any preferences for blonde Vs. flamed? (Eric Sweet) Here are some that I have tried that worked on flamed rods:
Bottom line. Put some experimental wraps on the butt section where the handle will go. Finish them, and show them to your wife. (Jeff Schaeffer)
Is there a good way off getting rid of fuzzies without using an alcohol lamp (which I can't get hold of in SA).I can't seem to get rid of the fuzzy at the end of the thread successfully. I have been using Pearsalls Gossamer. Sometimes I manage to get the end of thread to remain under the wraps it is pulled through, but most times I end up with a very short 'tag'. (Stephen Dugmore) Leave a longer tag and cut flush after you varnish. (Timothy Troester) If you very carefully slightly separate the wrap the thread before the tag comes out, using a very sharp Exacto knife blade and a steady hand cut straight down between the threads. If the blade is sharp enough and with a little tension on the tag end, all you have to do is touch the thread. Burnish the wrap back together. (Don Schneider) I doubt you want to hear this, but practice will help quite a bit with those fuzzies. I'll share another remedy in a sentence or two. I break a single edged razor blade in half lengthwise and use it to trim the tag ends after it has been pulled through. I lay it flat against the wrap, with the sharp edge just nudging the tag end and the dull edge towards the end of the wrap that was just finished. The tag end is gently pulled straight up, perpendicular to the rod shaft, then leaned into the razor blade. About 90% of the time there is no fuzzy. When there is, a little burnishing will often coax it back under the main wrap. Here's the tip... Do not singe the fuzzies on silk thread. Singeing (sp?) seems to melt the silk a little bit and not allow the finish to penetrate, resulting in shimmers. Instead of using flame to remove the fuzzy, go ahead and apply your first few coats of finish. Before applying the final few coats, yet when the most recent coat is fully hard, use that same single edged razor blade to shave away any fuzzies which remain. Additional coats of wrap finish will completely hide the little shaved-off crater. Of course, a modicum of care is required to keep from cutting away the wrap. I'm going to wager a guess that you are wrapping too tightly. Wraps which are too tight are far worse than wraps too loose. I find that the less tension the better. If the wrap will barely stay together and hold the guide in place, it's tight enough. You should still be able to wiggle the guide around a little even after both feet are wrapped. When the wraps are too tight it is very difficult to get the little fuzzy tag end to snap back under the main wrap where it belongs. (Harry Boyd) PS -- I use a new single edged blade for each rod. They dull rather quickly. 6-8 fuzzy shaves will dull that blade thoroughly, and dull blades are worse than useless. With a little practice I've learned to start the pulling thread under a few more wraps (5 or 6). Then when I'm on the last wrap and ready to pull the tag end through, I put the tag end through the loop, pull the loop snug with the last previous wrap, make sure last wrap is tight and pull the tag end just barely under previous wraps. Then I can cut the tag end flush with previous wraps and pull it all the way under without a tag end. It seems that it helps to pull the pulling loop toward me (IE: perpendicular to rod rather than parallel) - that way if there might be a little bit peeking through, it is naturally pulled down between previous wraps. Then it can be smoothed into the grooves with a sharp dental pick and no danger of cutting the wraps. Snug and burnish as usual. Hope this helps. Best 'O Sport... (Darrol Groth) I do it like Darrol except when I stop to cut the first tag end after 4-6 wraps at the beginning , I put in the pull through loop and when I get to the end of the wrap I put the 2nd tag end in the loop, pull tight to the last wrap cut the thread right next to the loop and pull the loop through, no fuzzies and I only have to stop 2 times per wrap. (John Pickard)
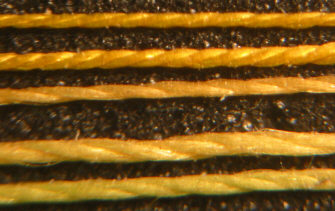
I'm a little bored waiting for my eyes to completely heal and Alan Kube and I were comparing silk threads under the microscope today so I decided to take a digital photo and share with everyone. I compressed the photo down to less than 20 KB so I hope it doesn't slow anyone down. I will take some better photos and send them to Todd for Power Fibers later. The photo was taken with a Canon A40 Digital Camera and microscope set at 10X magnification.
The silk threads are from top to bottom: Pearsalls Gossamer Pearsalls Naples YLI #100 Gudebrod 00 Belding Corticelli A (Jeff Fultz) FWIW, the Pearsalls looks like a tighter twist than the others. It seems to me that would make it a better choice for guides? I know with rope, a tighter twist is less likely to fray although it's not as easy on the hands. Same idea here on a much smaller scale. (Neil Savage)
I just finished wrapping three rods this week using one of those jobs where you twist the rod by hand and the thread is run thru a hand tensioner. For me it was very tedious work and I was wondering if a powered wrapper is a good thing. I looked thru the archives and looked at the pictures of some home made jobs. I have three alternatives: 1. The Pac Bay Rod Smith for under three hundred bucks looks nice; eBay and Cabelas have them for about the same price. 2. I thought I could rig my Dremel tool with the variable speed foot pedal to do a nice job but then I've got to come up with all those little wheels and I don't know where to get them. 3. I also have one of those little rod drying motors with an inline on-off switch. Could that be rigged with the foot pedal rheostat? So what are your thoughts folks? I do only small trout rods for the most part. I hope to build twenty or more per year. I watched a pro do it at Orvis and she did the whole rod in under five minutes. I won't admit how long it takes me. My questions are 1. Where do you get those little wheels? 2. Does a motorized wrapper do the job any more carefully as well as faster? 3. Does the expense far outweigh its usefulness? 4. How long does it take to wrap the average rod? (Dick Steinbach) I have a couple of expensive Renzetti rod lathes that I used to use for wrapping under power when building big standup tuna rods. I would never, never, not even think about wrapping a bamboo rod under power. A short wrap on a fly rod with small size thread is way easier to do turning the rod by hand. Wrapping under power will not increase the quality of your wraps (probably the opposite) and your speed will only increase if wrapping long underwraps on big rods (3-4 inch wraps). I wrap around 200 rods per year counting new rod, restorations and repair work and every one of these is turned by hand. I would wager that I could wrap a graphite rod (turning by hand) as fast as someone doing it under power. I really think you would be wasting your money if you were to buy a motorized wrapping machine. However, a good hand wrapping jig can really improve your wraps and make it much easier and faster to wrap a rod. Golden Witch sells one as well as Flex Coat and a few other places. Of course you could build one in an afternoon with scrap parts laying around your shop too. (Jeff Fultz) I have the wonderful luxury of not building rods for sale but here's my $0.02 worth. Wrapping a rod is the most relaxing, non stressful part of rod building. You can do it as many times as you like until you get it just right and never worry about if it will turn out right. You don't like the color?, redo it You don't like the trim wraps?, redo them You want to add trim wraps?, do it Changed your mind and want silk instead of nylon (or vice versa)? No problem And all the while you can relax, listen to some music and have fun. Do a guide or two and have a wee dram. (I often feel I do my best work after a small amount of "relaxation") If it only took 5 minutes to do a rod I'd never get to listen to an entire symphony and have a drink. I think I'll just keep doing it by hand and keep using my "Webster's" thread tensioner. (Joe Behar) Non-stressful? Heh, how 'bout them leetle two turn trim wraps with Gossamer that just don't want to work... ;-) (Mark Wendt) I tried 2 turn trim wraps on my most recent rod. I used a "clove hitch" if you are into knots at all, but it makes a bigger bump than I like where the threads cross. I also had to put a drop of varnish on each wrap immediately and cut the tag ends after it set. It worked, sort of, but I think I'll go back to the 4 turn trims I've used on my other rods. (Neil Savage) Tony Spezio gave me a little tip a while back for doing trim wraps. Start your trim wrap the regular way, with the loop under, complete your turns, and leave both ends long until after you get a coat of two of finish on the wraps. That way, if the wrap comes loose, you still have a couple of handles to tighten it back up. The stress level has gone down, but it's still a pain in the arse when they do loosen up. (Mark Wendt) I think anyone that has mastered 2 turn wraps is a candidate for investigation by the men in black! (Larry Blan) Well, not sure I mastered it, but the last rod I sold had two turn wraps, and they came out purty good. It wasn't as easy as doing the three turn wraps though...(Mark Wendt) Try one turn tipping....!#$%@ $%&#!@!!!!!!!!!! On clear wraps.....$%&^#!@#@ ^%&$#!@ $%&^%#!!!!!!!! (Jeff Fultz) In my experience powered wrappers haven't worked so good on bamboo because of the corners. they work much better on the round sticks. I don't know if someone else uses them. I prefer using that Golden Witch reproduction wrapper. I found it necessary to tune it a bit with a file so the spool wouldn't wobble, but I like it much better to apply the tension to the spool rather that the single strand. (Timothy Troester) I agree with Tim, it's best to turn the rod by hand. I apply tension to the entire spool on the shaft of a gear motor. I like the ability to back up, an entire wrap if I have to. (Ron Larsen) Wrapping was my least favorite (HATED) part of rod making until I bought the JW Wrapper. Now I enjoy doing a great job with it. It is not cheap. but it has been worth every penny to me. (Grayson Davis)
Is there any difference between the silk thread one can buy at a local sewing shop and the thread sold by, let’s say, Golden Witch? (Dave Gerich) 'Fraid so. At least I've never seen thread as fine as Pearsalls Gossamer in a sewing shop. Also, I understand some brands tend to have more "fuzzies" than others (I don't know this personally since I've only used Gossamer.) (Neil Savage) Many quilting stores carry YLI #100 which is just a bit thicker than Pearsalls. You can see if there is a dealer in your area by going YLI’s Web Site and selecting the 'Retail Store Locator' option on the left. I also prefer Gossamer, but have had good luck with YLI when I want a color that isn't available from Pearsalls. (Chris Carlin) Pearsalls Pure silk Gossamer threads are Organzine threads manufactured from 20/22 denier Chinese Bombyx Raw silk. (8 filament). Their denier is 126. The reason for fuzzies in some silk is because it is made from pieces, not from single strand silk like the Pearsalls. Today's genetic silk worm produce large cocoons having fibers that are over 2,000 meters long. Denier is the unit used to measure the fineness of silk; it gives the weight of 9000 meters in grams. For example 9000 meters of 20/22 denier Raw Silk weigh between 20 & 22 grams Pearsalls Pure Silk Tag and Body Flosses are manufactured from 27/29 denier Chinese Bombyx Raw silk (12 filaments). Their denier is 672 and they have a loose holding twist. All of the above has been provided to me by Alex Jackson. (Denny Conrad) I love it when you talk dirty like that... Just curious, how many strands of silk are in any given segment of Pearsalls Gossamer? Is the thread a simple twist, or some kind of braid? (Mark Wendt) It's a twist, if it were a braid you'd know and hate it. (Robin Haywood)
I'm ready to start my first wraps. Most of the sources I have looked at have loads of information on how to wrap and finish but little guidance as to lengths. I've tried Maurer's book and Todd's tip site. I have Hatton's new book for some visual references. What does everyone do in terms of length of wrap and how far past the foot of each and how far up onto the guides. Tip tops, ferrules and grip lengths as well. I know this is all subjective and after twenty or so rods I will develop my own style, but, for my first rod a little opinion would be nice. (Ralph Tuttle) I just finished watching the Golden Witch video, "Finishing Bamboo Rods." In it, Russ Gooding talks about having three wraps on the blank before wrapping up the guide foot. I think that's a pretty good spot to start. He uses Pearsalls Gossamer for his wraps, so that wouldn't be too much thread on the blank before going up the guide foot. Of course this should also lead into a good discussion on dressing guide feet before wrapping. Anyone care to comment on that? (Todd Talsma) Wrap lengths are a personal preference. The most common tastes these days seem to be for shorter rather than longer wraps. I make my wraps only one or two turns of thread longer than the guide foot. Others seem to keep their wraps as short as possible too. (Harry Boyd) It's a personal preference. Lets add one more book to the library, I have Wayne Cattanach's book, there is a chapter on finishing and wrapping. He gets into detail of how many turns per different sized silk to cover the foot and wrap past. I would try the first guide foot and count how many turns looks good to you. and duplicate it on the other foot and measure them they should be close to the same size - If you like them, keep them and move to the next guide. One thing to remember though, smaller guides have smaller feet. You might need to back of a turn or two as you get to the guides on the tips. (Pete Van Schaack) Thin Ralph. I like not much more than 3-5 turns ahead of the guide foot, and wrap up to the beginning of the curve. Too much thread on a bamboo rod is not only ugly, but seriously affects the action. (Ralph Moon) I wrap from the blank UP the foot. Not everyone does it that way but it's easiest for me. I use three wraps of thread to start any wrap whether it's tipping or a main wrap. I just keep tugging the thread over until it's square with the base of the foot and then climb up the foot. I used to shorten every foot ALA Wayne's book but I had to. I was using PacBay guides in those days and every guide had one long foot and no two guides were ever the same. I have since switched to "Snake Brand" and find their consistency frankly remarkable. (Yeah, Yeah, no financial interest blah, blah, blah) They require little work if any to prepare and so wraps come out the same length on rod to rod, practically. Nothing is perfect. I do agree with Ralph Moon. Even that little extra weight on a tip can be felt. (Mike Shay) With 00 thread, I make three wraps with the forth wrap on the foot. With Gossamer thread, I make four wraps. I use snake brand guides. When I was using Pac Bay guides, I made a small template for the total length of the wrap. The Pac bay guides were not the same length. (Tony Spezio) I use a small pair of draftsman's dividers (the kind with an adjusting wheel between the legs) to get all my wraps the same length. (Neil Savage) I'm with you on the use of the dividers. Set it up once and it works with all the guides of that same size. I also prep the feet by making sure they are all the same length. I've been using H&H's and there can be some minor variations in the overall length of the foot. Once I've got 'em all uniform I will then grind the profile on each end. I'm prone to use a shorter (2-3 turns) wrap before the foot and work my way up. Tipping is also short, no more than 3 turns. I had a hard time convincing a non-rodmaker once looking at one of my rods that the tipping wasn't painted on. Then he just said that he thought I was nuts (with a few other colorful adjectives added not appropriate for the list). To each his own, as they say. (Brian Smith) I think that I am a little out of the choir. Personally, I like the long wraps. I use ten turns of Pearsalls Naples before the feet of the guides. Why? For me the wraps are "glamour" and a well made wrapping job, well varnished, adds an aesthetic appeal to the rod. Like a pair of earrings add fashion to the face of a nice girl. Of course this is just a personal opinion. On the other side, I do not think that same turns of silk can change the action of the rod, but also this is my untested opinion. (Marco Giardina) My tastes for wrap lengths have changed over the years. I now prefer about 4 turns in front of the snake guide foot and something less than 1/8" wide at the tip top. At the ferrules it depends a bit on the type of ferrule and whether the wrap just butts up against the end of the ferrule as in refinishing old cane rods or whether the wrap goes up onto the ferrule as in a nickel silver serrated and V-notched ferrule. But generally shorter length wraps look better about 3/16" to 1/4" beyond the ferrule end. Note too that some of the older rods had a snake guide right next to the ferrule end so a wider wrap is required at that spot and then you might want to make the wraps at the other ferrule stations on that rod about the same width for uniformity. Now as to grip lengths there is a wide choice. I don't care for the very short 5" long cork grips but prefer 6 1/2 to 7" lengths using a longer grip with uplocking seats and shorter ones with down locking. There's dimensions of some cork grips in my book "Tips and Tapers" on page 26 that might be helpful to you. It's a good idea to fit the grip length to the size of the customers hand if possible. (Ray Gould) For guides, I start between 3 or 5 thread wraps before the guide, just shy of a 16th of an inch. For tips I wrap a half inch and for ferrules and checks a quarter inch. I did this with graphite for 10 years (I wrapped two 1/4 inch wraps on the ferrules and never had a problem). When I switch to bamboo a couple of years ago, the only change I made was to grind the guide feet down to about half of their store bought length. My ferrule wraps on bamboo vary a bit based on my mood but are generally 1/4 inch to 1/16 beyond the tabs. Of course I'm new to this bamboo stuff and still experimenting and learning so I provide this for curiosity sake. I will be as interested as you to see what everyone else does. (Jim Lowe) Then there’s the wrapping style ALA Dave Collyer which I find very attractive and have used on four rods so far. It involves a fancy trim wrap before the guide wrap. The trim wrap consists of 5 turns close wound, then 4 turns in a “fast” helix (about 1/32 inch between wraps), then another 5 turns close wound. This trim wrap ends about 1/16 inch before the guide foot. Then standard wrap up the foot. The technique I use for the helix part actually gives a progressively tighter spacing as I work toward the tip so that the trim wrap length decreases as I go. The end result gives a more balanced look rather than a constant length which would look “too heavy” at the tip end. Granted this gives total wrap lengths greater than most use but I don’t find it “ugly”. Here’s a link to some pictures on Todd’s website. (Al Baldauski) I first prep all my guides by thinning the feet using a Dremel tool and polishing stone. The polishing stone is used to take off any burrs from grinding the foot tip to a very thin dimension and to smooth any problems from the thinning process on both the top and bottom of the guide foot. When I wrap guides I begin at the top of the guide and wrap down over the thin tip onto the bamboo. I make the guide wraps a given length with only a few wraps (3 to 6) past the foot bamboo interface. I can control the length of guide wrap and its smoothness better this way and as the guide feet become short towards the tip I reduce the length of the wrap to provide a uniform change from the butt to the tip. I know wrapping from the top is not how the books suggest doing it, but I have done it this way so long that it is no problem. I have no problem at the foot bamboo interface since the foot thickness is very thin and if one carefully packs the thread as one goes along, the thread forms a very smooth interface. I hope this helps. (Frank Paul) If I am reading Cattanach correctly he also begins his wraps on the ferrules and guides and finishes on the cane. He says right out that "The ferrule wrap is the hardest wrap to begin, because it's started on the polished barrel of the ferrule". With respect to the guides he doesn't come right out and say it but he does say: "I place the pulling loop in with seven turns left because the thread is still two turns form the end of the guide foot. By doing this I prevent the thread from forming a gap at the very end of the guide foot". I find this interesting because most others seem to describe wrapping from the cane onto the ferrules and the cane. (Larry Puckett) I also comment that my technique of wrapping down the guides is not common either - and instead of measuring to make wraps the same length I count threads or wraps as they are made. (Wayne Cattanach) The proponents of wrapping up the foot or ferrule claim it is easier to accomplish without leaving a gap. Pretty much a matter of personal preference, to my way of thinking. (Larry Blan) There's no doubt about it in my mind. It's much easier to start the wrap on the cane and wrap uphill onto the ferrule foot or ferrule. With a well thinned guide foot or ferrule end there is no "gap" problem. Wrapping downhill is always a big pain in the behind. (Ray Gould) I have settled on wrapping down the guide to the cane. Like everything else we do, it takes a little getting used to. I use Mike McCoy's guides and I don't do a thing to them, except maybe tweak the feet to straighten them out. I'll pack the wraps tight when coming down the foot where it drops off, and then burnish them out to fill any gap where the foot meets cane. After a few years of doing this I can finally count wraps. (Mike Canazon) Well I guess the responses from the list do suggest that we all develop ways to make it work. Amazing that different approaches still end up with a well casting bamboo rod that catches fish and looks "extremely good". On another note, hopefully the situation in the Southeast will improve with time and all will be recovered. (Frank Paul)
I was just wondering if anybody knows if there is a difference between Pearsalls Gossamer Rod Whipping, and Pearsalls Gossamer Fly Dressing thread. (Floyd Burkett) I don't think so. Gossamer is Gossamer, some use it for tying flies, and we use it for wrapping guides. I use it for both. Speaking of Gossamer, any of you’se guys ever get about half way through a wrap, and Pearsalls, in it's infinite wisdom, decides to add to the length of the thread on the spool by tying to segments together in a big ugly knot? Had that happen the other day on a lengthy clear wrap that was going on over a scarf joint. I was over half way done with the wrap, and this nifty thing came off the spool. (Mark Wendt) I've had it happen, but I can't recall whose thread it was - only the fine vocabulary I developed during the occasion! (Art Port) That wasn't the first time I've had that happen, but it was the first time it ever happened in the middle of a wrap. The few times I've had it happen before, I was able to finish the wrap, or it was early enough in the wrap that it was no biggy. The wrap I was working on would have been 2 7/8" long, and I was already over 2" on it. Yeah, there were a few choice words... (Mark Wendt) I see the problem, Mark. Try wrapping at sub-light rather than warp speed. You'll be better able to see the knot coming & not have to back up so far. (Ron Larsen) The last thing I have to worry about is wrapping at warp speed... I have to be one of the world's slowest wrappers! (Mark Wendt) Can you not just tie the end in, having removed the knot, obviously and proceed as normal? If tied in underneath, with ends as short as possible, it surely will not be at all obvious, even on a clear wrap? (Robin Haywood) Well, I usually have enough issues with clear wraps, and I like them to be as "seamless" as possible. That extra "bump" in the wrap just wouldn't look right to me, and it would probably end up frosting with my luck. (Mark Wendt) Thanks for the reply. I figured Gossamer was Gossamer whether it was labeled as "rod whipping" or " fly dressing". It would be rather silly to make two different threads of the same diameter, but I thought I would ask anyway. I hope I don't run into any of the knots I have a hard enough time with wrapping without one. If I do though I'll check back with you for a vocabulary update. (Floyd Burkett) It's all just Gossamer, and has been for at least 45 years! It's good because it uses very long filaments of silk indeed and even at 59 I don't find it specially hard to use. I've used it on flies for that time too, except where I need a color it doesn’t come in or where I need a stronger thread. I think I've had one knot in all that time, but since I don't tie flies for anglers I may have just tied the others in without noticing, I go on automatic a bit when tying a batch of flies! (Robin Haywood) Heh, you wouldn't have missed this knot... It was ugly, and had two looong tag ends to it. I was so intent on watching the wrap, I didn't notice it until it got almost to the wrap. (Mark Wendt)
Looking through the archives I've seen several "favorites" list, but have found none on wrap colors, so I thought I'd ask. I'm getting ready to order some components for rods 3-6 and am looking for some suggestions on thread colors. I haven't seen that many rods. My first rod was wrapped with some borrowed emerald green and black silk. Rod number 2 in some maroon nylon that was way to big, but I was on a time crunch. So, what are your favorite colors (and brand/size) for wrapping. I'd like to try a few different combinations since I get bored doing the same thing more than a couple of times. (Aaron Gaffney) Shades of red and brown in size 3/0, varnished only so it comes out transparent, trim with a different shade of the same color, IE: medium brown with dark brown trim, or red with maroon trim, you get the idea. I like YLI best, or Tire, they both come in a vast array of colors. (John Channer) A few years back I got a deal on Pearsalls Gossamer in Java, 50 cents a spool, I got 20 spools, so it's my favorite color. I have tipped it with several lighter colors but my favorite is Chestnut. Cardinal is great for a brighter tip. I like to use dark reel seats to match, mainly walnut, cause I got it free. (Chad Wigham) Pearsalls gossamer royal hunt tipped with black comes out (IMHO) quite nice on a flamed rod. It looks pinkish on the spool but after varnish it is a light reddish/rose color. (Bill Bixler) That's my favorite too. Especially on flamed rods. (Mark Wendt) I've been using Chestnut tipped with 3 turns of Cardinal (both gossamer). Looks pretty good to me on a flamed rod. However, I'm going to use Highland Green tipped with either Scarlet or Black on my current rod. Just got the thread and guides yesterday, today is wrap day. (Neil Savage) or many of us that have not had a chance to see a variety of rods, it would be nice to have some photos of favorite wraps, both colors and styles available. I know we are somewhat digitally challenged and Todd (here’s a start) has already done a lot but a site somewhere with pictures and color labels would be great. Then again, maybe that is where the artistry and personality of each maker comes in to play. And I would love to see some of Alan Kube's work again. I have used only my mentors color of Pearsalls Gossamer Java Brown tipped with black and it complements a blonde rod. (Ralph Tuttle)
Has anyone ever had any knots in the middle of a spool of thread? The reason I ask is last night I was wrapping a rod (PHY Perfectionist) with Pearsalls Gossamer and I was half way through a ferrule wrap and out came a knot with tag ends on it! Could this be where they spliced the thread together in production? Just curious if anyone else has ever had this happen. (Scott Bahn) Don't that rile ya?! I have run into that. Usually black. I assume the thread needed spliced at that point, or the big spool that was filling the little spools ran out. (Timothy Troester) I've had it happen many times, and always in the middle of the wrap for some reason. I've had knots in just about every color of Gossamer, with one especially cursed spool of Cardinal with 4 knots in the first half alone. That one got thrown across the room before I could run into any others. I have also had at least one spool whose thread was in several pieces. The knot guy must've been on vacation that day. (Chris Carlin) Yep, had that happen a couple of times. Last time I was about halfway through a 2 1/2" clear wrap over a splice joint. Quite annoying. (Mark Wendt)
To all of you who dip/drip a couple of coats and then wrap on guides; My first 4 rods were all finished with Tru-Oil and then I wrapped the guides on and finished the guides with spar. This weekend for rod number 5 I set up a drain tube. On Friday I put on a first coat (no guides on the rods), then on Sunday I sanded most of the first coat off and re drained. I must say it was extremely easy. My question has to to with the guides. How long should I wait before wrapping the guides on? I've read anywhere from 2 days to 2 weeks. I assume I sand the rod down before wrapping. Then, after I wrap the guides and finish them, how long after I do a final dip before I polish the rod. By the way, I did find out that I needed a drying cabinet because on the first coat I tried to dry them in the tubes and they didn't dry. By the way, you should see my drying cabinet - the ugliest piece of S$%^ ever constructed - on the plus side it only cost me a roll of duct tape, an old metal shelf I had lying in the basement, and some left over rigid insulation. (Aaron Gaffney) Here is my process: Once the blanks are ferruled, I rub on two coats of Waterlox sealer/finish 24 hours apart, steel wooling in between coats. At this point I steel wool the section and dip one coat of spar varnish on. after two days at @ 100 degrees in my drying cabinet, I lightly sand the finish removing any obvious blemishes and install the grip and winding check. After this is done I do my signature wraps and ferrule wraps and finish these wraps except for two coats of spar varnish. I sign the butt section and # the tip sections and then dip a second coat of spar varnish on. After another 2 days in the cabinet at @ 100 degrees I sand the sections and then I wrap all the guides and finish them except for 1 coat of spar varnish. Once the finish on the wraps has cured well I dip for the third and final time. I choose to only put one coat over the finished rod because I am not a big fan of the "ramping" you tend to get on the guide wraps when you dip all of you finish coats with the guides on. I do dip it once with the guides on because I like to seal all the edges of the guide wraps. Just the way I do it. What is the saying, there are many ways to skin a cat. (Robert Cristant)
For those of you who apply a couple of coats of varnish before you wrap, how long to you let the varnish cure before wrapping? (Aaron Gaffney) At least a week, sometimes several weeks. Wrapping guides is my least favorite thing to do in rodmaking, so I put it off as long as I can. (Darryl Hayashida) The pre-wrap varnish I apply is either Mike's stuff (when I have it), or a mix of varnish, tung, and turpentine in equal parts. It dries overnight, and probably faster. I do a coat a day until I get a smooth surface. Then wrap and finish. The wrap coats have to sit for at least three days in the hot box for them to be hard enough to sand. Then a final dip or two to give it a finished look. A new trick I learned is to apply the varnish at room temp, and not heat it. I do turn on the heat the next morning to get the curing going. (Jeff Schaeffer) I wipe on several coats of Formby's Tung Varnish before I wrap. The blank is warmed in the oven before applying the first coat. Dry overnight. Steel wool after the second coat. I apply coats till the blank is smooth. Steel wool the next day and wrap. If I apply one coat real early in the morning, I can apply another coat that evening. After steelwooling each coat of Formby's, I pass a large magnet over the blank to pick up any stray particles of steel wool and then wipe down with Denatured Alcohol before the next coat. I can wrap in three days. About 24 hours before I apply any wrap or finish varnish, I set the thermostat in the room to 80 degrees and let all the varnish, the drain tube and blank stabilize to that temp. After filling the wraps with thinned Helmsmen I only do one coat of Helmsmen in the Drain Tube. (Tony Spezio)
Most of us know that a double edge razor blade is about the sharpest blade you can get, because of this they are a little dangerous to handle. If you take a blade and cut it up into small triangular blades you can then hold them in an Exacto blade holder. I have been doing this for years and this is in my opinion the best wrapping blade bar none. I have been able to shave the small nubs that you get when the tag end is pulled all the way through by accident. Those #@*&#% 1 and 2 trim wraps are much easier to do as all you have to do is touch them with this blade. You can cut the double edge blades with a pair of ordinary scissors, the little blades will be bowed to one side but you can easily straighten them out. You use them till you feel they are dull and replace them. (Joe Arguello) I use the double edged blades, too. With a little caution they can be snapped in half lengthwise, rendering them relatively safe. That is, till you drop one off the wrapping bench and snatch at it as it falls. Yep, those clear wraps had a distinctly blood red tone to them. Yelled at my daughter to run for the Band-Aids so I wouldn't stain the carpet too badly. Sure is hard to wrap with a thumb in bandages. Guess you can start calling me Nunley lite. Well, maybe Nunley short. (Harry Boyd) I've found that the liquid Band-Aid works well for small cuts. I keep a bottle in my shop first-aid kit.. (Ron Grantham) By the way, all, liquid Band-Aid is just super glue. (Mark Wendt) My experience with real sharp blades is that I invariably cut the wrap along with tag. I absolutely hate trim wraps though I do them on almost all rods. (Mark Dyba) I've been using a cut throat razor. Smooth. Keep it sharp with 8000 grit waterstone. Lay the blade along the wrap and lift the tag and cuts clean as a whistle. (Tony Young)
I am doing a Payne taper, and would like to duplicate the original wrap colors. I know the finishing technique, but what were the wraps and tipping? Can't remember. (Jeff Schaeffer) Corticelli Java Beige #5115 is used for Payne Brown, size 4/0 also 6/0. I think a lot of folks just use Pearsalls Java, Naples or Gossamer, these days. I've not used it to try and duplicate Paynes technique though. Also you can use Pearsalls "Antique Gold" I believe, to match the tipping. (Mike Shay) Pearsalls Java brown tipped with a subtle gold were on the ones I've seen and I've seen a few of AJ Thramer’s Paynes that were tipped likewise. (Will Price) I too have been asked to come close to the Payne look for a rod. The rods I have seen have brown (Java Brown?) wraps with gold tipping. I'm not sure what color to use for the gold as my varnish always makes gold thread almost clear and I don't like C.P. (David Van Burgel) I've been told that the gold on Payne rods was an old Kozmic Rod Company green silk, especially selected by Jim Payne because no one else could get it. I've also heard of the odd spool going for big bucks at Lang Auctions and similar venues. (David Zincavage) If I remember correctly, a couple years ago in his talk at the Catskill gathering, Hal Bacon said that Jim Payne used a couple of coats of shellac on his wraps. You might try that. He suggested that you use Zinnsner precut clear waxless shellac by skimming the liquid from the top layer after the solids have settled and using that liquid straight. I have used it on a couple restorations, and it appears to leave the old gold thread (already on the rod) looking quite bright. I've also used it on some other colors, and it does not have as strong of a color preserving effect as most of the commercial products. Be very careful that it is incompletely dry before you overcoat with varnish. Waxless shellac is often used as an undercoat for varnish in furniture work. (Doug Easton) Oh, be very careful that it is completely dry before you overcoat with varnish. (Doug Easton) I just checked at my local hardware -- They have Zinsser Clear Shellac, but in reading the can, it is NOT recommended for undercoat under Urethane and I had planned on using my "normal" Helmsmans Spar Urethane. What do you think??? (David Van Burgel) I've used it on 2 rods and both rods are finished with Helmsman Spar Varnish. One was a restoration and the other was a new rod. Both of them have been around about two years now and I haven't seen any problems with them. I think some urethanes may not get along well with shellac. It may be that some of the solvents, cut into the shellac. I see no evidence, however, of bubbling with the helmsman. As I remember I used about three coats of shellac with overnight drying between them. I think the surface after the shellacking was just a bit rough. Then I let the whole thing dry a couple of days and started my usual varnish finish, which usually consists of three or four light coats of varnish with standing in between. One thing I've noticed is that there seems to be no problem with "casting cracks" at the ferrules on the new rod. I very carefully, thin out the tabs on my ferrules, but I do not chrome them, so the expectation would be that you would get casting crack's. Perhaps the shellac has something to do with this fortunate circumstance. Go figure. I suggest you try it on one of your color sticks and see what you think. (Doug Easton) I would strongly recommend you do not use shellac with wraps. I know there are some big names who are said to have done so but in my experience it cracks up and crazes under the finish. I've tried it a few times and in very thin concentrations (blond unwaxed) and it always wound up a disaster. (Tony Young)
Getting ready to dip varnish my first rod. I have refinished a lot of cane rods in the past and always wrapped them before varnishing. I tried varnishing my last rod before wrapping and found it was harder to get the wraps tight due to the fact it was hard to press them tight to each other with the burnishing tool because they wouldn't slide as easily on the varnish. Maurer, Howells and Wayne’s book show wrapping after the varnish. Any tips out there? (Mark Heskett) That's the very reason I wrap before varnishing. I had a difficult time getting the wraps to burnish after wrapping over a varnished blank, so I stopped doing it. What I usually do before I dip is carefully brush one or two coats of thinned varnish over the wraps so they don't bubble. (Dennis Haftel) I dip my rods twice and then sand it like I'm getting ready for the last coat. Then I wrap the guides and finish the wraps (three or four coats). Once I have the wraps smooth, I sand them one more time. Then I dip the whole section one more time, to blend everything together. That way I don't have to sand around and under the guides. If you are having trouble sliding the thread on the rod, you might be trying to wrap them too tight. I think the thread just reinforces the finish for locking the guides in place. I found with cane rods the thread seems to get tighter and flat going around the corners and loses tension on the flats. When I first started using 3/0 silk or Pearsalls Gossamer, I had a lot of trouble with overlapping. When I loosened the tension, I could wrap and move the thread easier without overlapping. (David Dziadosz) I put a VERY THIN coat of varnish on with my fingers and rub it out as thin as possible. After it dries I rub down lightly with 0000 steel wool. I then wrap. The varnish makes wrapping much easier as the thread grabs ever so slightly to the varnished blank. No problem burnishing at all. I finish up the rod with 2-3 coats of finish over the entire rod. (Marty DeSapio) I hand rub Spar onto a cane rod before wrapping. I do leave a few weeks before wrapping. (Brian Sturrock)
I'm sure this has been thought of this before, but I thought up a great way of holding on guides while I wrap out a rod. The last rod I wrapped I got really frustrated with the tiny little strips of masking tape I was using for holding on the guides while I wrapped them. So the last time I was at the hardware store I picked up a bunch of heat shrink tubing. Last night I cut the tubing into narrow little bands and tried them out. It works like a charm! I just slid the bands down the blank positioned the guides and zapped the bands with my heat gun for a few seconds. It makes adjusting the position and alignment of guides super easy. Plus if you cut the bands a little wider you can test cast with them. When you wrap the guides, just use a sharp X-acto knife to slice the band off when you get to it. The pieces were only available in 4' lengths which cost $1.89 to $3.99 a piece and I only used up about 6" of each size and now have enough rings for at least a dozen rods. I got 1/16", 1/8", 3/16", 1/4" and 3/8" sizes all in clear. I found the 1/16" size to be the least useful. It only works on the first 1 or 2 guides on a tip, and the 1/8" will shrink down enough to work in it's place. (Mark Shamburg) I use rubber rings made from surgical tube. Real easy to clip little rings off a length of tube. It also comes in different sizes, real small for tips. You can get it at Dive Shops. In a pinch I have used the dental elastic bands that are used for Dental braces. They are too big for tip sections but can be twisted around the section several times to make them work. I wrap up to the band on the foot then stick a dubbing needle under the band and stretch enough to make break all in one motion. Once one foot is wrapped, the band can be rolled off the other foot for wrapping. Gave up on tape many years ago. Another advantage is when checking the rod for bend with the fly line before wrapping, the guides can be easily moved without messing with tape. (Tony Spezio) Another neat thing about the heat shrink tubing is that if you get the heavier tubing, you don't need thread at all! (just kidding) I hold the guides in place with my fingers and wrap down the foot rather than up. No need for messing with tape. (Harry Boyd)
Can anyone tell me how to go about doing feather inlays. I have a few jungle cock feathers I would like to do this with. (Gary Nicholson) Russ Gooding (from Golden Witch) wrote a piece on just such a thing that is available in .pdf from their web site. If the link below won't take you directly there, you can get there through. (Carl DiNardo)
I just finished my last coat of varnish last night and it is drying in the cabinet as I type. How long do I need to wait before I wrap the guides or tape the guides and do a lawn cast? I am assuming since people like to wait a week , two weeks, or even a month before fishing a freshly varnished rod that a. I should probably wait as long as I can and b. it is subjective and everyone has there own ways of doing things. That aside, I would like to know how everyone here does it. (Greg Reeves) Depends on what sort of finish you use. Often the manufacturer will have instructions that say something like: "Wait 24 hours before putting into service, 48 hours for floors..."I think the mfr.'s recommendations are a good starting point. With spar varnishes, I wait 2-3 days before sanding between coats. With poly's, 12-24 hours depending on the specifics. After the final coat, I wait 3-4 days before polishing out any minor blemishes. (Harry Boyd) It depends on the varnish you’re using. You can handle Helmsman Spar pretty roughly after two days assuming you’ve waited at least two days between coats. When I want to speed things up I put my rod in my oven set to 180F overnight. (Al Baldauski) If you wrap then varnish the wrap then dip it smoothes the varnish out over the wraps to the blank. (Gary Nicholson) The few times that I have dipped first and then wrapped should (to my way of thinking)be the obvious reason: it is much easier to rub any imperfections out of the varnish and get a glass smooth finish without the guides and wraps in the way. That being said, it then becomes slower and more tedious to finish the wraps without smearing the blank. I've found the best method is to use an artists liner brush when varnishing the wraps and then on the very last coat feathering a bit over the edge of the wrap onto the blank(a band no more than 1/16" wide) and then if all goes well you can't tell whether it was dipped first or last. (Will Price) I do both. Two very thin coats(1 inch/minute) and sand most of it off. Wrap, saturate the wraps and dip as many times as it takes. Using well thinned varnish you don't have to weight long to re-dip. (Don Schneider) I have a lot of problems sanding under the guides. Short fat fingers, I guess! I like to put several coats on the rods, sand the rod, wrap/finish/sand the guide wraps, then do a final dip. Blends everything together and looks good. Plus it's much easier for me. I use Helmsman, but switching to Ace's Spar. I think it's about like the older formula of Helmsman. I wait several days between coats on the rod and sometimes over a week between coats on wraps. If it's too soft, the sand paper will grab the finish and tear in to it. Then it's start all over! (David Dziadosz)
I am wondering who varnishes then wraps guides on, and who wraps then varnishes. Why do you do it the way you do? There seems to be a a lot of people who do one or the other. (Louis DeVos) I varnish my blanks with three coats of Spar Varnish first, then wrap the guides on and put 5 to 6 coats of spar on the wraps. I like the looks of it better and if you ever have to replace a guide on the rod in the future, you can replace it, rewrap it and varnish the wrap and you won't ever see where it was done. If the rod is varnished after the guides are wrapped and varnished, you will have a heck of a time trying to change that guide and hope that it comes out good. Usually is very tough. (Dave LeClair) I do the same as Dave. I do, however use Helmsman Spar Urethane and wait until it is good and cured before wrapping. (David Van Burgel) I varnish first 4 coats International Goldspar on the butts and 3 on the tips, then wrap. Why? Because it is easier to do a good finishing job with the Perfect It/Finesse It when you can get at it without the interruption of the guides. Downside - It is much more difficult to get the wraps all butted up neatly when they are cutting themselves into a matrix of polyurethane varnish, and burnishing is very nearly out of the question. I finish guides with a two part epoxy varnish well thinned down with acetone. I apply this with a sable brush before I mount the section in the turner, as I find I can be more accurate that way. If necessary I remove any bubbles etc by using a hair dryer. In response to the obvious criticism, no you don't get a "high build" if you have the epoxy well thinned and if you apply several sparse coats instead of one bloody great dollop! Neither do you have the guide feet all gummed up doing it this way. (Peter McKean) I dip the blanks 3 to 4 times in spar varnish, then I polish the blanks, then wrap the guides and varnish them with 4 to 5 coats of spar varnish. The main reason I like to do it this way because I can polish any imperfections out of the varnish before wrapping, therefore I don't have to work around the guides, and it makes the dipping process go much faster. When I dipped after wrapping the guides I found it was very difficult to work around the guides if there was any dust or runs. Besides that I have been making furniture as a hobby for a number of years and I got used to applying the finish before the hardware, and I have just adopted that method for bamboo rods as well. Having said that I don't see any advantage (for protecting the rod) of one method over the other, this just works best for me. (Tom Mohr) When varnishing the wraps after varnishing the blanks, does the varnish run over the ends of the wraps onto the blank, thus making a varnish buildup on the blank? How would you remove or prevent that from happening? (Jim Sabella) I use a yarn needle (it is like a regular needle, but with a blunt tip; you can buy them in different thicknesses) to apply the varnish. I have tried a brush, but it seems I get air bubbles with a brush and I have more trouble controlling the flow of the varnish. I start with two or three coats Varathane, water thinned varnish as a color preservative; then apply three or four coats of spar varnish to finish. I put the rod on a rod turner and apply varnish nearest to the guide then I run the varnish out towards the edge of the thread slowly using the needle and being careful not to let it run over the outside of the thread. If you are careful, the varnish will follow the needle quite nicely without flowing out over the thread edge. For the first two coats I thin the varnish by about 1/4, and then for the last 2 or 3 coats I use the spar varnish at full thickness. If you only use small amounts of varnish you won’t get an overrun. I think this is similar to applying wrap finish to plastic rods (although I have not built any plastic rods). I like the Varathane as a color protector; because if some gets on the spar varnish finish of the rod you can wipe it off with no damage to the rod finish. I used to use AeroGloss however that eats into the varnish if you get some on the rod. (Tom Mohr) Thanks all for the great information and advice. I like the idea of the yarn needle. Have tried a brush as well and always end up with air bubbles. Will give it a try. (Jim Sabella) I wrap, then varnish. I've tried varnishing, then wrapping, but I could never get a decent pack of the threads due to the varnish being not quite as hard as the cane underneath it. So, I switched back to wrapping first, then varnishing. (Mark Wendt) I do the same Mark and never had any trouble. (Jack Follweiler) Well, since I'm hooked on Tru-Oil, I finish the blank first then wrap. I apply the wrap varnish with a small piece of bamboo, sharpened to a chisel edge, while the rod is turning. (Neil Savage) I take Neil's message a step further. Rub several coats of Tru-Oil into the blank, with a light buffing with 000 steel wool between coats. Wrap, and apply varnish to the wraps. Then one dip in the varnish tube. I've also used Daly's Seafin with good results. Rub in several coats, wrap and varnish the wraps, then apply a couple coats of Seafin. Apply carnuba wax a few times a year to maintain & protect the finish. (Tom Bowden) I do both :-) I pull two coats of varnish on the blank. Easy n' quick w/out the guides and I get more control over how much final varnish buildup I get on the wraps. After a couple of days, when the varnish is dry, I lightly sand or steelwool the finish to remove the "gloss". I wrap..with the hardened varnish it's easy to move and pack the silk and burnish... varnish the wraps..If I slop the varnish over the edge of the wraps I use a piece of Flytying floss pulled along the edge of the wrap to wick away the excess...works better than thread. After “x” coats of varnish I let the wraps dry, sand and pull one coat on the rod. The last coat is the only one I have to worry about dust, dog hair etc and I get a nice clean edge on the wraps. Last coat gets polished out if needed after a week or so. (Dennis Higham) I apply several coats of Formby's to the blank before wrapping. It does not keep me from pushing the wraps together like varnish does. When I used varnish, I had to wait a good while before wrapping to let the varnish cure. Thinned Helmsman is applied to the wraps wiping off the first two coats then a full coat is applied. I know it is against the grain using steel wool but I have not had any problems. The wraps are steel wooled and varnished till they are smooth. Then the rod is run through the drain tube. I am totally satisfied with the final results. (Tony Spezio) Which of the many Formby's products are you referring to? (Henry Mitchell) I use "Traditional Tung Oil Finish" Gloss. This is a mix of Tung Oil and varnish. It wipes on real easy and dries in a few hours. I apply up to six coats, steel wooling in between coats, using finger pressure on the flats as not to round off the apexes. Why Gloss, you can see the spots you night of missed with the steel wool. After five or six coats, the blank has a nice smooth finish ready to wrap. I run the rod through the drain tube once or twice using Helmsman for the final finish. (Tony Spezio)
My question concerns wrapping guides: Is it better to wrap from the rod up the guide foot, or from the guide foot down to the rod? And, why? Also, when starting the wrap, using a clove hitch, or wrapping the thread over itself ALA fly tying? (Walt Hammerick) I find wrapping up the foot to be easier for me. I find it easier climbing up the foot rather than sliding down the foot. I start the thread in front of the foot locking the tag end on the next flat and wrap three wraps. I keep the tag end laying right in front of the foot in making the three wraps. The three wrap lay on the tag end raising it the thickness of the thread so that the transition from bamboo to the foot is a bit shallower. . The forth wrap starts on the foot then wrap up to the end of the flat on the foot. This makes all my wraps even for each foot I use YLI Silk 00, used to use Gossamer but can't see that good anymore. Do what works best for you. (Tony Spezio) Years ago I tried Harry’s method, to no avail. Tried again a year or so ago, with same end result. Thus, I wrap from rod onto foot and up to guide leg. I use five base wraps before going onto the foot. I accomplish this by tying the first five wraps somewhat loose and with a tag end of an inch or so in length. I then push the five wraps up against the toe of the foot with my thumbnails and put the sixth, and successive, wraps on the foot itself. After three or four turns onto the foot, I take the tag end and pull everything up snug, and cut the tag end off. By putting a specific number of wraps on the blank before starting up the foot, I maintain uniform numbers of wraps off the foot and on the blank. The wrap lengths diminish as the foot length diminishes with decreasing guide size, resulting in a uniform wrap length ( when all feet of a given guide size are of uniform length). To these wraps I add a three turn tip wrap. I “make” the tip wrap away from the base wraps and slide it up to the base wrap after it has been made. You make these by putting all turns over your pull-out loop. I leave a long tag end and standing end, after the thread is cut, to allow me to pull the thread from both ends to tighten the three turns up. To minimize the three turn tips accidentally becoming loose, I apply my first coat of thinned varnish as soon as I complete a wrap. Has worked quite well for me. (Frank Schlicht) I wrap same as Frank except with 3 wraps before I start up the foot. I don't trim the tag ends on the tipping until three or four coats of varnish have been applied to the wraps and cured. I use a surgical blade to remove the tags. (David Bolin) I wrap down the foot, and count wraps. My reasoning for this is it seems to make it easier to get each wrap the same length. Assume a #1 Snake Brand guide, and 00 Gudebrod thread. 95% will require about 24 wraps to cover the foot. But 5 percent will require either 23 wraps or 25 wraps. So I'll go with 26-28 wraps. If I were wrapping up, I might not have room. I wrap the thread over itself for the first five turns. Always on the same flat (next to the guide). I'm not saying either of these is "right" -- just how I do it. (Harry Boyd) I use to wrap up the foot but now I wrap down. I found up easier but when I wrap down I can count the number of wraps beyond the foot to make them equal. (Timothy Troester) I find it easier to wrap up the foot, but harder to get a uniform length. (Wayne Caron) Get yerself one a them there 6" machinist scales. One side goes down to the 64th of an inch. You can measure the lengths of your wraps and keep them consistent. It's what I use. (Mark Wendt) I use a pair of drafting dividers -- the kind with an adjustment wheel between the divider legs. (Neil Savage) That'll work too. Buncha ways to ensure equal length wraps besides counting the wraps, for us memory-deficient folks. (Mark Wendt) I'm as much a toyl whore as mosta you guys, but I do ONE wrap, then take a 3X5 card and hold one end against the end of the wrap and make a fine pencil mark where it ends. Then I use THAT as my gauge. I HAVE darn near all the doo-hickeys you guys are espousing, but the card's just too damn convenient! And I can file the card as a benchmark for the next time I make that taper. I used to use a seamstress's hem gauge, which worked pretty well, but the card's better! (Art Port) Reason I mentioned the machinist scale is it also makes a very handy sanding stick, which means I always have it at the wrapping bench. Double-sided carpet tape holds the wet/dry sandpaper to the scale, and it peels off easy when the sandpaper gets used up. I stick the sandpaper on the large division side, which leaves the 1/32" and 1/64' division side available for use. Bit tuff to wet sand with 3x5 card stock. (Mark Wendt) Evidently you're unaware of the steroid stock 3X5's I use! Seriously, though (ba-RUM-bump -- swish) the sanding option is intriguing; may give THAT baby a try. (Art Port) Hey, I always figger that I oughta use what I got. It was a flash of brilliance (on my part that happens about once every 15 years or so) that happened a few years ago when I was wrapping and lost count of the wraps for about the 5000th time (on the same wrap...) that mebbe if I measured the length of the wrap that I want, I could come up with equal length wraps a lot easier than taxing my ever dwindling grey matter works. Then, having the scale there by my side, and no popsicle sticks handy, I said what the heck, what if I just put the sandpaper on the scale? And the rest, they say, is history. (Mark Wendt)
I have a couple of rods that I want to skip the metal winding check and just run the thread a bit up the cork grip. I have tapered the front of the grip but it is not a smooth transition from the flats/corners to the slope of the cork. Can I use a cork dust/glue paste to use as a filler for the transition from blank to cork. I’m using silk thread so it might show through the wraps. (Mike Monsos) I have done that or use a wood filler the color of the cork. Just so it's close in color it will look fine. Hope this helps. (Joe Arguello) I think I’ll try a bit of glue and cork dust as I touch up a few pits on the grip first. I hadn’t thought of the wood putty, I’ll keep that in mind if the first method does work out as planned. (Mike Monsos) I do this on most of my rods, you have to save the most flawless cork for that last ring, and don't taper it too steeply. (Henry Mitchell) I do it and I really think if looks nice. I use Minwax wood filler (color selected to match cork). It gives you a much nicer surface than you can get with cork dust and glue.It is an acrylic latex which dries really fast and is not prone to cracking. I have done a couple with black tread size #50 YLI. When it is all finished it is hard to tell it isn't blacked metal. I believe Bob Numbley does it on a lot of his rods. (Doug Easton) I have done quite a few Garrison type wraps up onto the grip. If I have any imperfections in the cork & fill it in using a mixture of cork dust & Titebond glue. I always save cork dust from turning my grips & keep a jar of it handy for the repairs. Do not mix the mixture too thin, more cork than glue; kind of the consistency of heavy corn bread mixture. (Bret Reiter) Also try a little 5 minute epoxy to smooth out the transition from cork to cane. (Brian Morrow) The Garrison style of winding check is neat, but not particularly easy to do. One writer warns not to get the slope too steep. That's good advice, but part of the trick is to get the slope steep enough. The next thing is to get the cork/bamboo transition without scuffing the bamboo. My solution here is to first wrap the bamboo with a layer of plumbers tape, then a couple of turns of 1/2" (or 1/4") masking tape over that. Then with 400 or 600 grit sand paper, very judiciously work the cork down to the tape at the flats. When satified with that, it's easy to 'round off' the remaining corners, but again very cautiously. (Vince Brannick) I have used cork dust and wood filler to fill in any gaps between cork and blank for the Garrison style wrap. The darker brown thread similar to Mr. G's hides all imperfections underneath - though I have also used brown or tan Prismacolor artist's marker to match color and blend to the blank on lighter thread. Wrapping up the slope of the cork is really not as scary as it seems. I tighten my thread tension to get a good bite on the cork - and raise the ferrule end of the rod about 30 degrees by placing one of the wrapping stands on books so as to make the cork wrapping area more horizontal. Just go slow and leave plenty of turns (5 or 6) to anchor the tag end solidly. Slap the varnish to it immediately to glue it all down. It's surprisingly easy and very satisfying. (Darrol Groth) Sorry folks, I did the Garrison thread thing on one rod and didn't much care for it at all, I much prefer either a rope knurled nickel winding check swaged to fit the shape of the rod, blackened to match my hardware, or, if I'm going to cheap out on a rod, then no check at all, just make a trim wrap next to the grip. If you drill a smaller hole than the flat to flat measurement and carefully work the last cork into position, then there is no gap to hide. (John Channer) Dave Norling uses this procedure on all of his rods and they look great. He uses 5 minute epoxy. Mixes a small amount and uses a toothpick to apply it at the cork/rod juncture. Slowly turning the rod and applying more while the rod is held vertical. After a couple of minutes a skin will form and then you use a wetted finger tip to form the epoxy into the slope that you want as you continue to turn the rod. You can leave and come back every couple of minutes until it starts to set. Sounds scarier than it is but you never have to worry about the wood filler cracking when your casting. Thread wraps stay in place. (Ralph Tuttle) Thanks for the epoxy/toothpick/wet finger suggestion. I had not thought about epoxy. The slope is nice on the grip but as it meets the rod the cork is ragged so this should do the trick. The epoxy transition should be about a ¼” in length. I’m hoping it looks good through some Garnet red silk thread. (Mike Monsos) I now do this on most of my rods – stop turning the last cork approx 1/8” before the cork meets the blank (leaving a nice clean edge to the last cork – not ragged, apply a blob of 5 minute epoxy to the blank in front of the cork, turn the rod by hand ‘steering’ the epoxy until it sets in a taper that continues the taper of the cork. Once fully cured sand the epoxy to flush up with the cork but recessed slightly so that the thread wrap and varnish will bring it back up to flush. Wrap up over the epoxy to the junction between cork and epoxy. I like this finish as I like using my index finger pointing done the rod when casting for accuracy See end result here
Seems to me, having tried a few approaches, that the feathering is best done before the cork is on the blank. I make my grips on a 25 thou mandrel, and it is there that I get the tapering and feathering done. I cannot remember ever having run into any trouble with the transition. (Peter McKean) This is an excellent point. I glue the rings to the rod and turn on the rod, but often I bevel the first cork separately before I glue it to the blank. This makes it much easier to get a clean taper down to the blank and especially on quads. (Morten Lovstad) Is there a special purpose or structural reason for running the thread up on the cork?? It seems to be a lot of trouble to get it right. I haven't tried it yet and probably won't, but you never know. It just looks like a lot of thread, too much for my likes. Sometimes I add a piece of wood (same as the reel seat insert) on the ends of the handle, but I always add a winding check. I like the way it looks. I set up a way to index my lathe chuck every 60° and every 90°. I built a tool post grinder. With that set up I can grind Hex shapes in round stock. I'm working on a set of punches to make the inside hex shape for winding checks. After forming the inside hex, I chuck the punch and use it as a mandrel to turn the winding check round and/or knurl it. (David Dziadosz) 25 thou? That's kinda a small mandrel Peter. I'm assuming you meant .250"? (Mark Wendt) Oops! I do seem to have missed off the "0" there! (Peter McKean) I have used a thick putty like epoxy to smooth things up for building a ramp. The epoxy comes in sticks similar to kids PlayDoh, mix it up and apply around the intersection of the grip and blank. Put tape on the blank and the grip (if you can) so you get a definite end to the epoxy. As it sets up remove the tape and smooth it up with an acetone soaked rag. This will give you a very nice ramp to wrap. You will need to make sure the thread tension is very loose when actually wrapping on cork. Too tight and it will dig into the cork and look unnatural. I have only done this when color preserving the wraps as there does tend to be too much color difference between the blank, epoxy, and cork. (Steve Shelton) On swelled butt rods, I have seen it’s possible, without problems, to remove apexes from the piece of rod under the grip to get a smoother transition. I have done that some times, rod won’t break for that :-) and its action doesn’t change appreciably (on other kinds of tapers, maybe it’s not advisable, since that would be a sort of unpredictable “hinge”, who knows) (Albano Barbiani)
A friend of mine kindly gave me about 6 spools of YLI sized at 100 for use in my rod making and after a test wrap on a cutoff it seems to be a bit on the thin side for a nice level and even layer. Is this thread just too thin or do I need to do something different to use this size thread. I did notice another posting somewhere stating that #50 is a better choice compared to the #100. Also is there any noticeable difference between the thread that is available at sewing centers (YLI) and rod making suppliers? I have many sewing centers nearby but all my rod making supplies are mail order only which makes color selection a bit of a challenge on the net. (Mike Monsos) Been using YLI #100 forever, no problems. I was delighted to find a sewing store that carries YLI thread close to home. Same stuff. (Joe Arguello) YLI 100 has been my first choice for a long time. The 50 is to heavy for most purposes but the 100 is a bit heavier than Pearsalls gossamer and in my opinion is easier to wrap with. I find that Pearsalls Naples is a bit heavy and seems to be a bit stiff. These are all my subjective observations. I believe there is a long thread on thread in the archives ; ) (Doug Easton) The only problem with using some of the threads at sewing stores is that it has wax or silicone on it to make it work better with the sewing machines. Not all of them have it, check with the store first. (Scott Grady) Size 100 is roughly equivalent to 3/0 and I never use anything larger. I use Gossamer for tippings (and sometimes for main wraps) which is said to be 6/0 in size. For me, it lays out a nice, tight wrap that is very even and level, but I'm used to working with it. You will end up with no gaps and a good smooth surface that does not look like "cord" in the wrap. Standard sewing threads (just in my opinion) are far too coarse and uneven for rod wrapping. They have far too many "fuzzies" and imperfections for aligning them in a consistent, smooth rod wrap. They serve well for their intended purpose, which leaves over 50% of them generally hidden from view. I've never compared YLI silks from sewing centers to the ones I purchase online. (Mike St. Clair) Thanks for the information. I’ll check for the wax or silicone and keep working on getting a nice wrap. I am looking for a “light” (not a heavy cord) look in my wraps. I’ll work on my technique on the rod I have in the make now. (Mike Monsos) Been using YLI 100 from sewing store for 9 years, no problem. Work on your wrapping technique Be sure you pack your wraps and keep the same tension on the thread. I get smooth even wraps that look like glass. (Tony Spezio) I used the Naples on my last rod, and wasn't too happy with the results. It's a lot thinner than Gudebrod A, and doesn't pack worth a darn. Also silk is slippery and doesn't stretch very much, so it's more of a challenge to tuck the ends. To each his own, but I'll probably go back to size A nylon.... (Paul Gruver) I tried YLI 100 on a repair, and the recipient was happy, but I wasn't. I must have gotten the kind with silicone or wax because the varnish soaked in very unevenly. I've used Pearsalls Gossamer on all the rods I've made -- no one told me it was hard to work with so I went ahead and did it. (Neil Savage)
OK, so here's a stupid question from a beginner rod maker: how come we don't varnish BEFORE the guides go on? Seems to me if you dip after the guides are on there will be varnish residue on the guides that could affect the performance of the line. Am I completely clueless about this? (Tom Brown) Some do just that. (Timothy Troester) The long answer is that it takes varnish quite a while (read weeks) to harden enough to be able to wrap over it and get the wraps packed tight, not to mention that that's how all the how-to books say to do it. Some of the more talented and practiced can maybe lay the thread down close enough to not have to pack it, but most need to be able to move the thread around a bit. Many also prefer the look of rods varnished over the wraps to that of varnished first then just the wraps varnished. Mostly it's a matter of ingrained habits, prejudices and preferences like most of the rest of this stuff. (John Channer) OK, I do dip before I wrap the guides, but I am about to stop doing that. Reason - it is hard to pack the silk wraps perfectly when you have 3 coats of varnish on the blank.. I used do it the other way, and my feeling was that the varnish did not persist long on the guides; however, I did make a point of taking a bit of dental floss and cleaning the sort of beads of varnish in the angle between the guide and the blank. (Peter McKean) Some folks do varnish the blanks first then wrap and varnish the wraps. Al Medved does this and turns out the nicest rods I've ever seen. It's hard to wrap and pack over a shiny, just varnished rod but easy if you sand out the blank. You do have to let the varnish cure awhile but not that long. I'd guess it kinda depends on what varnish and the drying conditions....drying cabinet, Colorado with minus humidity or Florida. I do this varnish thing a little differently. I dip two coats on the blank, wait a few days and sand out with 400 and then a LIGHT rub with 0000 steelwool. When you sand if the varnish comes off in little curls the varnish hasn't cured enough, wait another day or three ...it has to come off as dust. I then wrap, pack and varnish the wraps. I don't have any problems moving or packing the silk thread. When I varnish the wraps I slop the varnish past the wrap/blank edge a little to insure good penetration right out to the edge of the wrap. I then clean the edge with 6"-10" of fly tying floss pulled against the edge while the rod is turning. Nice clean edge and after 3-5 coats let the varnish cure, sand and pull on final dip. The last dip is pulled slow maybe 1"-2"/minute to get a thin coat just enough to seal everything and give me a tiny little ramp of varnish from blank to wrap. Like John I prefer the look of a rod that has been varnished over the wraps but not too much varnish. I wait about a week before polishing out the last coat. (Dennis Higham) I varnish over wraps but put two coats on the rod before hand. I use a Tung Oil Varnish, that cures very slowly, so I wait about a week between coats then about another two weeks before wrap over the second coat. I don't have much trouble with packing wraps, but that may be in part because I've wasted 21 years of my life wrapping bamboo!!! *S* If you look at my hands, and Harry Boyd's too, btw, you'll see that we keep our fingernails neatly trimmed... but our thumbnails are the envy of most women! That's our "packing" tool. (Bob Nunley) I support Bobs point on early coats before wrapping. I use a special tung oil varnish sealer with several coats, with subsequent rubbing down of the surface before wrapping the guides. Bob's point of using good finger nails for packing wraps is the way to go. ;-) I seal or varnish the wraps before doing the final finish coatings to the rod. Hope this helps. (Frank Paul) Or you could hand rub a couple of coats pour some varnish on material and rub it into the blank until you feel the heat gives a great finish with minimal buildup then put the guides on over that I did this on rod #2 and have had no problems with water ingress. (Nick Kingston)
I thought I would pass this on to those that have had problems of varnishing before wrapping guides. I did one rod by varnishing first and had the same problem of packing wraps even though I waited a week. I finally gave up and scraped the blank down and used Formbys. This is what I have been doing for about 9 years. I apply the first coat of Formbys on a warm blank. Apply a second coat by hand before doing any steel wooling. I buy my steel wool in the paint dept, no oil. I may apply up to six costs and steel wool in between coats . I do this till I am satisfied that the blank is smooth on all six flats The Formbys can be sanded after drying overnight. The rod is now wrapped and the final coat ( Helmsman) is applied with a drain tube. I find I normally only have to drain one coat of Helmsman to get a real nice finish. I drain about 4"/minute stopping at each wrap and at each guide. I have not had any problems with runs. I don't have a drying cabinet, just hang the sections and leave the room slowing closing the door and not coming back till the next morning. I do warm the room to 80 degrees F for a full day with all components in the room for a full day before draining. (Tony Spezio)
As suggested in previous postings, I purchased thread cards. These are very useful for finding like colors between the brands or for seeking out color combinations for test wraps without owning a spool of every color. The YLI card is $20 and the Kimono cards are $6 for both to cover all of their colors So.........if anybody wants to know......... the replacement for Pearsalls Gossamer Olive in #100 is YLI 236 or Kimono 353. I went with the Kimono because it arrived first. Wrapped similar to YLI and finished to a very nice transparent olive tone. (Gary Young) Having prepared transparent samples of both, YLI 236 is a nice olive color, but darker and contains a bit more green than Pearsalls Gossamer Olive. Obviously, I need to get some Kimono colors for comparison. (Tim Anderson) YLI 236 and Gossamer Olive are fairly different - substitute would maybe be a more accurate word than replacement. If somebody is looking to match the colors they are different. Would be interested in hearing if the Kimono 353 is closer. (John Rupp) Yes, John and Tim are correct. The YLI 236 and Kimono 353 are not exact "replacements". Do not wrap half of you guides using Pearsalls and finish with either of the "substitutes". However, even though the Kimono 353 is a very nice brownish/olive color, when compared side by side to the Pearsalls, it has a bit more on the olive green and a little less of the olive brown and maybe a tad lighter......but very close. I suspect that the YLI maybe the darker of the three. I misstated in my earlier post by saying "replacement" instead of "substitute" because that is what I did.....cut off one type of thread and replaced it with another. (I was happy to have a solid color of thread and according to Nunley.....my wraps are much stronger). ((BG)). Sorry for any confusion. (Gary Young)
Folks, I wondered if anyone could recommend a silk thread color that when Helmsman spar urethane is applied to will give a forest green color on blond rods without color preserver. I hate using color preserver. I have been using Gudebrod silk but it seems the sources I have do not have many colors available. (Dave Kemp) I have used Pearsall's Gossamer Kelly Green (I think that's the name). It comes out fairly dark and close to Forest Green without CP. That's just one option, I am sure you will get plenty of advice. (Pete Emmel) Whoa, I was way off on the name. Its Highland Green. Missed that one by a country mile. (Pete Emmel) I've used Pearsall's Gossamer in Highland Green with similar results. It doesn't show so much indoors, but outside in the sun, WOW! (Neil Savage) I use YLI #255 3/0 and YLI #139 sz. A. They're the same shade, just different size. It turns to a nice shade of, I call it emerald green, forest green, or something like that. I've seen on Denver Dave's site a green that is almost, if not identical to mine. I don't know what Dave uses, maybe he'll comment. (David Dziadosz) Here's a crazy idea I got and works well for a very vivid green. Try Gudebrod Teal and hit it with a fluorescent yellow highlighter. The yellow makes the blue in the teal green and the whole effect is GREEN Green. (Darrol Groth)
Did anyone the list attend this past years 2009 Catskill Rod Makers Gathering and sit in on Bob Taylor's guide wrapping demonstration? I would like to try to wrap my current rod this way and got frustrated earlier when trying it on my tip section. First let me state that I can wrap like he showed us but as soon as I introduce a guide in the process, I become all thumbs. Secondly, I forget If he wrapped up the guide foot or down. Thirdly, I'm having trouble trying to locate my starting point, "X" distance above or below from where my center-of-guide mark is. I can recall that he wrapped a couple of turns, butted the foot of the guide next to the wraps and proceeded to wrap up onto the guide foot and finishing at the base of transition point of guide to foot. I get that part of the process, but do I reverse the direction for the remaining foot and now wrap "up" the rod blank or just keep going in the same direction (so on the remaining guide foot I would be wrapping off of the foot and on to the rod blank and not vise-a-versa). Also, I should mention that I'm using Persall's Gossamer thread. This could be some of my frustration in using such a fine thread. I'm wondering if I tried a larger diameter thread how that might be different and a little easier to wrap. But as most of us are, I had the color thread Iwanted to use and I wanted to do it right then and there! (Derrick Diffenderfer) I tape my guides on the rod using 1/8 inch strips of blue masking tape before I start the wrap. Put the tape close to the guide so there will be space for the thread on the foot. I begin my wraps about 1/8 inch below each foot and wrap up the foot toward the center of the guide. When you reach the tape peal it off and continue the wrap until you reach the upslope of the guide foot. There is also a glue available to hold the guide temporarily until the wrap is finished but I prefer tape. Diameter of the thread should only affect how much tension you can put on the thread and how many turns will be needed. (Jim Healy) I didn't see the demo, but I wrap one end of a guide (or several) and then turn the rod end for end and do the other end(s). (Neil Savage) I was not able to attend but here is the way I do it I use dental rubber bands to hold my guides in place. I wrap three wraps of thread in front of the foot, the fourth wrap is the first wrap on the foot. I wrap up the foot. I find wrapping down the foot is not to my liking. About ten wraps before the inner end of the foot, the pull loop is put in place and wrap to the inner end of the foot. Cut the thread and slip the tag end through the thread loop and pull the tag end back under the wraps. (Tony Spezio) Do you count the number of wraps going up the foot or wrap to the same point on the foot? I ask this because Wayne's book and some other makers say that they are able to do that but I always burnish and pack as I go up the foot and, frankly, I forget exactly how many turns I have made. My wraps are not always the best and I am plagued with gaps that only appear after there have been a few coats of varnish applied. This results in subtle but visible lighter areas when I wrap dark thread over a light blank or vice versa. (Doug Easton) No, I don't count the wraps up the foot. I have a way of wrapping that might be a bit different than some use. I hold the burnisher in my right hand while wrapping. As I make a few wraps, I automatically use the edge of the burnisher to push the wraps against the last wraps. This closes any gaps as I go along. When I get to the end of the foot. I use the edge of the burnisher or my finger nails to push all the wraps together and check if I need another wrap or two. I stop the wraps where the foot of the guide starts to raise at the guide loop. I have been doing it this way for so long that it is just natural with me. I thought myself to wrap rods in 1947, used my finger nails back then instead of a burnisher. After all the wraps are made, then I burnish with the curved part of the burnishing tool. (Tony Spezio) Yeah, my short term memory always sucked, so I use a machinist rule that has graduations down to the 64th and measure my wraps. I figger in this case, a smidge either side of the 64th mark using Gossamer ain't gonna make much difference in the final outcome. (Mark Wendt) I watched Bob do that at the Colorado Reunion, the Catskill Gathering, and our Catskill Bamboo School, and it's MAGIC! Must've seen him do it ten or twelve times in all. It's like watching three card monte - you know exactly what he's doing till you lay down the bet. I managed to replicate it ONCE, at the third watching, and promptly forgot the muscle memory. Maybe I've got ADD or something. Stage scene set: Mark hunkered down over the wrapping jig, counting minuscule wraps of Pearsall’s Gossamer on a stripping guide: 43, 44, 45... Oh look! there's a Squirrel! 26, 27, 28... (Mark Wendt) Never wrap down the foot. Just doesn't work well. I like Tony's dental rubber band tip. Have to look into that myself. Here's a link to Mudhole and all the free online videos they have. They're mostly purveyors of graphite and glass, but do sell some things for cane rodmaking. Just scroll down to where it says New Videos, and you'll see the Wrapping Guides clip beneath. It's all basically the same techniques. (Bob Brockett) Missed Bob Taylor's demonstration, but his having been a former rod maker at Leonard's shop in Central Valley, it is more than likely that his procedure was much the same as that of the production worker there. The lady that so deftly applied the thread wraps, did so with the thread spool in her hand, and as I recall, held the rod section tucked in under her armpit, turning the rod, with the thread tension controlled with her hand (the caveat being, "as I recall"). The end of a wrap being a method of leaving a loop of thread, and (somehow) passing the spool back through the loop a number of turns ~ ala H.P. Wells. As often as I've tried, I've not been able to duplicate that technique. Don't know if Mr. Taylor used that method, but wish I had been an on-looker that day. (Vince Brannick) That's exactly the method Bob uses... at the end, he basically holds the loops open with his finger and thumb and passes the spool between them. Works amazingly well. By the way, I saw one comment about NOT wrapping off of the guide onto the rod that it didn't work well. I do it, Boyd does it, Kusse does it... works very well for us. Not bragging but if you see one of my rods, you'll be hard pressed to find one with better wraps. (Bob Nunley) Apologies, Robert (& Harry & Ron). You're correct, I should have said "I never wrap down the guide, it doesn't work well for me." Learned my technique from the Dale Clemens school (& numerous others) who were fairly adamant about it, except on larger rods with, naturally, larger guides/feet, where the opposite was sometimes recommended, don't remember just why now. Should have remembered that what works for one does not a rule make. (Rules? Who needs them?! :^). Might be a good suggestion for Dave Bolin's polling. Two kinds of people: those that wrap up & those that wrap down? (Bob Brockett) I had the pleasure of attending and watching the demonstration. For me that alone was worth the trip from Virginia. I also took notes, which read: 1. Holding rod in left hand and spool in right (for a right hander), cross the thread over itself and make one two more wraps rolling the rod to the left. 2. Tuck the guide foot under the threads to lodge it in place. 3. Turn 3 - 4 times. Cut tag. 4. Continue turning. When you are four threads short of the end of your wrap, bring the thread up over your left thumb to make a large loop. Continue wrapping by running the spool through the loop four times. 5. Roll the spool four times to the left around the rod above the wrap. 6. Using the thread of the loop around your thumb, continue wrapping to the right as the above wraps unwind. 7. When the turns are even, pull the thread from the top to eliminate any leftover loop and to snug up the thread. 8. Cut tag end. I discovered I had five thumbs trying this, but it sure looked smooth and easy when a practiced hand did it. (Dave Reimuller) Bob wraps from the rod onto the guide. He makes it look easy, but remember, he's been wrapping like that AT LEAST since he started for Leonard, and that was nearly 40 years ago. He simply places the guide so that one thread catches the foot then keeps on going like it's nothing. It's a very hard process to perfect. I've tried it a multitude of times and like you, I can do it on a rod with no guide. Introduce the guide and it's a disaster! (Bob Nunley) One thing Bob also mentioned a few times - he has to be particular about prepping the guide feet with his method of wrapping - even Snake Brand guides. (Tom Vagell) Yes, this is true. I use snake brand and H&H guides most of the time and do have to prep some of these, especially the stripper guides. One must make sure the taper is shallow and smooth at the guide tip. Also one needs to make sure there are no sharp edges on the guide feet that might cut the thread - top or bottom. (Frank Paul) Doesn't that kind of defeat the purpose of spending the higher price for Snake Brand guides?? (David Dziadosz) The guides from Snake Brand are well-made in all respects, appropriately hardened and predictable in their profile and dimension. I use nothing else and will continue to use nothing else while I can get them. However, I think that they need some fine prepping and tapering before they are used, especially on light bamboo rods with silk wraps. If you put them on a round (plastic) stick and use, say Gudebrod nylon thread, they are probably just fine as they are. Another, and probably minor, reason to grind them down is that if, like me, you tend to like guides a bit oversize, then the snakes tend, out of the packet, to overlap the flats on the tip sections of small rods, which makes for a very odd looking wrap. (Peter McKean)
Is there anyone in the Dental field that might have access to outdated Dental Elastics. I use them to hold the guides in place on the blank for wrapping. I can use 1/8. 3/16 and 1/4" elastics. (Tony Spezio) I was going to show a “jig” similar to this for holding guides in place for wrapping at the SRG. The way this works is you use a small rubber band and feed it through the hole in a bead. It should be a tight fit. You can then use the bead to adjust the stretch of the rubber band. It works really good. Cheap too, since most people have rubber bands and beads. (Scott Grady) That sounds like a great idea...I have used the ortho bands on my last 2 rods but as you probably know, you have to double them over on the tip sections and usually work from one end to keep from lifting them all over guides already placed.I also found that you better not leave the bands on the bamboo for more than 24 hours as they can leave a rubber/silicon type residue that is tough to remove and causes issues with the varnish if not completely cleaned up well. (Lee Slikkers) I bought some on ebay. I got 250 for $USD1.00 including postage (Nick Kingston) I use these on my rod guides. I got the last bags from eBay. (Mike Arnold) As an alternative to the dental bands I use rubber bands made from slicing little sections off surgical tubing and model airplane fuel line. I make the little rubber bands from 3/16 and 1/8 ID surgical tubing and the two largest sizes of model airplane fuel line. The biggest fuel line is about 1/8 ID. I have used up my supply of the next smaller size and have been forced to double up on the only fuel line bands I have to hold the last three or so guides on the tip sections. The local hobby shop has stopped carrying the fuel line. This is unfortunate for me since they had sold it by the foot. However you may be luckier than me and have a hobby shop nearby that still sells the stuff by the foot. (Joe Hudock) Building on Joe's experience, Tony, if you have a veterinary supply house nearby, I imagine that surgical rubber tubing of 1/8 to 1/4" ID may be easy to come by, as Joe says, "by the foot." If so, you may have your answer.The other option is to locate a fly-fishing veterinarian in northern Arkansas and appeal to his better instincts (and most veterinarians have these in abundance, speaking from personal experience). I turn to Peter for confirmation on this point . . . (Steve Yasgur) I don't use orthodontic rings for this purpose (though perhaps I should) but on other occasions when I have needed these bands I have just called in to my local orthodontist and bought them by the packet in whatever strength (indicated by colour) is needed.They are not exactly a restricted item, and orthodontists, of course, sell them to patients to replace broken bands, so there are usually plenty in stock.Tell you what - if you have trouble, tell me and I will toddle off to my local fang cranker, get a heap, and post them off to you. No trouble at all!The other source is physiotherapists, who sell tubular rubber for stretching exercises, which is also great for what we call shangais but you yanks would probably call catapults, and would slice nicely into bands. (Peter McKean) I always keep a bunch of O-rings, in a WIDE range of sizes, on hand in my shop. I buy them in bags of 50 or 100 from McMaster-Carr. The standard Buna-N compound works fine for holding guides in place and you can get them with an ID as small as 1/32 inch so you don’t have to ‘double up’, just pick the size you need based on the diameter of the rod at the specific location. Additionally, I use silicone O-rings to hold the strips in my MD forms during heat treating – the silicone compound is rated to well over 400 degF and stretches or relaxes as the forms and strips expand or contract. (Bryan Coles) David Atchison suggested I try automotive pin striping tape. I use 1/16" wide tape and wouldn't consider anything else. (Larry Tucker) Alas, rubber tubing seems to be getting more and more scarce as the health industry is moving to disposable plastic stuff. Really lousy for giant slingshots to lob water balloons at unsuspecting victims. (Darrol Groth) You just have to loop more 1/8 inch bands together to make the sling shot. Thousands of them! (Gordon Koppin) My rod building mentor, who did not work with bamboo, and who was perhaps the Premier Custom Rod Builder in the Greater Houston Area during the 70' and 80's, taught me to use Uni Knots (Duncan Loops) tied using 12-15lb monofilament fishing line, and to use the cheapest brand available. These can be 'mass produced' while watching a ball game on the tube, and stockpiled. I cut the tag end off just at the knot, and leave 1-2 inches of standing line. I don't really worry about the size of my loop, as it can be adjusted based on the length of the standing end. What the heck is wrong with blue tape? cheap and I have been using it for over 20 years. (Mark Heskett) I have used orthodontics for test positioning but I like to use a microdot of superglue under the feet for holding the guide in place. (Stephen Dugmore) I was using the Uni (Duncan Loop) knots long before blue tape became available. I have used masking tape and "Detailing Tape". They work; however, one must remove either by hand, and they stick to one's hand, in my experience. It can be an aggravation trying to get the stuff off of the hand so that one can proceed with wrapping. With the Uni Knot, if properly cinched up, they will literally 'fly off' when the knot is clipped with nail clippers or scissors ( I prefer nail clippers as I don't have to worry about dulling or 'warping' blades as one can do when using scissors).
Here in Louisiana we're actually having what passes for winter here. This is the first time in several years. I have actually seen snow three times! With the cool, dry air which has been persistently hanging around I find that every time I touch something metal I get a nasty little shock. That's not big deal. What bothers me is that while trying to wrap a rod, all the little ends stick to me. As I'm trying to maneuver the tag end through a tie-off loop, everything sticks to me, to itself, and to the rod. Anyone else have this struggle? Dare I wipe down with an anti-static dryer sheet or will I doom the wraps to a lifetime of fish-eyes because of the silicone? Other static elimination suggestions? (Harry Boyd) I didn’t realize that some of the things I do when wrapping silk are a reaction to our dry air, and it is mostly very dry here in the Lafayette in California. Well, today, we thankfully have some rain.Back to wrapping silk and, specifically, maneuvering the tag end through a tie-off loop. I have a little piece (about 3/4" x 3/4”) of blue masking tape ready to put on the wrap when I want to put the tag end through the loop. That holds the wrap nicely in place while I use two hands to cut the thread, put it through the loop, and pull the loop snug to the edge of the wrap while holding the tag end snug. I keep the tag end snug whole removing the bit of tape, cut the thread very short, and pull the loop. I know, that can all be done with one hand, but those words I used before adopting this method really did not help as much as a little piece of tape. (Tim Anderson) I just use a small pair of mosquito forceps - I push it through the loop in the pull cord, grasp the end to be pulled under, and bring it back through the loop that way. Easy! (Peter McKean) Glad you asked about that Harry. I was about to ask the same question. The relative humidity here in So. Cal. all year is quite low so I have that problem for the better part of the year. Right now all I do is cuss. Will have to try Tim's suggestion as I am wrapping a tip section right now. Would sure like to hear some other ideas. (JW Healy) Just wipe your hands with a used dryer sheet... this is a trick a fly tyer taught me when tying the Goddard caddis so the deer hair doesn't stick to everything. (Joe Arguello) Set a dampened sponge next to where you are wrapping rods. Before you cut off the thread dampen your finger and thumb and pass over the thread where you are going to cut it off from the spool. Pass it through the tie off loop as usual. This does two things. One, it dissipates the static electricity and two, it makes the tag end of the thread just a little stiffer. (Jerry Drake) I believe that dryer sheets have a bit of stearic acid in them that reduces friction and hence static and interfers with the varnish sticking to your bamboo. I would just keep a damp cloth nearby and dampen my fingers if static is bad on a particular day. Humidity also lessens static. Cold air contains less moisture so when it warms up inside, the humidity level drops and you will notice your cat’s hair is standing on end. I keep a kettle going on the woodstove which helps. (Ron Kubica) Lot of good ideas here. I just tried the "wet your finger" method because it is the easiest and it solved my problem with static electricity on thread. Anyone have an idea how to get rid of static electricity in bamboo shavings? Until a few days ago, the relative humidity here was in single digits and the bamboo shavings stuck to everything. (JW Healy) A dampened sponge? Just lick your fingers and moisten the thread. That's what real men do. (Ron Grantham Doesn't that depend on where your fingers have been most recently? The idea of licking your fingers and then passing the thread through them should work. Will the single malt affect the varnish? (Jim Sobota) As you know...... avoid cheap whiskey........... it will cause shimmers................ (Gary Young) But I would never maintain straight tight wraps and sure would get a smoky peaty finish.(Dave Wilson) As long as it is at least a 15-year-old Glen Livett or better you hould be okay. (Bret Reiter) Are you talking about the end of the tag becoming frayed and all spread out trying to get it through the tipping loop? If that is the case this is what I do to elevate that. I pull out a bit more thread to relive the tension. The back down a bit to loosen the thread where I will cut it off. The thread will be cut in the slack area and will not unravel like it will if cut under tension. If this is not what you are talking about disregard this. (Tony Spezio) After cutting the tag end I wet the tag end with water that I have on a little sponge soaked in water the type women use to apply make up with, this eliminates the static and also make the transition of the tag end under the wrap easier and tighter when it dries. (Graham Foxman) Guys get a computer tech anti static writ band, solves the problem of static instantly (Martin Wittmann)
What color YLI should I use to get clear wraps? With Pearsall’s I use white, but this is my first attempt w/ YLI. (Tom Key) I’ve used “white” and “natural” and I think the natural is slightly clearer, at least to my eyes. (Tom Vagell) I use YLI 239. Some prefer YLI 213 which is a pale yellow. (JW Healy) YLI White (000) gives a very slight pinkish tinge due to UV inhibitors in the thread. If you want no hue at all to your clear wraps try YLI 212 or 239 or, alternately, try Bullard/Kimono Natural Tan (S-101). (Chris Carlin) YLI White has optical brighteners and tends to yield an odd bluish cast. As JW and Tom Vagell mention, “Natural” (#239) works well. I am one who likes #213 (very pale yellow) because it seems to disappear even more than #239. (Tim Anderson) You may find that different threads work better with different tones of cane. Variations on straw cane might do well with pale yellow or natural. Darkly flamed rods might be best with white thread. Or not, to your eyes. Might need to play around a bit. (Chris Moore) Yes, YLI #239 Natural or anything Chris Carlin suggests. (Comes to silk, the man is a prodigy.) (Bob Brockett) I use YLI 212. (Tony Spezio)
I started using YLI thread this past year and order white to use for clear wraps but as I'm sure you in the know know white YLI doesn't get clear like white Pearsall. What color YLI should I be using? (Tom Key) YLI White has optical brighteners which produce an odd milky look. What you want is YLI 239 “Natural White.” For my clear wraps (which you have seen), I use YLI 213 which is a very pale yellow and seems to disappear better on the cane, perhaps because it is slightly yellow (and not clear) edge on. (Tim Anderson) Find the YLI in a "Natural" white. The pure white has some additives in it to make it whiter but don't allow it to be perfectly clear. The "Natural" does much better... not sure of the number. (Bob Nunley)
I want to color some silk red in a decorative wrap. Is there a red pen that will not bleed when hit with flexcoat diluted with dna? Thanks. (Tom Lucas) Bleeding when using something like a Sharpie is definitely a problem. I always use ink for such wraps, india ink for black and Daler Rowney - FW - Flame Red acrylic artists ink for red ones. It sometimes helps to thin the ink with a small amount of alcohol. (Tim Anderson) I went to my local Art Store and they had Prismacolor pens (no Bombay ink though). I would like to report that red Prisma pens do NOT work with diluted (dna) flexcoat. It blurs just as bad as a red Sharpie does. (Tom Lucas) I use a Crayola water color marker for black. It doesn't run under varnish and they are cheap and easy to find. But, I haven't tried other colors. (Bill Lamberson)
Over the last few years I've finished out a handful of rods. One of the traits that keeps popping up is how a rod goes up one line weight from what it was with the guides taped on and no varnish to the finished rod. Both Perfectionist tapers I finished out started as 4 weights and finished as 5 weights. The numbers for the second one were extremely close for the .275 butt, however, still wound up a light five weight. I saw rods go to 4.5 weights once wrapped and then to light 5wts once dip varnished. Is this something others have noticed or am I the only one foolish enough to want to see how a rod casts right out of the string? Assuming my experience is not just an anomaly, how can one adjust for this, so that the rod winds up the expected rod taper? (Bill Walters) Depending on how you tape the guides on, the tape can easily weigh more than the thread wraps (with varnish). This is particularly true toward the tip of the rod which yields a greater effect on the casting properties. The more weight toward the tip, the lighter the apparent line weight of the rod, ALL other things being equal. Thickness of varnish on the entire rod can also affect the final line weight, of course. Leon Hanson has produced out some very interesting results by reducing the weight of guides and tip top. (Tim Anderson) I agree with Tim about weight. Another possible explanation is that the guides, once wrapped, will cause stiff spots on the blank. When just taped on they can slip around a little and don't add as much stiffness to the blank. (Mike McFarland) Hopkins and Holloway, a.k.a "Guides 'n Blanks" here in the dear old UK, sell lightweight snake guides which i always use on anything less than a #6, for this very reason. As Tim said, you gotta keep weight out of the top half or so, for on an average rod of 8' or so a gramme at the tip is equivalent to 7 at the butt, to a rough approximation, obviusly. Try using one of the lightweight snakes artistically bent so it works as a tip ring, for instance, fly line does'nt seem to get stuck in rthe very small gap on the back-cast.
|