Bamboo Tips - Tips Area |
|
< Home < Tips Area < Hardware < Ferrules < Repair
Anyone have an easy to round out a ferrule that was stepped on? (Pete Van Schaack) I actually have done this trying to salvage a crushed ferrule - don't ask how it got crushed, it's a long story. In the long run it probably is more cost effective to buy a new ferrule, but if you absolutely have to fix this one.... Using successively larger drills - the smooth end not the cutting end - open the welt up until the male will begin to slide in. Tape a small thick piece of leather around the female to prevent teeth marks from a pliers from marking the NS. Jam in the male as far as you can, then with moderate pressure with the pliers squeeze the female around and around until the male loosens. Jam it in as far as you can, squeeze around and around until the male loosens, etc. etc. etc. Until the male goes all the way down. At this point the ferrule will be too loose, and you will have to tighten it up with one of the various methods we discussed on this list, I use a three jaw chuck. (Darryl Hayashida)
On my 11th rod, I finally did it - overlapped a male ferrule so there is a slight "click" when the rod is wiggled. Damn! My inclination is to just replace it. But I was looking at Ray Gould's book the other day & he had plans for a ferrule presser. It's basically two pieces of steel with various sized holes that, when clamped together, squeeze the female ferrule. Has anyone tried something like this? Are there any other options? (Tom Bowden) You can find someone with a 3-jaw chuck on their lathe, crimp the female, rotate so that the jaws now align midway between the last contact points, and crimp again. It's a pain, but it works. (Martin-Darrell) That's right I have done the same to two female ferrules to tighten them and it works just fine. I don't know however how long they will stay tight but they have been fine so far. (Jack Follweiler) I am going on the third year on a cheap brass ferrule that I tightened with a Jacobs Chuck. It was on Rod #1. It loosened up in a few casts. That is what I get for using a 3.50 chrome plated brass Ferrule. Has been OK since I gave it the Jacobs treatment. (Tony Spezio) You probably already did this, but if not, be sure to rule out a dry socket. I had a clicking ferrule on a rod that I initially thought was too much material removed from the bottom of the male slide. A.J. Thramer suggested I check for a dry socket, meaning that I starved one of the ferrule stations of glue or the glue didn't adhere to both surfaces sufficiently. I removed the ferrule, reglued, and that solved the click. The click was in the bamboo to ferrule rather than the ferrule to ferrule connection. It's something to confirm before altering the ferrules. Good luck. (Chris McDowell) A few weeks ago I posted a question on fixing a male ferrule that I overlapped. I really appreciated all of the helpful responses. Thought I'd let everyone know the resolution. One suggestion was to use wax on the ferrule and forget about it. I tried this, and still had the annoying "click". I then put more wax on & still had the click. Hmmmm..... Maybe it's not an overlapped male. I took the ferrule off (I used Ferrul-Tite, so it was easy to remove), and noticed that the fit was loose. I put one turn of masking tape on the end of the ferrule station to build it up, and re-seated the ferrule. It still clicked! What the heck is happening? Then I remembered that I'd cleaned all of the wax off both ferrules. I tried the wax again. Lo & behold - no click!!!! I had screwed up twice - first by oversanding the bamboo, and then oversanding the male! So I ordered a replacement male - only about $15 with shipping. I glued bamboo shavings onto the ferrule station with Probond to build it back up, and sanded to get a good fit. Mounted and lapped the ferrule like normal. Took the rod out in the yard last weekend for a test cast & it's great! I feel good about fixing it right rather than compromising. This was my 11th rod & I haven't had problems like this before. So I can't claim "beginners ignorance". I was simply careless & rushed the process. I believe that mistakes are valuable if you learn from them. From now on, I'll take it slow and be more careful. And sometimes a problem has multiple causes, not just one. (Tom Bowden)
Is there any reasonable way to solve a loose ferrule problem other than replacement of the ferrules. I mean looseness of the male to female fit due to excessive wear. (Bob Amundson) There are several alternatives. You can try squeezing the female in the chuck of a 3 jaw vice, although I've had only mixed success using that method. Or, you can try drilling a hole 1/64" smaller than the female outside diameter in a piece of mild steel cutting that in half and bolting it back together to make a ferrule squeezer. I've heard of guys replacing the cutters in pipe cutters with an extra wheel, and forming a third type of squeezing device. Perhaps simplest of all....send the sections to Dave LeClair and ask him to nickel plate the male ferrule for you. Viola, tight ferrules again. (Harry Boyd) Varnish male slide with Metal Primer (just dip in) and make it dry. After dry, try to sand with fine grit paper to just fit, if necessary. It will fit very nicely and last for a year or so. When it begins to be loose again, do the same thing again. I am also putting wax on male slide when fishing in addition to above. (Max Satoh) Smear some super glue on the male slide and let it dry. then check for fit. it will be tighter and you may have to lightly sand the glue a bit. it will last along time. (Timothy Troester) For tightening up the fit on a ferrule, metal primer would probably work OK, my experience with super glue on metal is that it has a tendency to flake off. JB Weld comes to mind in that I know that won't flake off and it is sandable. I spent a good deal of time developing another approach to the problem. That is a ferrule with a composite resin sleeve (see below).
This ferrule is refittable. Using a very hard epoxy or super glue. Used in spots, lines, or areas as needed. I sometimes do this to adjust the feel of the fit, or tension you might say. I sell these ferrules pre fitted ready for use. They are machined and quite time consuming to make. This isn't a plug for the product, just bringing to light one mans approach to a century old problem. (Todd Webb)
I just cleaned the inside of the female ferrule on my Orvis MCL Limestone Special and when I put the darned thing back together, the ferrule clicks! It didn't before. And it's not like I dug out a ton of gunk... Before I shell out the dough to get Whitey at Orvis to do it, is there any fix other than to replace the ferrules? I'm also debating, would it be a good exercise to build the 2nd tip for this rod myself, or is it valuable enough to pay Whitey the $300 for the full overhaul (replace all hardware and make 2nd tip) and just be done with the matter. (Joe West) Is it clicking because the male is loose inside the female? If so, there's a simple fix. Put the female in a drill chuck so it's positioned on the body of the ferrule. Tighten the chuck. Rotate the ferrule 60 degrees and tighten it again. This will give you six microscopic dents in the female. You'll have to experiment to learn how much to tighten the chuck. If the the problem is that the bamboo is loose inside the male or female, then I'm afraid you are faced with regluing the ferrule. (Ron Larsen) An Orvis rod has some inherent value that is much more likely to be retained if the Orvis shop does the repair work. I'd gladly pay them to do the work. From what I hear, their service is 100% topnotch. (Harry Boyd) Here is what you do with the click. Get a drill chuck (not attached to the drill) and key. Open the chuck and slide the female ferrule in from the rear. Close the chuck by hand till the 3 jaws make contact. Using the key tighten the chuck slightly. Remove the chuck and check. Repeat if necessary. Work slow and check often. I have done this numerous times with good success. (Marty DeSapio) For anyone who also may be a reloader, the chuck in a case trimmer, presuming you have a size match, works even better, since there's very little gap. The downside is that the chuck is stepped, so your piece has to fit one of the steps for it to work. It doesn't leave marks like a drill chuck, so it's worth checking if you have a fit. (Greg Kuntz) How about using a snug-fitting collet in the lathe and tightening it on the female ferrule? (Steve Weiss) One thing you might consider if you are to "chuck' the female is that any other male will also be tough to fit. Further, the female crushing will prematurely wear the male resulting in further crushing etc. When and if you decide to replace the tip, both ferrules will need replacement. The female due to the crushing, the male the result of the crushing. I've fished rods that also click. Use paraffin or other type of wax to take up the space. Crushing works, done it myself. Usually take the 3 jaw off the lathe, mount it solidly in a vice where it can operate it readily. I find it easier that attempting to work over the lathe. (Don Anderson) For what its worth, if I have a ferrule with a light click, I rub some soap or candle wax on it. It doesn't click anymore, its cheap and quick and it is not a drastic change. And though it is just a temporary solution, you could fish for many more years. (Geert Poorteman) Just put this into perspective, imagine what the rodmaking tools/supplies one could get for $300 versus paying Orvis $300 for one tip. Is this the correct way to think about it, know what I mean? Am I being a cheap B__stard? And it's not like I have any rodmaking skills at this point, just a pile of tools! (Joe West) I'd say it depends on your skill level (as YOU see it), whether you have some or all the tools now, etc. It might be a good way to start, since you have one tip to compare with. Even if you're not completely happy with the second tip, you would be apt to get one that's "good enough to fish with". Also, it seems to me that a tip is more apt to be damaged in use than a butt, so if you fish your own second tip you would preserve the original. As to the click, I dunno. No experience in that line. (Neil Savage)
Perhaps more one for the restorers but something I tried successfully at the weekend. I have seen several posts about trying to sort out loose ferrule fitting either due to wear or over enthusiasm and most revolve around fitting a new ferrule or attempting to squeeze the female component in a lathe chuck. I have used the latter for cases where the lack of fit is marginal but have not been able to get any success where the parts are really loose. I collect old rods and the last two have had loose butt to mid section ferrules, in both cases large diameter as these are coarse fishing rods but the principle is the same whatever. For the first I machined a new brass male ferrule, successful if radical but for the second I rescued the male ferrule by use of Nickel plating. Apart from the fact that this has proved entirely successful and looks just like high grade nickel silver the main potential advantage is that it could potentially be done with the ferrule still attached to the rod. I did mine with the ferrule off the rod but half of the whipping still attached and this survived intact. Probably not something you would invest in for just this purpose but if you also have that old bike to restore. (Gary Marshall) Bob Venneri also does some nickel plating. (Mark Wendt)
I have a couple ferrules that are getting worn to the point of looseness. I was thinking of getting an electroless nickel setup to build up the males a bit. Caswell seems to have a kit with all the bells and whistles, but I have also seen just the solution for sale. Anyone know what is actually needed, or have a better method? I would prefer not to crimp the ferrules if possible. (Tom Smithwick) Plating is definitely the way to go. I built my own electroplating set up for doing nickel, silver, and gold. You really need to have the proper voltage to make it work but the solutions are available through various suppliers. If you just need to do one set of ferrules occasionally, you might want to send them to someone else. I only charge $25 to refit male slides, this includes plating and lapping. (Jeff Fultz) If you are going to plate the ferrules on the rod, you can't do it with the electroless nickel. You will ruin the varnish on the rod and/or possibly delaminate the end of the rod, from the very hot steam. You will want to use the regular nickel plating set up with the anodes, like I use. But, the way I do it, is to bronze plate the ferrule first, as the bronze goes on a lot heavier than the nickel, then after I fit the ferrules, then I put a coat of nickel over this, so the color matches the nickel silver. The electroless nickel will plate a lot heavier than the regular type of plating, but you would have to plate the ferrules off of the rod. (Dave LeClair)
I've got a ferrule that seems to have some flux or some sort of soldering material inside. I basically have a lump on the bottom of the inside portion of the ferrule which is causing the rod not to seat fully inside the ferrule. Apart from trashing the ferrule altogether, will using a Dremel tool to scrape out the material damage the ferrule or any seals. I believe the ferrule is either an REC SS ferrule or a Golden Witch Field Grade ferrule, I can't remember which. (Jim Lowe) Personally, if I didn't have a reamer the right size, I'd take a drill bit (an old one would do) and grind the end flat, then use it by hand to clean out the ferrule. If you don't have a chuck you can easily get off the drill, use vise grips, or wrap tape around the bit. Anything so you can get a grip on it. I would NOT use any kind of power tool for this. My $0.02. (Neil Savage) What do you have to lose? I'd have at it using a Dremel tool. (Don Schneider) Thanks for the responses everyone. Seem like consensus is to go with the drill bit. (Jim Lowe) If it looks like flux, you can buy flux remover from an electronics store. I might be tempted to try that before doing surgery. On the other hand, I'm impatient, so there is no telling what I might do with it in hand. (Larry Blan) I had a rod come in for restoring... Someone reset the ferrule and popped/glued the moisture dam 1/4" out of place so the male ferrule would not fully set... Drilled it out with the correct size drill bit, worked like a champ... (Dave Collyer) Someone asked that I report back on my success or lack there of with the ferrule. I didn't use the drill bit. I tried but I wasn't willing to flatten the tip and thus missed the spot all together. Fortunately, my Dremel tool came with a flat bottomed router type bit. This worked perfectly. I worked it by hand and a half an hour later the stuff was gone. From now on I'm going to start checking the inside of the ferrules before I start to work the station. (Jim Lowe)
Today a customer gave me one of his rods for a repair job. It's a Hardy rod with a clicking female ferrule. He asked if it could be done by not removing the ferrule. He was thinking about injecting glue/epoxy after a small hole was drilled into the moisture plug. I'm not sure about this... Anyone done this and might have tips. Or maybe other suggestions? (Danny Heus) Rubbing wax on the male slide can cure a click. I've fixed some of my learning curve lapping with a piece of wax paper. (Lee Orr) The clicking is ONLY in the female end? If so the wax idea (which works well) probably wouldn't work right? So clicking ferrule (this usually is talking about the interaction between ferrules), or loose ferrule? Now that I read it again, the original question could go both ways. (Martin Jensen) I've never tried to repair a ferrule except to remove and reglue one that didn't stick. I have tried to fix wooden chairs by injecting various things with no long-term success. At a guess, any glue he/you might try would be too thick to flow into the proper area. Also, drilling a hole in the moisture plug would ruin the ferrule in case the fix didn't work, wouldn't it? (Neil Savage) I have to agree with Neil, however there is one fix you can try but it only works on rods where the ferrules have been mounted with a thermal plastic type ferrule cement. You can carefully reheat the ferrule with a heat gun or flame to re-melt the glue. Then press the end of the ferrule again at a table top until it cools. I have done this to an old FE Thomas of mine. If there is any tack left in the glue it might hold for a long time, but it might come loose the next day. Your customer would curse you if it came loose on a fishing trip. I have only myself to blame. (Doug Easton) I'm going to remove the ferrule then. The two holes seemed like a good idea but you never know how the glue exactly spread out inside I would like to make a long term repair. (Danny Heus) Could anyone tell me what Hardy used for a glue when they built it the first time. I have a friend that has this problem and in the past we have heated it let it cool and fished it for a year or two. (Ronnie Rees) They used some kind of a ferrule cement. I re set a Hardy ferrule once, and the wood to metal fit was loose. There was a spiral of thread on the cane. I am sure they did that deliberately to make a space for a layer of cement. That is why the reheat worked, most likely. It also adds to the argument that injecting a different type of glue is a bad idea. (Tom Smithwick) There are all sorts of resins you could inject but it is likely that they will not bond properly to either the old glue or the inevitably corroded inner surface of the ferrule. It is also far more likely that they will fill only part of the void. The net result will be a future failure. I am sure you can see where this is going. Make sure you check for pinning when you take it off. (Gary Marshall)
I am replacing ferrules on a rod, and after I removed them, I noticed that the stations had been cut much smaller than was needed (The void was filled with epoxy). What is the best way to build them up so that the ferrule stations fit tighter short of cutting them off? My thoughts were to either build them up with thread and epoxy or to drill out a hardwood dowel, epoxy it over the station, then chuck it up in the lathe and trim it to the appropriate size. They were obviously sized wrong from the beginning, and I would like to do what you folks may have found worked the best. (Paul McRoberts) Build them up with slivers of bamboo! Use a good epoxy like Golfsmith or JB Weld. Then turn it down to the correct diameter on a lathe. If it isn't too bad you can lay silk thread over end in the shape of an x when looking at the end of the ferrule station. But it sounds like you have too much space for that. (Jeff Schaeffer)
On Saturday I was at down at the local (graphite/fiberglass) rodmaking shop. A guy brought in what looked like an old Japanese bamboo rod which had a break above the ferrule in the midsection. I was appalled at the clerk's recommended solution - replace the ferrule with an oversized set of nickel plated brass ferrules that had no moisture cap on the female or male! I told the guy he'd end up getting moisture and ruining the rod, but the clerk insisted that the ferrules fit tightly and that little, if any, moisture would enter. I just shook my head & shut up. It's his store, the rod in question probably wasn't worth the cost of good ferrules, and I wasn't in the mood for an argument. I did manage to convince the clerk to find a male with a moisture cap - "they stopped making them that way a few years ago, but we still have a few in stock". I asked the clerk how much the ferrules cost - $3.75 per set! They actually fit together nicely, and didn't look that bad. They were obviously made in Europe, since they came in metric sizes rather than 64ths. I'm sure these are intended as replacements for old fiberglass rods, where moisture isn't an issue. I'm currently making a 6' spinning rod out of spare butt section strips for my nephew. I got to thinking that these cheap ferrules might be okay in this situation, if I could figure out a way to insert a moisture plug. Maybe you could make a disc by filing a brass rod to fit & then gluing or soldering it into the ferrule. Or maybe the ends of the bamboo sections could be treated with something to seal them up. Any thoughts? (Tom Bowden) I do not believe those post War Japanese rods deserve a set of quality NS ferrules but that is up to the owner. Cheap ferrules are still available from suppliers such as Clemens Custom Tackle in Allentown PA (no financial interest). They have a male water plug but no female plug. I do not believe the lack of a female water plug is the end of the World as millions of cheaper rods such as HI and Montague have been used and are still used with no problems. The rod just has to be dried thoroughly before putting in the case. (Marty DeSapio) A drop of epoxy in the female should seal it off. (Dave Norling) I believe Winston does not use a "water plug" as you call it. (Martin Jensen)
After getting a little overzealous with my lathe fitting a ferrule, I recalled someone writing in about fixing a loose ferrule by filling the male with sand and using a punch and hammer to pack in the sand, expanding out the male. I tried it and it works! Except I had no sand so I used table salt. That worked too, except it packed the salt in hard as cement. But a little warm water under the faucet, and it was all cleared out. Who ever came up with the idea - Good technique! (Darryl Hayashida)
Has anyone any idea what I could do to hone the internals of female ferrules. Have had one of those incidents where the females galled. (Don Anderson) Take a small wooden dowel, a bit smaller than the ID of your female ferrule, cut a thin slit into the end of it, take a strip of 1000 grit sandpaper, placing one end into the slit, and wrap around the dowel until you have a diameter that will barely start into the ferrule. Once inside the ferrule twist the dowel so as to sand the offending gall. It shouldn't take much but be careful to clean out the ID of the ferrule, and to go easy with the fitting until you're sure that the galling has been eliminated. You could further polish the ID of the ferrule using successively finer grits of paper, but you must be careful lest you increase the diameter too much, loosening the fit. (Martin-Darrell) Or you could carefully 'polish' the inside with 0000 steel wool. (Nick Kingston) You can buy internal laps from almost any machine shop supply house. Actually, I think I got mine from Enco. Very cheap and well worth what little they cost. If I remember right, you can buy them in 64th increments and each is widely adjustable. Be sure and get "Blind Hole Laps". I think that suggestion could be credited to the Late George Aldrich. I know he brought some to SRG the last year he attended to show them around. I bought mine immediately after SRG. (Bob Nunley) Yes, it was George who first enlightened us to these. I, too, have some, but not a complete set, so at times must resort to the dowel and sandpaper method. (Martin-Darrell) Went to the Enco web site to look them up but had no luck. I searched Laps, lap, internal laps and Blind Hole Laps. Do you know what they are called or how they are listed? (Al Spicer) I got mine from McMaster-Carr (where else?), so I don’t know anything about the Enco versions. The correct name is Expandable Brass Laps. You do want the Blind-Hole version. (Martin-Darrell) I can't find my ENCO catalog right now, but did find them in the Travers Catalog. If you have the catalog, they're on page 823 and are called Blind Hole Laps. The arbors for the laps are less than $2 each for the sizes you'll need and the laps themselves are about $5 each.... so $7 per lap and each is adjustable to 15% expansion, so you actually only need a 1/8", a 5/32", a 3/16", a 7/32", a 1/4" if you're doing 2 piece trout rods... doing 3 piece you might want to get a 9/32", a 5/16" and an 11/32" in addition to the others. In any case, that's less than $60 worth of laps, and well worth the investment. Be sure to order a good lapping compound like Clover to use with these. TTC also makes a great compound for finish lapping, but it's expensive. A 5 gram tube of TTC costs $16.19 from Travers, where a one pound jar of 600 grit Clover costs $27.99... a pound of lapping compound will do a truckload of ferrules. Also, you can buy brass barrels that act as "guides", but I use mine in the lathe, which is centered correctly, so I don't worry about the guides. I just chuck them in the tailstock and run them in and out with the tailstock. (Bob Nunley) My thanks for the responses I've received. Measured the male ferrules I presently stock from 9>16/64's. Found that 2 of the suppliers mentioned only carry them in 16" increments and even with the 15% increase, I'll still miss some ferrule sizes. Tried Enco (both catalogue & web site) no luck finding them there. So does anyone know where they are available in 64" increments? And what speed do I run them @ in the lathe. And is 600 grit too course a grit for ferrules. And is there some danger that with the lap of brass and the ferrules, which are mostly brass, that the grit that would embed into the lap and ferrule. I should think that it should embed into the lap and "skid" on the ferrule. But with similar metals, does this present a danger? (Don Anderson) The internal laps are adjustable within a specific range. A couple of years ago I posted a chart to the List detailing each size, the available range within that size, and the ferrules those fit. Usually, I turn them by hand to remove the galling effect, and use a non-imbedding compound, such as garnet, used for lapping scope rings. I have some 800 which quickly breaks down, since garnet is friable, into a finer compound. Of course, this only occurs when used in a lathe, and not when I'm turning by hand. I also have some finer water-based compounds for which I do not know the abrasive material, but the stuff works, it doesn't embed, and it barely seems to erode the metal, but it does. All of these compounds are available from Brownells. Go slow, especially if the male is nearly fit, and all you've done is gall the female. It won’t take much to get too carried away with the lapping process. (Martin-Darrell)
I don't do much restoration work, but the few that I have seen, if the rod was over 50 years old or used a lot the tabs in the casting plane top and bottom were separated off of the ferrule. Right were the slits ended. At first I thought that someone did that deliberately to try and stop the varnish cracking, but now I know it's metal fatigue over the years of use. First thought is should a slit be on the flat? That way the stress from casting is taken by the slit opening and closing. On the other hand the varnish will probably crack more. No slits at all? I have seen ferrules with no tabs. Different slit configuration? Two slits on the side? Two slits on top and bottom? Four slits? Maybe it's not a problem at all. After a few decades the tabs are broken off under the wraps, but it doesn't bother anything? (Darryl Hayashida) Try putting a radius in the corners of the tool forming the slot, instead of using a square cornered slitting saw, round the edges to form a "U". The lack of a square corner would greatly decrease the chance of a stress crack developing in the corner of the slit. (Brad Love) A couple of things 1) I always drill a very small hole and then cut up to it to give the radius that Brad refers to. Crack propagation is significantly reduced from a radius. When I restore a rod I usually drill a small small hole on the rods ferrules to stop the cracking that will come with age. 2) The length of the tabs is important as well. I restore a lot of Allcocks rods and they always cut their tabs with a shallow V so that there was still a flat between them. * ***** * * * * The result is that the whip always splits in line with the end of the ferrule. (Tim Watson)
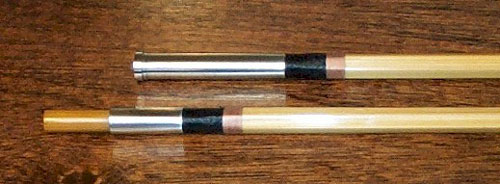
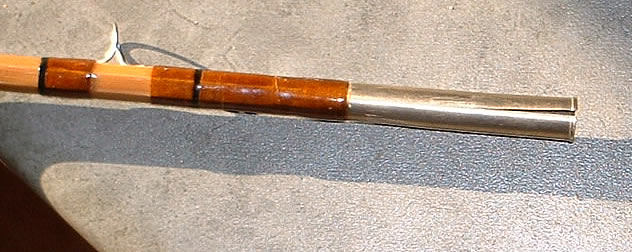
I had something unusual happen yesterday. I was fishing my PHY Para 15 taper and the tip came lose while fighting a fish. I was able to put it back on (and land the fish) but about 20 minutes later, the tip came free again. Upon closer inspection, the female nickel silver ferrule had split down one side. The ferrule came from a well-known firm from which many of you buy your ferrules. I've never had this happen before. So my question is, could this have been from the cold? It was about 34 degree F yesterday. Alternately, could this have been a defective ferrule? I've fished this rod 5-6 times per season for the last three years and I've never had a problem with it. (Richard Nantel) That type ferrule failure is very common on the old inexpensive brass chrome plated ferrules but seldom seen on nickel silver. I'd chalk it up to a flaw in manufacturing. Best to send it back to the maker and ask for their analysis. Sure would like to learn about their response. (Ray Gould) Most likely, it was. 35° is not enough to cause any functional problems with the metal, but it is enough to cause it to shrink considerably, putting a lot of stress on the metal. If the ferrule was made from drawn tubing, then the tubing was welded from strip stock at one point back in the process. It visually disappears when the tubing is drawn, but weld failure would be my first thought to explain the split. Next on the list would be a nick or scratch in the ferrule. If metal gets stressed to the point of failure, the crack will propagate from a small defect usually. I'm not a metallurgist, but I spend a lot of time talking to them, and a lot of time looking at failed parts. Sometimes you can tell why the metal failed just by looking, sometimes it takes an extensive study. Harry may well have a point in his discussion about a non fully fitted male causing a wedge effect. I guess if you know you are going to fish a rod in cold weather, you should consider fitting the ferrules on the slack side just to be safe. I had a strange case a couple months ago where a guy was drawing a new stainless part much like a male ferrule. He ran the prototypes and sent them off to his customer. When the customer opened the box, the parts had split longitudinally in a dozen places. What happened was that as the part cooled off, stresses grew to the point of failure. The "hot off the press" parts had shown no sign of trouble. We sent the guy a more expensive alloy with better drawing qualities, and that solved the problem. Stuff happens. (Tom Smithwick) To be honest, I've never really understood how a ferrule can become tighter in the cold. The female part would shrink but so would the male part, no? In reality, though, I know this to be the case. I fished the rod the previous day and did notice that the ferrule was a bit tight when taking the rod apart at the end of the day. I then checked it again at night in my warm hotel room (it wasn't damaged then) in preparation for dressing it a bit. It felt fine so I didn't bother. The next day was much colder and that's when the break occurred. About Harry's suggestion that the ferrule wasn't seated completely, well, maybe. When warm, it certainly seated all the way but I wonder if perhaps it didn't when I assembled the rod in the cold and the dark that cold November morning. If you'd like to see an image of the split ferrule, here it is:
(Richard Nantel) Here are two possibilities: The metal shrinks radially, ie. around the circumference, therefore the part with the larger diameter shrinks more. The male is supported by the cane, which does not shrink as much. Both of those are theories, maybe one of the list's rocket scientists or math majors could jump in here and help out the humble metal banger :-) As to the crack itself, it sure looks like it propagated down from the mouth, which is what I would expect. It looks a little crooked in the picture, which, if so, would tend to rule out a weld failure, which should be dead straight. One interesting thing you can look at is the interior of the crack itself. If it is clean and bright, the metal was pulled apart by sudden force. If it is gray and has a grainy appearance, it's a fatigue failure which occurred over time. If there is a black spotty appearance, there was an internal void in the metal. (Tom Smithwick) I think the answer is they expand and shrink together if they are the same material. Consider what happens if there is no crack between the two (They are one piece). They do not develop internal stress unless the temperature is changing across the part. Putting the seam between them changes nothing. (Jim Utzerath) The heat discussion is interesting. I've found that when lapping & fitting ferrules, I often get a good fit initially, then 1/2 hour later the ferrules are too tight & I need to work down the male more. Is it possible that all the sanding & buffing I do during the fitting process heats the metal, and when it cools the metal expands? (Tom Bowden) My chemistry, physics, and materials classes are but a fuzzy memory, but back then, the only common material that expands when it cools was water. Metals expand when heated, the amount of expansion can be calculated for a given temperature if the coefficient of expansion for the metal is known. (Larry Blan) Also, Larry, it is not strictly true to say that water "expands when cooled". Water has a peculiar physical property which used once, at least, to be known as "the abnormal expansion of water" which indicates that when cooled water behaves as any other liquid until it reaches freezing point. Then, between O and minus 4 degrees Celsius, water expands. this is not only why ice floats on water, but also why it manages to burst pipes. Other substances tend not to have this function. I would think that the reason that either heat or cold tends to loosen stuck ferrules is that each and every substance upon this earth has an inherent property known as its "coefficient of linear expansion", and that the implication here is that the absolute linear measurement of expansion is a function of the original dimension. Hence, since the linear diagonal dimension of the female will always be a wee bit larger than that of the male, its expansion or contraction will always be a wee bit greater. (Peter McKean) Thanks for showing the picture of the split ferrule. What's really unusual is that the split occurred from the outer end right thru the welt. All of the other split ferrules I've seen, and there have been many, were split at the other end that is the serrated end. Very strange indeed. (Ray Gould) I know for a fact that the ferrule was fine the night before, since I inspected it then. The following morning, I caught a small 4-5 lb Steelhead on the rod. Then, at around 11 a.m., I hooked and landed a small 6-7 lb Chinook on the rod. That's when the tip came free. A few casts later, I noticed the split in the ferrule. I know these are pretty big fish for a 6 wt rod but I've caught and landed quite a few 10 LB migratory brown trout on this rod before with no problems. So, I can't see how a fish would have caused this. Plus, I've always assumed cane would give way long before nickel silver would. I guess I'll send this back to the manufacturer and let them analyze the ferrule to see what the problem might be. (Richard Nantel) You raise a good point - if anything, the welt should act as a reinforcing ring. Could there have been water in the ferrule that froze at another time and perhaps started a weak point or even a hairline crack? (Greg Kuntz) My physics classes are 40+ years in the past, but it would seem to me that the male part, which has a solid end and is filled with cane, can't shrink as much as the female part which is hollow. If you fit loosely to use the rod in cold weather, isn't it likely to be TOO loose in warm weather? Also, I've been told you shouldn't fish cane if it's less than 45°. Someone with a lot more experience than I have want to weigh in on this? (Neil Savage) I've found that chilling a set of "locked" ferrules usually allows them to be pulled apart. I think what happens is that the inside diameter of the female becomes larger, and the outside diameter of the male becomes smaller. Could it be that the extreme cold caused the ferrule to loosen, causing it to break under casting load. (Ted Knott) Ted's observation puzzles me a bit: "I've found that chilling a set of "locked" ferrules usually allows them to be pulled apart. I think what happens is that the inside diameter of the female becomes larger, and the outside diameter of the male becomes smaller. Could it be that the extreme cold caused the ferrule to loosen , causing it to break under casting load." I was always my conception that metals expanded under heating and shrunk under cooling. I have always found that very light heating of a stuck ferrule station loosened the fit with no problem. Indeed I once submitter a tip that a small cloth bag filled with rice and placed in a microwave for a few minutes made an ideal warmer for stuck ferrules. Ted's approach seems just the opposite. How say you all? Also something else I have not seen discussed on this forum is the differences between ferrules made from precision drawn tubing and those made from solid bar stock. I recall once cursing long and loud because my alcohol burner melted all the solder in a tubing made ferrule. I have made ferrules from bar stock as I know that some manufacturers do (Winston) and a lot of you who are now doing your own. Which is better? and Why. (Ralph Moon) Ralph Moon is correct about heating and cooling. One needs to be sure which part of the ferrule (male or female) one heats or cools. To unstick ferrules one should heat the female and/or cool the male - heating expands and cooling contracts geometric dimensions. A comment on my previous email - if one used a 10X/20X microscope, and looked at the female ferrule tip area, one should be able to see if there was a flaw in the original material on the crack surface - one would see a small void in the material. Note that since all materials have very small flaws (broken molecular bonds), it is quite possible that this was a supportive factor in ferrule failure along with the cold temperature. (Frank Paul) Well, being a scientist, although not a rocket jockey, I will venture a guess. First, metals expand when heated and contract when cooled (maybe there are special alloys that do otherwise so I won't say ALL metals behave this way). So why then does cooling the ferrule pair allow them to separate? My guess is that when cooled they both would shrink, however when you start manipulating them the female, being on the outside would warm faster than the sheltered male, allowing the female to increase in diameter faster than the male and presto they pop apart. (Larry Puckett) I agree with Ralph. I never known of a metal that expands when chilled. (Don Schneider) There's a metal alloy that is used for making model parts that melts in hot water and expands when it sets so it fills the mold completely. One trade name is/was Cerro-Bend. I haven't looked for it in years. Not practical for ferrules anyway, and as you say the vast majority of alloys do shrink as they cool. (Neil Savage) I have made a lot of ferrules from bar stock. One time I found a flaw in the metal as I worked it and had to throw out the ferrule. But this was the only time. Nevertheless, I think the theory that the metal was flawed is the most likely cause of the failure. (Ed Hartzell) Maybe not having the male in the female far enough might of caused it. It looks like a graphite ferrule that cracked the same way when I was casting a rod with the male was not seated all the way. Part of the male had broken off earlier. I thought I would continue fishing by using what was left of the male in the female ferrule. It only went in a short way and the ferrule cracked on the third cast. (Tony Spezio) Any metallurgists out there? My thought would be that 34° isn't cold enough to make nickel silver brittle. I'd think (based on no more than the fact that I've used a cane rod all day at 35° and rain/snow mixed with no problems) that it was probably a defect in the ferrule. (Neil Savage) I hate to even ask this because it implies some culpability on the rod maker's part, but how did the ferrules fit -- male into female? I know a few rod makers who don't fit their male ferrules all the way down to the shoulder. Often their reasoning is that they are leaving a little room for wear. I think they are asking for trouble. If the male doesn't fit all the way to the shoulder into the female it creates lotsa stress that might -- might -- cause the female to crack. Or, could the cold weather have caused you not to force the ferrules all the way home? (Harry Boyd) My engineering guess would be a combination of what Harry suggested (male ferrule not completely inserted) and possibly a material flaw around the top of the female ferrule. The crack is orthogonal to the casting direction, so there clearly was a high stress concentration causing the ferrule material to fail under loading at the female ferrule tip and the crack to run. Cold could be an aggravating factor in this regard. (Frank Paul) I need to step in here. I don't think temperature had anything to do with it and it was most likely a defective ferrule. I have been at this fly fishing for many years and I live up in the North country where we see plenty of cold weather. I have been fishing for Steelhead in January and February when it was so cold a Polar Bear would have thought twice about being outside. I have never had a ferrule fracture at any time while doing this and it was a heck of a lot colder than 35 degrees out. Try fishing when it is in the teens for Steelhead when the guides freeze up all the time and you have to wear a leather face mask to protect you from the cold and frostbite. Whomever you got the ferrule from, I would contact them and send back the ferrule to see why it did fail. any of you guys who want those rods put to the test to see if you have any defective ferrules, send them my way and I will test them out on the Steelhead rivers in Michigan this winter. (Bret Reiter) I've refinished a bunch of old cane rods and many of them had cracked ferrules. 90% of the cracked ones were male. How come? (Don Greife) The main culprit of a cracked ferrule is moisture. Not your everyday humidity but water. Pretty much every cracked ferrule I have seen (discounting Montagues which are just junk) had a blackening of the bamboo (mold/rot) at the ferrule station. Very simple, water swells cane, cane splits ferrule. (Marty DeSapio) True, but from the picture the split is in an area where there isn't any cane. It looks like it started at the open end and ran toward the cane. (Neil Savage) I don't think this cracked ferrule was due to humidity in the cane. The female split at the opening, not at the cane end. Also, the rod still feels snappy (well as snappy as a Para 15 can feel) so think the humidity level in the cane is quite low. (Richard Nantel) I had a case where the ferrule was just a bit loose and as it was cast, the male ferrule started to come out a bit from the female part, thus putting a lot of pressure on the rim of the female. The less depth you have in the female the more possible the break of the outer rim of the female. (Mike Lajoie) I have to agree that if the ferrule is not seated and is a bit loose that can very well happen. I used to leave just a bit of male from seating all the way to the collar to allow for wear. The ferrules were a good fit and not at all loose. I have quit doing that. The rod I use on a regular basis has a ferrule (not seated to the collar) like this on it, have not had any problems in the four years that I have used it. As far as I know neither has any of the others I have done that way. I do seat my ferrules all the way to the collar now because "it is the thing to do". As I posted with the graphite rod, it had just part of the male ferrule in the female. It was not a good fit at all but I thought I could get by. The female ferrule split down the side for about 4 inches. There had to be a load on it to do that. Personally I think the N/S ferrule that split, had a flaw in it. (Tony Spezio) I'm thinking along the same lines as Harry and Frank but more of the ferrule unseating itself during casting, say 1/4 to 1/3 out and created the stress needed to crack the ferrule. No doubt the cold and or flaws in the metal played a part... I'm thinking the failure in a lot of the vintage ferrules was a combination of the practice of compressed fitting (ferrule station cut to large in cane, brass or N/S ferrule pressed into place) expansion and contraction, some of those Heddon (just to name one) ferrules are so tight there very hard to pull after removing the pin and the glue is almost nonexistent in the joint... (Dave Collyer)
In searching the archives it seems the following methods are available for repairing poorly fitting ferrules:
I have a female 15/64 ferrule that is supposed to fit the butt section of a three piece rod, but the ferrule station is between 13/64 and 14/64 The last two methods will avoid stripping off the reel seat, handle and/or strippers in order to get the butt section onto a lathe. What, pray, is the method du jour? (Chris Spurrell) If you are going to try method #3, get hold of some "microballoons" -- they are available from marine supply places. Boat builders use them a lot, they make the epoxy into a putty, rather than just a glue. In fact, in many boat building applications, either microballoons or chopped cotton are added to the epoxy for gap filling purposes. (Neil Savage) I had a rod a while back with a bad fit, and used the bamboo build up technique. I can't remember which one it was, so it must have worked. I think that there are very good instructions on how to do it in "The Lovely Reed". (Jeff Schaeffer)
Can nickel plating correct a loose male slide, as opposed to the alternative options of waxing, inducing a slight crimp in the female ferrule, or flat-out replacement? Has anyone tried this technique with success, or am I taking another jog down the yellow brick road? I have a Plug-n-Plate wand from Caswell, Inc. with 1.5v and 4.5v power supplies. With the ferrule still attached to the tip section, can the plating wand adequately close the circuit to transfer the nickel from the solution to the slide? I searched the archives and couldn't find anything on the matter, and I'd greatly appreciate the list's perspective. I'm no plating expert. (Duane Locklear) Electroplating will work to correct the fit of a loose or overlapped male slide but because you are attempting to plate nickel onto a brass alloy, surface preparation is vital. I doubt you could get an even plating with a brush type of system but you might be able to adapt your system to a small tank style. I use a small tank plating system for nickel, silver, gold, and even chrome. (Jeff Fultz) Smear on a little super glue and let it dry. Sand lightly to fit. It will last for a while. After fitting the glue use some dripless candle wax. (Timothy Troester) Yes, nickel plating works very well to tighten a loose ferrule. I do them in my shop quite often. The plating wand style of plater should work for you, but may take you a while. Depending on how worn the male is, it may take quite a few coats to build it up enough to refit to the female. But, it will work. (Dave LeClair)
The best luck I've had fitting a bad fitting ferrule is with a method I got from the list. Using a piece of lead as a hammer and another as an anvil, simply tap the outside of the female ferrule as you rotate it. Check the fit frequently as you do this. I've used this method a couple of times with success, and seen no marring or apparent distortion of the ferrule. (Robert Kope)
|