Bamboo Tips - Tips Area |
|
< Home < Tips Area < Hardware < Reel Seats < Sliding Band
I've never had a rod that had a slip ring type reel seat. Are they secure or does the reel keep loosening up and you gotta keep messing with it? (Mark Pohl) All but one of my personal rods uses cap and ring reel seats. The only reason the one has a screwing uplock is I found an old "new" one in a box in the shop and was just too lazy that day to turn the hardware and filler, so I used the little treasure I found in the box. A properly dimensioned cap and ring on a properly mortised filler works great. I prefer them over screwing up or downlock. I have not yet lost a reel from my rod in the water. (Bob Nunley) I like the cork ones quite a bit, but have had no problems with wood insert slide band seats I got from Tony Young. (Bob Maulucci) If you are referring to a dual slip ring seat over wood, then that seat is probably slightly, very slightly, less reliable than the cap and ring style. Still, if it is well made, it should hold the reel with no problems. Put dual slip rings over cork, and you will never have a problem. Cap and ring is my standard seat. (Harry Boyd) I use them a lot and don't have any problems. That includes seats with wooden inserts, but I've come to prefer cork seats. After a lot of use you sometimes get an imprint in the cork from the reel seat, but exposure of the imprinted area to steam (like that coming out of the spout of a whistling teapot) revives the cork nicely. And this doesn't go only for very light rods -- in fact I have a Sharpe 12' 10 wt spey rod with a cork/ring seat (like many older bamboo spey rods) and it holds a 4" salmon reel in place very well. (Barry Kling) Most of my rods are made with 2 sliding rings or a ring and pocket. These hold very well, specially on lightweight rods, but I use only cork arbors. Other arbors of harder woods might be a problem. (Bill Fink) 90 percent of all the bamboo rods I've seem have slide band reel seats. They work very well, or rodmakers just wouldn't use them. They're also lighter then the screw lock type. Unless you're fishing steelhead or salmon, you're probably going to like the slide band reel seat better then a screw lock type. (Jim Bureau) Put dual slip rings over cork, and you will never have a problem. When I put dual rings on a cork filler I always caution the user to avoid a screwing motion when tightening the rings over the reel feet. I think that will erode the cork and result in eventually being too loose to hold the reel. If the rings are slid firmly over the reel feet, they will not slip down and should not eat into the cork opposite the feet. With a wood filler, I only use a single ring and a butt cap, either the Garrison type or a mortised type. (Steve Weiss) I have been making slip rings. They are as reliable as the threaded screw. In fact the only reel seat that "reliably" loosened up was a Powell threaded reel seat. They stated it was the "strongest" one on the market with square (or acme) threads. Always loosened up. The double sliding band and a bit cumbersome and I don't make those anymore. (Martin Jensen)
I've decided on a sliding ring type Venneri reel seat for my 1st rod. I need to decide on the wood and up/down lock. What are the pros and cons of up Vs down lock seats? is any wood better suited for reel seats than others. I've got a Winston that has a maple reel seat that's turned moldy on me after the first year and I always let the rod get to room temp before wiping it down and putting it away, cork is crappy too but that's besides the point. (Mark Pohl) You may hear other opinions on this, but I don't believe there are any "pros and cons" in comparing the uplock to the downlock reel seat. I think each works equally well, and that the issue is purely a matter of taste. I prefer the downlock, but only because that's what my eye likes. As to wood choices, again, I do not believe there are any that are better or worse than another -- at least as to species. Various woods certainly have different characteristics, but this is more important to luthiers or furniture makers than it is to rod makers. We have used everything from balsa to ebony. It's all just fine. The maple seat that you say has become moldy is a new one on me. I never heard of a piece of wood go moldy just because it was one species or another. Individual blocks of wood must be properly dried before turning and finishing, and perhaps this was not done. But whatever the cause may be, it is not because the wood happens to be maple. Maple makes excellent reel seats, and has always been highly prized as stock material for the old flintlocks rifles. I would choose the wood you like to look at, dry it well, finish it nicely, and let that be the end of your worries. (Bill Harms) Could the mold actually be in the rod sock? I know it would love to live there all warm and toasting between those fibers. (Adam Vigil) It's not the sock, it's moldy at the hardware insert interface. like water got trapped under the hardware. it's black at the interface. (Mark Pohl) Mold (fungus) can only grow where it has water and a food source, for a substantial period, i.e., a week or so. It goes dormant when humidity drops below about 70%. On the other hand, a humid micro environment can be created at lower humidity levels when a normally dry surface has something on it that is hygroscopic, collecting moisture and holding moisture from the air. Salt from sweat can provide the moisture, and many finishes, especially tung or linseed types, can provide the food source. Moral: wipe with water and then dry well. (Carey Mitchell) Bob's wood spacers are gorgeous. Ask him to pick a real purdy one for your "first time" experience. The up and down is a personal preference... or I think he has a dual band seat so you have the best (or worst) of both worlds. (Darrell Lee)
I was wondering what some of you do to prevent the slide band on reel seats from digging into the filler/finish. I can't seem to prevent it. I've tried a 2 degree angle on the inside of the ring, machining a slight chamfer to take the edge off and played around with a few varnishes. Either way they still dig in. What sort of finish should I use? (Eamon Lee) I always just considered it to be just life, the insert gets a dent and a black mark where the band snugs up and that's how it's supposed to be, use the same reel on it all the time and you never really notice. I like True Oil for inserts, it's easy and makes a nice durable finish. (John Channer) Look at some of the old Payne reel seats. Payne tapered the wood filler to minimize the reel band digging into the wood. A second approach is to swag the reel bands out to 8 degrees to match reel foot taper. I do this by driving the band down onto an 8 degree tapered mandrel. The bands then conform to the wood insert and the reel's foot. (Ted Knott) You can protect the reel seat by using a thin insert between the slide bands and the wood or cork. The one I have is clear plastic (about as long as a reel foot) and not noticeable when in place. Works really well with those older Hardy reels that have thinner reel feet. (Bob Perry) I've seen rods by Rick Robbins that use a NS (or other metal) strip inlaid lengthwise down the top of the insert. I can't recall if the strip is on the reel side, though. It stands slightly proud of the wood. Looks pretty classy and functional, too. (Bill Hoy)
I've never had a rod that had a slip ring type reel seat. Are they secure or does the reel keep loosening up and you gotta keep messing with it? (Mark Pohl) I have been making slip ring. They are as reliable as the threaded screw. In fact the only reel seat that "reliably" loosened up was a Powell threaded reel seat. They stated it was the "strongest" one on the market with square (or acme) threads. Always loosened up. The double sliding band and a bit cumbersome and I don't make those anymore. (Martin Jensen) When I put dual rings on a cork filler I always caution the user to avoid a screwing motion when tightening the rings over the reel feet. I think that will erode the cork and result in eventually being too loose to hold the reel. If the rings are slid firmly over the reel feet, they will not slip down and should not eat into the cork opposite the feet. With a wood filler, I only use a single ring and a butt cap, either the Garrison type or a mortised type. (Steve Weiss)
I just received a reel seat, Garrison style, and I noticed the absence of a mortise groove on the spacer. I have no experience in using non-mortised reel seats with a slide band reel lock. Has anyone had any negative feedback with this style of reel seat? (Mark Dyba) I use them exclusively. They work great, especially if the spacer is cork. I find they hold better than even many locking seats and they are very light weight. Their big disadvantage is that they are rather plain looking. I glue enough cork rings on the blank for both the reel seat spacer and grip, usually 19, and turn them at one time. I just enlarge the diameter of the turning in the middle of the seventh ring to make the transition from reel seat to grip. (Bill Lamberson) Are the slide bands notched to receive the reel seat? Or at least large enough to slide up the reel seat foot? The only problem I have had with double sliding bands is the reel falling of once on a large fish, it dropped into the river spooled through the backing, luckily I was able to catch the reel before it hit the stripper. The sudden stop did break the fish off at the tippet. The fix was to rough up the insert with sand paper, no problem since. (Pete Van Schaack) The only complaint is the cosmetic look. This is my favorite style of reel seat... all cork filler with aluminum cap and ring, very light weight, and as Bill mentioned I think it grips the reel foot better than most any other style. If folks could get past the fact that it is not jewelry, but rather is an optimal design in terms of both weight and function, then they would appreciate it more. Everybody seems to want the $100 reel seat with exotic burled wood and engraved NS, not sure why, it won't make you a better caster but I'm sure you feel better about it. [:)] Anyone every figure out how to make uplocking reel seats at home on the lathe? In particular, out of aluminum? (Kyle Druey) I use these pretty much all the time. I have absolutely no trouble with them. You can usually order the Garrison style hardware dolled up a bit if you are ordering from REC. If you are ordering from another supplier, rope knurled hardware is not hard to come by. REC doesn't like to do it (but they will) because their ring needs to be milled out to use a rope knurled ring. Extra charge but worth it to me. The only time I use something other is when I get into heavier line weights. But I have used these on rods up to #5. I know a lot of people don't particularly care for them, but I like them. (Mike Shay)
I recently purchased some aluminum sliding band hardware. While it doesn't look as pretty as NS it is far lighter. What are the thoughts on this type of material? I plan on using this hardware for the next few rods (still learning), but is it a no-no for higher end rods? (Lee Orr) There is absolutely nothing wrong with aluminum hardware on any rod. As you point out, it's much lighter, and probably more durable, than nickel silver. The transition to nearly 100% nickel silver is a modern happening. Even 30 years ago, many more rods were built with aluminum. Confession time -- I only use aluminum on my introductory level rods. Sadly, I have succumbed to the pressure of today's market. Of course, if all we really wanted was top notch performance, we would all be using Fuji composite seats on our rods. They perform far better than anything else. But they're ugly, IMHO. (Harry Boyd) You point out of the real bug-bears of cane rod building. At what point does "pretty" overcome workable. The Fugi reel seats are a fine example. They look a tad rough but they wear real well and work just fine without real care. Guides like 1 foot ceramics look like hell but perform brilliantly. Some of the items could be: silk windings - they rot - nylon doesn't And while I was writing this a quote occurred to me from a guy stuck on a small plane during a thunderstorm "I don't care what he/she looks like - just get the thing on the ground - wheels down" I guess beauty/competent performance is in the eye of the beholder. (Don Anderson) One reason aluminum may have been more popular in the past is that at one time it was rarer than platinum. It was even used for some of the finest and most expensive jewelry. Then we found out how to extract it cheaply from bauxite and now aluminum cans are everywhere. I find that the aluminum rod hardware I have seen and even used is not as durable as NS. It is softer, scratches more easily, and bends more easily. Maybe some of the aircraft grade alloys are better but then I'm not sure they use it for making rod hardware, at least not any I've had experience with. (Larry Puckett) I agree. No matter how much better nickel-silver may look, the weight is mostly unjustifiable. I've seen commercial reels seat made from stabilized wood and threaded nickel/silver barrels that weight in at 2 and 1/4 oz. I think its insane to put such a reel seat on a 4 oz rod. For most of my bigger rods, I've gone to my own make aluminum reel seat. They usually weight in at a little over 1 oz. No, they don't have quite the glitter of nickel/silver but they feel a lot better. (John Zimny) There are some nice aluminum fittings out there. I make my own out of aluminum and nickel silver. The fact is many consumers believe there is silver in German Silver aka Nickel Silver which it totally incorrect. Nickel Silver is simply white brass. While it make a great compliment to any fly rod it is not necessary. I suggest when someone is making rods for themselves and they will be fished that aluminum is just fine. But if a customer wants nickel silver then give them what they want. But when it comes to ferrules nickel silver is great and a must in my book. It is cheap in rod form and for larger ferrules I use brass and blue them. (Adam Vigil) Nickel Silver is not white brass. (Dave Kenney) NICKEL SILVER The Material Copper (±65%) and zinc (±25%) alloyed with nickel (±10%), this is also known as "White Bronze." The subtly colored elegance of nickel silver is notable in Art Deco pieces from the early 20th Century, when it was used by itself or layered and inlayed with other copper alloys. Physical Properties
Yellow Brass (wrought brass) The Material 65% copper and 35% zinc. Physical Properties
... NICKEL SILVER, The ... Expensive. Architectural bronze, Very good, Good, Good, Expensive. Nickel silver, High, Good, Monel, Good, Excellent, Expensive. Therefore, the difference is the addition of nickel to the alloy. NO silver in it. (Neil Savage) I think layman’s terms for this material may be very misleading. It is best to represent copper/nickel alloys by their alloy number. Such numbers and their characteristics are available in Machinery's Handbook. All the work hardening and annealing information is there for each alloy. (John Zimny) Alum. is fine especially where weight is a consideration. Those black alum. rings by Bellinger are mighty nice. (Marty DeSapio) I just started turning my own aluminum cap and ring hardware. It was a lot easier to do than I'd first thought. The right tools have made the process fairly easy and have produces "acceptable" results. Be glad to share my methods with anyone on the list. I use a 9x19 Grizzly lathe, some jobber length drill bits, a 5/8" end mill, a 1/4" boring bar and common lathe tools. The 3/4" aluminum rod costs about $3/foot. (Don Greife)
Someone out there has a design or technique for expanding the ring on a cap and ring reel seat the way Garrison did. Here is the problem. It makes sense to tap the ring onto a tapered shaft (as he did), but I have not found a way to get the ring off without boogering it up. I spent two evenings working on a contraption that could push the ring on and off the taper, but let's just say it did not work as well as planned. Does anyone have a plan, device or technique that actually works? (Jeff Schaeffer) I'm no machinist, but it seems to be it would be fairly simple to drill a hole in the center of the tapered shaft. You could then drive the cap off with a wooden or high density plastic peg through the center hole. Might also be a good idea to place a small spacer in the cap to absorb the taps from the peg. (Harry Boyd) Try splitting the tapered shaft lengthwise into two halves. Then you can brace one half and tap out the other. The whole thing should separate easily without damaging the ring (theoretically) (Tim Preusch) How about splitting the tapered shaft part way, drilling it through, and expanding it with a cone. When finished, drive out the cone and the outer tapered shaft should collapse enough to get the ring off. The cone could have a threaded end and be pulled in with a nut and washer. (Neil Savage) Why not take a piece of hard copper water pipe, with the ID slightly larger than the diameter of the expander, mount it in a vise, set the expander in the copper pipe, and tap the top of the expander with a brass hammer. The copper pipe will be hard enough to take the abuse, but not hard enough to damage the nickel silver fitting. (Mark Wendt) Vaseline. (Dennis Bertram) In my college jewelry class we'd stretch a ring on a mandrel, then heat it to get it off. Don't know if that'd work in this case. (Chad Wigham) I machined a device. Essentially a hollow steel shaft of two diameters with a taper in the middle. I then made two "caps": small diameter to push the ring on to the taper, and a larger diameter to push it off. The whole thing was to be powered by a bolt and nut. The trouble was that the bolt and nut could not generate enough pressure to pop the ring off, and when I tapped it with a hammer the shaft and cap stuck together. Permanently. I should have gone to the gun shop to get some case lube or just used any one of a number of lubes I had. But I didn't, and it is back to square one. The problem is that I have a bunch of tubing with .687 ID. you can turn the reel seat to .687, and make a cap for it, but I need a slightly larger ring. I could take a bit off the inside, but thought that the angled expanded cap would look cool, and perhaps hold the reel foot better. I prefer to use .650 ID tubing for reel seat caps and .687 for rings, especially on little rods, but the .650 tubing seems to be in limited supply and my stock is running out. But I have a ten year supply of the .687 stuff. I am going to get this figured out somehow. But with my little Sherline each contraption is a two evening project and I don't want too many more failures. (Jeff Schaeffer) Did you ever hear of a Sullivan pin? It is a round tapered shaft split not quite down the middle. Two pieces. Hit one side of the pin to drive it into an object, hit the other side and it will release. I don't know if it will work but you might try that. (Mike Canazon) Thanks to all for the input. If jewelers can get gold rings on and off a tapered mandrel, I should be able to do it. I think that lubing the thing should help, so it is back to the hacksaw and then the lathe. I will let you all know how it works. (Jeff Schaeffer) I just got a Harbor freight catalog today that has a three piece ring expander for 14.99 it says: specialized stretcher has multi-leaf mandrel that expands without distorting the walls of the ring. You can check it out at www.harborfreight.com #3871 (Tony Spezio)
Those of you who make 2 slip ring all-cork reel seats... Do you mortise the cork in some way (perhaps I'm using "mortise" incorrectly - I mean the "squaring" or the cylinder where the reel goes)? How do you do it? I'm thinking of starting with a smaller file and progress to my 4/6 cut Grobet, and then 2000 grit wet or dry on a popsicle stick. Is this a dumb way of doing it? (Joe West) I've made only one all cork reel seat so far. I made it like others that I had seen that did not have a "mortise." The slide rings were made just slightly larger to accommodate the reel foot. (Jim Harris) I make reel seats just the way you mentioned but I just use a sanding block to flatten one side of the cork cylinder where the reel sits. I assemble all rings of the grip/reel seat except for the very last one where the butt cap is attached. I wait to attach this last ring until the reel seat area is turned down to the proper size, the flat is sanded and the rings are slid on, then the last ring is glued on, pressed, and shaped. (Jeff Fultz) I usually purchase all my nickel silver hardware from various sources. I actually have a background as an aviation machinist, so I have the skills, experience and even some of the equipment to make just about anything out of metal, but I've decided to concentrate my efforts on moving forward in my bamboo rodmaking skills. I believe there are numerous gifted professional metalsmiths capable of creating rod hardware but only a few gifted professional canesmiths making rods! I've always been one to run against the crowd and do things the hard way. If I wanted to be famous, I would probably fabricate every last item that was used on each of my rods, but I just want to make rods and hope others enjoy fishing them as much as I do. How do you like them apples, boys? (Jeff Fultz) I don't really mortice the seat but make it elliptical. I do this just as you said. File and sandpaper (without the popsicle stick) (Marty DeSapio) Doing it by hand would work just fine. Other than speeding things up, the other reason for doing it under power would be uniformity. Since I haven't seen any magic solution to this, I'll toss this one out. I would not be afraid to duplicate David Rinker's bit as a steel shanked, wood bodied tool with carbide grit epoxied to the wood. You need an epoxy that can withstand a bit of temperature, as anyone who has ever tried power reaming can attest. I suspect it would still need a bit of hand finishing, but with the initial mortise cut, that should be fairly simple. It could be used as a stopped mortise for use with rings, or one end could be run full length for use with a cap and ring, or as an uplocker with one ring and a buried hood. (Larry Blan)
I am thinking of fitting a simple cork reel seat to my first rod with 2 sliding bands and an end cap profiled to stop them falling off. I understand Payne simply flattened off a length of the cork for the reel seat rather than routing a curved profile? Is there somewhere I could find the dimensions for such a reel seat - diameter, how much to flatten off as well as internal diameters for the sliding bands (and internal taper to bands if considered essential). (Stephen Dugmore) A year or so ago I submitted reel seat dimensions to the Planing Form newsletter. The dimensions were taken from two Payne rods that passed through my hands. The dimensions covered the wood insert and the nickel silver bands and cap. (Ted Knott) All the cap & ring style wood Payne reel seat spacers I've seen have been made out of Spanish Cedar and were cut flat with a jack knife and then finished with a file to smooth things out and give a little curve. I've never seen a morticed Payne reel seat spacer. I have a 7'9" Payne parabolic that has an all cork grip & reel seat. The cork is round with a pocketed cap and a ring. (Dennis Higham)
Does any one have standard clearance dimension for sliding band seats to prevent the band from sticking when the blank expands in wet weather? (Dennis Bertram) On my mortised seats, I usually make the slide band .015 larger than the diameter of the filler. I haven't had any problems with a slide band binding on any of my seats. (Dave LeClair)
For those of you who make sliding band & cap reel seats. What is the outer dimension of the wood spacer (and depth of the half moon mortise), and what is the inner diameter of the cap and sliding ring? (Chris Obuchowski) I make my fillers to a diameter of .650 and around 3.5" long. The mortise is cut in approximately .085. The cap ID is .655. The slide band ID is .665-.670 (Dave LeClair)
Two things about reel seat hardware that I wanted different; I wanted the band and cap to be tapered to fit the reel foot and flat against the insert. I wanted the knurl to be unique. I taper the band to 3° 45' and about a 1/4" of the cap to 7° 30' and fit the insert to the cap. This works great! The knurl? NO knurl!! I tried to get Nickel Silver in a hex rod, but had to buy 100# minimum. So I tried with 2024 aluminum. I leave narrow bands of the hex on the cap and ring, also I make the cork check out of a thin piece of the hex. I think nickel silver would look better, but... I have came up with a tool post grinder for my 9X19 Grizzly, that can make hex from round nickel silver! Just haven't got around to finishing the project! (David Dziadosz)
I am building a spinning rod and am wondering how the traditional cork and double ring handle holds up for spin reels as compared to a locking reel seat? (Louis DeVos) I made 2- 5' ultra lights, one for my father, one for my brother. Used burled cork to keep cost down, and I think it is tougher. Brother loves his, father loves the rod, hates the double ring seat. I have two rods with cork double ring seats they seem to hold up well. (Tom Kurtis)
I have never been a fan of the sliding band system for holding down fly reels because they just have not worked well for me on any of the rods that I have used. I do however like there appearance and would like to have my opinion changed from the negative to the positive. Before making my first one, I would like to ask the list for some advice on what makes a good sliding band "cap & ring" real seat. 1. I am starting off with birds eye maple which has been roughed out to 1 1/8" diameter x 4 1/2" long with a 5/16" thru hole. It has been marinating in a mixture of Plexiglas and acetone soup for approximately one week. How long will it take to be stabilized and how will I know when it is? 2. What materials are suitable for rings? 3. What diameter, wall thickness, width should a ring have and clearance should there be between the ring and the finished wood surface? 4. Is there a special router bit that is used on the wood seat, if so where can I find one. Thanks. (Don Green) All my reel seats are sliding bands. Because they are so easy to make. I have a wood seat which is simply a round piece of cork or horn, with a hole in the middle for the rod butt. My cap is a red copper cap used by plumbers for gas or water, I don't know. The sliding ring is a brass ring, used for the same purpose and which has the same inner diameter as the cap. I make my reel seat just a tad smaller than the ID. The difficult pars is (or was) making a tapered piece of steel to punch a taper on the inside of the sliding ring. Another punch was made to punch out an opening in the butt cap so It takes the reel foot. If all is made well and there is not to much play between the sliding ring and the reel seat, your reel will be very tight. (Geert Poorteman) I like a deep pocket. Sliding band needs to be tapered and ends need to be smooth, rounded. Tom made some good ones from stainless steel. (Gary Nicholson) 1. What materials are suitable for rings? Nickel silver, brass, aluminum or stainless 2. What diameter, wall thickness, width should a ring have and clearance should there be between the ring and the finished wood surface? I like .687 ID for the ring, which seems large enough to hold a range of reels well, but not so large that the seat seems clunky on a lightweight rod. .750 and .650 are also used. Wall thickness depends on the strength of the material, and the design of the ring. If you want a raised edge or heavy knurling, go heavier. I would say .025-.035 for a plain ring. The ring should definitely be tapered to grip the reel well, and slide freely on the wood insert. 3. Is there a special router bit that is used on the wood seat, if so where can I find one. Bob Venneri sells them, and I'm sure there are others. I've been working with lightweight stainless rings, and put together a mini tutorial on how to cut the tubing and taper the rings. If you want to see the photos, contact me off list. (Tom Smithwick)
Anyone know where I can get nickel silver slide bands for my reel seats? I've been having trouble locating just the bands without having to order the whole hardware set. (Eric Thieman) Golden Witch sells them listed under "slide bands". (Jack Follweiler) Rush River sells them. You can find his address on the rodmakers site. (Larry Downey) Rush River Rods makes them. Excellent quality & a fair price. Check the "Tool & parts Suppliers" page on Jerry fosters Rodmakers web site for the link to Rush River. (Paul Julius)
I was wondering what a good way of putting a swage (?) in reel seat hardware is? (Jim Lowe) If you have The Master`s Guide from Garrison lookup page 190 and 191. Picture of the device is shown on page 191 upper left corner. It's like a tapered mandrill with a 8 degree angle. (Christian Meinke) Question ~ are you making reel seat rings or/and butt caps? What material are you wanting to swage? Swaging nickel silver (or other nonferrous material) is easily done but stresses should first be relieved by heating metal to dull red and immediately quenching in cool water. Then in the case of a ring, the part can be swaged over an eight degree tapered mandrel. I would recommend the wall thickness of the ring to be about .025", and the original straight bore diameter to be slightly larger than than the reel seat insert. The mandrel then can be turned with the small end to suit. It's also advisable to provide a plate with an appropriate size hole to fit over the tapered mandrel before pressing on the ring, to facilitate removal of the ring. Swaging the butt cap to accommodate the reel foot is another process, and if that is your concern, I can provide some information if you wish. I have developed a tool for that purpose, as I make my own butt caps from solid stock.
(Vince Brannick) The simple tapered arbor for the slide ring was made on my old 10" Atlas lathe, with the description of the process pirated from the Garrison Book, as an impetus. The reel foot swage in the butt cap was an issue I agonized over for a lot of years. My early conception was to make the punch press tools that duplicated the process that was developed by Dave Brandt for Hoagy Carmichael. If not developed per se, Dave did make original drawings of the die/assembly, which he provided to me. "Agonized" is an appropriate term ~ redrew the draft, procured a die assembly, scrounged around for material(s), made some of the parts, etc., etc. ~ and finally decided I was never going to (have enough time left) to finish the project, and would never need enough parts to warrant the "agony" anyway. But I did want to make my own butt caps, and I did have a couple of feet of 3/4"dia. n/s., so, time to rethink the whole idea. Making the basic cap was easy enough ~ again my faithful old Atlas late, and with an assortment of tools and materials garnered over a period of (47) years in the machining trade, the only problem left was to draw (form) the 'lip' for the reel foot. That's the genesis of the drawing die. After considerable deliberation, the resulting tool was conceived, and although I did most of the prototype work with my old Buffalo drill press, and hand filing, the final machining was done for me by a machinist friend who possessed a high quality Vertical Mill. Nothing like good friends! My one caution for anyone forming parts, (as opposed to machining) is to be sure to anneal the material at a number of steps in the process. As previously mentioned, my method is to heat the part(s) to a dull red, and immediately quench in cool water. (nonferrous material, that is). I usually need only one application for the butt cap lip, but anneal the ring after each of a number of intermediate swages. (Vince Brannick) As an aside to this process; do not try & work the metal when it is still red hot & it will also work harden so you may have to reheat. If you try & work it hot it can break apart & if it work hardens & you try & keep working it it will crack. (Bret Reiter) I'm doing both caps and rings of Nickel Silver and thought there was an easier solution. (Jim Lowe) Question, If the reelseat is mortised why would you want to swage either piece? Or are you speaking strictly of a round seat, which is what Garrison used. (Will Price) There are two ways I go about it. One is to make the butt cap or slide band out of tubing. If making it out of bar stock, I find the appropriate size socket from a socket wrench set and put it inside the ring/butt cap. Then I sandwich an old Pflueger reel foot in the space between the two and hammer away until a perfect pocket is formed. My theory is that if it can fit a Pflueger, it can accommodate anything. I think Vince is right on when speaking of heating then cooling the NS first. I have yet to try that, but will be doing so from now on. (Brian Morrow) Wouldn't a swaged ring hold better than a non- swaged ring? I would think that there would be more surface area of the ring in contact with the butt. (Jim Lowe) Yes Jim, it is always better as long as the angle is correct. (Ren Monllor) On a round seat a swaged ring would hold better but if it made a difference on a mortised set I think manufacturers would sell swaged rings. I've bought cap and ring sets from Tony Larson, REC and from a fellow in Idaho who used to sell them on Ebay, none of them were swaged. (Will Price) You put a lot of stalk in what the manfg's do. They are trying to make $$ not necessarily the best components. An extra process costs money and time. Bands do fit better when they have an internal bevel whether the seat is mortised or not. The advantage that I see is not clamping pressure but the band doesn't bite into the reel seat on an edge. (Jerry Foster) I think the taper is important, too. In addition, a small radius should be worked into the inside edges of the rings to further protect the reel seat filler, especially if it's cork. (Tom Smithwick) If you check Joe Arguello’s attached “industry standard” drawing of reel foot dimensions, the rationale for the internally tapered ring becomes easier to appreciate. If the reel seat filler surface is level, front to back, mortised or not, then when the ring is slid over the reel foot, the internal taper surface is parallel to the filler on the side opposite the reel foot, and parallel to the reel foot surface which slopes upward from the filler at an angle of eight degrees (+ or -). The distance separating the inner ring surface from the filler and the reel foot is “zero,” presumably. Contrast that with the UNtapered ring interior, where the reel foot taper tends to force that side of the ring into a parallel position with the foot. That brings the edge of the ring over the filler alone into contact with the filler surface and . . . There goes your nice filler finish! My windy point: I think it DOES make a difference on mortised fillers, also. Some makers, e.g. Shirl Maisey, do sell tapered rings. I haven’t yet taken a boring bar to my Venneri reel seats, but I wouldn’t think it’d be terribly complicated to pivot my Sherline headstock four degrees away from me and introduce a boring bit parallel to the lathe bed axis into the ring opening and taper away. Carefully. :) (Steve Yasgur) It seems to me (in my ignorance) as if a tapered ring would only bear on the filler at the end away from the reel if it is flat to the reel foot. Or do I misunderstand? (Neil Savage) If I’m understanding your response, actually you are spreading out the load or contact point over a larger amount of the foot with the built in taper. If you had a corner of the ring contacting it would “bite” into the foot and cut into the foot. I’m not a technical guy; that’s the only way my feeble mind can explain it. (Ren Monllor) Don't bore out anything. Get yourself a piece of round steel, the diameter of which is larger than the ID of the ring. Put that into your lathe, and taper the end into a blunt cone, with a four degree taper to match the reel seat foot (the taper of the foot is 8 degrees, so the cone taper should be half that, or 4 degrees, since the ring has two sides, which added together equal the 8 degrees taper of the reel foot). The narrow end of the "cone" should be about .010" smaller than the ID of the ring, and the taper progressively fatter. Once you have this swaging "mandrel" complete, force the ring over the mandrel to swage it out with an internal taper, one end of the ring flush with the small end of the swaging "cone." Because the mandrel is tapered, the ring will pop off easily, and swaging doesn't require a lubricant. (Chris Obuchowski) Don't forget to polish the tapered end of your mandrel so that the swage operation goes easy and doesn't scratch and bind the inside of your ring. (Larry Swearingen) Sounds great but how do you create a tapered mandrel on a lathe? (Jim Lowe) The easiest way to make a long taper on the lathe is to offset the tail stock. You'll have to figure out how much with Trig. (Neil Savage) Chuck up a short piece of steel with enough allowance of course for chucking and a little distance from teh chuck. Turn your Lathe Compound rest to the angle desired and hand feed over the taper. Feed towared the chuck so that the narrow part of the taper ends up on the tailstock end. This is so short that you won't need to use the tailstock. Advance the depth of cut wi the cross slide and hand feed with the compound slide to cut the next pass on the taper. Just remember to stop cutting when you get the small end to the right dimension. {:>) Sometimes I get a little hypnotized watching the steel come off in curls. After all those years of woodworking I still am amazed that you can cut steel like wood. (Larry Swearingen) Or, you can go to Caswell Plating and order the "black krome" kit. It works on stainless and piano wire. This is just more permanent that the sharpie solution. (Jerry Foster) This is an interesting product. Have you tried this for bluing ferrules? (Bill Ernst) Yes I have tried it with only marginal results. It works best on ferrules and butt caps (slide bands) if you coat them with copper first. (Jerry Foster) If the taper is short enough, set up your compound to cut the taper, rather than using the cross slide. If it's a long taper, you can either offset your tailstock, or use what they call a taper attachment that mounts on the lathe. Lotsa ways to skin that cat. (Mark Wendt) Like Mark said, set the compound slide on your lathe with good protractor (don't trust the markings on your compound slide, other than as a ball park figure). You're only talking tapering slightly less than .500", say around .350", assuming you use half inch long rings (I leave a small untapered section at one end of the ring). (Chris Obuchowski) You might want to check the AFFTA web site for a reel foot standard. That standard states the taper on the reel foot is 7 degrees plus or minus 1 degree. Reels made to this standard will fit any reel seat made to the standard. (Jerry Drake) This is true, but older reels may not have been made to the standard. (Neil Savage) Thanks. I had this, I just didn't know what to use to make the internal angle. (Jim Lowe) When I started turning my own hardware, I taper the slide band 3° 45' and the butt cap 7° 30' for about .250" from the opening. I turn the insert to fit the cap, (a little tricky), then mortise the insert. The reel fits nice and snug and the slide band won't dig into the insert! (David Dziadosz) That's exactly how I do mine except I taper 4-5 degrees. (Ren Monllor) For a simple jig, use a #3 morse taper it will get you close. Just tap it down and remove. (Scott Grady) Check out a ring-sizing mandrel for swaging an internal taper into rings and caps (before you solder the butt plate on...) Riogrande.com, item # 112-038, costs $22. The angle is about right. It really does help the hardware hold a reel foot. I'm sure a person should soften the metal before proceeding, but I never do, and it seems to come out OK. Particularly if you're starting with about the right diameter and you just want to put a taper into it, in other words you are not significantly stretching the metal. (Lee Koch) To sum it all up: If the angle on the reel foot is 7 degrees, you need a ring with a 7 degree included angle. That way, when you install the reel, the inside of the ring will be parallel to the reel foot where it contacts it, and will be parallel to the reel seat where it contacts. Thereby giving greatest contact area, holding force, and least digging into seat. To achieve a 7 degree included angle on a swaging tool you must set your compound rest to 3 1/2 degrees because, as Mark says, you're removing material from two sides. Radius (break) all corners for easier fit, good looks, and safety. Sharp corners cut you and the seat. It all works, I've done it that way. (Al Baldauski) So is it better to bore the taper into the ring or swage it? (David Bolin) I’ve only made rings out of reinforced phenolic so I have no experience swaging. I would think that if you had the right size tubing, then swaging would be quick and efficient, however you would need some way of fixturing the ring to be able to round the edges. Boring requires starting with solid stock, drilling, boring and deburring edges, a more time consuming process and more wasteful of material. Unless, of course, you start with heavy walled tubing. Just some thoughts. (Al Baldauski) 6 of one, half a dozen of the other. Depends on how much material you have to work with. If you have a thin ring to begin with, swaging may be a better option. (Mark Wendt) Sank you Doctah, for summing it all up so nicely! (Mark Wendt)
Just tried my hand at my first slide bands......have some nice rope knurling but can't get it off my mandrel :( I made a sleeved mandrel to put the tubing on. Made it a few thousandths small. Wanted a solid surface to knurl against. Ended up with a tight fit. Can't get the tube off....called it a night. How do you hold the tubing? How many can be made at a time? Do I need a mandrel on the inside? Any pictures of some in process? (Barry Janzen) I needed to thin down some bands.
An improvement would be to have a longer bolt so that you can have a longer piece and then put the bolt end inside chuck which would allow for a live center in the threaded hole on other side. (Steve Dugmore) You need to make an expanding mandrel that looks like this. - this is from Gary Dabrowski's web site where you can also get other info, as well as rod makers findings. (Mark Wendt)
I have in mind to make some cane, hexagonal reel seats but wondering if anyone is making hexagonal reel fittings i.e sliding bands? (Paul Blakley) I make reel seat hardware from 3/4" aluminum hex rod. I call them the "No Knurl" hardware. I just leave narrow bands of the hex instead of knurling. I also taper the inside of the band and cap for a tighter fit. Once while fishing and it rained, the stabilized, so I thought, insert swelled and I thought I was going to need a wrench to get the reel off. I've got my lathe set up to grind the hex bands into a turned piece of 7/8" nickel silver. I found some nickel silver hex rod, but had to buy such a large quantity that I couldn't justify it. Now if we could get together a group buy?!?!? (David Dziadosz) Lee Koch did a demo at the SRG a year or two ago on how to make your own hex shaped reel seat hardware. You might want to get in touch with him. (Mark Wendt)
I am considering making a couple of slip rings for reel seats out of aluminum. What would you recommend for a minimum thickness of aluminum? (Scott Grady) I have been using tempered 6061 which I got from either Wicks Aircraft or Aircraft Spruce some time ago. It is marked that it has an .035 wall, but it seems to be closer to .030. I don't think I would want to go lighter than that, especially if you are going to knurl it, which I would recommend for best appearance. (Tom Smithwick)
Quick question - gearing up for making sliding bands (finally) on my Sherline. The design I came up with has a narrow knurled section cut with a milgrain tool on a shoulder, with two light grooves (cosmetic) cut on the down side of the shoulder. What's the best lathe tool to cut these cosmetic grooves with? A regular lathe tool with a narrow radius on the point, or??? I have a carbide 60-degree thread cutting tool that came with my thread cutting attachment but the radius seems too rounded to cut a narrow enough groove. I also have several high speed steel tool blanks so I can grind up my own tool shape if I need to. (John Rupp) I took an 1/8" sq lathe tool blank and ground it down to a very fine point. First ground the end of the lathe tool to about 1/16", then ground that down to a very fine point. Take it easy and don't overheat the cutting tool. It is very easy to overheat on that small part. I use the tool to cut the fine grooves on the female ferrule when I make my own. I can send you a photo of the ground tool and the grooves in the ferrule. (Tony Spezio) Get yourself some High Speed Steel tool blanks suitably sized for your machine, and hand grind what they call a form tool. You grind the end of the tool blank (with the necessary relief and such) to the "opposite" shape you want to machine into the metal. In other words, if you want a convex shape on the ring, you grind a concave shape on the cutting tool, or vice versa. Think of a threading tool - it's actually a form tool. We want 60 degree threads, so we have a tool that's ground to a 60-degree point. Same idea for cutting shapes on a work piece. (Mark Wendt)
I’m curious to know what you all find as the cut off point for going from a sliding band reel seat to an uplocking or downlocking style? I’ve only used sliding band seats for rods up to 6 weight - the heaviest rod I’ve made so far. I’m finishing up an 8014G, and the 8014 I made several years ago has a sliding band seat that just doesn’t feel or look quite right to me on that rod. I assume down locking might be a better choice, uplocking would be more for a rod with a fighting butt, or a salmon/steelhead rod? (Tom Vagell) I have used sliding band seats for rods up through 11 ½’ two handed rods with no problems. With a slide band over cork I have had less problem with reels coming loose than when using locking reel seats. It is a difference story however if slide bands are used with a wood filler. (Bill Lamberson) I have a friend who is a retired machinist, and he is a big bloke, with big, strong hands. When he puts on a sliding band he applies some lateral squeeze, slides the ring into position, and then relaxes the squeeze. The result is about as secure as a junction can get. I can't do it, as my little surgeons' fingers cannot squeeze hard enough. (Peter McKean) Marinaro suggested rings made from spring steel tubing for just that reason Peter. Wish I knew where to get some of the tubing to make some light rings. (Scott Grady) I started making rings out of titanium tubing (type 2 from McMaster-Carr) and they are slightly flexible and are feather light. The tubing is surprisingly inexpensive and will polish very well. If you wanted blackened hardware, titanium is not the right stuff, though. Carl Otto of Waniglas posted on Clark's Forum that Leon Hansen's rings hold reels very tightly because of the way the rings flex. (Tim Anderson) It is helpful to note the AFTTA Reel Foot spec. It calls out a 7-degree slope for each end of the foot. I machine my sliding bands with this taper. I do this by setting the compound on my lathe to 3.5 degrees, cutting the taper with a boring bar, so that the rings on the inside are a 7-degree section of a cone. Thus they are flat on the foot and where they bear on wood spacer. I cut them fairly thin so I get a bit of spring action when they are pushed up tight. Seems to work pretty well. (Mike McGuire) I do similar but different. I took a piece of round stock, and cut a 3.5-degree taper on the end of the round stock. Once I've turned the decorative pattern of my choosing on the band, and the band to the appropriate thickness (2/64", which makes a nice, light, springy band), I then swage the band onto the conical round stock, which results in a conical band. The result is that the inside of the band against the wood reelseat spacer lies flat, and the inside against the reel tang cocks to a 7.5degree angle matching the slope of the reel tang. This way the band holds positively tight, and doesn't mark either the reel tang or the reel seat. (Chris Obuchowski) I used downlocking screw reel seats on the 8014G's that I have made. (David Van Burgel) I am currently making one of these. I am planning on a small fighting but for steelhead, any suggestions? (Jim Miller) I have used a short 2 inch fighting butt on steelhead rods, as well as a 4 inch one and really find the 4-inch size much more useful when playing a reasonable fish. It is really handy to have the extension removable, to stash away when taking the rod down. I use locking reel seats on my 6, 7, 8 wt rods cause were I use them a dropped reel is usually in water I do not want to mess with. I also use electrical tape around the sliding band when I'm going to be fishing all day to prevent loosening of the band. (Jim Tefft) A very good rod maker twigged me onto making a longish wood spacer and then the reel can be secured with the rings at the sweet spot to balance the rod with the reel to make it more neutral, a lot of wrist, elbow........ stress cab be elimintaed with a balanced rod and making the rod feel lighter. I chose downlocking or up locking with the same prinicipal in mind, which ever will balance the rod best, downlocking can get the reel closest to the end of the rod on a long higher wt rod. (Ron Petley) I once cast a rod of Harry Boyd's at SRG that had an up or down locking reel seat. It had a wood filler and a hood at each end and a single slide band so you could have your choice of up or down locking. The difference in the casting was stunning when the reel was switched from the up to the down locking positions. You are only moving the reel about an inch or so but if you don't always use the same reel on a rod, that may be the way to go. I sure like mine. You can get them from Ballinger's/Bellinger's? in Oregon. They are good looking too. (John Long)
For sliding bands, it is not necessary to use spring steel or titanium, though you may want to. Nickel silver will work fine and give plenty of springy tension, even on wood inserts. At least, that has been my experience so far. In fact, CSE sells a very nicely designed ring with their Mayfly series. The ring is maybe 4mm wide (don't recall exactly). It is .009 or .010 on one side, mostly flat, and then quickly expands to about .030 on the other side, knurled. I think the whole thing is machined from tube, but the "welt" might be soldered. You'd have to ask Bailey or Steve. The thin side of the band goes over the reel foot first and has flex without being flimsy. The thicker side prevents collapse--unless you're a mechanic or blacksmith perhaps. This ring is extremely light weight and effective. (Chris Moore) I was just at CSE and Bailey now also has a very nice threaded locking reel seat that can be set either down or up locking. It was very light weight. (Ron Kubica) I forgot to say, this works best if the ring is slightly swaged, as others have mentioned. The tension idea works better with a little more surface area for friction. (Chris Moore)
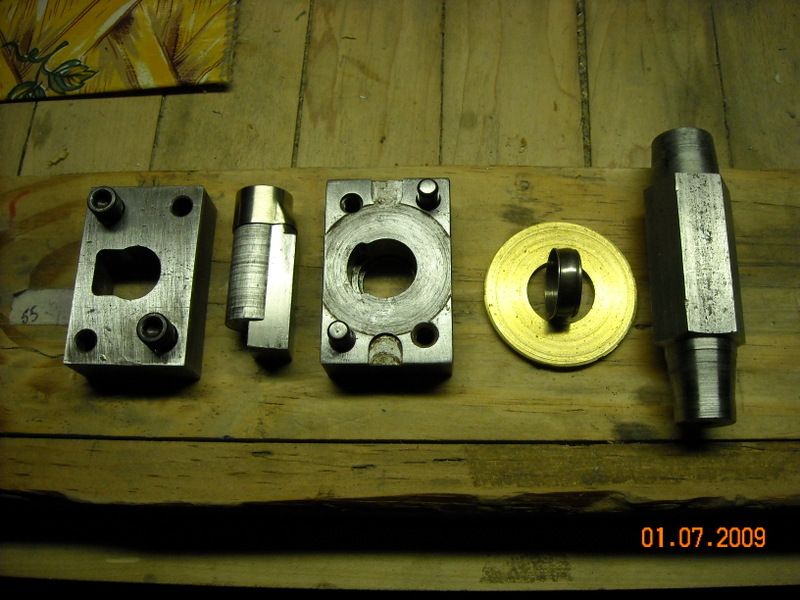
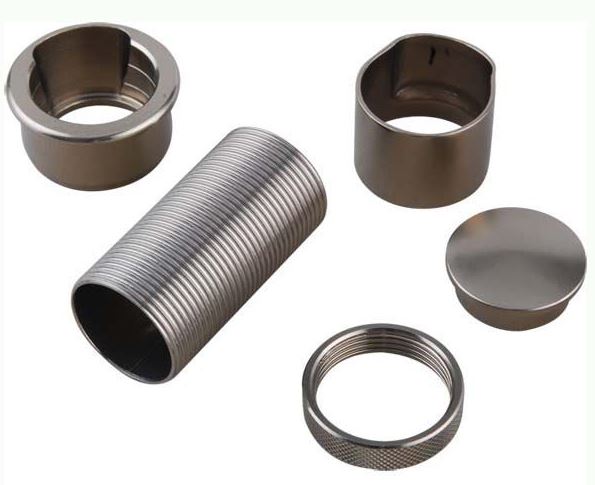
I am working on reel seats right now. I have purchased skeleton parts for screw lock type of reel seats. (I prefer that style. I have the sliding rings style on an ice fishing rod and can never keep the rings in place. I like the looks but not the function. But I digress.) Problem is, I guess, I know nothing. Or I bought these from places who never told me exactly what they were. So I have two of one size (similar to the seat shown below but with two threaded rings)
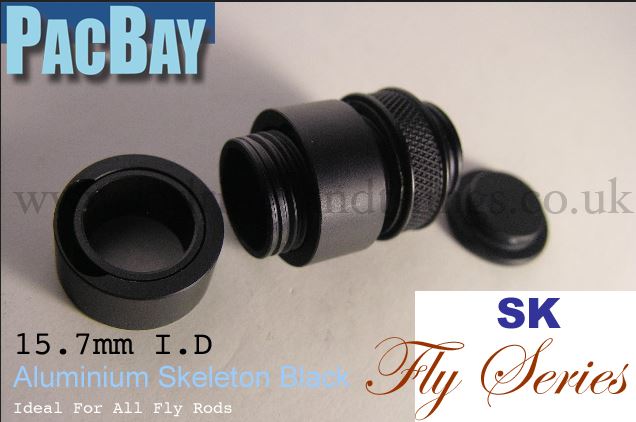
and one smaller (Pac-bay?) (similar to the seat shown below)
The two are about .635 ID, and the purportedly Pacbay one is about .615 ID. None of these came with any instructions. So I am asking a generic question. I can turn wood inserts to fit the ID's. I assume that the OD of the insert needs to fit the outside diameter of the threaded tube sections and with appropriate mortising. (the pacbay one does not have mortised threads, so I assume the reel foot has to sit on top of the threads?) But what I really have no clue is how long do these need to be? I can fit them to the reels I have, but I worry that if I buy a different reel they won't fit. A related question. How do I know the sizes of these reel seat hardware are appropriate for the rod I am building now (a 9ft 5wt darkly flamed) I've seen several manufacturer's charts but their designations are almost meaningless as I don't know exactly what I've got. (besides an A16 and a AR7C-T are the same right?) I have figured that I need the .635 ID one for this large a rod. But. . . Once I can get a better handle on the whole bamboo rodmaking from start to finish, I am more willing to spend a bit more on the parts I need (with some confidence I am getting what I want) and be less concerned about the price. I really need to buy my own lathe so I won't give a hoot what the various manufacturer's are making and charging. But then I'd have to hock a child to buy one, and have another heart attack to get enough time at home to learn how to use it, if I survived. Actually, I did take a machine tools class in college, uh, a few, uh something years ago. So maybe that part would be easier. Wasn't there an industry standardized list of sizes for reel seats or reel feet? Weirder questions from a weird guy, (Sam Nielson) What you have is an up-locking reel seat hardware. The piece in the upper left of your photo of the 'polished aluminum' seat is the portion of the seat (hood) that fits into a recessed cork handle. The long threaded piece will fit at the back end of your wooden insert. The knurled piece with the internal thread is the locking ring, and is to screwed onto the long threaded tube. The poece in the upper right is the hood for trh reel foot that goes at the back end of the reel seat, but in front of the the locking ring. The last piece is the solid butt cap. The function of sliding rings is harder to comprehend, in my opinion, than the Higgs boson or the the flavours of quarks.Some love 'em, some hate 'em.I have used well over a hundred, maybe a hundred and fifty, on my rods and cannot recall getting a complaint from any buyer; those on the various rods I have, or have had in the past, have performed flawlessly. And yet some people just don't like them.I was taught, when tightening a sliding ring, to pinch it hard from the sides prior to to sliding it up tight, then to release the lateral pressure. Does everybody do this? It surely seems to work for me. I guess you probably need strong hands, but they are pretty common, I would think, among rodmakers. (Peter McKean) "But what I really have no clue is how long do these need to be? I can fit them to the reels I have, but I worry that if I buy a different reel they won't fit." Unless you have some pre-AFFTA Pflugers. (Probably some other brands as well.) Unless you have a specific reel in mind for the rod, size it to modern reel feet, and you should be OK. (Paul Gruver) I generally make mine 3 3/4 from end to end. Seems to work (Gordon Koppin) I have found the biggest fit problem is the length of feet on older reels, especially old English reels with long brass feet, as long as 2 3/4". If you use those a lot, err on the side of longer. (Chris Moore) I am working on reel seats right now. I have purchased skeleton parts for screw lock type of reel seats. (I prefer that style. I have the sliding rings style on an ice fishing rod and can never keep the rings in place. I like the looks but not the function. But I digress.) Problem is, I guess, I know nothing. Or I bought these from places who never told me exactly what they were. So I have two of one size (similar to the seat shown below but with two threaded rings) and one smaller (Pac-bay?)
This picture appears to be what I use a lot of, a BUL5 reel seat skeleton which PacBay or Baston which I get from UTMOST. Here are the dimensions for this from the manufacturer: Now while I like this skeleton set I think it has a problem in making the insert look too short so when I turn the insert by lengthening the "Length" by .25" and shorten the tenon by .25". This gives a much more appealing insert similar to the length of the RA5 or Alps B101. (Ron Hossack)
Making some 8wts, for steelhead/heavy bass, mainly. With regard to a mortised seat insert, has anyone ever tried mortising the entire length of the insert and having a cap recess under the tail end of the cork handle as well as at the very butt end of the rod so that you have a choice of up or down locking using a single ring? The only cap and ring setups I've personally used or made have all been down locking. Have any of you experienced problems using a ring instead of a threaded locking nut system when uplocking? Is the reel more secure the other way (down)? (Bob Brockett) New member but I own one rod with up/down reel seat and know of a Swedish maker of fiberglass rods who routinely makes U/D reel seats with slide rings. Personally, I like the option for versatility alone. Also has rod balance applications.......my 2 cents worth.... (Tom Lucas) I’ve seen them a couple of times. Made them a couple of times. I believe the best known example would be those of Bernard Ramanauskus. (Chris Moore)
|